


The MEAN stack is comprised of four technologies: MongoDB, Express.js, Angular.js, and Node.js, and is one of the best tools available for solving contemporary business challenges. This technology results in low maintenance costs, fewer resources being required, and entails less development time. Furthermore, it provides flexibility, high scalability, and several features that help businesses deliver high-performance solutions.
For developers or aspiring developers, learning MEAN is essential as it has become an indispensable tool for web applications. Businesses and developers are increasingly skipping Ruby, Python, and PHP, and choosing JavaScript for development. Also, JavaScript boasts the most active developer community.
Other stacks also exist, such as the Linux, Apache, MySQL, and PHP (LAMP) stacks. However, the flexible simplicity of the MEAN stack is highly desirable. Also, factors such as Node being super-fast and the fact that MongoDB is a compelling database with which apps can be developed, tested, and hosted in the cloud with ease, add to the popularity of the MEAN stack. In comparison, LAMP is MySQL-based and has a confining structure, and thus is not as popular as the MEAN stack.
This chapter introduces the components, libraries, and framework that make up the MEAN stack architecture. We will also describe various contemporary commercial applications that can be built with the MEAN stack. Finally, we will build web servers with Node.js and implement various features that are provided by the backend runtime environment.
MEAN is a software stack for building active websites and web applications. It is a collection of JavaScript-based technologies for developing web applications. Thus, from the client to the database, everything is based on JavaScript. This free and open source stack is an acronym that's made up of the first letters of MongoDB, Express.js, Angular.js, and Node.js, as shown here:
Figure 1.1: The MEAN stack

The MEAN architecture is comprised of four different JavaScript technologies when they are stacked successively. The architecture is designed so that each component performs specific tasks individually as well as in sync with other layers in the stack to achieve an end goal.
In the MEAN architecture that's shown in the following diagram, the client initiates the requests, which flow right from the first layer down to the last. Appropriate responses to those requests then flow right through all the layers back up to the client.
The client first interacts with the user interface, which is built using the Angular frontend framework. Requests made on the interface are passed to Node.js, the server-side engine. Then, the middleware framework known as Express.js makes a request to MongoDB, which is the database. Express.js retrieves the response in the form of data from the database. Finally, this response is then returned by Node.js to the client via the user display:
Figure 1.2: Workings of the MEAN architecture

Note
For further information on the MEAN stack, refer to the following page: https://blog.meanjs.org.
There are several advantages to using the various MEAN components, which has made it a technology stack to reckon with for start-ups and big companies alike. There are several reasons why the MEAN stack is preferred in web application development. A few of these reasons are listed here:
Reduced development time and cost
Speedy MVP development and scalability
Increased developer flexibility and efficiency
Excellent performance
Speedy data storage and retrieval
Uniform programming language
Operating system compatibility
Agility and quality of apps
The MEAN stack supports the MVC architecture
Owing to its performance benefits, the MEAN stack has been adopted by many contemporary commercial organizations, such as Uber, PayPal, Netflix, and so on to build their websites and web applications. Ulbora and Trakit.me are a couple of other web applications that are built using the MEAN stack.
Note
A few live applications that have been built with the MEAN stack can be viewed here: https://github.com/linnovate/mean/wiki/Built-with-Mean.
Before going into MEAN application development, we will briefly discuss the individual technologies that make up the MEAN stack. We will start with MongoDB.
MongoDB
MongoDB is a document-oriented database program. The database, which is classified as NoSQL, is developed by MongoDB Inc. It's a free and open source database that uses JSON-like documents with schemas. Described here are some of the major features that make MongoDB stand out in application development:
Strong consistency: Strong consistency is a default feature in MongoDB, and thus it takes no additional upgrades to create consistency. It's also highly guaranteed: as long as a write is successful, you will be able to read it. Automatic failover of the replica set makes it highly available. Also, flexibility and scalability are not readily available in traditional databases that only rely on a defined schema. In comparison, MongoDB, which is NoSQL, relies on the key-to-value pair approach. This enables flexibility and scalability in MongoDB.
Real-time aggregation: This is a built-in MongoDB feature that allows real-time statistical analysis and the generation of pre-aggregated reports on request.
Ad hoc queries: These are impromptu queries that are written to extract information from the database, but only when necessary.
Indexing: Indexing in MongoDB makes it easy to search documents without performing a collection-wide scan by matching specific queries with documents.
Database-as-a-service: Database-as-a-service offerings by MongoDB enable users to access databases without having to install software or set up hardware. MongoDB Atlas, which is a cloud-hosted service offering by MongoDB Inc., will be used in this book. As we progress in the next chapter, we will go through all the processes involved in its setup.
Note
For more features and pricing information on different tiers, refer to this link: https://www.mongodb.com/cloud/atlas.
Despite having several advantages, there are a few limitations of MongoDB that we need to be aware of:
Limited data size: Documents have a maximum data size of 16 MB.
Limited nesting: The maximum number of documents that can be nested is 100.
Joins not supported: This is one of the main differences between RDBMS and NoSQL. MongoDB is not designed to have related columns. Rather, it stores de-normalized data and thus joins are not supported.
However, these limitations cannot overshadow the fact that MongoDB provides high performance, high availability, and automatic scaling, thus mitigating—if not completely eliminating—the preceding limitations.
So far, we have introduced the MEAN stack and its database component, MongoDB. We will now continue with the introduction of the second component, Express.js—a middleware application framework for developing web applications.
Express.js or simply Express is a Node.js web application framework that provides a strong set of features for web and mobile applications. It's free, open source, fast, un-opinionated (that is, there is no "right way" to complete a certain task in Express), and is comprised of a simple web framework that's designed for building web applications and APIs. The framework has achieved a dominant position in the industry as the server framework for Node.js. Express possesses rich features and advantages. A few of these are listed as follows:
Configuration
Middleware
Views and templates
Routing
Session
Security
The preceding list includes a few of the most dominant features and advantages of Express, and each of them contribute to the performance benefits afforded by this framework. In Express, third-party plugins (middleware) can be set up to respond to HTTP/RESTful requests, and a routing table can also be defined to perform different HTTP operations. HTML pages are dynamically rendered by Express based on passing arguments to templates. Express supports a wide range of templating languages, such as Pug, React, hbs, and h4e. Furthermore, it has detailed documentation to help developers maximize its uses. The community support is huge: as of now, Express has gathered over 30,000 GitHub stars, which means that it is well accepted and supported in the open source community. Also, Express allows for the addition of custom code. In terms of performance, Express leads other frameworks because of its inherent properties that make the routing process efficient and faster.
Express presents a thin layer that enables the addition of robust features and functionalities to your web applications. It organizes web applications into a model view controller (MVC) architecture and manages everything from routes, to rendering views, and pre-forming HTTP requests.
However, we do need to be aware of certain limitations while developing apps in Express. In a real-life situation, when projects become more complex and code base size increases, refactoring becomes very complex and a lot of manual labor is required. This is because the absence of organization makes the handling of complex applications difficult as Express is not designed to manage complexity by itself. Furthermore, the cost of scaling increases with application complexity.
Note
To explore popular Node.js frameworks that have been built on Express.js, refer to this link: https://expressjs.com/en/resources/frameworks.html.
In this section, we introduced another MEAN stack component – Express.js. We described its features and viewed popular Node.js frameworks that have been built using Express.js. In the next section, we will continue with the introduction of the third component, Angular.
The next component after Express in the MEAN stack is a JavaScript frontend framework known as Angular. We will be introducing Angular features across all of its existing versions, and then we will talk briefly about its advantages and limitations.
Angular is an open source TypeScript and JavaScript-based frontend web application structural framework and is managed and sustained by Google. Being open source, a community of software developers and corporations provide maintenance and address issues that are encountered when developing single-page applications. Listed here are some of the advantages that make Angular stand out:
Use of Typescript: Angular uses Typescript, which is a better tooling language that compiles to readable, clean code and standards-based JavaScript, which is highly scalable.
Component-based architecture: Angular embraces component-based architecture to ensure high quality code.
Platform-agnostic philosophy: A platform, agnostic philosophy simply means that Angular is unbiased toward the use of different technology tools to solve different problems.
High performance: The Angular framework offers dependency injection, end-to-end tooling, declarative templates, and integrated best practices. These features help to solve development challenges. Thus, web, mobile, and desktop application development is made easier using Angular.
Long-term support (LTS) by Google: Long-term support by Google ensures the there is a continuous and timely release of versions to address any performance issues and bugs.
However, note that no framework is perfect and there have been several Angular versions. The following list shows how Angular has evolved over the years, along with its different versions:
Angular.js: This was the first version and was a library written in JavaScript released in 2009. It was developed with a modular structure that expresses an application's behavior and manages its data, logic, and rules. Its data binding (binding data to a DOM element) and architecture was based on model view controller (MVC), but was built with no support for mobile.
Angular 2: This version was written in TypeScript 1.8 and released in 2016. It was developed to be faster than the previous version and was mobile-oriented. It offers structured components and has support for offline compilation and fast change detection. Dynamic loading and asynchronous operation brought about performance improvements. Furthermore, it provides support for component directives, decorator directives, and template directives. Data binding was improved, compared to the previous version, and it offered support for component-based architecture.
Angular 4: This was written in TypeScript 2.1 and 2.2 and was released in 2017. It was developed to be compact and fast. Animation packages and pipes were introduced, along with directive improvements and simplified HTTP requests.
Angular 5: This version was released in 2017 and was faster than the previous version. Features such as watch mode, type checking, improved metadata structure, and better error messages were introduced. AOT (ahead-of-time) compilation was set to default.
Angular 6: This was released in early 2018 and was faster than the previous versions with features such as ng update, ng add, Angular element, Angular Material and Components development kit (CDK), RxJs version 6, and improved animation, and a CLI workplace.
Angular 7: This version was released in October 2018 with updated features such as drag and drop, virtual scrolling, and CLI prompts, among many others.
Note
The third version release of Angular was skipped to avoid conflict with the router package version. For more detailed documentation, please refer to this link: https://angular.io/. Information on bug fixes in each version can be found here: https://github.com/angular/angular/blob/master/CHANGELOG.md.
However, you should be aware that no web framework is perfect, and in the case of Angular, its verbosity and complexity renders it a difficult framework to master. Furthermore, Angular has a steep learning curve.
In this section, we introduced the third component of the MEAN stack – Angular. We discussed its features, as well as its limitations. In the next section, we will introduce our final MEAN component, a server-side technology known as Node.js.
Node is an open source program that is built on a JavaScript runtime engine (Chrome's V8) and consists of JavaScript libraries that are implemented in the form of modules. The cross-platform server environment is lightweight and efficient because it uses an event-driven, non-blocking I/O model. For example, PayPal employs Node to solve the problem that arises owing to the boundary between the browser (client side) and server (server side) by enabling both to be written in JavaScript. This, in turn, helps PayPal unify their engineering specialties into one team, thus enabling them to focus on user needs and create solutions to meet these on the technology stack level. Some other websites and applications built on Node are eBay, GoDaddy, Groupon, Uber, Netflix, Mozilla, Yahoo, LinkedIn, and so on. The outstanding performance offered by Node makes it the heart of the MEAN stack. According to a number of benchmarks, JavaScript technology for the backend outperforms several other backend programming languages, such as PHP, Python, and Ruby. Listed here are some of the major advantages of Node:
Fast code execution: Google Chrome's V8 JavaScript engine makes the Node library extremely fast at code execution as V8 compiles JavaScript into native machine code.
Single-threaded operation: Node is able to handle concurrent tasks because its architecture is built to use the single-threaded event loop model.
Highly Scalable: Its microservice architecture makes Node highly scalable, thereby making it a highly sought after development environment by most start-ups and established companies alike.
Asynchronous and event-driven I/O: Programs in Node do not run until an event occurs.
Open source (MIT license) and community support: Node is a distributed development project that is governed by the Node.js Foundation. Also, Node has a very active and vibrant community with several code files shared by GitHub users.
Easy web-application deployment: Node allows the automated deployment of web applications. Also, the deployment of further updates can be reduced to a single command with Node. Thus, the deployment of Node applications has also led to the proliferation of Platform-as-a-service (PaaS) providers such as Heroku, Modulus, and so on.
Easy scalability: Developers find it easy to scale applications horizontally as well as vertically.
However, you should be aware of a few points before beginning application development in Node. Using relational databases in conjunction with Node might be a daunting task because Node does not provide support for them. Also, using Node is unsuitable for heavy-computation applications. Having given an overview of Node, we will now progress and build our first Node application in the next section.
Here, we will build on the introduction to Node from the previous topic and concretize our knowledge about Node by completing exercises and activities that will help us understand how application development with Node.js is achieved. To get started with Node, the first step is installation. You have two installation options: the LTS or stable version:
LTS (Long-Term Support): Support and maintenance are provided by the Node Foundation for at least 18 months from the date of release. So, it's better to use this version for the production of backend Node applications.
Stable: Stable has support for approximately 8 months after release, with features/updates released more often. This version can be used for production if you're using Node for frontend services (dependency management). If apps can be easily updated without interrupting the environment, this version will work for backend services in Node as well. In this book, we will be using the LTS version.
Before we start with Node application development, we need to understand the built-in modules that make up Node. The set of modules that you can use without any further installation are listed as follows, along with a short description:
Assert: This module provides a set of assertion tests
Buffer: This module is used to handle binary data
Child process: This module is used to run a child process
Cluster: This module is used to handle unhandled errors
Events: This module is used to handle events
Filesystem (fs): This module is used to handle the filesystem
HTTPS: This module is used to render Node as an HTTPS server
Path: This module is used to handle file paths
Readline: This module is used to handle readable streams one line at a time
Stream: This module is used to handle streaming data
String: This module is a decoder that's used to decode buffer objects into strings
Timers: This module is used to execute a function after a given number of milliseconds
Beginning a Node application involves the following steps:
Importing and loading the required modules by invoking the require directive.
Creating the server that will receive the client's requests.
Reading the requests and returning the responses from the server that was created in the preceding step.
We will apply all of these steps in our first exercise.
Before beginning this exercise, make sure you have Node installed. Our aim is to create a Node program that will print Hello World on the browser window once the appropriate command is passed on to the server. To do so, the following steps have to be performed:
Note
The code files for this exercise can be found here: http://bit.ly/2TaT32E.
Create a JavaScript file and name it hello.js. This can be done using the options in the File tab.
Load the built-in http module by using the "require" directive and passing a constant variable (http) to it:
const http = require ('http');Declare and initialize the hostname and port as constant variables using the following code:
const hostname = '127.0.0.1';
const port = 8000;
Create the server using the createServer method and pass req and res, which denote a request to and a response from the server, respectively:
const server = http.createServer((req, res) => {
res.statusCode = 200;
res.setHeader('Content-Type', 'text/plain');
res.end('Hello World\n');
});
This created server sends the following response to the browser:
statusCode: 200, the Content-Type header in plain text, and a string, Hello World.
Have the server listen to localhost on port 8000 using the following command:
server.listen(port, hostname, () => {
console.log ('Server running at
http://${hostname}:${port}/');
});
Run the server using the following command prompt, as shown in the following screenshot:
node hello.js

Figure 1.3: Running the server using the command prompt
The output is as follows:

Figure 1.4: Output of the hello.js program
One of the learning objectives of this book is to create the components of a blogging application with basic features. We will commence its development in this chapter. Most of this will be done in the activity section of each topic.
You have been tasked with developing the HTTP server component for a blogging application. Your aim is to call the server and listen to the localhost on a specified port. Before you begin this activity, ensure that you have completed the previous exercise, in addition to creating a project directory named Blogging Application and a subfolder named Server. You can use an IDE of your choice; however, in this book, we are using Visual Studio.
To complete this activity, the following steps have to be completed:
Note
The code files for this activity can be found here: http://bit.ly/2TZYqz5.
Create a server.js file.
Declare and assign the HTTP server.
Declare and assign localhost and port number.
Create an HTTP server.
Listen to the server.
Run the server.js file on the command-line terminal.
Go to your browser and type in the localhost:8000 address.
Node is built to be asynchronous in everything that it does. In this view, a callback is an asynchronous equivalent of a function that is called after a given task is completed. Alternatively, it can be defined as a function that is passed into another function so that the latter can call it on the completion of a given task. It allows other programs to keep running, thereby preventing blocking.
Let's consider a JavaScript global function, setTimeout(), as implemented in the following snippet:
setTimeout(function () {
console.log("1…2…3…4…5 secs later.");
}, 5000);
setTimeout() accepts a callback function and a delay in milliseconds as first and second arguments, respectively. The callback function is fired after 5,000 milliseconds has elapsed, thereby printing "1…2…3…4…5 secs later." to the console.
An interesting thing is that the preceding code can be rewritten and simplified, as shown here:
var callback = function () {
console.log("1…2…3…4…5 secs later.");
};
setTimeout(callback, 5000)
Another example of callbacks can be seen in filesystem operations. readFile (asynchronous) and readFileSync (synchronous) are two unique API functions in the Node library that can be used to read a file.
An example of synchronous reading is as follows:
var Filedata = fs.readFileSync('fileText.txt');
console.log(FileData);The readFileSync() method reads a file synchronously (all of the content is read at the same time). It takes in the file path (this could be in the form of a string, URL, buffer, or integer) and an optional parameter (either an encoder, which could be a string, null, or a flag in the form of a string) as an argument. In the case of the preceding snippet, the synchronous filesystem function takes in a file (fileText.txt) from the directory and the next line prints the contents of the file as a buffer. Note that if the encoding option is specified, then this function returns a string. Otherwise, it returns a buffer, just as we've seen here.
An example of asynchronous reading is as follows:
var callback = function (err, FileData) {
if (err) return console.error(err);
console.log(FileData);
};
fs.readFile('fileText.txt', callback);
In the preceding snippet, the readFile() method asynchronously reads the entire contents of a file (read serially until all its content is entirely read). It takes in the file path (this could be in the form of a string, URL, buffer, or integer), an optional parameter (either an encoder, which could be a string or null, or a flag in the form of a string), and a callback as arguments. It can be seen from the first line that the callback function accepts two arguments: err and data (FileData). The err argument is passed first because, as API calls are made, it becomes difficult to track an error, thus, it's best to check whether err has a value before you do anything else. If so, stop the execution of the callback and log the error. This is known as error-first callback.
In addition, if callbacks are not used (as seen in the previous example on synchronous reading) when dealing with a large file, you will be using massive amounts of memory, and this leads to a delay before the transfer of data begins (network latency). To summarize, from the use of the two filesystem functions, that is, the readFileSync(), which works synchronously, and the readFile(), which works asynchronously, we can deduce that the latter is safer than the former.
Also, in a situation where a callback is heavily nested (multiple asynchronous operations are serially executed), callback hell (also known as the pyramid of doom) may occur, when the code becomes unreadable and maintenance becomes difficult. Callback hell can be avoided by breaking callbacks into modular units (modularization) by using a generator with promises, implementing async/await, and by employing a control flow library.
Note
For more information on callback hell, refer to this link: http://callbackhell.com/.
An event loop is an efficient mechanism in Node that enables single-threaded execution. Everything that happens in Node is a reaction to an event. So, we can say that Node is an event-based platform, and that the event loop ensures that Node keeps running. Node uses event loops similar to a FIFO (first-in first-out) queue to arrange the tasks it has to do in its free time.
Let's assume that we have three programs running simultaneously. Given that each program is independent of another at any given time, they won't have to wait for the other before the output of each program is printed on the console. The following diagram shows the event loop cycle:

Figure 1.5: Event loop cycle
The following diagram shows the event queue and the call stack operations:

Figure 1.6: Event queue and call stack
To understand the concept of an event loop, we will consider the following implementation of an event loop in a program to calculate a perimeter:
const perimeter = function(a,b){
return 2*(a+b);
}
constshowPerimeter = function(){
console.log(perimeter(2,2));
}
const start = function(){
console.log('Initailizing.....');
console.log('Getting Started.....');
setTimeout(showPerimeter,10000);
console.log('Ending program.....');
console.log('Exiting.....');
}
start();
The operation sequence of the preceding snippet is listed here:
start() is pushed to memory, which is known as a call stack.
console.log ('Initializing …..') is pushed and popped on execution.
console.log ('Getting Started …..') is pushed and popped on execution.
setTimeout(showPerimiter,10000) is pushed into the stack, which is where a timer is created by the API, and the program does not wait for the callback.
console.log ('Ending program…') is pushed and popped on execution.
If 10 seconds elapse, the showPerimiter(2,2) callback function will be sent to the event queue to wait until the stack is empty.
console.log ('Exiting program…') is pushed and popped on execution.
Executed.start() is also taken out of the stack.
The showPerimiter(2,2) function is moved to the stack and is executed.
Finally, 8 is printed to the command line, which is the perimeter.
Now, we are able to understand the concept of the event loop in Node. Next, we will explore the EventEmitter, which is one of the most important classes in Node.
Callbacks are emitted and bound to an event by using a consistent interface, which is provided by a class known as EventEmitter. In real life, EventEmitter can be likened to anything that triggers an event for anyone to listen to.
EventEmitter implementation involves the following steps:
Importing and loading the event modules by invoking the "require" directive.
Creating the emitter class that extends the loaded event module.
Creating an instance of the emitter class.
Adding a listener to the instance.
Triggering the event.
You can implement the EventEmitter by creating an EventEmitter instance using the following code:
var eEmitter = require('events'); // events module from node
class emitter extends eEmitter {} // EventEmitter class extended
var myeEmitter = new emitter(); // EventEmitter instance EventEmitter makes it possible for you to add listeners to any random event. For flexibility, multiple callbacks can be added to a single event. Either addListener(event, listener) or on(event, listener) can be used to add a listener because they perform similar functions. You can use the following code block to add listeners:
var emitter = new MyClass();
emitter.on('event', function(arg1) { … });
You can also use the following code block to add listeners:
emitter.EventEmitter.addListener(event, function(arg1) { … });To trigger an event, you can use emit(event, arg1), as can be seen here:
EventEmitter.emit(event, arg1, arg2……)
The .emit function takes an unlimited number of arguments and passes them on to the callback(s) associated with the event.
By putting all of this code together, we have the following snippet:
var eEmitter = require('events');
class emitter extends eEmitter { }
var myEemitter = new emitter();
myEemitter.on('event', () => {
    console.log('Hey, an event just occurred!');
});
myEemitter.emit('event'); We can also remove a listener from an event by using the removeListener(event, listener) or removeAllListeners(event) functions. This can be done using the following code:
EventEmitter. removeAllListeners (event, arg1, arg2……)
Alternatively, you can use the following code:
EventEmitter. removeListener(event, listener)
EventEmitter works synchronously; therefore, listeners are called in the order in which they are registered to ensure proper sequencing of events. This also helps avoid race conditions or logic errors. The setImmediate() or process.nextTick() methods make it possible for a listener to switch to an asynchronous mode.
For example, let's say we wanted an output such as "Mr. Pick Piper". We could use the following code:
console.log ("Mr.");console.log("Pick");console.log("Piper");However, if we want an output such as "Mr. Piper Pick" using the preceding snippet, then we would introduce an event sequencing function, setImmediate(), to help the listener to switch to an asynchronous mode of operation, such as in the following code:
console.log ("Mr."); console.log("Pick");
setImmediate(function(){console.log("Piper");});
The output of the preceding function is exactly as expected:

Figure 1.7: Output using the sequencing function
Note
Callbacks, event loops, and event emitters are important concepts in Node.js. However, a more detailed description is beyond the scope of this book. For more information on these topics, please refer to this link: https://nodejs.org/.
eventEmitter.once(): This can be used to add a callback that is expected to just trigger once, even when an event occurs repeatedly. It is very important to keep the number of listeners to a minimum (EventEmmitter expects the setMaxListeners method to be called). If more than a maximum of 10 listeners are added to an event, a warning will be flagged.
myEmitter.emit('error', new Error('whoops!'): This emits the typical action for an error event when errors occur within an EventEmmitter instance.
We've described several features of Node in the preceding topics. However, our introduction to Node wouldn't be complete without looking at some features, such as buffers, streams, and filesystems, which make Node stand out on the development scene. So, in this topic, we will look at how these features play their respective part in the Node environment.
This is a chunk of memory where data is stored temporarily. This non-resizable memory is designed to handle raw binary data, and the integers in it are limited to values from 0 to 255 (2^8 - 1), with each integer representing one byte.
Let's look at a real-world scenario so that we have a better understanding of what buffers are and how they work by using the following screenshot from a YouTube video:
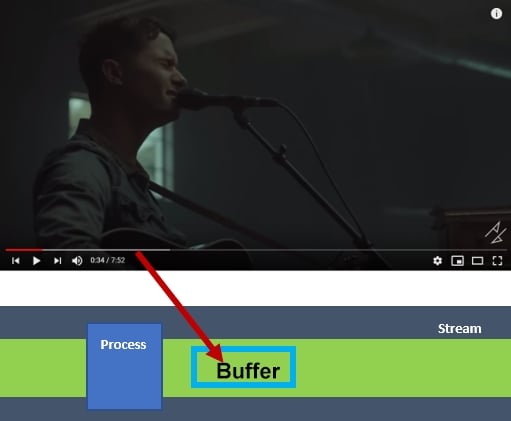
Figure 1.8: The workings of a buffer in YouTube
When a YouTube video starts to play, and if the internet is super fast, a gray area is observed in the playing stream. This area is the buffer zone, where data is being collected and stored temporarily (usually in the RAM) to allow for continuous playing, even when the internet is disconnected. The red zone is the playing zone (data processing zone) whose length is dependent on the video's playing speed and the amount of data that has been buffered. If the browser is refreshed, the temporary storage is re-initialized and the process is restarted.
Now that we have seen a real-time application using a buffer, we will now create, read, and write to buffers in the upcoming exercises.
In this exercise, our aim is to create, read from, and write to a buffer. Before attempting this exercise, make sure you have completed all of the previous activities in this chapter. To complete this exercise, perform the following steps:
Note
The code files for this exercise can be found here: http://bit.ly/2SiwAw6.
Create a new folder in an appropriate location in your system and rename it Buffer Operations.
Open the newly created Buffer Operations folder from your code editor and create a buffer.js file. Buffers can be created in the following ways:
You can create an uninitialized buffer by passing the buffer size to Buffer.alloc(), or you can create an instance of a buffer class; for example, let's create an uninitiated buffer of 5 bytes using the following code:
var buf1 = Buffer.alloc(5);
var buf2 = new Buffer(5);
console.log(buf1)
console.log(buf2)
The output is as follows:

Figure 1.9: A buffer of 5 bytes
You can create a buffer using a given array using from() or using an instance of a buffer; for example, let's initialize a buffer with the contents of the array [10, 20, 30, 40, 50]:
varbuf3 = new Buffer([10, 20, 30, 40, 50]);
varbuf4 = Buffer.from([ 10, 20, 30, 40, 50]);
console.log(buf3)
console.log(buf4)
Note that the integers that make up the array's contents represent bytes. The output can be seen as follows:

Figure 1.10: A buffer created using array content
Finally, you can create a buffer using a given string and, optionally, the encoding type using from() or using an instance of a buffer. The following code initializes the buffer to a binary encoding of the first argument, which is a string that's specified by the second argument, which is an encoding type:
var buf5 = new Buffer("Hi Packt students!", "utf-8");
var buf6 = Buffer.from("Hi Packt students!", "utf-8")
console.log(buf5)
console.log(buf6)
The output can be seen as follows:

Figure 1.11: Output of the buffer created using a string
The buffer also supports encoding methods such as ascii, ucs2, base64, binary, and so on.
To write into a buffer, we can use the buff.write() method. The output returned after a buffer has been written to (created) is the number of octets written into it:
buffer.write(string[, offset][, length][, encoding])
Note that the first argument is the string to write to the buffer and the second argument is the encoding. If the encoding is not set, the default encoding, which is utf-8, will be used. Write into the buffer that we created in the preceding step using the following code:
len = buf5.write("Packt student", "utf-8")
console.log (len) //The length becomes 13 after writing into the buffer
The output can be seen as follows:

Figure 1.12: Output of the buffer using utf-8
To read from the buffer, the toString() method is commonly used, but keep in mind that many buffers contain text. This method is implemented as follows:
buffer.toString([encoding][, start][, end]
Here, we will read from the buffer that was written into in the preceding step and print the output on the command line using the following code:
console.log(buf5.toString("utf-8", 0, 13))
Figure 1.13: Reading from the buffer
There are a few more methods for buffers, which will be covered in the following sections.
You can also create buffers using the allocUnsafe(length) method. The allocUnsafe(length) method creates an uninitialized buffer of the assigned length. When compared to the buffer.alloc() method, it is much faster, but old data in the returned buffer instance needs to be overwritten using either fill() or write().
Let's see how the allocUnsafe(length) method is being used in the following snippet:
var buf = Buffer.allocUnsafe(15);
var buf1 = Buffer.alloc(15);

console.log(buf);
console.log(buf1);
The preceding snippet yields the following output:
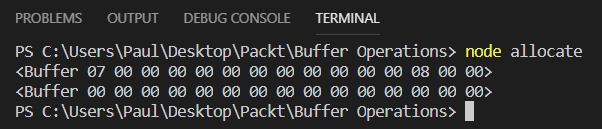
Figure 1.14: Output of the buffer created using allocateUnsafe(length) and alloc(length)
There are a few other methods that you need to be aware of. These are listed here:
byteLength(string, encoding): This method is used to check the number of bytes required to encode a string with a given encoding.
length: This method is used to check the length of your buffer, that is, how much memory is allocated.
copy(target, targetStart=0, sourceStart=0, sourceEnd=buffer.length): This method is used to copy the contents of one buffer into another.
buffer.slice(start, end=buffer.length): This is the same as Array.prototype.slice, except modifying the slice will also modify the original buffer.
Whenever you talk about reading data from a source and writing it to a destination, you're referring to streams (Unix pipes). A stream can be likened to an EventEmitter. There are four types of streams, and they are as follows:
Readable: Allows you to read data from a source.
Writable: Allows you to write data to a destination.
Duplex: Allows you to read data from a source and write data to a destination.
Transform: Allows you to modify or transform data while data is being read or written.
A stream is said to be readable if it permits data to be read from a source, irrespective of what the source is, be it another stream, a file in a filesystem, a buffer in memory, and so on. Various data events can be emitted at various points in a stream. Thus, streams can also be referred to as instances of EventEmitters. Listening to a data event and attaching a callback are the best ways to read data from a stream. A readable stream emits a data event, and your callback executes when data is available.
Let's observe how a stream is read, a data event is emitted, and a callback is executed using the filesystem module with a readable and writable file. See the following code:
const fs = require('fs');
const file = fs.createReadStream('readTextFile.txt');
file.on('data', function(data) {
console.log('Data '+ data);
});
file.on('end', function(){
console.log('Hey!, Am Done reading Data');
});
First, we created a file named readTextFile.txt. Then, a readable stream is created using the fs.createReadStream('filename') function. It is good to know that the stream is in a static state initially, and gets to a flowing state as soon as you listen to a data event and attach a callback. Streams emit an end event when there is no more data to read.
A stream is said to be writeable if it permits data to be written to a destination, irrespective of what the destination is. It could be another stream, a file in a filesystem, a buffer in memory, and so on. Similar to readable streams, various events that are emitted at various points in writeable streams can also be referred to as instances of EventEmitter. The write() function is available on the stream instance. It makes writing data to a stream possible.
Take a look at the following snippet:
const fs = require('fs');
const readableStream = fs.createReadStream('readTextFile.txt');
const writableStream = fs.createWriteStream('writeTextFile.txt');
readableStream.on('data', function (data) {
console.log('Hey!, I am about to write what has been read from the file readTextFile.txt');
if (writableStream.write(data) === true) {
console.log('Hey!, I am done writing. Open the file writeTextFile.txt to see what has been written');
    }
else
console.log('Writing is not successful');
});
First, we load the filesystem using the require directive. Then, we create two files: readTextFile.txt and writeTextFile.txt. We then write some text string into the readTextFile.txt file and leave writeTextFile.txt blank. Using the filesystem createReadStream() function with the file path or directory as an argument, we create a readable stream. Thereafter, a writeable stream is created using the filesystem createWriteStream() function with the file path or directory as an argument. readableStream.on('data', callback) listens to a data event and attaches a callback, whereas writableStream.write(data) writes data to a writable stream. Once this snippet is run, you will realize that the text string read from readTextFile.txt has been written into the writeTextFile.txt file.
Duplex
Recall from the short description in the previous section that a duplex is a type of stream that allows you to read data from a source and write data to a destination. Examples of duplex streams are as follows:
crypto streams
TCP socket streams
zlib streams
Transform
This is another stream method that lets you modify or transform data while data is being read or written. In essence, transform streams are duplex streams with the aforementioned functionality. Examples of transform streams are as follows:
crypto streams
zlib streams
end(): When this method is called, a finish event is emitted by the stream and a notification is sent to the stream that you have finished writing to.
setEncoding(): Upon being called, the stream becomes encoded. This method is used in a situation where a readable stream needs to be encoded.
pipe(): When this method is called on a readable stream, you can read data from the source and write to the destination without normal flow management.
pause(): When this method is called on a flowing stream, the stream pauses, data will be kept in the buffer, and data events will not be emitted anymore. When this is called on a non-flowing stream, data events will not be emitted, but the stream will start flowing.
resume(): When this method is called on a paused stream, the stream starts to flow again.
unpipe(): When this method is called on a piped readable stream, the destination streams are removed from pipes.
Node has a module name File System (fs) that works with the file systems on a computer. This module, fs, performs several methods that can be implemented both synchronously and asynchronously, but there is there is no guaranteed ordering when using them.
Reading, creating, updating, deleting, and renaming are some of the operations that can be performed on any text file that's saved in a directory.
Reading Files
After the required directive has been invoked for the fs module, assuming that we have a string of text contained in the text file, the file can be read by calling the readFile() function, as shown here:
var fs = require('fs');
fs.readFile('readFileName.txt', function(err, data) {
if (err) throw err;
console.log('Read!');
  });
Creating Files
The methods that are highlighted here are made available by the fs module for creating new files:
fs.appendFile(): This method appends a given content to a file. The file will be created in this case, even if it does not exist. This function can also be used to update a file. Its implementation is as follows:
var text = ' Hey John, Welcome to Packt class.'
var fs = require('fs');
fs.appendFile('newTextFile.txt', 'text'
', function (err) {
  if (err) throw err;
  console.log('Saved!');
  });
Once the preceding code is run, you will see the designated string written into the file.
fs.open(): When this method is called, a given file is opened for writing, and if the file doesn't exist, an empty file will be created. The implementation is as follows:
var fs = require('fs');
fs.open('TextFile.txt', 'w', function (err, file) {
  if (err) throw err;
// let's assume the file doesn't exist
  console.log('An empty file created');
});
This method takes a second argument, w, which is referred to as a flag for "writing."
fs.writeFile(): When this method is called on a given file and content exists in it, the existing content is replaced by new content. In a situation where the file doesn't exist, a new file containing the given content will be created. This function can also be used to update the file, and the implementation is as follows:
Var fs = require('fs');
fs.writeFile('textFile.txt', 'Hello content!', function (err) {
if(err)throwerr;
console.log('Saved!');
});
Deleting Files
fs.unlink(): When this method is called on a given file in the filesystem, the file is deleted. The implementation is as follows:
var fs = require('fs');
fs.unlink('textFile.txt', function (err) {
  if (err) throw err;
  console.log('File deleted!');
});
Renaming Files
fs.rename(): This method takes in three arguments: the old name of the file, the new name of the file, and a callback. When this method is called on a given file in the filesystem, the file is renamed. The implementation is as follows:
var fs = require('fs');
fs.rename('textFile.txt', 'renamedtextFile.txt', function (err) {
  if (err) throw err;
  console.log('File Renamed!');
});access(): This method is used to check whether a user has access to the file or directory.
close(): This method is used to close a file.
exists(): Though this method is deprecated, it's called on a file to check whether a file or folder exists.
fstat(): When this method is called on a file, it returns the status of that file.
link(): This method is used to create an additional name for a file. The name could either be the old or a new one.
mkdir(): This method is used make a new directory.
readdir(): This method is used to read the contents of a directory.
rmdir(): This method is used to remove a directory.
stat(): This method is used to return the status of a file.
truncate(): This method is used to truncate a file.
watch(): This method is used to watch for changes in a file name or directory name.
Note
For more information on the Node.js APIs, refer to this link: https://nodejs.org/api/.
Our aim is to read and write data using the Node filesystem. To complete this exercise, the following steps have to be performed:
Note
The code files for this exercise can be found here: http://bit.ly/2U1FIH5.
Create a new folder at an appropriate location and rename it FileSystemProgram.
Open the newly created FileSystemProgram from your code editor and create write.js, read.js, write.txt, and read.txt, as shown here:

Figure 1.15: Creating filesystem program files
Open the read.txt file and write some text; for example, "Welcome to Packt." To read what has been previously input in the read.txt file, open the read.js file and type in the following code:
var fs = require('fs')
fs.readFile('read.txt', function(err, data) {
if (err) throw err;
console.log('Read!');});
First, we will use var fs = require('fs') to declare fs (a filesystem variable) and assign a filesystem module to it. Then, we will use the readFile() function on the read.txt file and attach a callback. Next, we will check for errors using if (err) throw err. If no errors are present, then we will print "Read!" using console.log('Read!').
Press Ctrl + ` to open the integrated command-line terminal in Visual Studio and run the following command:
node read.js

Figure 1.16: Running the read program
Open the write.js file to write into the write.txt file and run the following command:
var fs = require('fs');
fs.writeFile('write.txt','Welcome to packt' function(err, data) {
if (err) throw err;
console.log('Written!');  });
We use var fs = require('fs') to declare fs (a filesystem variable) and assign a filesystem module to it. We then use fs.writeFile('write.txt', 'Welcome to Packt' function(err, data) to call the writeFile() function on the write.txt file, pass the text to be written as the second argument, and attach a callback as the third argument. Thereafter, we check for if errors using if (err) throw err. If there are no errors, we print Written! using console.log('Written!').
Press Ctrl + ` to open the integrated command-line terminal in Visual Studio and run the following command:
node write.js
You will obtain the following output:

Figure 1.17: Running the write program
Open the write.txt file to view what has been written from the output, as shown here:

Figure 1.18: Contents written to the file
The previous examples and activities have explored the knowledge and implementation of different built-in modules in Node. The next activity will be a hands-on implementation of streaming data from one file to another.
You have been tasked with developing an application that streams data (copies some text) from a local file on your system into another local file that's located in a different directory. The aim is to read and write data to a stream.
Before we begin this activity, it is essential that you have completed all the previous exercises and activities. Then, use the IDE to create a project called StreamingProgram.
To complete this exercise, the following steps have to be completed:
Note
The code files for this activity can be found here: http://bit.ly/2EkRW8j.
Create a folder/directory and name it StreamingProgram.
Create stream.js, readTextFile.txt, and writeTextFile.txt in the StreamingProgram directory.
Load and import the filesystem module into stream.js file.
Create a readable stream on the readTextFile.txt file.
Create a writeable stream on the writeTextFile.txt file.
Call the on() function on the readableStream() method to read data.
Call the write() method on the writeableStream() method to write data.
Run the stream.js program via the command line and open the writeTextFile.txt file to confirm that the text has been written to it.
In this chapter, we first described MEAN architecture by briefly expanding on the layers that comprise the MEAN stack: MongoDB, Express, Angular, and Node. For each of these components, we discussed their features/advantages and limitations. Thereafter, we began by describing the Node framework in detail. We first discussed the various installation options (the LTS and stable versions) that are available. Then, we had a brief look at the built-in modules that make up Node and also learned about the steps that are involved in starting a Node application.
In the subsequent topics, we described some important concepts in Node, such as callbacks, event loops, event emitters, buffers, streams, and the filesystem. For callbacks, we described their implementation in synchronous and asynchronous mode. We also looked into how Node employs event loops in sequencing program operations. Next, we learned how to add event listeners, trigger events, remove listeners, and implement some other features. We then moved on to discuss buffers. Specifically, we learned how to create, read, and write to buffers. The next topic described the various types of streams that are available. We performed an exercise on writing to and reading from a stream. Finally, we discussed the filesystem and implemented different operations that can be performed on a file via an activity.
In the next chapter, we will begin developing RESTful APIs to perform create, read, update, and delete (CRUD) operations.