


Welcome to Instant StyleCop Code Analysis How-to. If we look at how we begin development of medium and big projects, one of the first things we do is to edict base principles and among them, we define coding conventions. These rules, stating how our code must look like, are here in order to improve readability and maintainability for all developers of the team. The choices made there are fairly arbitrary and depends on the background and the likes and dislikes of the person (or the development team) who laid them down. After the project begins, it however takes a lot of time and code reviews to follow them.
This is where StyleCop comes in. In this book we will take a look at some recipes that range from a simple to advanced level, which will tell you all about StyleCop and how it is used to analyze code.
In this recipe, we will describe the installation process of StyleCop, learn how to configure the rules to be executed on a project, and how to launch an analysis from Visual Studio.
In order to follow this recipe, you will need to have at least one of the following Visual Studio programs installed:
Visual Studio 2008 Professional
Visual Studio 2010 Professional
Visual Studio 2012 Professional
Download StyleCop from its website (http://stylecop.codeplex.com). At the time of writing, the current version of StyleCop is 4.7 released on January 5, 2012.
Once downloaded, verify your Visual Studio is closed and launch the setup. The procedure is relatively straightforward. The only tricky part is to choose the correct components for your installation according to your use.
The wizard shows an MSBuild integration step during installation as shown in the following screenshot. Here are two pieces of advice on the installation process:
For a developer using only Visual Studio on his computer, staying with only the Visual Studio integration is fine
However, if you need to use another IDE such as SharpDevelop or need StyleCop to be used in your CI, the best approach is to add the MSBuild integration as it might be required

Once the installation process is finished, let's see what has been added to your Visual Studio.
Open a project in your Visual Studio.
Right-click on the project file in the explorer solution panel, and then click on StyleCop Settings... to open the configuration window as shown in the following screenshot:

Once you have finished selecting the rules you need, you can launch your first analysis of code.
In the Explorer solution, right-click on the project file to open the context menu, and then click on Run StyleCop… to launch your analysis. You can perform analysis on different scope by launching StyleCop in different ways:
From the Tools menu, you can perform a scan for the current C# document, or a full scan of your solution
In the Explorer solution, from the context menu, where you can restrict the scope of your analysis to the node you have currently selected
And from the coding panel, where you can analyze the code you're currently modifying.
StyleCop configuration is made on a project basis, not solution. This means you will have to specify for each project what rules and other configuration data you will use.
When opening a Visual Studio solution, you can access the StyleCop configuration from the context menu of each project in the explorer panel. You can also find configurations made this way in the Settings.Stylecop file of the project folder.
You can also use some "master" configuration files if you want to propagate the same settings in multiple projects.
Now let's talk about some useful options that are available in the settings and how to have StyleCop violations displayed in your favorite IDE if it's not Visual Studio.
Each section of rules may contain some additional configuration elements (they will be displayed in the Detailed settings region of the Rules tab.
At the moment you have additional configuration elements for the following lines:
C#: The detailed settings of this section are certainly the most important as they allow you to exclude generated and designer files from further analysis by StyleCop. This is helpful as designer files do not generally follow these rules and generates many issues.
Documentation rules: In this section, you can change the check scope of the documentation. This means you can remove the rule checking for private and internal code and you can exclude fields from it.
Ordering rules: The detailed section lets you exclude the generated code from the checks.
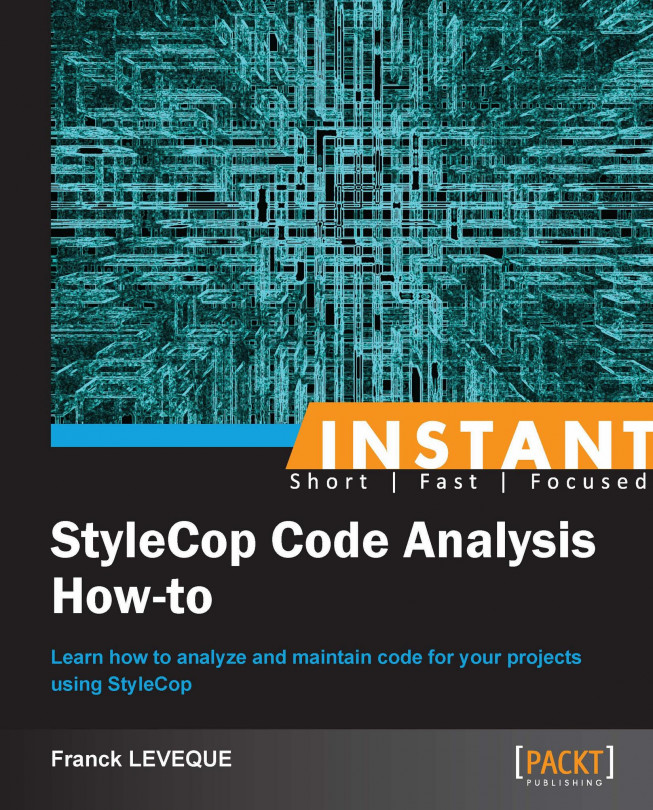
Earlier in this chapter, I explained that StyleCop configuration was set up on a project basis. While this is true for the standard behavior, the Setting Files tab allows you to change the default behavior and specify a setting file to merge with your current project settings as shown in the following screenshot:
Doing so allows you to have a global configuration file and depend on it for rule exclusion. If you modify any settings, they will appear in bold in the Rules tabs to show they have been overwritten.
In order to use StyleCop with Visual Studio Express or SharpDevelop, we have to enable MSBuild integration. For SharpDevelop, that is all that's required. SharpDevelop will then take care of missing lines in your project files.
However, for Visual Studio Express, you need to manually add StyleCop analysis in your project files. See the Automating StyleCop using MSBuild (Simple) recipe to know how to do this.
Once you have set up StyleCop analysis in the projects files of your solution, StyleCop violations will be displayed as warnings or errors at compile time.
Tip
Is there a way to do automate StyleCop integration for all my project files?
Since framework 4.0 it is also possible to include the Stylecop.targets file in C:\Program Files\MSBuild\4.0\Microsoft.CSharp.targets\ImportAfter\.
This will allow the integration of Stylecop.targets by default in all the project builds. If the directory doesn't exist, you will have to create it.
To be sure of version of the framework MSBuild uses, you can run the following command in your visual studio command line:
MSBuild /version
In this recipe, we will discover the StyleCop add-in for Resharper. We will see its real-time analysis and how to easily fix most of the StyleCop violations.
For this recipe, you will need to have:
StyleCop 4.7 installed.
Resharper 7.1 installed. Evaluation version available at http://devnet.jetbrains.com/docs/DOC-280.
Visual Studio Professional (2008, 2010, or 2012).
A sample C# project to modify.
Note
Before starting to see the benefit of Resharper with StyleCop, I have to say that the installation is not an easy one. First, each version of StyleCop seems to be tightly built on a specific version of Resharper. At the time of writing, StyleCop Version 4.7 is compatible with Resharper v7.1.1000.900. You can find the compatibility matrix at http://stylecop.codeplex.com/.
Then you need to install them in a specific order to be able to use them. The exact order to install them is to begin with Resharper, and installing StyleCop after. If you didn't do it this way, you will have to remove both products and reinstall them in the right order.
When you open Visual Studio for the first time after having installed Resharper, you will be asked if you want to reset the default settings of Resharper to comply with StyleCop rules. Click on Yes to do so.
Now let's open our sample project. The first thing visible is a new column at the right-hand side of the code screen as shown in the following screenshot:

This column updates in real time and gives you all the errors or warnings you have in your document. If you go over one of the warnings displayed in the file, you will be able to see a description of the warning.
If you click on it, a light bulb icon will appear on the left-hand side of your code and provide you options for dealing with the error. Generally the options are of three kinds for each error:
You can either autofix the rule, which is also marked by a light bulb icon
You can explicitly suppress the error by automatically adding a suppress message in your code. This is marked by a hammer icon
And you can change the level of this kind of error for Resharper. This is marked as a barred light bulb
The following screenshot shows you the options available for dealing with the StyleCop violation:

As this is quite a long task, we can fix in one go most of the violations. To do so, use the Clean up command. This command is accessible in three places:
From the Resharper | Tools menu.
In the Explorer solution, from the context menu.
And from the coding panel's context menu.
Whereas the auto clean up feature of Resharper helps to quickly fix a lot of violations, it won't fix all of them, and you will have to check the remaining violations manually or with the help of the fixing feature of Resharper.
If you want to know what the autofixing capabilities of the Resharper add-in are, you can refer to the following link:
http://stylecop.codeplex.com/wikipage?title=ReSharper%20Fixes&referringTitle=Documentation
You can manage the behavior of the Resharper addin in the Resharper | Option… menu. You have two menus that address StyleCop. The first is the Code Inspection | Inspection Severity menu, which allows you to change the way each StyleCop violation is displayed in Resharper.
The second one allows you to manage how StyleCop is running under Resharper, as shown in the following screenshot:

The most important part in this screen is the Analysis Performance as it allows you to control the resources allocated to the StyleCop analysis.
Though Resharper is certainly the most complete tool to autofix your violations and has the advantage of being directly supported by the StyleCop team, it's not the only program that is able to automatically correct violations. Other tools exist, and can help with StyleCop violation fixing.
This is a direct competitor of Resharper. Through plugins, it can also have some StyleCop compliant violation fixing features. However, at the time of writing, they seem to cover only a small part of StyleCop violations.
You can download Code Rush at the following address:
http://www.devexpress.com/Products/Visual_Studio_Add-in/Coding_Assistance/index.xml
The plugin used to include StyleCop violation fixing is CR_StyleNinja and is available at the following site:
http://code.google.com/p/dxcorecommunityplugins/wiki/CR_StyleNinja
Code Maid is a free Visual Studio add-in allowing you to reformat your code. While it doesn't have a plugin for StyleCop, it allows you to reformat your code in order to remove layout and ordering violations.
You can find the tool at the following address:
Narrange is another code beautifier, but unlike Code Maid, it's not a Visual Studio add-in. All configurations are made in an XML file and you can set up NArrange launch from the Visual Studio external tools menu. The configuration has a tool to simplify its edition.
One of the advantages of this tool is the fact it is not dependant on Visual Studio. You can integrate it with other developing tools such as SharpDevelop or MonoDevelop.
You can download it at the following site:
In this recipe, we will see how to automate our build process using MSBuild. We will describe which lines need to be added to the MSBuild project in order to enable StyleCop analysis and how to cap the number of violations encountered before the build breaks.
For this recipe, you will need to have:
StyleCop 4.7 installed with the option MSBuild integration checked
A sample C# project to modify
Open your project file with the text editor, and locate the following line:
<Import Project="$(MSBuildBinPath)\Microsoft.CSharp.targets" />
After this, add the following line:
<Import Project="$(ProgramFiles)\MSBuild\StyleCop\v4.7\StyleCop.targets" />
This enables StyleCop analysis on the project.
Now let's modify the behavior of the StyleCop task to brake after 100 violations are encountered. Locate the first
PropertyGroupsection within the project file, and then add a new XML elementStyleCopMaxViolationCountwith a value of100. For example:<Project DefaultTargets="Build" xmlns="http://schemas.microsoft.com/developer/msbuild/2003"> <PropertyGroup> <Configuration Condition=" '$(Configuration)' == '' "> Debug </Configuration> <Platform Condition=" '$(Platform)' == '' "> AnyCPU </Platform> <ProductVersion>8.0.50727</ProductVersion> <SchemaVersion>2.0</SchemaVersion> <ProjectGuid> {F029E8D9-743F-4C6F-95F3-6FBDA6477165} </ProjectGuid> <OutputType>Exe</OutputType> <AppDesignerFolder>Properties</AppDesignerFolder> <RootNamespace>VanillaProject</RootNamespace> <AssemblyName>VanillaProject</AssemblyName> <StyleCopMaxViolationCount> 100 </StyleCopMaxViolationCount> </PropertyGroup>
The first element we added imports the StyleCop task in the project. That's all that is really required to enable StyleCop analysis via MSBuild. The element is located just under the project root node. It can be placed anywhere as long as it's a direct child of the root node. As you can see, the path used to locate the StyleCop.Targets file is dependant of the version you installed on your computer.
In the second part, I showed you how to modify the behavior of StyleCop by adding properties in the project.
There are 10 properties that can be modified that way; I will present the three most important to me:
StyleCopAdditionalAddinPaths: This allows you to specify other paths for your custom rulesStyleCopTreatErrorsAsWarnings: This allow you to turn your StyleCop violations into build errorsStyleCopMaxViolationCount: This allows you to specify the maximum number of violations we accept in the project before breaking the build
Here is some other information that might come in handy in certain scenarios.
In this recipe, we have seen how to modify the StyleCop task behavior on a project basis. However, we can set the behavior properties as environment variables on the machine, or within the build environment command window. Setting the properties in this way will cause StyleCop to behave in the same way for all projects where StyleCop build integration is enabled.
Excluding files from analysis can be helpful in certain scenarios (such as in legacy projects, or when you add third-party Mono.Options files, for example). To do such a thing, you need to open your project file and change the compile node of the file:
<Compile Include="File.cs"/>
Should become:
<Compile Include="File.cs">
  <ExcludeFromStyleCop>true</ExcludeFromStyleCop>
</Compile>
In this recipe, I will show you how to analyze your projects with StyleCop from the command line. For this, I will use a tool named StyleCopCmd, and prepare it to be able to launch the last version of StyleCop.
For this recipe, you need to have the following elements:
StyleCop 4.7 with MSBuild integration
StyleCopCmd 0.2.10 (Sources); they can be downloaded from http://sourceforge.net/projects/stylecopcmd/files/stylecopcmd/stylecopcmd-0.2.1/StyleCopCmd-src-0.2.1.0.zip/download
A sample C# project to analyze
Note
As indicated in the previous recipe, StyleCopCmd is not maintained anymore. However, the tool works correctly and need just a little tweaking to be run with the last version of StyleCop. That's what we will do in this recipe.
Open the Visual Studio project of StyleCopCmd.
First, we have to change the references of StyleCop libraries from 4.3 to 4.7. This is done quite easily in the all projects by removing the references to:
StylecopStylecop.CSharpStylecop.CSharp.Rules
Use Visual Studio to replace all
Microsoft.Stylecopoccurrences by StyleCop. When the project was put on CodePlex, one of the first things undertaken was the removal of Microsoft references.Finally, in the file
ReportBuilder.csof the StyleCopCmd project, remove the call to the dispose method in the method created at line 437.Verify you are able to generate your binaries (right-click on Net.SF.StyleCopCmd.Console and click on Build)

Now that we have our up-to-date binaries we can use them to launch StyleCop directly from the command line. To do so, open a command console, and then go to your StyleCopCmd directory and type the following command:
Net.SF.StyleCopCmd.Console.exe -ifp "((.)*(Base*)(.)*(\.cs))|((.)*(\.Designer\.cs))|(AssemblyInfo\.cs)" -sf "..\StylecopCustomRule\StylecopCustomRule.sln" -of "stylecop-report.xml"On the screen, the only information that appears is the total number of violations and the list of files scanned:
Pass 1:   StylecopCustomRule.csproj - MyCustomRule.cs
9 violations encountered.
If we look at what has been generated, you will find two files in your directory:
stylecop-report.xmlstylecop-report.violations.xml
Both displays the list of violations generated by StyleCop; the only difference is the XML structure of the files. The first one follows StyleCopCmd internal schema and transformation files whereas the second is a bare output of StyleCop.
StyleCopCmd comes with a lot of options out of the box.
In the previous example, I made you give a solution file. However, StyleCop allows four kinds of entry point:
The solution files with
–sfparameterThe project files with
–pfparameterDirectory with
–dparameter, an optional–roption allows you to force recursion on the given directoryAnd files with
–fparameter
The ipf parameter allows you to remove some of the files from StyleCop scan by providing a regular expression matching their filename.
Finally, the -of option permits you to specify the name of the output file. This is used with –tf, which is used to transform the output with the help of an XSLT file. It can give you any kind of human readable report.
To get help, launch StyleCopCmd with the -? option; this will display the available options as shown in the following screenshot:

I will let you explore the remaining possibilities.
StyleCopCmd is not the only tool available to do StyleCop analysis from the command line. As we will see later, the API of StyleCop is quite easy to understand and though they don't give a command line directly, lots of projects have been made to support this functionality.
StyleCopCmd has been made available on Mono and Linux systems thanks to the work of Ian Norton (https://github.com/inorton/StyleCopCmd).
The original version of StyleCopCmd is still linked to StyleCop 4.3, and you will have to upgrade the project to StyleCop 4.7 if you want to use the latest functionality of StyleCop.
Some problems are known and well documented. For me, the major problem I encountered was the registry key used by StyleCop. It forces the user to execute StyleCop commands with root privilege on the first start.
StyleCop CLI has the same objective as StyleCopCmd. It permits an integration of StyleCop from the command line in a wider automation system.
Compared to StyleCopCmd, this project has less functionality; one of the most important missing functionality is the ability to transform the output of StyleCop violations. However, the tool doesn't need any tweaking to be compatible with StyleCop 4.7 as it already embeds it. The tool is available at the following site:
As I said earlier, lots of people have already started this task for you. However, if you're not satisfied with the existing tools or if you just want to look at how to make one, a good start is the tutorial made by the team of StyleCop+, which gives you advice on how to start building such a tool. The tutorial is available at the following site:
http://stylecopplus.codeplex.com/wikipage?title=Running%20StyleCop%20from%20Your%20Code
In this recipe, we will see how to use StyleCopCmd to automate our process using NAnt.
For this recipe, you will need to have:
StyleCop 4.7 installed
NAnt Version 0.89 or higher
The sample C# project used in the previous recipe
I will assume you have already used NAnt, and I will concentrate on describing the two methods to achieve integration of StyleCop task in to your NAnt script.
Note
StyleCopCmd comes with its own NAnt task. It is contained in the Net.SF.StyleCopCmd.Core.dll file.
To include it in your NAnt script you will need to add a reference to this dll and add the following XML element in your project or target element:
<styleCopCmd outputXmlFile="stylecop-report.xml"
             transformFile=""
             recursionEnabled="true"
             ignorePatterns="AssemblyInfo\.cs"
             processorSymbols=""
             styleCopSettingsFile="Stylecop.Settings" >
    <solutionFiles>
        <include name="StylecopCustomRule.sln" />
    </solutionFiles>
    <projectFiles />
    <directories />
    <files />
</styleCopCmd>
Once our build file is ready, we can execute it in a console, and we obtain the following output:
NAnt 0.92 (Build 0.92.4543.0; release; 09/06/2012)
Copyright (C) 2001-2012 Gerry Shaw
http://nant.sourceforge.net

Buildfile: file:///C:/dev/StylecopCustomRule/bin/test.build
Target framework: Microsoft .NET Framework 4.0

[styleCopCmd] Pass 1:   StylecopCustomRule.csproj - MyCustomRule.cs
[styleCopCmd] 9 violations encountered.

BUILD SUCCEEDED

Total time: 1.6 seconds.
As with the command-line version, we obtain two files in the directory that can be exploited in a CI to show the violations results:
stylecop-report.xmlstylecop-report.violations.xml
In the previous sample, I tried to give you the full NAnt command. In the StyleCopCmd element we can configure six attributes:
outputXmlFile: This attribute is used to specify the result file we want.transformFile: This attribute is used to specify the transformation (XSLT) file we want to apply to the result file.recursionEnabled: This attribute is used to enable recursion in the directories to check.ignorePatterns: This attribute contains a regular expression pattern to exclude filenames from scanning; in the sample I removed theAssemblyInfo.csfile from the scan.processorSymbols: This attribute is used to specify a list of processor symbols (for example:DEBUG,CODE_ANALYSIS) to be used by StyleCop. Generally, it is not used in most scenarios.styleCopSettingsFile: This attribute is used to specify a common settings file for all the files being scanned. If no common settings files exist, then it should be removed from the task.
The elements solutionFiles, projectFiles, directories, and files are used to specify the different kinds of element to analyze.
The explained method is not the only one usable to launch StyleCopCmd task. Another way to do it is to rely to the exec element of the NAnt framework. It allows you to use the command line executable of StyleCopCmd (or your own if you made it). The tool can be found at the following site:
http://nant.sourceforge.net/release/0.92/help/tasks/exec.html
In this recipe we will see how to build and display StyleCop errors in Jenkins/Hudson jobs. To do so, we will need to see how to configure the Jenkins job with a full analysis of the C# files in order to display the technical debt of the project. As we want it to diminish, we will also set in the job an automatic recording of the last number of violations. Finally, we will return an error if we add any violations when compared to the previous build.
For this recipe, you will need to have:
StyleCop 4.7 installed with the option MSBuild integration checked
A Subversion server
A working Jenkins server including:
The MSBuild plug in for Jenkins
The Violation plug in for Jenkins
A C# project followed in a subversion repository.
The first step is to build a working build script for your project. All solutions have their advantages and drawbacks. I will use MSBuild in this recipe. The only difference here will be that I won't separate files on a project basis but take the "whole" solution:
<?xml version="1.0" encoding="utf-8" ?>
<Project DefaultTargets="StyleCop" xmlns="http://schemas.microsoft.com/developer/msbuild/2003">
  <UsingTask TaskName="StyleCopTask" AssemblyFile="$(MSBuildExtensionsPath)\..\StyleCop 4.7\StyleCop.dll" />
  <PropertyGroup>
    <!-- Set a default value of 1000000 as maximum Stylecop violations found -->
    <StyleCopMaxViolationCount>1000000</StyleCopMaxViolationCount>
  </PropertyGroup>
  <Target Name="StyleCop">

    <!-- Get last violation count from file if exists -->
    <ReadLinesFromFile Condition="Exists('violationCount.txt')" File="violationCount.txt">
      <Output TaskParameter="Lines" PropertyName="StyleCopMaxViolationCount" />
    </ReadLinesFromFile>

    <!-- Create a collection of files to scan -->
    <CreateItem Include=".\**\*.cs">
      <Output TaskParameter="Include" ItemName="StyleCopFiles" />
    </CreateItem>

    <!-- Launch Stylecop task itself -->
    <StyleCopTask
      ProjectFullPath="$(MSBuildProjectFile)"
      SourceFiles="@(StyleCopFiles)"
      ForceFullAnalysis="true"
      TreatErrorsAsWarnings="true"
      OutputFile="StyleCopReport.xml"
      CacheResults="true"
      OverrideSettingsFile= "StylecopCustomRule\Settings.Stylecop"
      MaxViolationCount="$(StyleCopMaxViolationCount)">

      <!-- Set the returned number of violation -->
      <Output TaskParameter="ViolationCount" PropertyName="StyleCopViolationCount" />
    </StyleCopTask>

    <!-- Write number of violation founds in last build -->
    <WriteLinesToFile File="violationCount.txt" Lines="$(StyleCopViolationCount)" Overwrite="true" />
  </Target>
</Project>
After that, we prepare the files that will be scanned by the StyleCop engine and we launch the StyleCop task on it. We redirect the current number of violations to the
StyleCopViolationCountproperty.Finally, we write the result in the
violationsCount.txtfile to find out the level of technical debt remaining. This is done with theWriteLinesToFileelement.Now that we have our build script for our job, let's see how to use it with Jenkins. First, we have to create the Jenkins job itself. We will create a Build a free-style software project. After that, we have to set how the subversion repository will be accessed, as shown in the following screenshot:

We also set it to check for changes on the subversion repository every 15 minutes.
Then, we have to launch our MSBuild script using the MSBuild task. The task is quite simple to configure and lets you fill in three fields:
MSBuild Version: You need to select one of the MSBuild versions you configured in Jenkins (Jenkins | Manage Jenkins | Configure System)
MSBuild Build File: Here we will provide the
Stylecop.projfile we previously madeCommand Line Arguments: In our case, we don't have any to provide, but it might be useful when you have multiple targets in your MSBuild file
Finally we have to configure the display of StyleCop errors. This were we will use the violation plugin of Jenkins. It permits the display of multiple quality tools' results on the same graphic. In order to make it work, you have to provide an XML file containing the violations.

As you can see in the preceding screenshot, Jenkins is again quite simple to configure. After providing the XML filename for StyleCop, you have to fix thresholds to build health and the maximum number of violations you want to display in the detail screen of each file in violation.
In the first part of the How to do it… section, we presented a build script. Let's explain what it does:
First, as we don't use the premade MSBuild integration, we have to declare in which assembly the StyleCop task is defined and how we will call it. This is achieved through the use of the UsingTask element.
Then we try to retrieve the previous count of violations and set the maximum number of violations that are acceptable at this stage of our project. This is the role of the ReadLinesFromFile element, which reads the content of a file. As we added a condition to ascertain the existence of the violationsCount.txt file, it will only be executed if the file exists. We redirect the output to the property StyleCopMaxViolationCount.
After that we have configured the Jenkins job to follow our project with StyleCop. We have configured some strict rules to ensure nobody will add new violations over time, and with the violation plugin and the way we addressed StyleCop, we are able to follow the technical debt of the project regarding StyleCop violations in the Violations page.

A summary of each file is also present and if we click on one of them, we will be able to follow the violations of the file.
Tip
How to address multiple projects with their own StyleCop settings
As far as I know, this is the limit of the MSBuild StyleCop task. When I need to address multiple projects with their own settings, I generally switch to StyleCopCmd using NAnt or a simple batch script and process the stylecop-report.violations.xml file with an XSLT to get the number of violations.
In this recipe, we will see how to customize file headers to avoid StyleCop violations, and how we can use Visual Studio templates and snippets to make our life easier while developing.
For this recipe, you will need to have:
StyleCop 4.7 installed
Visual Studio 2008 or higher
Note
StyleCop doesn't use a lot of rules for headers. Basically, it requires the following things: the file name, a copyright, a company name, and a summary.
Let's try to make a LGPL header compliant with StyleCop. As there's no advice on how to integrate the Version 3.0, we will stick with the header proposed in Version 2.1 and which can be viewed at http://www.gnu.org/licenses/old-licenses/lgpl-2.1.html.
The only requirements of the LGPL license header is to give one line to describe the project, the year of the project, and the author that wrote it (I will use the company name as the author). So the file header should look something like the following:
// <summary>
// {one line to give the library's name and an idea of what it does.}
// </summary>
// <copyright file="{File}" company="{Company}">
// Copyright (C) {year} {Company}
//
// This library is free software; you can redistribute it and/or
// modify it under the terms of the GNU Lesser General Public
// License as published by the Free Software Foundation; either
// version 2.1 of the License, or (at your option) any later version.
//
// This library is distributed in the hope that it will be useful,
// but WITHOUT ANY WARRANTY; without even the implied warranty of
// MERCHANTABILITY or FITNESS FOR A PARTICULAR PURPOSE.  See the GNU
// Lesser General Public License for more details.
//
// You should have received a copy of the GNU Lesser General Public
// License along with this library; if not, write to the Free Software
// Foundation, Inc., 51 Franklin Street, Fifth Floor, Boston, MA  02110-1301  USA
// </copyright>
Having this license is great in itself; however it will be quite boring to add it manually in each file we create. In order to automate it, we will create a Visual Studio template. This will help you to have consistent file headers during your project at a minimal cost. To begin with, we will create a new library project, and modify
Class1.csby adding the previous LGPL header we made. Now, we have to modify the line of the summary section to comply with our project description; then we will modify the first copyright lines to enable visual studio to change text automatically. The first two lines of the copyright section have to be changed like this:// <copyright file="$safeitemname$.cs" company="$registeredorganization$"> // Copyright (C) $year$ $registeredorganization$
In this code, we just introduce some Visual Studio template parameters:
safeitemname: This is the name you provide when you add a new item to your project.year: This is the year you added the file.registeredorganization: This is the name of the company you provided during your Windows installation. It can be found in the registry under theHKLM\Software\Microsoft\Windows NT\CurrentVersion\RegisteredOrganizationkey.
Now that we have our model for the template ready, we have to export it.
Click on the File menu and select Export Template.
Select the
Class1.csitem, and then click onNext.Add the default assemblies you want to include in the template, and then click on Next.
Modify the template name and template description to suit your taste and click on Finish.

The template is now available in the My templates section when you create a new file.
In this recipe, we see a way to include your own licensing section in headers. If your needs are not so specific that they include a particular license, you can have a look at this site http://vstemplates.codeplex.com/, which provides some basic templates for visual studio compatible with StyleCop.
In the following paragraph we will see two others topics meant to help you manage the headers of your code files.
While templates are ideal for new files, you might need to apply your templates to old work. Visual Studio provides numerous ways to do so. You can at least rely on snippets or macro.
Snippets are quite easy to create. They are in fact a simple XML file with a piece of code containing parameters. Let's create it for the LGPL license:
<?xml version="1.0" encoding="utf-8"?>
<CodeSnippets xmlns="http://schemas.microsoft.com/VisualStudio/2005/CodeSnippet">
  <CodeSnippet Format="1.0.0">
    <Header>
      <Title>Add LGPL License</Title>
      <Author>Franck LEVEQUE</Author>
      <Description>Add LGPL License to a file</Description>
      <Shortcut>copyright</Shortcut>
    </Header>
    <Snippet>
      <Declarations>
        <Literal Editable="true">
          <ID>Description</ID>
          <ToolTip>Insert here your project description </ToolTip>
          <Default>Project description</Default>
        </Literal>
        <Literal Editable="true">
          <ID>ClassName</ID>
          <Default>ClassNamePlaceHolder</Default>
        </Literal>
        <Literal Editable="true">
          <ID>Company</ID>
          <Default>Company</Default>
        </Literal>
        <Literal Editable="true">
          <ID>year</ID>
          <Default>Year</Default>
        </Literal>
      </Declarations>
      <Code Language="csharp" Kind="" Delimiter="$"><![CDATA[// <summary>
// $Description$
// </summary>
// <copyright file="$ClassName$.cs" company="$Company$">
// Copyright (C) $year$ $Company$
//
// This library is free software; you can redistribute it and/or
// modify it under the terms of the GNU Lesser General Public
// License as published by the Free Software Foundation; either
// version 2.1 of the License, or (at your option) any later version.
//
// This library is distributed in the hope that it will be useful,
// but WITHOUT ANY WARRANTY; without even the implied warranty of
// MERCHANTABILITY or FITNESS FOR A PARTICULAR PURPOSE.  See the GNU
// Lesser General Public License for more details.
//
// You should have received a copy of the GNU Lesser General Public
// License along with this library; if not, write to the Free Software
// Foundation, Inc., 51 Franklin Street, Fifth Floor, Boston, MA  02110-1301  USA
// </copyright>]]></Code>
    </Snippet>
  </CodeSnippet>
</CodeSnippets>
The first part of the snippet named Header describes what will be displayed in the snippet menu; I added a Shortcut element to be able to use it by typing copyright followed by two tabulations. The two really important sections are the Declarations section and the Code section. As you can see the Code section is simply the code of the LGPL we created in the first part. We just replaced each variable name with a parameter name surrounded by $. The Declarations section contains a definition of all the parameters you use in your snippet code. Each Literal element contains an Editable attribute specifying that you can edit the parameter, an ID element that is the variable name surrounded by $ in the code and a default value.
Your snippets usable in C# are generally located in Documents\Visual Studio 2008\Code Snippets\Visual C#\My Code Snippets.
Note
To edit snippets more easily, you can use Snippet Editor. It can be downloaded at http://snippeteditor.codeplex.com/.
StyleCop can enforce a specific company name and a copyright text in the copyright section. This might be useful if you want to be sure all the files of your project have the same copyright information. To do so, you need to go in the StyleCop settings in the Company Information tab.
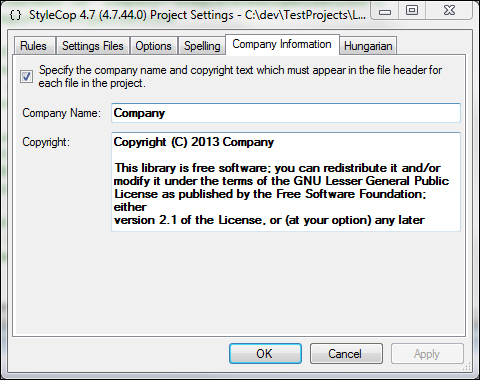
The Company Name field corresponds to the company attribute of your copyright tag, whereas the Copyright field refers to the content of the copyright tag.
In this recipe, we will see how to create our own custom rules for the StyleCop engine. We will also see how to add parameters to this rule.
In the early days of StyleCop, lots of the rules chosen by Microsoft were criticized. One of them was the fact that the developer couldn't add an underscore at the beginning of their private instance fields. In this recipe, we will take this rule as an example and try to implement it at the beginning of non public instance fields.
Note
This rule directly conflicts with the following StyleCop rules:
SA1306: Variable names and private field names must start with a lower-case letter
SA1309: Field names must not start with an underscore.
You will have to disable them, if you want to use the rule.
To create our custom rule, the first thing we must do is create a new Class Library project in Visual Studio. Then, we need to add the following reference to our project:
StylecopStylecop.CSharp
Both libraries are located in the installation directory of StyleCop.
The rules need to be implemented in a code analyzer. Each analyzer is composed of two files:
A file containing the class that will discover your rules violations
An XML file containing the rules description
Let's begin with the XML file. This file should have the same name as your analyzer class. Its purpose is to describe the analyzer category, describe the rules it contains, and prepare the parameters you might need in your rules. Let's have look at the file contained in our custom rule:
<?xml version="1.0" encoding="utf-8" ?>
<SourceAnalyzer Name="NamingExtension">
  <Description>
    Naming rules extending Stylecop.
  </Description>
  <Properties>
    <BooleanProperty
      Name="UseTokenAnalysis"
      DefaultValue="true"
      FriendlyName="Token Analysis"
      Description="Indicates whether the analyzer of document will the token analysis or the visitor pattern analysis."
      DisplaySettings="true"/>
  </Properties>
  <Rules>
    <Rule Name="NonPublicFieldsMustBeginBy" CheckId="NE1001">
      <Context>Instance fields should be prefixed.</Context>
      <Description>Instance fields should be prefixed to allow a better visibility of non public fields.</Description>
    </Rule>
  </Rules>
</SourceAnalyzer>
The file is composed of three important elements:
The
Descriptionelement is used to define the description that will be displayed to the user for the category.The
Propertiessection is optional, and allows you to define parameters you want to use in the different rules that your analyzer manages. There are four available kinds of properties:BooleanProperty,StringProperty,IntegerProperty, andCollectionProperty. They can be accessed in your code by the analyzer functionGetSetting(Settings, String).The
Rulessection is used to describe all the rules your analyzer will manage.
Next we need to create our analyzer class, which inherits
SourceAnalyzerand definesSourceAnalizerAttribute,specifying which parser this analyzer is for:using System; using System.Linq; using StyleCop; using StyleCop.CSharp; namespace StylecopCustomRule { /// <summary> /// Description of custom rule for stylecop /// </summary> [SourceAnalyzer(typeof (CsParser))] public class NonPublicFieldsMustBeginBy : SourceAnalyzer { public override void AnalyzeDocument(CodeDocument document) { var csDocument = (CsDocument) document; // General settings var generalSettings = (from parser in document.Settings.ParserSettings where parser.AddIn.GetType().Equals(typeof(CsParser)) select parser).Single(); BooleanProperty analyseGeneratedFiles = (BooleanProperty)generalSettings[«AnalyzeGeneratedFiles»]; if (csDocument.RootElement != null && (analyseGeneratedFiles.Value || !csDocument.RootElement.Generated)) { csDocument.WalkDocument(new CodeWalkerElementVisitor<object>(this.VisitElement), null, null); } } private bool VisitElement(CsElement element, CsElement parentElement, object context) { if (element.ElementType == ElementType.Field && element.ActualAccess != AccessModifierType.Public && element.ActualAccess != AccessModifierType.Internal && !element.Declaration.Name.StartsWith("_")) { this.AddViolation(element, "NonPublicFieldsMustBeginBy", new object[0]); } return true; } } }
The main entry point is the AnalyzeDocument function; this is where the document will be analyzed to see if it contains any broken rules. We have two options. Either we use the visitor pattern provided by StyleCop, and in this case we have to define code walkers for the type of construction we want to check (there are four walkers available: CodeWalkerElementVisitor, CodeWalkerStatementVisitor, CodeWalkerExpressionVisitor, and CodeWalkerQueryClauseVisitor), or you can directly access the token list and check them directly. The second approach is a little trickier as upper constructions are made of one or more tokens. To use it in our example, we just have to replace the call to the visitor function by a LINQ request selecting the tokens in violation of your rule. For our sample, it will look as follows:
if (csDocument.RootElement != null && (analyseGeneratedFiles.Value || !csDocument.RootElement.Generated))
{
   Array.ForEach(
       (from token in csDocument.Tokens
        let element = token.FindParentElement()
        where token.CsTokenClass == CsTokenClass.Token &&
        token.CsTokenType == CsTokenType.Other &&
        element.ElementType == ElementType.Field &&
        element.ActualAccess != AccessModifierType.Public &&
        element.ActualAccess != AccessModifierType.Internal &&
        !token.Text.StartsWith("_")
        select element).ToArray(),
        a => this.AddViolation(
        a,
        "NonPublicFieldsMustBeginByUnderscore",
        new object[0]));
}
As you can see, both ways of enforcing our rule look quite similar as we need the parent element of tokens to check easily if the token is a field and if it respects the rule. To exclude tokens of the element construct I had to add further restrictions based on the token class and token type.
When you report your violations you have to be careful of the name of the violation as any reference to an unknown rule in the XML file will just discard the violation.
In this recipe, we have seen how to implement a rule. However, you have to keep in mind that the analyzer is designed to allow you to create a set of rules, not just one. We have also seen that the central method of the analyzer is the AnalyzeDocument function; this is where you have to analyze the rule violations and report them. We also quickly see how to set some properties and use them.
However, custom tasks is a huge topic. In addition, you can customize the StyleCop setting, unit test your rules, and much more.
Defining your properties in the XML file of the analyzer doesn't display them in the StyleCop settings UI. Only BooleanProperty can be shown directly using the DisplaySettings element as shown in the following screenshot:

All other properties require a custom UI. This is achieved by providing UserControl implementing Stylecop.IPropertyControlPage.
A really great tutorial is provided in the Adding a Custom StyleCop Settings Page section of the StyleCop SDK.
Unit testing your rules is really important and can be achieved quite easily. To do so, we have to rely to the integration API provided by the StyleCop team. In this recipe code, I have made a project to unit test my rule using NUnit 2.6.2.
As it was only one rule, I didn't abstract the StyleCop integration in a base class, but this should be done as all your rules will depend on the same code implementation.
I also use test files that I placed in the TestFiles directory.
In this recipe, we will see how to embed StyleCop with your own tools. As an example, we will create a real-time analysis add-in for MonoDevelop/Xamarin Studio.
For this recipe, you will need to have:
StyleCop 4.7 installed
Xamarin Studio 4.0 or MonoDevelop 4.0
Note
MonoDevelop add-ins are library projects composed of two mandatory components:
An addin.xml file describing the add-in, its dependencies, and the dll files to load at runtime and the code of your add-in.
We will create an add-in with an executable command in the tool menu to activate or deactivate the real-time analysis.
Let's go to the part related to the StyleCop analysis itself; for this I will heavily rely on the code provided with this recipe:
We first initialize a StyleCop console in our command handler constructor (
RealTimeEgine.csline 85-87):this.console = new StyleCopConsole(null, true, null, null, true); this.console.OutputGenerated += this.OnOutputGenerated; this.console.ViolationEncountered += this.OnViolationEncountered;
The
StyleCopConsoleclass is the main entry point of the StyleCop analysis system, and it is able to run the analysis and report the violations found.We currently use default settings, but the arguments passed to the engine are really important if you want to embed specific settings or rule analyses.
The five constructor parameters are:
The first argument is the path to the settings you want to load. If it is set to null value, then it uses the default project settings files.
The second argument indicates whether we want to write results cache files or not.
The third argument is the path of the output file we want to write in.
The fourth argument is a list of paths to search for parser and analyzer add-ins. It can be set to null if no add-ins are provided.
The last argument indicates whether we want to load add-ins from the default path where the core binary is located.
After the initialization of our console, we indicate callbacks for its output and the violations encountered.
Now let's see the execution code itself (
RealTimeEgine.csline 166-180):Configuration configuration = new Configuration(new string[0]); List<CodeProject> projects = new List<CodeProject>(); CodeProject project = new CodeProject(IdeApp.ProjectOperations.CurrentSelectedProject.BaseDirectory.GetHashCode(),IdeApp.ProjectOperations.CurrentSelectedProject.BaseDirectory, configuration); // Add each source file to this project. this.console.Core.Environment.AddSourceCode(project, tmpFileName, null); projects.Add(project); this.console.Start(projects, false);
To execute the analysis, we have to define a Configuration object, this is used to allow StyleCop to analyze preprocessor regions (for example, if you want to analyze regions marked by a #if DEBUG, you should add the DEBUG string in this object).
After that, we configure our project itself; it's the common unit under which we analyze a subset of files. It takes an ID, a base path, and a configuration.
Then we add each source file related to the project, in our case it is a temporary file made of the content of the file currently being edited.
Finally, we start the console process. The callbacks we set up at the beginning will transmit the violations and the process message to the host.
The add-in is plugged to two events of the MonoDevelop apps:
ActiveDocumentChanged: This event is called when the active document is "replaced" by another one.DocumentParsed: This event is called once the document has been correctly parsed by MonoDevelop. It is run after almost every modification in the text editor.
Following is the sequence diagram of the add-in:

You should have a look at the full source code to understand how the add-in really works.
The current add-in is just the beginning. It currently contains some drawbacks (first launch of StyleCop) and can be improved in many ways. Here some of them:
The add-in is currently not configurable. While this is not really important if you use the default parameters of StyleCop and don't have any custom rules, it will be mandatory for a finished product. It could at least define a way to add StyleCop settings and a path to check for custom rules.
One of the most significant drawback of the current implementation is that the UI freezes for one to two seconds during the first launch of the StyleCop analysis. To prevent this, we should put the StyleCop analysis in a separate thread to let the user interact with the interface during the analysis.
