


 Download code from GitHub
Chapter 1: Getting Started with Clean Architecture
In this chapter, we'll take you back and show you how a feature would have been implemented in the past while analyzing the potential issues and problems with that approach. Then, we'll look at some key design principles for software development and apply those principles to our legacy examples. After that, we'll cover the evolution of the Android platform and the various libraries and frameworks that have emerged. We'll also see how they can be integrated while adhering to various software design principles.
After that, we'll introduce clean architecture so that we know what our system needs to be improved and what questions we must ask, as developers, so that we can create a robust, scalable, maintainable, and testable application.
In this chapter, we're going to cover the following main topics:
- The architecture of a legacy app
- Software design principles
- Exploring the evolution of Android
- Enter clean architecture
By the end of this chapter, you will know about the evolution of Android development, its architecture, and its design concepts, as well as the concept of clean architecture and how it can be used to build flexible, maintainable, and testable applications.
Technical requirements
For this chapter, you will need Android Studio Arctic Fox 2020.3.1 Patch 3.
The following are the hardware requirements for this chapter:
- Windows:
- 64-bit Microsoft® Windows® 8/10
- x86_64 CPU architecture; 2nd generation Intel Core or newer, or an AMD CPU with support for a Windows Hypervisor
- 8 GB of RAM or more
- 8 GB of available disk space minimum (IDE + Android SDK + Android Emulator)
- 1,280 x 800 minimum screen resolution
- Mac:
- macOS® 10.14 (Mojave) or higher
- ARM-based chips, or 2nd generation Intel Core or newer with support for Hypervisor.Framework
- 8 GB of RAM or more
- 8 GB of available disk space minimum (IDE + Android SDK + Android Emulator)
- 1,280 x 800 minimum screen resolution
- Linux:
- Any 64-bit Linux distribution that supports Gnome, KDE, or Unity DE; GNU C Library (glibc) 2.31 or later
- x86_64 CPU architecture; 2nd generation Intel Core or newer, or AMD processor with support for AMD Virtualization (AMD-V) and SSSE3
- 8 GB of RAM or more
- 8 GB of available disk space minimum (IDE + Android SDK + Android Emulator)
- 1,280 x 800 minimum screen resolution
The architecture of a legacy app
In this section, we will look at how Android applications used to be built in the past and what difficulties developers had with the approach taken.
Before we start analyzing an older application, we must distinguish the architecture and design of an application. To borrow from the construction industry, we can define architecture as a plan for the structure of a building; a design would be a plan to create each part of the building. Translating this into the world of software engineering, we can say that the architecture of an application or a system would be defining a plan that would incorporate the business and technical requirements, while software design deals with integrating all the components, modules, and frameworks into this plan. In an ideal world, you would want to recognize the architecture of an application in the same way you would recognize the architecture of your house.
Now, let's look at the four main components of an Android application:
- Activities: These represent the entry points for interacting with the user.
- Services: These represent the entry points for having an app run in the background for all kinds of reasons, such as large downloads or audio playback.
- Broadcast Receivers: These allow the system to interact with an application for a variety of reasons.
- Content Providers: These represent a way for an application to manage application data.
Using and relying on these components created a challenge for developers because an app's architecture became dependent on the Android framework, mainly when it came to implementing unit tests. To understand why this is a problem, let's look at an example of what some older application code would look like. Let's suppose you have been asked to fetch some data from a backend service. The data would be served in the form of JSON through an HTTP connection.
It wasn't uncommon to see a class such as BaseRequest.java, which would execute the request and depend on abstraction in the form of JsonMapper.java, to convert the data from a String into a Plain Old Java Object (POJO). The following code represents an example of how fetching the data might be implemented:
public class BaseRequest<O> {
    private final JsonMapper<O> mapper;
    protected BaseRequest(JsonMapper<O> mapper) {
        this.mapper = mapper;
    }
    public O execute() {
        try {
            URL url = new URL("schema://host.com/path");
            HttpURLConnection urlConnection =
                (HttpURLConnection) url.openConnection();
            int code = urlConnection.getResponseCode();
            StringBuilder sb = new StringBuilder();
            BufferedReader rd = new BufferedReader(new
            InputStreamReader(urlConnection.
                getInputStream()));
            String line;
            while ((line = rd.readLine()) != null) {
               sb.append(line);
            }
            return mapper.convert(new JSONObject
                (sb.toString()));
        } catch (Exception e) {
            …
        } finally {
            if (urlConnection != null) {
                urlConnection.disconnect();
            }
        }
        return null;
    }
}
In the execute method, we would use HttpURLConnection to connect to the backend service and retrieve the data. Then, we would read it into a String, which would then be converted into a JSONObject and then passed to JsonMapper to be converted into a POJO.
The JsonMapper.java interface would look something like this:
interface JsonMapper<T> {
    T convert(JSONObject jsonObject) throws JSONException;
}
This interface represents the abstraction of converting a JSONObject into any POJO.
The use of generics allows us to apply this logic to any POJO. In our case, the POJO should look something like ConcreteData.java:
public class ConcreteData {
    private final String field1;
    private final String field2;
    public ConcreteData(String field1, String field2) {
        this.field1 = field1;
        this.field2 = field2;
    }
    public String getField1() {
        return field1;
    }
    public String getField2() {
        return field2;
    }
}
The ConcreteData class will be responsible for holding the data we will receive from the backend service. In this case, we just have two String instance variables.
Now, we need to create a concrete JsonMapper.java that will be responsible for converting a JSONObject into ConcreteData:
public class ConcreteMapper implements JsonMapper<ConcreteData> {
    @Override
    public ConcreteData convert(JSONObject jsonObject) {
        return new ConcreteData(jsonObject.optString
            ("field1"), jsonObject.optString("field2"));
    }
}
The convert method creates a new ConcreteData object, extracts the data from the JSONObject object, and populates the field1 and field2 values.
Next, we must create a ConcreteRequest.java that will extend BaseRequest and use ConcreteMapper:
public class ConcreteRequest extends BaseRequest<ConcreteData> {
    public ConcreteRequest() {
        super(new ConcreteMapper());
    }
}
This class will inherit the execute method from BaseRequest and supply a new ConcreteMapper object so that we can convert the backend data into ConcreteData.
Finally, we can use this in our Activity to execute the request and update our user interface (UI) with the result. Here, we have a limitation: we cannot execute long-running operations on the main (UI) thread and we cannot update our views from any other thread except the UI thread. This means that we would need something to help with this. Luckily, Android provides the AsyncTask class, which offers a set of methods for doing work on a separate thread and then processing the results on the main thread. However, we risk creating a context leak (if, for any reason, the Activity object is destroyed, then the garbage collector will not be able to collect the Activity object while AsyncTask is running since Activity has a dependency on AsyncTask) by using an inner AsyncTask class. To circumvent this, the recommended approach is to create a WeakReference for our Activity. This way, if the Activity object is destroyed either by the user or the system, its reference can be collected by the garbage collector.
Now, let's look at the code for our MainActivity:
public class MainActivity extends Activity {
    private TextView textView;
    @Override
    protected void onCreate(Bundle savedInstanceState) {
        super.onCreate(savedInstanceState);
        setContentView(R.layout.activity_main);
        this.textView = findViewById(R.id.text_view);
        new LoadConcreteDataTask(this).execute();
    }
    private void update(ConcreteData concreteData) {
        textView.setText(concreteData.getField1());
    }
}
This class is responsible for loading the UI and starting LoadConcreteDataTask. The update method will then be called by LoadConcreteDataTask to show the data in the user interface.
LoadConcreteDataTask must be an inner class of MainActivity:
public class MainActivity extends Activity {
    …
    private static class LoadConcreteDataTask extends
        AsyncTask<Void, Void, ConcreteData> {
        private final WeakReference<MainActivity>
            mainActivityWeakReference;
        private LoadConcreteDataTask(MainActivity
           mainActivity) {
            this.mainActivityWeakReference = new
                WeakReference<>(mainActivity);
        }
        @Override
        protected ConcreteData doInBackground(Void...
            voids) {
            return new ConcreteRequest().execute();
        }
        @Override
        protected void onPostExecute(ConcreteData
            concreteData) {
            super.onPostExecute(concreteData);
            MainActivity mainActivity =
                mainActivityWeakReference.get();
            if (mainActivity != null) {
                mainActivity.update(concreteData);
            }
        }
    }
}
In LoadConcreteDataTask, we take advantage of the doInBackground method, which is executed on a separate thread to load our data and then update our UI in the onPostExecute method. We also hold a WeakReference to MainActivity so that it can be safely garbage collected when destroyed. This also means that we will need to check if the reference still exists before updating the user interface.
The class diagram for the preceding code looks as follows:
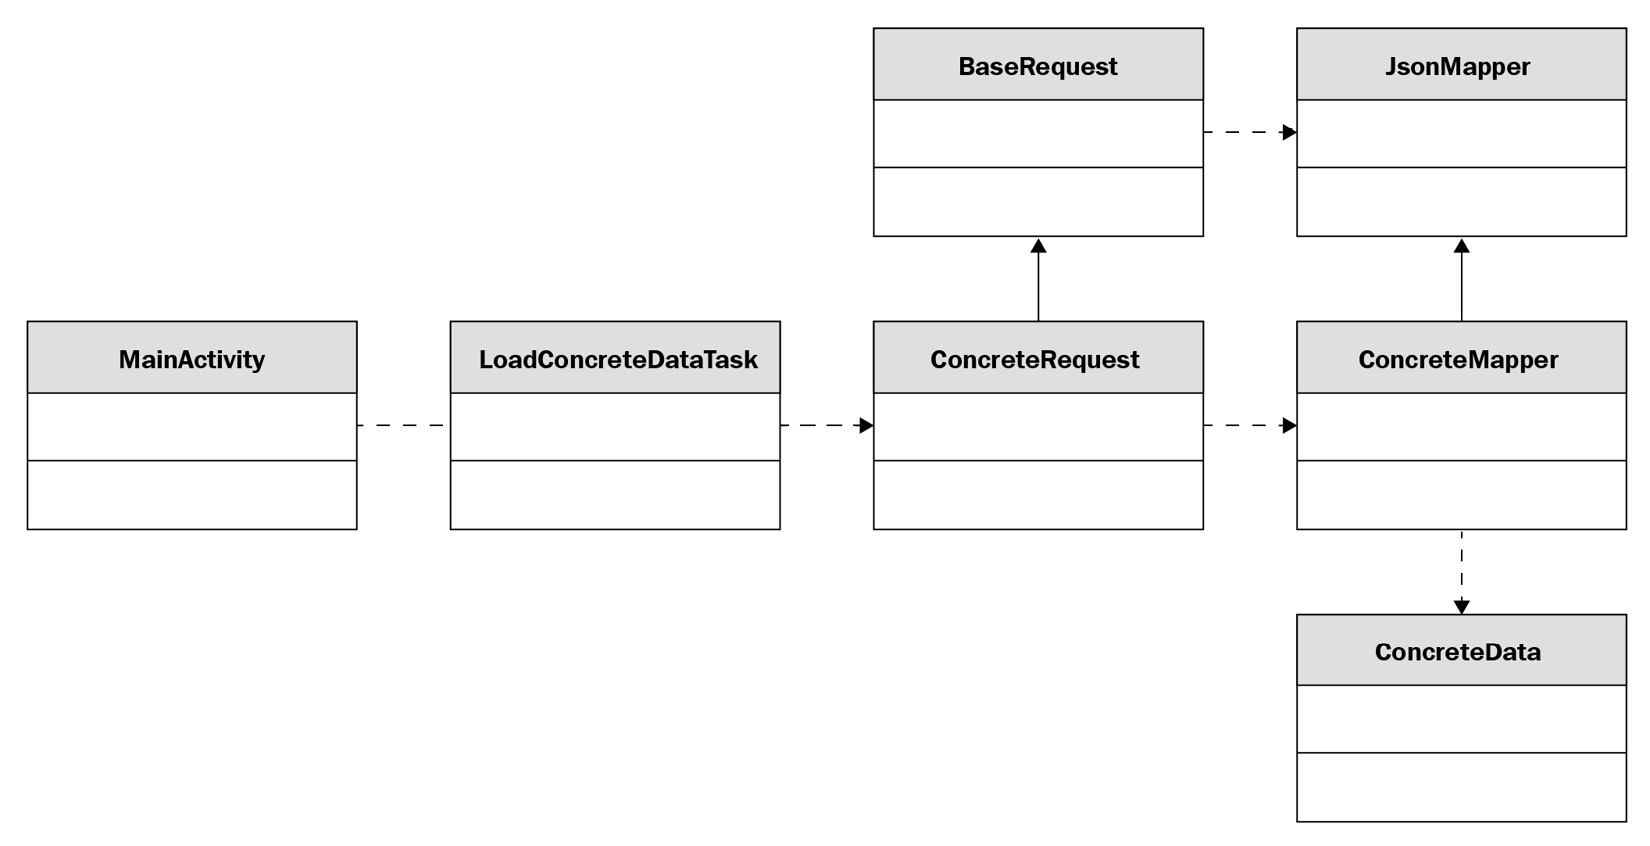
Figure 1.1 – A class diagram for an older Android app
Here, we can see how the dependencies move from MainActivity toward the ConcreteRequest class, with one exception between MainActivity and LoadConcreteDataTask, where both classes depend on each other. This is a problem because the classes are then coupled together and making a change to one implies making a change to the other. Later in this chapter, we will look at some principles that can help us avoid such dependencies.
Now that we have an idea of what a legacy application looks like, let's see what issues we may encounter if we follow this path.
Legacy analysis
In this section, we will analyze some of the problems that legacy applications have.
Let's ask ourselves the following questions:
- What can we unit test?
- What happens if, instead of showing the value of
field1fromConcreteData, we need to showfield1+field2? - What happens when the requirements for this particular screen change and data needs to be retrieved from another endpoint on top of this one?
- What happens if we need to introduce caching or SQLite persistence?
- What happens if another activity needs this particular use case?
Let's answer these questions:
- Answer 1: The answers to all of these questions will come with headaches. The first question is a mix of technical limitations and doubtful design techniques. The technical limitation comes from the fact that the code will execute on the device or an emulator, but we want our unit tests to be executed on our development machines. This is the reason we have the split between the
androidTestandtestdirectories. Theoretically, we can write our unit tests so that they can run on the emulator, but that takes more time and instability. We can now execute these types of tests in the cloud using technologies such as Firebase Test Lab, but that would inevitably cost us money and it's in our interest to avoid taking in such costs. Realistically, we are left with one option and that is to test as much as possible using local unit tests instead of instrumented ones. To solve this, we will need to separate the Android components we use from the Java components. - Answer 2: The second question produces a similar problem. The easiest choice here would be to put that concatenation into
MainActivityor add a method into theConcreteDataclass that will return the concatenated result. But either of these will come with downsides. If we move the concatenation intoMainActivity, we will put logic that can be unit tested into a class that is very hard and shouldn't be unit tested. If we create a method to concatenate inConcreteData, we risk giving responsibility to this class that it shouldn't have since it's related more to the UI than the actual representation of the JSON itself. What if, in the future, the networking aspect is developed by another team? You would need to rely on that particular team to create this update. - Answer 3: The answer to the third question looks straightforward as well. We must create new concrete implementations for the new data to be added and the associated request. Then, we will either create a separate class that will extend
AsyncTaskor execute both requests in the sameLoadConcreteDataclass and then update the UI. If we create a separateAsyncTask, then we will need to make the activity responsible for managing the results and balance the twoAsyncTasks, which again creates a problem concerning testing. If we execute the requests in the sameAsyncTask, then the responsibility ofAsyncTaskincreases, which we may want to avoid. - Answer 4: The fourth question presents us with a new challenge. Let's say we add a new database class that contains all the methods to perform create, read, update, and delete (CRUD) operations. Which one of our classes would have a dependency on this class? The choices here would be between the two request classes and
LoadConcreteDataTask. Here, we run into the same issues that we did in the previous questions. If we used the request classes, we would end up being more responsible for dealing with HTTP connections than handling calls to the database. If we useLoadConcreteDataTask, we make the answer to the fifth question even harder. - Answer 5: Based on the previous answers, we notice that a lot of work may end up being moved to the
LoadConcreteDataTaskclass. Now, let's imagine that another activity with a completely different UI and a different interpretation of that data will rely on the same use case. One solution is to duplicateLoadConcreteDataTaskinto the new activity. This is not a great idea because a change in the requirements will make the developers change all the tasks. A better approach would be to create a new abstraction that will remove the dependency betweenLoadConcreteDataTaskandActivity. This would allow us to reuse the same class for both activities. Let's say that the activities would need different types of data for each interpretation. Here, we could follow theJsonMapperexample and create an interface that would convertConcreteDatainto a generic type, provide two implementations for each activity, and create the necessary POJOs to convert into.
Another question that can be asked here is, "What amount of work would be necessary to export the business logic into another project?" This is an important question because it highlights how we should structure our code so that it can be reused by others without making it a pain for them to integrate. If we were to answer this, we must first ask, "Where's the business logic?" The answer would probably be LoadConcreteDataTask. Can we export that and publish it somewhere where other developers can get it?
The answer is no, because of its dependency on MainActivity. This question highlights an important aspect of defining an architecture, namely drawing the boundaries around your components. A component can be defined as the smallest piece of deliverable code. In our case, it would be the equivalent of a module. Now, let's say we were in a place where we could ship out our LoadConcreteDataTask. A follow-up question would be, "Would the data be hosted on the same service?" followed by, "Is it in the same JSON format?" Here, we would need to draw a boundary between LoadConcreteDataTask and BaseRequest and remove such dependencies on how the data is retrieved.
The reason these questions were raised and answered is that all those scenarios have happened in the past and they will all likely happen in the life cycle of an application. We, as developers, tend to answer those questions in our code differently based either on time constraints, the rigor imposed on the team we work in, our ambition to deliver something fast by constantly challenging ourselves, and our experience or the team's experience. The fact that we had the option to make a less desirable solution or to be stuck in a situation where we had to pick between the frying pan or the fire represents a problem. Sometimes, it is good to take a step back from our daily routine, ask ourselves some of these questions, do mind experiments to see how our code may end up in those scenarios, and assess what would happen if that would happen now or 1 or 2 years from now.
A common scenario a lot of Android developers found themselves in was having a lack of businesses investing in testing because it would take too much time and there was a need to go to market. In many of these cases, the apps became harder to maintain over time, so more developers needed to be hired to keep the same productivity as a team compared to when they had fewer developers. When code is written with the notion that it needs to be unit tested, then the way we write that code becomes more rigorous and more maintainable. We start keeping track of how we create instances and separate the things we can test from the things we can't, we apply creational design patterns, and we also shorten the sizes of the methods in our classes, among other things.
We now have an idea of how applications used to be written in the past and the problems that were caused by the approaches that were taken, such as issues with the testability and maintainability of an application due to dependencies on the Android framework. Next, we will look at some design principles that will prove useful in how we write an application.
Software design principles
In this section, we will analyze a set of design principles that are adopted by developers worldwide to improve their systems and can also be applied to Android development. We will mainly focus on the principles defined by Robert C Martin (also known as Uncle Bob) for classes and components because they are well suited to Android development.
Based on the examples in the previous section, we understand that our code bases should be maintainable, understandable, and flexible. There is a set of software design principles that we can turn to for help when we develop classes or components. Think of a component as the minimum amount of code that can be released as part of a system. In Android, you can view them as individual modules. They don't necessarily need to be modules, but they can be organized as if they are.
SOLID principles
These are some of the most known design principles. The name is an acronym for a set of design principles that were collected by Robert C Martin. These principles are as follows:
- Single responsibility principle
- Open-closed principle
- Liskov substitution principle
- Interface segregation principle
- Dependency inversion principle
Let's look at these principles in detail:
- Single Responsibility Principle: This states that a class should have one responsibility or one reason to change. Looking at our example, let's suppose someone makes a change to the
BaseRequestclass to change how the HTTP request is executed. Let's assume that we now have two different AsyncTasks that will load the data. Both of these will be impacted by the change in theBaseRequestclass. A solution would be to delegate the execution of the request to different classes for each particular use case. This would also allow developers to work on different features related to backend communication without changing the same source file. - Open-Closed Principle: This states that a class should be open for extension and closed for modification. Thinking back to our example, this principle would answer the question, "What would happen if an activity requires this particular use case?" The abstractions we discussed in how to answer that question would serve as a good example of implementing this principle.
- Liskov Substitution Principle: This states that a parent class should be replaced by a child class without changing the behavior of the system. An example of this principle is if you have a class called
Birdand a sub-class calledDuck. If you are using references ofBirdin your code and substitute those usages withDuck, then your code should remain unchanged. A famous example of a violation of this principle is having aRectangleclass with two members namedwidthandheightand a sub-class namedSquare. In reality, a square is a rectangle, but our modeling of a square wouldn't be a rectangle because the rules inSquarewould mean that the width and height will always have to be the same. If you were to swap these two dependencies, then your code would break. - Interface Segregation Principle: This states that we should avoid using large interfaces and instead break them up into smaller interfaces. The idea here is that code shouldn't depend on methods it doesn't use. An example of this is defining interfaces whose methods don't need to be implemented. A good example of this is the approach that's taken in Android user interfaces by separating
OnClickListener,OnLongClickListener, andOnTouchListener. - Dependency Inversion Principle: This states that we should depend on abstractions rather than concretions. The idea here is to depend as much as possible on abstract classes and interfaces. This can be very difficult to achieve considering that we rely on concretions a lot of the time. Here, we should identify parts of the code that are constantly developed and subject to change and introduce layers of abstractions between our code and these classes. A good way to protect against this is through dependency injection frameworks such as Dagger and Hilt, which generate factories to create volatile components.
SOLID principles are used across the object-oriented programming (OOP) field to create applications that are flexible and able to incorporate new features and requirements. The principles that follow represent an expansion of SOLID.
Component cohesion principles
We can define cohesion by how well the classes in a component belong together or what classes belong in a certain component. In the past, components were assembled based on the context without any particular guiding principle. This would cause issues such as a change in the dependencies of a component triggering a change in the dependants of this component, without this having any relevance to the dependants.
The three principles are as follows:
- Reuse/Release Equivalence Principle (REP): This states that we group classes in a component that can be released together. In Android development, this would translate to making sure that every module you create should be able to be published and used by other developers.
- Common Closure Principle (CCP): This states that components should have one reason to change. This principle is an application of the single responsibility principle for components.
- Common Reuse Principle (CRP): This states that a component should only have classes that should be used together. This represents the interface segregation principle for your component. In Android, this would mean that you should make sure that the users of your Android modules depend on all your classes in the module, not just some.
When these principles are incorporated, they end up conflicting with each other. REP and CCP tend to make components bigger, while CRP tends to make them smaller. The idea is to always match the current requirements of the application and find the middle ground between these principles. After that, you should constantly monitor how new requirements would affect this middle ground.
Now that we've seen how SOLID can be applied to building a particular component through the component cohesion principles, let's learn how to manage a set of components.
Component coupling principles
These principles deal with how to manage the relationships between our components in an Android application. In Android, this would be represented by how to manage the Gradle dependencies between different modules. The principles are as follows:
- Acyclic Dependencies Principle: This states that we should avoid cyclic dependencies between components. Applying this to Android would mean that the dependencies that our modules have most not be cyclical (for example, module A depends on module B, which depends on module A). Fortunately, this rule is currently enforced by the build system, which doesn't allow cyclical dependencies. A solution to this would be to create a new module in which we apply the dependency inversion principle and make one of the modules depend on the abstraction and create the implementation in the second module. If this is not possible, we can create a new module that can depend on both existing modules. An example of this can be seen in the following diagram:

Figure 1.2 – Cyclic module dependency
- Stable Dependencies Principle: This states that less stable modules should depend on more stable modules. A component's stability is defined as the ratio between outgoing dependencies (dependency on other components) and the total number of dependencies. The closer the number is to 0, the more stable a component becomes. This means that stable components should avoid having changes made because this will cause potential issues for the components that depend on the stable ones. One solution to avoid the dependencies between stable components and volatile components would be using abstract components. These are components that will contain nothing but abstractions.
- Stable Abstractions Principle: This states that components that are likely to change should be more concrete and that stable components should be more abstract. This principle represents an application of the open-closed principle. We would want our high-level architecture decisions to be flexible enough to be changed without having to modify existing source code. We can achieve this using abstract classes. The abstractness of a component is defined as the ratio between the number of abstract classes and interfaces inside a component and the total number of classes in the component. The closer to 1 the value gets, the more abstract the component becomes. A component with 0 stability and 0 abstractness represents a zone of pain because it is very hard to change. A component with 1 stability and 1 abstractness is called a zone of uselessness because we have an independent component with no implementations. The aim is to get as many components as possible in either the 0 stability and 1 abstractness or 1 stability and 0 abstractness range.
With that, we have looked at some of the key design principles that should help us tackle problems that we face while developing an application. The SOLID principles show us how we should structure our code into classes, while the component cohesion principles and component coupling principles show us how we should structure our classes into separate modules, as well as how we should establish the relationships between those modules. In the next section, we will see how these principles lead to the evolution of the Android platform and what an application may look like now.
Exploring the evolution of Android
In this section, we will look at key releases and changes that have been made to the Android framework and supporting libraries that have shaped the development of applications and how applications have evolved because of these changes.
We started by looking at an example of what the code in an older Android application looked like before looking at the design principles we should incorporate into our work. Now, let's see how the Android framework evolved and how some of our questions from the beginning have been answered. We will analyze some of the newer libraries, frameworks, and technologies that we can incorporate into an Android application.
Fragments
The introduction of fragments was meant to solve important issues developers were facing – that is, the activity code would become too big and hard to manage. They were released on Android Honeycomb, which was an Android release that only targeted tablets. The introduction of fragments was also meant to solve the issue of having different displays for activities in landscape versus activities in portrait. Fragments are meant to control portions of an activity's user interface.
Another improvement fragments brought was the ability to change and replace fragments at runtime. There was even a separate back stack for Fragments that the activity would be responsible for. This comes at a couple of costs: the life cycle of the fragment was even more complex than the life cycle of the activity, where you would have fragments that had their views destroyed but the fragments themselves weren't. Another cost was the communication between two fragments. If you needed to update the user interface being handled by Fragment1 because of a change in Fragment2, you would need to communicate through the activity. This meant that every time a Fragment needed to be reused by a different activity, then the activity would be forced to adapt to this:

Figure 1.3 – Activity and fragment life cycle
In the preceding figure, we can see the difference between the lifecycle of activities and the lifecycle of fragments. We can observe how fragments have their own internal lifecycle for managing the views that they display between the onCreateView method and onDestroyView methods. This is often the reason why in many applications, you will see these methods used to load data and on the opposite site unsubscribing from any operations that might trigger a change in the user interface.
The Gradle build system
Initially, Android development used the Eclipse IDE and Ant as its build system. This came with certain limitations for applications. Things such as flavors were not available at the time. The release of Android Studio, along with the Gradle build system, provided new opportunities and features. This allows us to write extra scripts and easily integrate plugins and tools, such as performance monitoring of an application, Google Play services, Firebase Crashlytics, and more. This is often done through ".gradle" files. These files are written in a language called Groovy. Another improvement that was added was the usage of the ".gradle.kts" extensions, where we can provide the same configurations using the Kotlin language. The following code shows what the build.gradle file for a module looks like:
plugins {
    id 'com.android.application'
}
android {
    compileSdk 31
    defaultConfig {
        minSdk 21
        targetSdk 31
        versionCode 1
        versionName "1.0"
    }
    buildTypes {
        release {
        }
    }
    compileOptions {
    }
}
dependencies {
    implementation ""
}
In the plugins section, we can define external plugins that will provide certain methods and scripts that our project can use. Examples include annotation processing plugins, the Parcelize plugin, and Room plugins. In this case, the com.android.application plugin offers us the android configuration, which we can then use to specify the app version, what Android versions we want the app to be accessible from, various compilation options, and configurations for how the app should be built for the end user. In the dependencies section, we specify which external libraries we want to add to the project.
Networking
Quite a few popular networking libraries have emerged, mainly in the open sourcing community. A large proportion of the applications in Google Play rely on HTTP communication and a large proportion of them use JSON data. With the addition of networking libraries, JSON serialization/deserialization to POJOs also became adopted. What this means for developers is that the communication with the backend is simplified – we no longer need to concern ourselves with how the actual communication is done; we only point to where we want the data from and provide the models that are required for this communication. The libraries will take care of the rest. Some of the most popular libraries include Volley and Retrofit. In terms of object serialization, we have libraries such as Moshi and GSON.
Humble objects
Because activities and fragments are difficult to unit test, the code inside them needed to be split into testable sections and untestable sections. Because of this necessity, two patterns emerged: Model View Presenter (MVP) and Model View ViewModel (MVVM). Sometimes, these patterns are referred to as architecture patterns. This shouldn't be confused with the entire architecture of the app. The idea is to turn activities and fragments into humble objects with no logic, keep the references to the user interface objects, and shift the logic into the presenter and ViewModel, which we can write unit tests for. We will focus more on the particularities of each in Chapter 8, Implementing an MVVM Architecture.
Functional paradigms
Just like objected-oriented languages have adopted paradigms from functional programming, so has the Android development world in the form of RxJava. Functional programming works on the premise that programs are built from composing functions rather than imperative statements such as the ones in Java. RxJava is a library that allows developers to implement event-driven applications. It offers observables (for emitting data) and subscribers (for subscribing to that data). What made this library appealing to developers was how it deals with threading. Let's assume you wanted an operation to be executed on a separate thread, and then you wanted to transform your data – all you need to do here is invoke the data you want, apply mapping functions, and then subscribe to get the final result. The added benefit is that you can chain different operations, have them processed, and get the result with all of the operations. All of this removes the need for creating and managing different AsyncTasks or threads.
Kotlin adoption
RxJava introduced some aspects of functional programming. Its adoption and transition into Kotlin programming has added others. One of the most important is the concept of mutability. In Java, all variables are mutable unless they're declared otherwise through the final keyword. In Kotlin, all the variables must have their mutability declared. Why is this important? Because of multi-threading. If you had an application where multiple threads were executed at the same time and they all interacted with the same object, you would end up in a situation where you would either modify the same value at the same time or create deadlocks in which a thread would wait for another thread to release a resource, but the second thread would need access to a resource that the first thread is currently holding. This introduction helps developers aim for a greater degree of immutability, which would increase thread safety because immutable variables are thread-safe. Lambdas represent another great feature of Kotlin that allows boilerplate code to be reduced when you're dealing with callbacks. Other benefits of the adoption of Kotlin include that you can remove boilerplate code by introducing data classes, which represent POJOs, and introducing sealed classes, which allow developers to define enum-like structures that can carry data.
Dependency injection
Dependency injection represents the decoupling of object invocation and object creation. Why is this important? Mainly because of testing. It's easier to write unit tests for classes that have their dependencies injected rather than adding extra responsibilities, such as creating new instances for all of the dependencies in that class. Another benefit is in situations where we depend on abstractions. If we have a dependency on an abstraction, we can easily switch between different implementations, depending on different circumstances. Several libraries have emerged to tackle this issue: Dagger, Koin, and Hilt. Dagger is more of a general library that is not only Android applicable, but also applicable for other Java-based platforms. It aims to manage our dependencies using components and modules. Components are responsible for how the dependencies are managed, while modules are responsible for providing the appropriate dependencies. It relies on annotation processors, which generate the necessary code that will be responsible for managing our dependencies. Koin is what's referred to as a service locator library. It keeps a collection of all the dependencies and when a particular dependency is required, it will look it up and provide it. Koin is an Android-specific library, and it provides support for injecting specific Android dependencies. Hilt is the newest of these libraries and it is built on top of Dagger. It removes the boilerplate code that was required for Dagger and provides support for Android dependencies as well.
Android architecture components
This is represented by a set of libraries that help developers make their apps scalable, testable, and maintainable. These libraries affect components that deal with activity and fragment life cycles, persisting data, background work, and UIs. Here, we have seen the introduction of concepts such as life cycle owners (such as activities and fragments), the Android ViewModel, and LiveData. These are meant to solve problems developers had with managing the state of a life cycle owner when it's destroyed and recreated by the system. It puts the logic that, in the past, was handled by the life cycle owners and delegated to the Android ViewModel. The combination of the Android ViewModel and LiveData has helped developers implement the MVVM pattern, which is also life cycle aware. This means that developers no longer have to concern themselves with stopping a background task when the life cycle owner is destroyed.
The introduction of Room means that developers no longer have to deal with interacting with the SQLite framework, which caused a lot of boilerplate code to be written to define tables and various queries. Developers no longer need to deal with the SQLite interaction and the many dependencies that come with it; instead, they can focus on creating their own models and providing the abstractions for what needs to be queried, deleted, updated, and deleted; Room will take care of the actual implementations. DataStore does for SharedPreferences what Room does for SQLite. This is for when we want to store data in key-value pairs instead of using an entire table. DataStore provides two options for storing data: safely typed data and no type safety data.
With the addition of these new persistence libraries, the Repository pattern was adopted. The idea behind this pattern is to create a class that will interact with all the data sources we have in our application. As an example, let's imagine we have some data we will need to fetch from our backend that will then need to be stored locally in case we want the user to view it offline. Our repository would be responsible for fetching the data from the network class and then storing it using the persistence class. The repository would sit in between the local and remote classes and the classes that would want access to that data.
Regarding the UI, we now have access to view binding and data binding. Both of these deal with how activities and fragments deal with the views that are declared in our XML layout files. View binding generates references for each view we defined in our XML. This solves an issue that developers would have in the past where a view would be deleted from your XML file, but your application would still run because of another view with the same name in another file. This would cause crashes in the past because the findViewById function would return null. With view binding, we know at compile time what views we have in our hierarchy and what views we don't. Data binding allows us to bind our views to data sources. For example, we can bind a TextView in our XML file directly to a field in our source code. This approach tends to work well with the MVVM pattern, in which the ViewModel updates certain fields that are bound by views in our XML. This would update what the view would display without it interacting with the activity.
Coroutines and flows
Coroutines came as a feature of the Kotlin language. The idea behind coroutines is to execute data asynchronously in a very simplified manner. We no longer have to create threads or AsyncTasks (which have been deprecated) and manage concurrency because it's managed under the hood. Other features include that it's not bound to a particular thread, and it can be suspended and resumed. Flows represent an extension of coroutines where we can have multiple emissions of data, such as RxJava, providing similar benefits.
Jetpack Compose
This allows developers to build UIs directly in Kotlin without the use of XML files through composable functions. This removes the amount of code that needs to be written for building your UI. Compatibility with the other Android architecture component libraries is provided, allowing for easier integration into your application. The following is an example of what Compose looks like:
class MainActivity : ComponentActivity() {
    override fun onCreate(savedInstanceState: Bundle?) {
        super.onCreate(savedInstanceState)
        setContent {
            ExampleTheme {
                Surface {
                    ExampleScreen()
                }
            }
        }
    }
}
@Composable
fun ExampleScreen() {
    Column(modifier = Modifier.padding(16.dp)) {
        TextField(
            value = "",
            onValueChange = {
                // Handle text change
            },
            label = { Text("Input") }
        )
        Text(text = "Example text")
        Button(onClick = {
            // Handle button click
        }) {
            Text(text = "Button")
        }
    }
}
In this example, we can see a screen that contains an input field, some text that displays Example Text, and a button with the text Button. The layout of the screen is defined as a function annotated with the @Compose annotation. This content is then set in an activity through the setContent method, where a theme is provided. We will expand on how Jetpack Compose works later in this book.
Now, let's look at what our example code from the The architecture of a legacy app section will look like after we transition it through some of the aforementioned Android frameworks and updates. All our code will now be migrated to Kotlin. We will be using libraries such as Retrofit and Moshi for networking and JSON serialization and Hilt for dependency injection, as well as ViewModel, LiveData, and Compose for the UI layer. We will discuss how these libraries work in the following chapters.
The ConcreteData class will look this:
@JsonClass(generateAdapter = true)
data class ConcreteData(
    @Json(name = "field1") val field1: String,
    @Json(name = "field1") val field2: String
)
The ConcreteData class is now a Kotlin data class and will use the Moshi library for JSON conversion. Next, let's see what our HTTP request will look like when we use something such as Retrofit to handle our HTTP communication:
interface ConcreteDataService {

    @GET("/path")
    suspend fun getConcreteData(): ConcreteData
}
Because we use Retrofit and OkHttp, we only need to define the template for the endpoint we want to connect to and the data we want; the libraries will handle the rest. The suspend keyword will come in handy for Kotlin flows.
Now, let's define a repository class that will be responsible for invoking this HTTP call on a separate thread:
class ConcreteDataRepository @Inject constructor(private val concreteDataService: ConcreteDataService) {

    fun getConcreteData(): Flow<ConcreteData> {
        return flow {
            val fooList = concreteDataService.
                getConcreteData()
            emit(fooList)
        }.flowOn(Dispatchers.IO)
    }
}
ConcreteDataRepository will have a dependency on ConcreteDataService, which it will call to fetch the data. It will be responsible for retrieving the data on a separate thread by using Kotlin flows. The constructor will be annotated with the @Inject annotation because we are using Hilt, which will inject ConcreteDataService into ConcreteDataRepository.
Now, let's create a ViewModel that will depend on the repository to load the appropriate data:
@HiltViewModel
class MainViewModel @Inject constructor(private val concreteDataRepository: ConcreteDataRepository) :
    ViewModel() {

    private val _concreteData = MutableLiveData
        <ConcreteData>()
    val concreteData: LiveData<ConcreteData> get() =
        _concreteData

    fun loadConcreteData() {
        viewModelScope.launch {
            concreteDataRepository.getConcreteData()
                .collect { data ->
                    _concreteData.postValue(data)
                }
        }
    }
}
MainViewModel will then use ConcreteDataRepository to retrieve the data, subscribe to the result, and post the result in LiveData, which MainActivity will subscribe to.
Now, let's create MainActivity:
@AndroidEntryPoint
class MainActivity : ComponentActivity() {
    override fun onCreate(savedInstanceState: Bundle?) {
        super.onCreate(savedInstanceState)
        setContent {
            Screen()
        }
    }
}

@Composable
fun Screen(mainViewModel: MainViewModel = viewModel()){
    mainViewModel.loadConcreteData()
    UpdateText()
}

@Composable
fun UpdateText(mainViewModel: MainViewModel = viewModel()) {
    val concreteData by mainViewModel.concreteData.
        observeAsState(ConcreteData("test", "test"))
    MessageView(text = concreteData.field1)

}

@Composable
fun MessageView(text: String) {
    Text(text = text)
}
MainActivity is now written using Jetpack Compose. It will trigger the data load when the screen is created and then subscribe to LiveData from ViewModel, which will update the text on the screen when the data is loaded.
Since we are using Hilt for dependency injection, we will need to define our external dependencies in a module, as follows:
@Module
@InstallIn(SingletonComponent::class)
class ApplicationModule {

    @Singleton
    @Provides
    fun provideHttpClient(): OkHttpClient {
        return OkHttpClient
            .Builder()
            .readTimeout(15, TimeUnit.SECONDS)
            .connectTimeout(15, TimeUnit.SECONDS)
            .build()
    }
}
First, we must provide the OkHttp client, which is used to make the HTTP requests.
Next, we will need to provide the JSON serialization:
@Module
@InstallIn(SingletonComponent::class)
class ApplicationModule {
    …
    @Singleton
    @Provides
    fun provideConverterFactory(): MoshiConverterFactory = MoshiConverterFactory.create()
}
We are using the Moshi library for JSON serialization, so we will have to provide a Factory that will be used by Retrofit for JSON conversion.
Next, we need to provide a Retrofit object:
@Module
@InstallIn(SingletonComponent::class)
class ApplicationModule {
    …
    @Singleton
    @Provides
    fun provideRetrofit(
        okHttpClient: OkHttpClient,
        gsonConverterFactory: MoshiConverterFactory
    ): Retrofit {
        return Retrofit.Builder()
            .baseUrl("schema://host.com")
            .client(okHttpClient)
            .addConverterFactory(gsonConverterFactory)
            .build()
    }
}
The Retrofit object will need a base URL that will act as the host for our backend service, OkHttpClient, and the JSON converter factory, which were provided earlier.
Finally, we will need to provide the template we defined previously:
@Module
@InstallIn(SingletonComponent::class)
class ApplicationModule {

    @Singleton
    @Provides
    fun provideConcreteDataService(retrofit: Retrofit):
        ConcreteDataService =
           retrofit.create(ConcreteDataService::class.java)
}
Here, we will use Retrofit to create an instance of ConcreteDataService that will be injected into ConcreteDataRepository by Hilt.
Finally, we need to initialize Hilt in the Application class:
@HiltAndroidApp
class MyApplication : Application()
This code represents a 10-year jump in time when it comes to Android development. Going back to the questions we asked for the initial example in the Legacy analysis section, we can see that we answered quite a few. If we want to introduce persistence into the application, we now have a repository that can manage that for us. We also have a lot of classes that can be individually unit tested because of the introduction of Hilt and because we have delimited separated from the Android framework dependencies. We have also introduced flows, which allow us to manipulate and handle the data in case we need to connect to multiple sources and handle multi-threading more easily. The introduction of Kotlin and Retrofit also allowed us to reduce the amount of code. If we were to make a diagram of this, it would look as follows:

Figure 1.4 – A class diagram for a newer Android application
Here, we can see that the dependencies between the classes go from one direction to the other, which is another positive. The introduction of Retrofit saved us a lot of hassle when dealing with HTTP requests. But an issue remains with regards to how ConcreteData is handled. We can see that it travels from ConcreteDataService into MainActivity. Imagine if we wanted to provide the data from a different URL with a different POJO representation. This means that all of the classes will have to be changed to accommodate for this. This violates the single responsibility principle because the ConcreteData class is used to serve multiple actors in our application. In the next section, we will try to seek a solution to this problem and address ways to properly structure our classes and components.
With that, we have explored the evolution of the Android platform and tools, what an application may look like using the latest tools and libraries, and how this evolution solved many problems developers had in the past. However, we still haven't solved all of them. In the next section, we will talk about the concept of clean architecture and how we can use it to make our application flexible and more adaptable to changes.
Enter clean architecture
In this section, we will discuss the concept of clean architecture, the problems it solves, and how it can be applied to an Android application.
Architecture can be viewed as the high-level solution that's required to build a system that can solve business and technical requirements. The goal should be to keep as many options on the table for as long as we can. From an Android development perspective, we've seen the platform grow a lot, and to balance the new changes that have been added to the platform with the addition of new features for our application and its maintenance, we will need to give our application a very good foundation so that it will adapt to changes. A common approach to architecture in Android development was the layered architecture, where apps would be split into three layers – the user interface, domain, and data layers. The problem here was that the domain layer depended on the data layer, so when the data layer changed, the domain layer needed to change too.
Clean architecture represents an integration of multiple types of architecture that provide independence from frameworks, user interfaces, and databases, as well as being testable. The shape resembles that of an onion, where dependencies go toward the inner layers. These layers are as follows:
- Entity Layer: This layer is the innermost layer and is represented by objects that hold data or business-critical functions.
- Use Case Layer: This layer implements the business logic of the system.
- Interface Adapter Layer: This layer is responsible for converting the data between the frameworks and drivers and the use case. This will hold components such as ViewModels and presenters, as well as various converters that are responsible for converting network and persistence-related data into entities.
- Frameworks and Drivers Layer: This layer is the outermost layer and is comprised of components such as activities, fragments, networking components, and persistence components.
Let's consider a scenario: you've recently been hired by a start-up company as their first Android engineer. You have been given a basic idea of what the app that you've been asked to develop should do, but there isn't anything too concrete; the user interface has not been finalized, the teams working on the backend are new themselves, and there isn't anything too concrete on their side either. What you do know is a set of use cases that specify what the app does: log into a system, load a list of tasks and add new tasks, delete tasks, and edit existing tasks. The product owner tells you that you should work on something while using mock data so that they can get a feel of the product and consult with the user interface and user experience teams to discuss improvements and modifications.
You are faced with a choice here: you can build the product that's been requested by the product owner as fast as possible and then constantly refactor your code for each new integration and the change in requirements, or you can take a little bit more time and factor in the future changes that will come into your approach. If you were to take the first approach, then you would find yourself in a situation where many developers found themselves, which is to go back and change things properly. Let's assume you chose the second approach. What would you need to do then? You can start decoupling your code into separate layers. You know that the UI will change, so you will need to keep it isolated so that when it is changed, the change will only be isolated to that particular section. Often, the UI is referred to as the presentation layer.
Next, you want to decouple the business logic. This is something specific to processing the data that your app will use. This is often done in the domain layer. Finally, you want to decouple how the data is loaded and stored. This will be the part where you deal with integrating libraries such as Room and Retrofit and it's often called the data layer. Because the requirements aren't definitive yet, you also want to decouple how you want to handle use cases so that if a use case changes, you can protect the others from that change. If you were to rotate the class diagram from Figure 1.4, you would see a layered approach to this example.
As we've mentioned previously, the fact that ConcreteData shows up in all the classes in our example is not a good idea. This is because, at the end of the day, the fact that we chose Retrofit and Moshi shouldn't impact the rest of the application. This is similar if it was the opposite way around and the activity or ViewModel would've done the same. At the end of the day, the way we choose to implement our UI or what networking library we should use represent details. Our domain layer shouldn't be impacted by any of these choices.
What we are doing here is establishing boundaries between the components in our system so that a change in a component doesn't impact a change in another component. In Android, even if we use the latest libraries and frameworks, we should still make sure that our domain is still protected by changes in those frameworks. Going back to the start-up example, and assuming you've chosen to decouple your components and pick the appropriate boundaries, after many demos and iterations, your company decides to hire additional developers to work on new, separate features. If those developers follow the guidelines you've set up, they can work with a minimal level of overlap.
The recommendation from Android development documentation is to take advantage of modules. One of the arguments is that it improves build speed because when you work on a certain module, it won't rebuild the others when you build the application – it caches them instead. Splitting your application into multiple modules serves another purpose.
Let's go back to the start-up. Things are going great and people love your product, so your company decides to open your APIs for other businesses to integrate into their systems. Your company also wants to provide an Android library so that it's easier for businesses to access your APIs. You already have this logic integrated into your application; you just need to export it. What features do you want to export? All? None? Do they want to persist data locally? Do they want some of the UI or not? If your modules were split with proper boundaries, then you would be able to accommodate all of those features. What we want to do is have a system where we can easily plug things in and easily plug them out.
Transitioning our previous example to this approach, we would have something like this. The ConcreteData class and ConcreteDataService would remain the same:
@JsonClass(generateAdapter = true)
data class ConcreteData(
    @Json(name = "field1") val field1: String,
    @Json(name = "field1") val field2: String
)
interface ConcreteDataService {

    @GET("/path")
    suspend fun getConcreteData(): ConcreteData
}
Now, we will need to isolate the Retrofit library and create the interface adapter for it. But to do that, we will need to define our entity:
data class ConcreteEntity(
    val field1: String,
    val field2: String
)
It looks like it's a duplicate of ConcreteData, but this is a case of fake duplication. In reality, as things evolve, the two classes may contain different data, so they will need to be separated.
To isolate the Retrofit call, we need to invert the dependency of our repository. So, let's create a new interface that will return ConcreteEntity:
interface ConcreteDataSource {

    suspend fun getConcreteEntity(): ConcreteEntity
}
In our implementation, we will invoke the Retrofit service interface:
class ConcreteDataSourceImpl(private val concreteDataService: ConcreteDataService) :
    ConcreteDataSource {

    override suspend fun getConcreteEntity():
        ConcreteEntity {
        val concreteData = concreteDataService.
            getConcreteData()
        return ConcreteEntity(concreteData.field1,
            concreteData.field2)
    }
}
Here, we have invoked ConcreteDataService and then converted the network model into an entity.
Now, our repository will change into the following:
class ConcreteDataRepository @Inject constructor(private val concreteDataSource: ConcreteDataSource) {

    suspend fun getConcreteEntity(): ConcreteEntity {
        return concreteDataSource.getConcreteEntity()
    }
ConcreteDataRepository will depend on ConcreteDataSource to avoid the dependencies on the networking layer.
Now, we need to build the use case to retrieve ConcreteEntity:
class ConcreteDataUseCase @Inject constructor(private val concreteDataRepository: ConcreteDataRepository) {

    fun getConcreteEntity(): Flow<ConcreteEntity> {
        return flow {
            val fooList = concreteDataRepository.
                getConcreteEntity()
            emit(fooList)
        }.flowOn(Dispatchers.IO)
    }
}
ConcreteDataUseCase will depend on ConcreteDataRepository to retrieve the data and emit it using Kotlin flows.
Now, MainViewModel will need to be changed to invoke the use case. To do so, it will use the field1 object from ConcreteEntity:
@HiltViewModel
class MainViewModel @Inject constructor(private val concreteDataUseCase: ConcreteDataUseCase) :
    ViewModel() {

    private val _textData = MutableLiveData<String>()
    val textData: LiveData<String> get() = _textData

    fun loadConcreteData() {
        viewModelScope.launch {
            concreteDataUseCase.getConcreteEntity()
                .collect { data ->
                    _textData.postValue(data.field1)
                }
        }
    }
}
MainViewModel will now depend on ConcreteDataUseCase and retrieve ConcreteEntity, where it will extract field1. This will then be set in LiveData.
MainActivity will be updated to use the textData object from MainViewModel:
@AndroidEntryPoint
class MainActivity : ComponentActivity() {
    override fun onCreate(savedInstanceState: Bundle?) {
        super.onCreate(savedInstanceState)
        setContent {
            Screen()
        }
    }
}

@Composable
fun Screen(mainViewModel: MainViewModel = viewModel()){
    mainViewModel.loadConcreteData()
    UpdateText()
}

@Composable
fun UpdateText(mainViewModel: MainViewModel = viewModel()) {
    val text by mainViewModel.textData.
        observeAsState("test")
    MessageView(text = text)

}

@Composable
fun MessageView(text: String) {
    Text(text = text)
}
With that, MainActivity has been updated to use LiveData, which emits a String instead of a ConcreteData object.
Finally, the Hilt module will be updated as follows:
@Module
@InstallIn(SingletonComponent::class)
class ApplicationModule {
    …
    @Singleton
    @Provides
    fun provideHttpClient(): OkHttpClient {
        return OkHttpClient
            .Builder()
            .readTimeout(15, TimeUnit.SECONDS)
            .connectTimeout(15, TimeUnit.SECONDS)
            .build()
    }

    @Singleton
    @Provides
    fun provideConverterFactory(): MoshiConverterFactory =
        MoshiConverterFactory.create()

    @Singleton
    @Provides
    fun provideRetrofit(
        okHttpClient: OkHttpClient,
        gsonConverterFactory: MoshiConverterFactory
    ): Retrofit {
        return Retrofit.Builder()
            .baseUrl("schema://host.com")
            .client(okHttpClient)
            .addConverterFactory(gsonConverterFactory)
            .build()
    }

    @Singleton
    @Provides
    fun provideCurrencyService(retrofit: Retrofit):
        ConcreteDataService =
        retrofit.create(ConcreteDataService::class.java)
    @Singleton
    @Provides
    fun provideConcreteDataSource(concreteDataService:
        ConcreteDataService): ConcreteDataSource =
        ConcreteDataSourceImpl(concreteDataService)
}
Here, we can see that ConcreteDataUseCase just invokes ConcreteDataRepository, which just invokes ConcreteDataSource. You may be wondering why this boilerplate is necessary. In this case, we have a bit of fake duplication. As the code grows, ConcreteDataRepository may connect to other data sources, and ConcreteDataUseCase may need to connect to multiple repositories to combine the data. The same can be said about ConcreteData and ConcreteEntity. Another benefit of this approach is the imposition of more rigor when it comes to development, and it creates consistency.
Let's look at the following diagram and see how it compares to Figure 1.4:
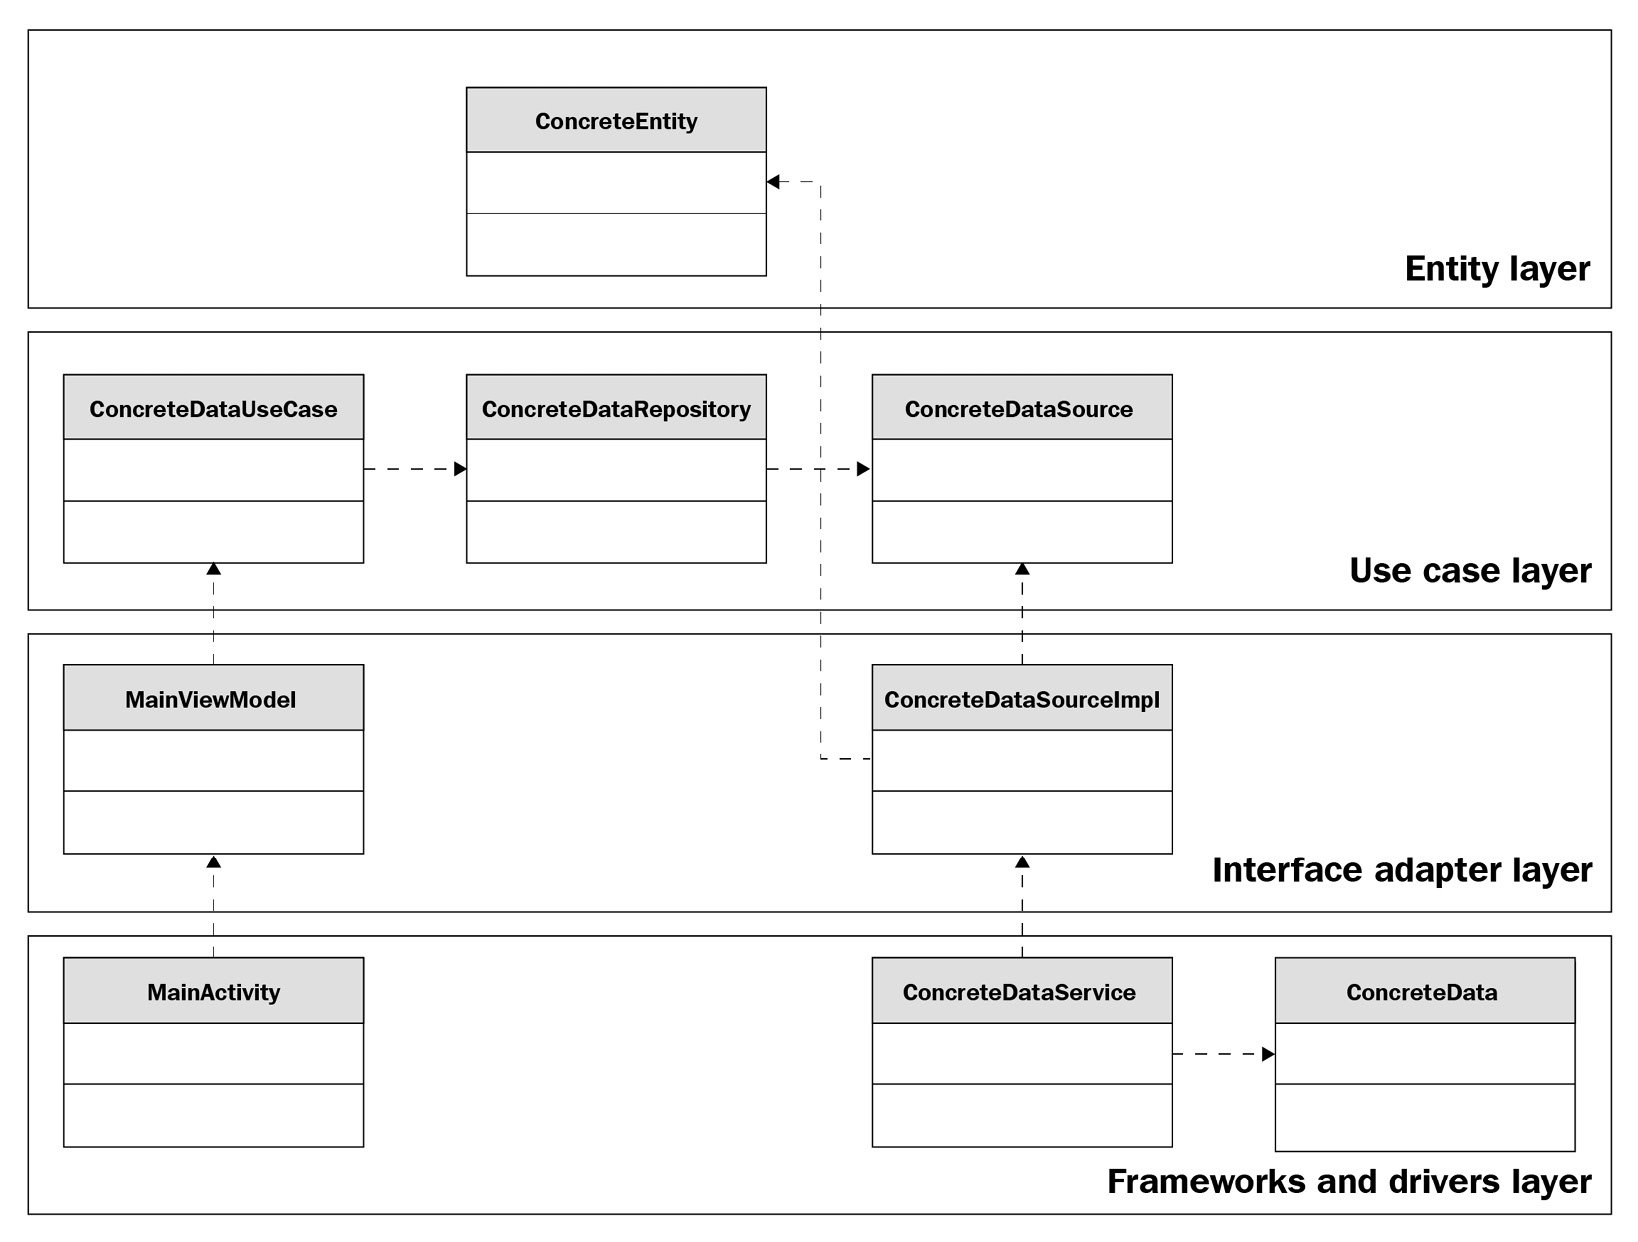
Figure 1.5 – Clean architecture
If we look at the top row, we will see the use case and the entity. We can also see that the dependencies go from the classes at the bottom toward the classes at the top, similar to how the dependencies go from the outer layers toward the inner layers here. A difference you may have noticed is that our example doesn't mention the usage of modules. Later in this book, we will explore how to apply clean architecture to multiple modules and how to manage them.
We are now back in the start-up, and you started working on the application, where you have defined a few entities and use cases and have put a simple UI in place. The product owner has asked you to deliver a demo with some mock data for tomorrow. What can you do? You can create a new implementation of your data source and plug in some mock objects that you can use to satisfy the conditions for the demo. You show the demo of the application and you receive some feedback about your UI. This means you can change your activities and fragments to render the data appropriately, and this won't impact any of the other components. What would happen if the use case were to change? In that situation, this would propagate into the rest of the other layers. This depends on the change, though, but this scenario is to be expected in this situation.
Summary
In this chapter, we explored what an Android app used to look like and all the problems developers would face at the time. We've looked at some of the most important software design principles, such as SOLID, to get a better understanding of how to improve our code and how these principles helped the Android platform evolve. We also looked at the adoption of a new programming language that came with the introduction of new software paradigms, the addition of event-based libraries and frameworks, the introduction of architecture components to help developers write more testable applications, and a new way to build user interfaces. Finally, we introduced clean architecture, which helps us build maintainable, testable, and more independent applications. We looked at all of these changes through a small example, where we saw them transition from what they may have looked like in 2010 to what they may look like now.
In the next chapter, we will deep dive into the libraries that are required for loading, storing, and managing data on Android. We will combine them to build an app using clean architecture.

