


 Download code from GitHub
In this chapter, we will cover the following topics:
Setting up service workers
Setting up SSL for Windows
Setting up SSL for Mac
Setting up GitHub pages for SSL
Registering a service worker
Registering a service worker in detail
Debugging
Providing stale version on error
Creating mock responses
Handling request timeouts
If you travel a bit, chances are you have probably found yourself stuck with zero network connectivity way too often. This is frustrating, especially if you just wanted to continue reading some news articles, blog posts, or you wanted to get some work done.
Unfortunately, with your browser, attempting to make requests for something from the network while being offline doesn't quite work out so well.

Even though on planes, the subway, in hotels, and at conferences, Wi-Fi may provide you with opportunities to restore your connection, in general you will have to wait for the network to return online in order to request the pages you want to view.
Previous attempts to solve this issue include AppCache. It seems to work, to some extent, but the issue with AppCache is that it makes a lot of assumptions about user interactions. When those assumptions are not met, the application will fail to function as expected. It is also designed to work well with single page apps, not the traditional multi-page websites.
Also, one of the most challenging problems with providing a seamless user experience with web apps is making them functional while offline. This is an important issue to resolve, given that most users today access web apps on the move. Enter service workers, a script running in the background of our browser.
Being able to use a web app, regardless of the connectivity, means users can operate uninterrupted when they are on board a plane, the subway, or in places where connectivity is limited or not available. This technology will help boost client productivity and will increase the availability of the application.
With service workers, we are able to pre-cache some assets of a website. What we are referencing as assets are JavaScript files, CSS files, images, and some fonts. This will help us to speed up the loading time, instead of having to fetch information from the web servers every time we visit the same website. And of course, most importantly, those assets will be available for us when we are offline.
A service worker is a script that stands between your browser and the network, giving you, among other things, the ability to intercept network requests, and respond to them in different ways.
In order for your website or app to work, the browser fetches its assets, such as HTML pages, JavaScript, CSS, images, and fonts. In the past, managing these resources was mainly the browser's responsibility. If the browser couldn't access the network, you would probably see its Unable to connect to the Internet message. There were techniques you could use to encourage the local caching of assets, but the browser often had the last say.
One feature service worker uses heavily is promises. So it is important to have a good understanding of promises.
Promises are a great mechanism for running async operations with success dependent on one another. This is central to the way service workers work.
Promises can do a great many things, but for now, all you need to know is that if something returns a promise, you can attach .then() to the end and include callbacks inside it for success, failure, and so on, or you can insert .catch(), the end if you want to include a failure callback.
Let's compare a traditional synchronous callback structure to its asynchronous promise equivalent:
sync
try {
  var value = Fn();
  console.log(value);
} catch(err) {
  console.log(err);
}
async
Fn().then(function(value) {
  console.log(value);
  }).catch(function(err) {
  console.log(err);
});
In the sync example, we have to wait for Fn() to run and return a value before any more of the code can execute. In the async example, Fn() returns a promise for the value, then the rest of the code can carry on running. When the promise resolves, the code inside then will be run asynchronously.
In order to get service workers running, we need to serve our code via Hyper Text Transfer Protocol Secure (HTTPS). Service workers are designed to run only across HTTPS for security reasons. Source code repositories such as GitHub support HTTPS, where you can host your files.
If you are using a newer version of a browser, the chances are that service workers are already enabled on it. But, if that is not the case, we will have to change few things in the browser settings. In the following section, we are going to cover how to enable service worker features in Chrome and Firefox.
Follow the steps below to enable service worker in Chrome and Firefox.
To experiment in Chrome, you need to download Chrome Canary:
Go to https://www.google.com/chrome/browser/canary.html and download the latest version.
Open Chrome Canary and type
chrome://flags.Turn on
experimental-web-platform-features.Restart the browser.
The following image shows experimental features on the Chrome browser, where you enable the Experimental Web Platform feature by clicking on the Enable link underneath:

To experiment in Firefox, you need to download Firefox Nightly:
Go to https://nightly.mozilla.org/ and download the latest version.
Open Firefox Nightly, and go to
about:config.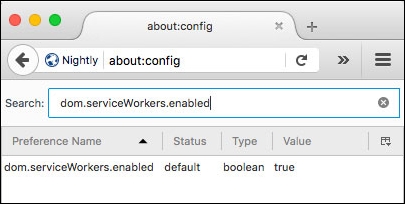
Set
experimental-web-platform-featurestotrue.
Note
At the time of writing, Opera offers partial support for service workers, including basic support, as well as installing and uninstalling events. Internet Explorer and Safari do not support service workers.
Service workers are currently an experimental technology, meaning the syntax and the behavior are subject to change in future versions as the specification changes.
Service workers are designed to run only across HTTPS, so in order for us to test our code, we need our web pages to be delivered across HTTPS. In this recipe, we will cover getting your site setup with SSL support for Windows.
Follow these instructions to enable SSL:
First, open IIS; you can do this by running the following command inside the command line:
InetmgrSelect the server node in the tree view and double-click the Server Certificates feature in the list view, as shown:
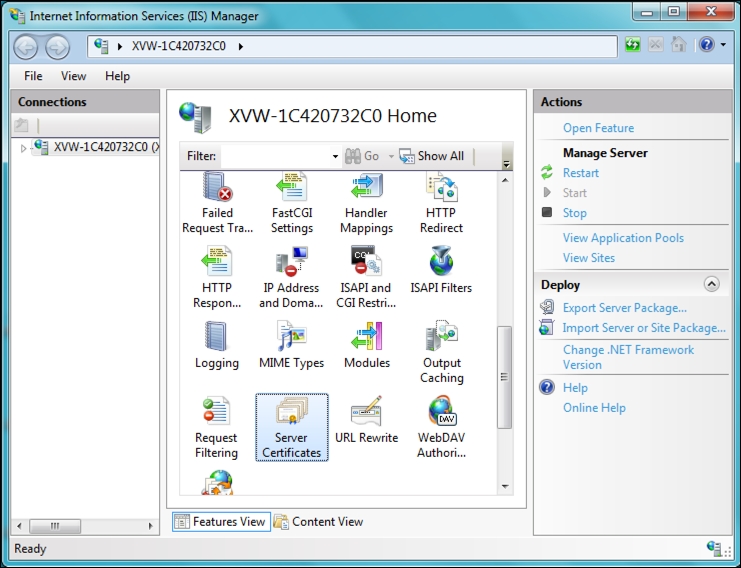
Click on the Create Self-Signed Certificate... link in the Actions pane.

Enter a meaningful name for the new certificate and click OK.

This will generate a self-signed certificate, which is marked for Server Authentication use, meaning it uses a server-side certificate for authenticating the identity of the server and also for HTTP SSL encryption.
In order to create an SSL binding, we have to select a site in the tree view and then, in the Actions pane, click Bindings.... This will bring up the bindings editor that manages bindings for your website, which include create, edit, and delete. Now, to add your new SSL binding to the site, click Add....

Port 80 is the default setting for a new binding for HTTP. We can select https in the Type drop-down list. Select the self-signed certificate we created in the previous section from the SSL Certificate drop-down list, and then click OK.
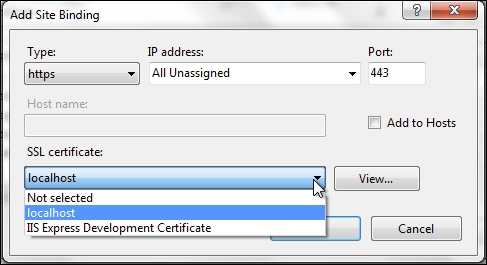
Now we have a new SSL binding on our site and all that remains is to make sure that it works.
As mentioned in the previous recipe, service workers are designed to run only across HTTPS. So, in order for us to test our code, we need our web pages to be delivered across HTTPS. In this recipe, we will cover getting your site set up with SSL support for Mac.
This recipe assumes that you are running OS X 10.11, El Capitan, or higher. We are going to use a command-line utility called Vim for editing files, which already comes with Mac. Make sure not to use the number pad with Vim. Please be aware that this process is lengthy.
Follow these instructions to enable SSL:
First, we need to make sure Apache is running (you may get a prompt for a password):
$ sudo apachectl startThe next step is to make some modifications to your
httpd.conf. Because it's a system file, you will need to usesudoagain:$ sudo vim /etc/apache2/httpd.confIn this file, you should uncomment both
socache_shmcb_moduleandssl_module, and also the include thehttpd-ssl.conffile by removing the leading#symbol on those lines (you can use/to search on the Vim editor):LoadModule socache_shmcb_module libexec/apache2/mod_socache_shmcb.so ... LoadModule ssl_module libexec/apache2/mod_ssl.so ... Include /private/etc/apache2/extra/httpd-ssl.conf
After saving the preceding file (press
:wq), you should then open up your/etc/apache2/extra/httpd-vhosts.conffile:$ sudo vim /etc/apache2/extra/httpd-vhosts.confHere, you can create a VirtualHost entry for each virtual host that you wish to provide SSL support for:
<VirtualHost *:80>
       DocumentRoot "/Library/WebServer/Documents"
    ServerName localhost
    SSLEngine on
    SSLCertificateFile "/private/etc/apache2/localhost.crt"
    SSLCertificateKeyFile "/private/etc/apache2/localhost.key"
</VirtualHost>
Make sure you copy your development folder to the
DocumentRootdirectory as you did earlier:/Library/WebServer/Documents.To get this all to work with Apache, we need to create a self-signed certificate that we have already referenced in the
VirtualHostdefinition.Generate a key:
$ cd /etc/apache2Press Enter with no input after the following command:
$ sudo openssl genrsa -out localhost-key.pem 1024Next, we have to generate a certificate signing request:
$ sudo openssl req -new -key localhost-key.pem -out localhost.csrUsing this certificate signing request (CSR), generate the certificate:
$ sudo openssl x509 -req -days 365 -in localhost.csr -signkey
localhost-key.pem -out localhost.crt
Then we have to convert the key to a no-phrase key:
$ sudo openssl rsa -in localhost-key.pem -out localhost.keyNow change
server.crttolocalhost.crtas well asserver.keytolocalhost.key:$ sudo vim /etc/apache2/extra/httpd-ssl.confAll you need to do now is double check your Apache configuration syntax:
$ sudo apachectl configtestIf all goes well, restart Apache:
$ sudo apachectl -k restartNow, simply point your browser at
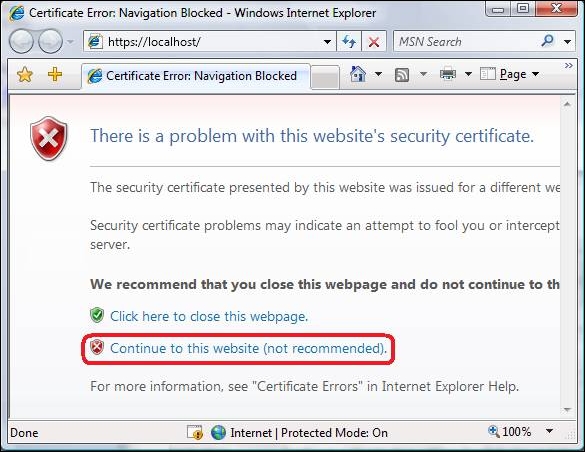
https://localhost. If you are prompted for a self-signed certificate in Chrome you can hit the Advanced option on that page and proceed, while in Firefox, you need to expand the I understand the risks options and add an exception. This is owing to the fact that the self-signed certificates are not signed by any authority, and for this reason the browsers add warnings about them. Although, since you are the one who created the certificate, you understand it's safe to accept it.To fix this, you need to add the certificate as a trusted root authority.
Open the Keychain Access utility in OS X. Select the System option on the left. Click the lock icon in the upper-left corner to enable changes.
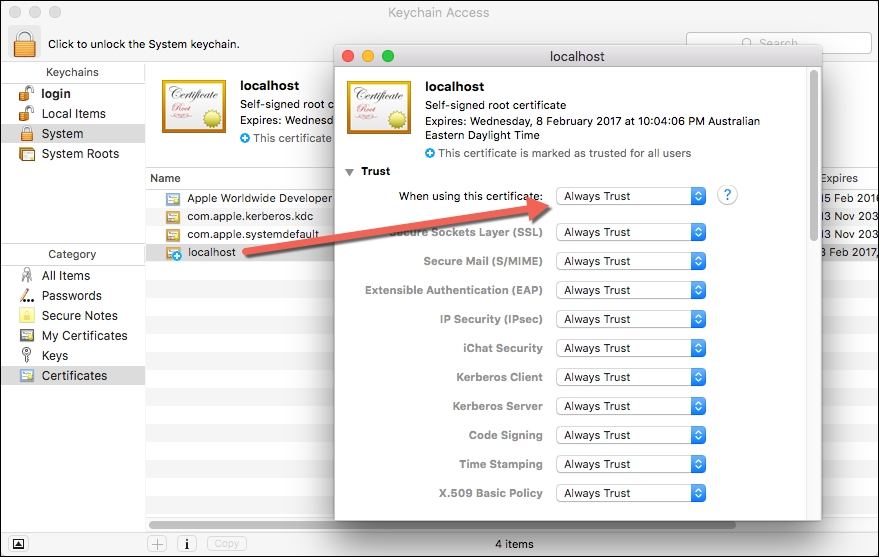
Click the plus button at the bottom and select the
/etc/apache2/localhost.cerfile you copied to the desktop. In the dialog that comes up, click Always Trust. After the localhost gets added to the system keychain, double-click it to open it again. Expand the Trust section and for the first option, pick Always Trust.At this point, everything has been configured. Quit Chrome and all other browsers (this is required), fire up the web server, and try to navigate to the local HTTPS site again.

Tip
Detailed steps to download the code bundle are mentioned in the Preface of this book. Please have a look.
The code bundle for the book is also hosted on GitHub at https://github.com/PacktPublishing/Service-Worker-Development-Cookbook. We also have other code bundles from our rich catalog of books and videos available at https://github.com/PacktPublishing/. Check them out!
Service workers are designed to run only across HTTPS. So, in order for us to test our code, we need our web pages to be delivered across HTTPS. GitHub pages are served across HTTPS and it's free to use. So let's get on with it.
Before registering for a GitHub account, please make sure you have a valid e-mail address.
Follow these instructions to set up GitHub pages:
Head over to GitHub (https://github.com) and register yourself to obtain an account, if you don't have one already.
Once you have done that, log in and create a new repository with the following format:
username.github.io, whereusernameis your username.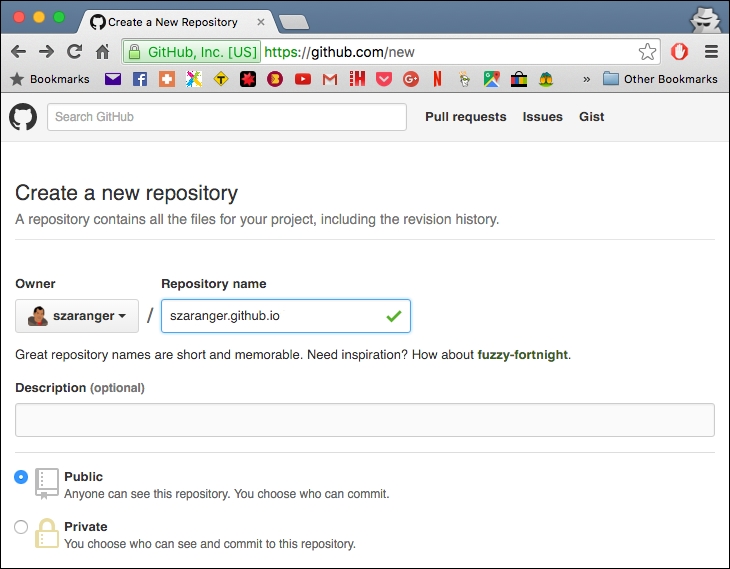
If the first part of the repository doesn't match your username exactly, it won't work.
Open your command-line window and clone your repository.
$ git clone https://github.com/username/username.github.ioChange the directory to
username.github.io:$ cd username.github.ioCreate a directory called
service-workers:$ mkdir service-workersCreate an
index.htmlfile with some text:$ echo "Service Workers" > index.htmlNow let's commit and push our changes to the repository:
$ git add --all
$ git commit -m "initial commit"
$ git push -u origin master
Open up a browser and go to
http://username.github.io/service-workers/.
Registering your service worker is the first step to getting a service worker up and running. By registering a service worker, we tell our website to use the service worker. And this registering process happens outside of the service worker, in our case inside the index.html file. You can do that inside a JavaScript file and then reference it within the index.html file, but not in the service worker script file.
In this basic registration demo, we will test to see if our service worker gets registered successfully.
To get started, with service workers, you will need to have the service worker experiment feature turned on in your browser settings. If you have not done this yet, refer to the first recipe: Setting up service workers. Service workers only run across HTTPS. To find out how to set up a development environment to support this feature, refer to the following recipes: Setting up GitHub pages for SSL, Setting up SSL for Windows, and Setting up SSL for Mac.
Follow these instructions to set up your file structure:
First, we need to create the
index.htmlfile as follows:<!DOCTYPE html> <html lang="en"> <head></head> <body> <p>Registration status: <strong id="status"></strong></p> <script> if ('serviceWorker' in navigator) { navigator.serviceWorker.register( 'service-worker.js', { scope: './' } ).then( function(serviceWorker) { document.getElementById('status').innerHTML = 'successful'; }).catch(function(error) { document.getElementById('status').innerHTML = error; }); } else { document.getElementById('status').innerHTML = 'unavailable'; } </script> </body> </html>Create an empty JavaScript file called
service-worker.jsin the same folder as theindex.htmlfile.With your two files in place, you can navigate to the GitHub page,
https://username.github.io/service-workers/01/01/index.html, and you will see the success message in your browser.
We started off by making sure that the service worker feature is available with the line if ('serviceWorker' in navigator). If that's not the case, then we set the message to unavailable. If your browser does not support service workers, you will get this message.
Now we register the service worker with the empty JavaScript file and the scope. To ensure the registration is only applicable to the current directory and those underneath it, we override the default scope of '/' with './' in the line { scope: './' } as the scope has to be of the same origin.
If you decide that your script files should sit elsewhere, you will need a special header, such as Service-Worker-allowed: true or a specific content-type, such as text/javascript.
If the registration was successful, we print the message successful to the status message.
Otherwise, we print the error message as the status. The reason for the error could be something going wrong during the registration, for example, the service-worker.js file may not available or it may contain a syntax error.
We can unregister the service worker by calling the following unregister() function:
serviceWorker.unregister().then(function() {
    document.getElementById('status').innerHTML = 'unregistered';
})There are a couple of issues with the Chrome browser when working with service workers, which might confuse you.

Understanding events involved in service worker registration and state transitions will give you greater control over your application by using this feature. In this detailed registration demo, we will take a look at the state transitions of service worker registration.
To get started with service workers, you will need to have the service worker experiment feature turned on in your browser settings. If you have not done this yet, refer to the previous recipe: Setting up service workers. Service workers only run across HTTPS. To find out how to set up a development environment to support this feature, refer to the following recipes: Setting up GitHub pages for SSL, Setting up SSL for Windows, and Setting up SSL for Mac.
Follow these instructions to set up your file structure:
First, we need to create an
index.htmlfile as follows:<!DOCTYPE html> <html lang="en"> <head> <meta charset="UTF-8"> <title>Detailed Registration</title> </head> <body> <p>Registration status: <strong id="status"></strong></p> <p>State: <strong id="state"></strong></p> <script> function printState(state) { document.getElementById('state').innerHTML = state; } if ('serviceWorker' in navigator) { navigator.serviceWorker.register( 'service-worker.js', { scope: './' } ).then( function(registration) { var serviceWorker; document.getElementById('status').innerHTML = 'successful'; if (registration.installing) { serviceWorker = registration.installing; printState('installing'); } else if (registration.waiting) { serviceWorker = registration.waiting; printState('waiting'); } else if (registration.active) { serviceWorker = registration.active; printState('active'); } if (serviceWorker) { printState(serviceWorker.state); serviceWorker.addEventListener('statechange', function(e) { printState(e.target.state); }); } }).catch(function(error) { document.getElementById('status').innerHTML = error; }); } else { document.getElementById('status').innerHTML = 'unavailable'; } </script> </body> </html>Create a JavaScript file called
service-worker.jsin the same folder as theindex.htmlfile with the following code:self.addEventListener('install', function(e) { console.log('Install Event:', e); }); self.addEventListener('activate', function(e) { console.log('Activate Event:', e); });With your two files in place, you can navigate to the GitHub page,
https://username.github.io/service-workers/01/02/index.html, and you will see the success message in your browser.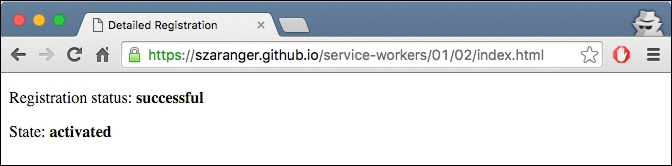
When the registration is successful, we inspect the state of the registration and print it to the browser. In this case it is installing, waiting, or active:
if (registration.installing) {
serviceWorker = registration.installing;
printState('installing');
} else if (registration.waiting) {
serviceWorker = registration.waiting;
printState('waiting');
} else if (registration.active) {
serviceWorker = registration.active;
printState('active');
}The printState(state) helper function will print out the state to the browser.
At the end we attach an event listener to the service worker called statechange. The callback of this event listener will print the state changes to the browser:
if (serviceWorker) {
printState(serviceWorker.state);
serviceWorker.addEventListener('statechange', function(e) {
printState(e.target.state);
});
}When the registered service worker is in the activated state, we can refresh the page to see the service worker taking control.
To demonstrate a page loading, without the service worker taking control, press Shift and refresh the page. You will see the activate event logged in the web console.
We are subscribing to two event listeners in the service-worker.js file, install and activate:
self.addEventListener('install', function(e) {
  console.log('Install Event:', e);
});

self.addEventListener('activate', function(e) {
  console.log('Activate Event:', e);
});These events get fired when this version of the script first gets registered for the given scope.
The install event is a good place to prefetch data and initialize caches, and the activate event works well for cleaning up data from the old version of the script.
When the service worker is successfully registered, it will go through the following stages.
In the life cycle of service workers, at the point when the service worker has registered without errors, but is not yet active, any service workers previously activated will still be in control. The service worker is considered new if there is any change in the service worker file between page reloads. It will therefore go through the installation step. At this stage, the service workers are not intercepting any requests.
The service worker is said to be at the activate stage when it becomes active for the first time. The service worker is now able to intercept requests. This will happen when we close the tab and reopen it, or the page is refreshed by a hard refresh using Shift + reload. It will not occur immediately after the install event.
This can happen at any time, even outside of a request. But the termination happens mostly when the browser needs to reclaim memory. When a new request is made, the service worker will be restarted as needed, or a message will be received, but it will not go back through the activate step.
The service worker will intercept a request it is registered to catch all the time, even if it needs to be restarted in order to do so. But, having said that, we cannot guarantee it will be around for any length of time. Because of this, the global state will not be preserved, so we have to make sure to avoid using any global variables within the service worker file. Instead, we can use indexed or localStorage for persistence.
Service workers run in a separate thread in the browser from the pages they control. There are ways to communicate between workers and pages, but they execute in a separate scope. That means you will not have access to the DOM of those web pages from the service worker script, for example. Because of this, we cannot use the DevTools on the same web page to debug service worker scripts. We need to open a separate inspector to debug the service worker thread.
Service workers do most of their work by listening for relevant events and responding to them in a productive way. In the life cycle of service workers, different events are triggered at different points in a service worker's life cycle. So, if we want to cache assets, it is a good time to do that during the install state by listening to the install event. In the same way, we can debug service workers by adding breakpoints to the relevant event handlers.
To get started with service workers, you will need to have the service worker experiment feature turned on in your browser settings. If you have not done this yet, refer to the previous recipe: Setting up service workers. Service workers only run across HTTPS. To find out how to set up a development environment to support this feature, refer to the following recipes: Setting up GitHub pages for SSL, Setting up SSL for Windows, and Setting up SSL for Mac.
Follow these instructions to set up debugging for service workers:
To find out your currently running service workers, type the following into your browser:
chrome://inspect/#service-workers: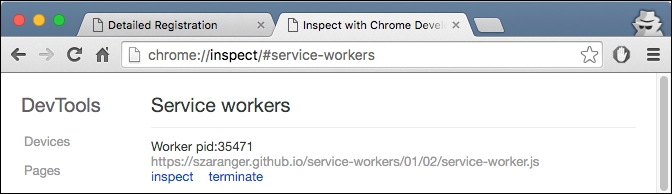
Otherwise, type the following into your browser:
chrome://serviceworker-internalsto find out the registered workers. If there aren't any listed, then there are no currently running service workers.
To debug your service worker with Chrome DevTools, navigate to the service worker page and open DevTools. (Cmd + Alt + I in Mac or F12 in Windows)
You can add a breakpoint to inspect your code.

The service worker will be displayed in the Threads list, and the Service Workers tab lists all the Active Running service workers this page belongs to.
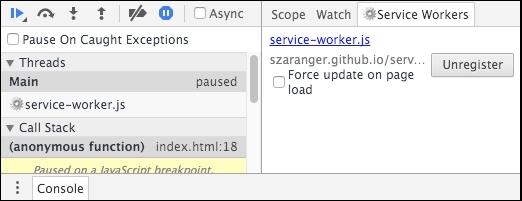
We can use the console for debugging as well. Any errors during the installation process will be printed on the console page. The console is useful for inspecting the service worker context.

You will also find the debugging panel in the Resources tab of the DevTools useful. In order to view network activity of the worker, click the
inspectlink on the Resources tab to launch a dedicated DevTools window for the worker.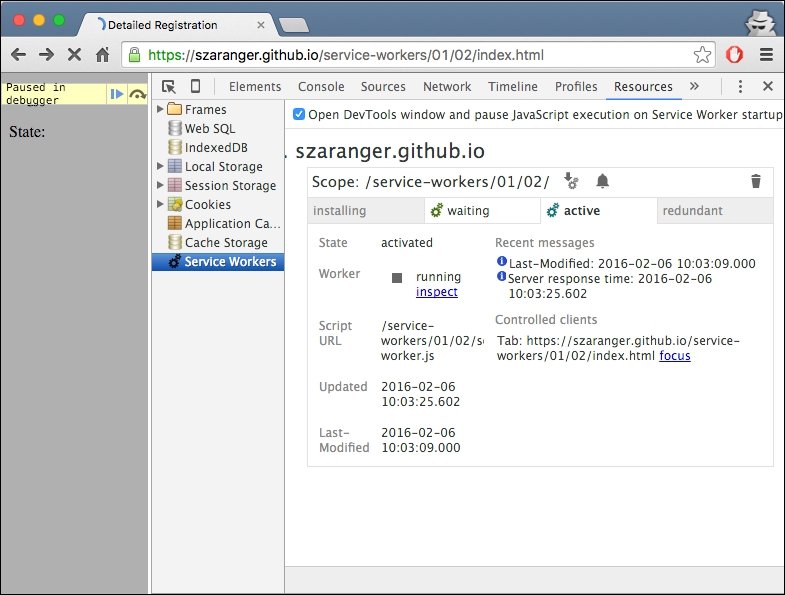
The resulting page chrome://serviceworker-internals shows the registered service workers. It also shows basic action buttons, which are explained in detail as follows:
Terminated: Unregisters the worker.
Start/Stop: Starts/stops the worker. This will happen automatically when you navigate to a page in the worker's scope.
Sync: Dispatches a sync event to the worker. If you don't handle this event, nothing will happen.
Push: Dispatches a push event to the worker. If you don't handle this event, nothing will happen.
Inspect: Opens the worker in the inspector.
If you travel a lot, chances are you have often experienced a lot of zero network connectivity. This is frustrating, especially if you want to view previously viewed pages. In this recipe, we will look at how we can address this issue by providing the user with the stale version from the cache.
To get started with service workers, you will need to have the service worker experiment feature turned on in your browser settings. If you have not done this yet, refer to the previous recipe: Setting up service workers. Service workers only run across HTTPS. To find out how to set up a development environment to support this feature, refer to the following recipes: Setting up GitHub pages for SSL, Setting up SSL for Windows, and Setting up SSL for Mac.
Follow these instructions to set up your file structure (or you can find the files in the provided directory, 01/05):
First, we need to create an
index.htmlfile as follows:<!DOCTYPE html> <html lang="en"> <head> <meta charset="UTF-8"> <title>Stale on Error</title> </head> <body> <p>Registration status: <strong id="status"></strong></p> <script> if ('serviceWorker' in navigator) { navigator.serviceWorker.register( 'service-worker.js', { scope: './' } ).then( function(serviceWorker) { document.getElementById('status').innerHTML = 'successful'; }).catch(function(error) { document.getElementById('status').innerHTML = error; }); } else { document.getElementById('status').innerHTML = 'unavailable'; } </script> </body> </html>Create a JavaScript file called
service-worker.jsin the same folder as theindex.htmlfile with the following code:var version = 1; var cacheName = 'stale- ' + version; self.addEventListener('install', function(event) { self.skipWaiting(); }); self.addEventListener('activate', function(event) { if (self.clients && clients.claim) { clients.claim(); } }); self.addEventListener('fetch', function(event) { event.respondWith( fetch(event.request).then(function(response) { caches.open(cacheName).then(function(cache) { if(response.status >= 500) { cache.match(event.request). then(function(response) { return response; }).catch(function() { return response; }); } else { cache.put(event.request, response.clone()); return response; } }); }) ); });With your two files in place, navigate to
index.html.
When the registration is successful, we inspect the state of the registration and print it to the browser.
In the service-worker.js file, we always fetch the response from the network:
event.respondWith(
        fetch(event.request).then(function(response) {
If we received an error response, we return the stale version from the cache:
if(response.status >= 500) {
                    cache.match(event.request).
					then(function(response) {
                        // Return stale version from cache
                        return response;
})
If we can't find the stale version, we return the network response, which is the error:
}).catch(function() {

return response;
});
If the response was successful (response code 200), we update the cached version:
} else {
cache.put(event.request, response.clone());
   return response;
}The put() method of the cache interface allows key/value pairs to be added to the current cache object. The put() method also overrides any key/value pair previously stored in the cache that matches the request:
fetch(url).then(function (response) {
  return cache.put(url, response);
});In order to mock API responses from your server to your app, which is instead of actual API responses for the API requests, we can make the service worker return mock responses that will be identical to an API response.
To get started with service workers, you will need to have the service worker experiment feature turned on in your browser settings. If you have not done this yet, refer to the previous recipe: Setting up service workers. Service workers only run across HTTPS. To find out how to set up a development environment to support this feature, refer to the following recipes: Setting up GitHub pages for SSL, Setting up SSL for Windows, and Setting up SSL for Mac.
Follow these instructions to set up your file structure (these can also be found in the provided directory, 01/03):
First, we need to create an
index.htmlfile as follows:<!DOCTYPE html> <html lang="en"> <head> <meta charset="UTF-8"> <title>Detailed Registration</title> </head> <body> <p>Network status: <strong id="status"></strong></p> <div id="request" style="display: none"> <input id="long-url" value="https://www.packtpub.com/" size="50"> <input type="button" id="url-shorten-btn" value="Shorten URL" /> </div> <div> <input type="checkbox" id="mock-checkbox" checked>Mock Response</input> </div> <div> <br /> <a href="" id="short-url"></a> </div> </div> <script> function printStatus(status) { document.getElementById('status').innerHTML = status; } function showRequest() { document.getElementById('url-shorten-btn') .addEventListener('click', sendRequest); document.getElementById('request').style.display = 'block'; } function sendRequest() { var xhr = new XMLHttpRequest(), request; xhr.open('POST', 'https://www.googleapis.com/urlshortener/v1/url?' + 'key=[Your API Key]'); xhr.setRequestHeader('Content-Type', 'application/json'); if (document.getElementById('mock-checkbox').checked) { xhr.setRequestHeader('X-Mock-Response', 'yes'); } xhr.addEventListener('load', function() { var response = JSON.parse(xhr.response); var el = document.getElementById('short-url'); el.href = response.id; el.innerHTML = response.id; }); request = { longUrl: document.getElementById('long-url').value }; xhr.send(JSON.stringify(request)); } if ('serviceWorker' in navigator) { navigator.serviceWorker.register( 'service-worker.js', { scope: './' } ).then( function(registration) { if (navigator.serviceWorker.controller) { printStatus('The service worker is currently handling ' + 'network operations.'); showRequest(); } else { printStatus('Please reload this page to allow the ' + 'service worker to handle network operations.'); } }).catch(function(error) { document.getElementById('status').innerHTML = error; }); } else { document.getElementById('status').innerHTML = 'unavailable'; } </script> </body> </html>Create a JavaScript file called
service-worker.jsin the same folder as theindex.htmlfile with the following code:self.addEventListener('fetch', function(event) { console.log('Handling fetch event for', event.request.url); var requestUrl = new URL(event.request.url); if (requestUrl.pathname === '/urlshortener/v1/url' && event.request.headers.has('X-Mock-Response')) { var response = { body: { kind: 'urlshortener#url', id: 'http://goo.gl/IKyjuU', longUrl: 'https://slightlyoff.github.io/ServiceWorker/spec/service_worker/index.html' }, init: { status: 200, statusText: 'OK', headers: { 'Content-Type': 'application/json', 'X-Mock-Response': 'yes' } } }; var mockResponse = new Response(JSON.stringify(response.body), response.init); console.log('Responding with a mock response body:', response.body); event.respondWith(mockResponse); } });With your two files in place, you can navigate to the GitHub page,
https://username.github.io/service-workers/01/03/index.html, and you will see the success message in your browser.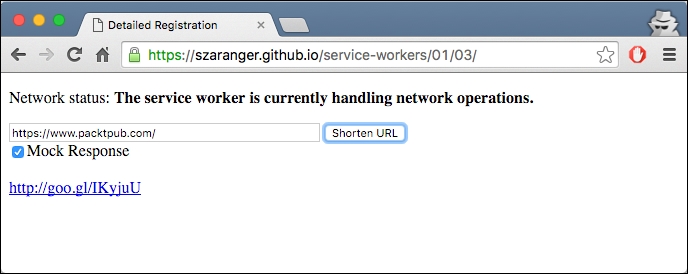
After the service worker registers itself successfully, we check to make sure that it is currently handling the network operations:
if (navigator.serviceWorker.controller) {
printStatus('The service worker is currently handling
network operations.');
…
}
In this case, we are calling the showRequest() function to add an event listener to the URL shorten button, and show the request block. Otherwise, the whole request block will be hidden:
function showRequest() {
   document.getElementById('url-shorten-btn')
.addEventListener('click', sendRequest);
   document.getElementById('request').style.display = 'block';
}
The sendRequest() function builds the HTTP request. It creates a POST request with a URL of the Google API for URL shortening:
xhr.open('POST',
        'https://www.googleapis.com/urlshortener/v1/url?' +
  'key=[Your API Key]');
You will have to obtain an API key for this service to be used. For this, follow these instructions:
Visit the Google Developers Console page at https://console.developers.google.com.
You can either select an existing project or create a new one.
Expand APIs & auth, in the sidebar on the left.
Click APIs. Now, in the list of APIs provided, make sure the status is ON for the Google URL Shortener API.
Finally, in the sidebar on the left-hand side, select Credentials.
If the Mock Response is checked, set the request header X-Mock-Response to yes:
if (document.getElementById('mock-checkbox').checked) {
      xhr.setRequestHeader('X-Mock-Response', 'yes');
    }
Now add an event listener to the load event and pass in a callback to assign the response data to the link displaying the result:
xhr.addEventListener('load', function() {
var response = JSON.parse(xhr.response);
var el = document.getElementById('short-url');

   el.href = response.id;
   el.innerHTML = response.id;
});
At the end of the sendRequest function, we are sending the original URL as well as the request object we built as a request:
request = {
        longUrl: document.getElementById('long-url').value
      };
xhr.send(JSON.stringify(request));
In the service-worker.js file, we are adding an event listener for the fetch event. We check that the request URL path has the urlshortner in it and the request header has X-Mock-Response:
if (requestUrl.pathname === '/urlshortener/v1/url' &&
    event.request.headers.has('X-Mock-Response')) {
…
   }
We build a mock response object with a body, status, and the headers:
   var response = {
      body: {
        kind: 'urlshortener#url',
        id: 'https://goo.gl/KqR3lJ',
        longUrl: 'https://www.packtpub.com/books/info/packt/about'
      },
      init: {
        status: 200,
        statusText: 'OK',
        headers: {
          'Content-Type': 'application/json',
          'X-Mock-Response': 'yes'
        }
      }
    };
Finally, we create a response with the mock response:
var mockResponse = new Response(
JSON.stringify(response.body), response.init);

console.log('Mock Response: ', response.body);
event.respondWith(mockResponse);Long-running requests can be the result of connectivity issues. Service workers are an ideal solution for overcoming these problems. Let's look at how we can implement a solution with service workers to handle request timeouts.
To get started with service workers, you will need to have the service worker experiment feature turned on in your browser settings. If you have not done this yet, refer to the previous recipe: Setting up service workers. Service workers only run across HTTPS. To find out how to set up a development environment to support this feature, refer to the following recipes: Setting up GitHub pages for SSL, Setting up SSL for Windows, and Setting up SSL for Mac.
Follow these instructions to set up your file structure:
First, we need to create an
index.htmlfile as follows:<!DOCTYPE html> <html lang="en"> <head> <meta charset="UTF-8"> <title>Request Timeouts</title> </head> <body> <p>Registration status: <strong id="status"></strong></p> <script> if ('serviceWorker' in navigator) { navigator.serviceWorker.register( 'service-worker.js', { scope: './' } ).then(function(serviceWorker) { document.getElementById('status').innerHTML = 'successful'; }); } else { document.getElementById('status').innerHTML = 'unavailable'; } </script> <script src="https://code.jquery.com/jquery-2.2.0.js"></script> </body> </html>Create a JavaScript file called
service-worker.jsin the same folder as theindex.htmlfile with the following code:function timeout(delay) { return new Promise(function(resolve, reject) { setTimeout(function() { resolve(new Response('', { status: 408, statusText: 'Request timed out.' })); }, delay); }); } self.addEventListener('install', function(event) { self.skipWaiting(); }); self.addEventListener('activate', function(event) { if (self.clients && clients.claim) { clients.claim(); } }); self.addEventListener('fetch', function(event) { if (/\.js$/.test(event.request.url)) { event.respondWith(Promise.race([timeout(400), fetch(event.request.url)])); } else { event.respondWith(fetch(event.request)); } });With your two files in place, navigate to
index.htmland open the DevTools. You will see the time out error logged on the console.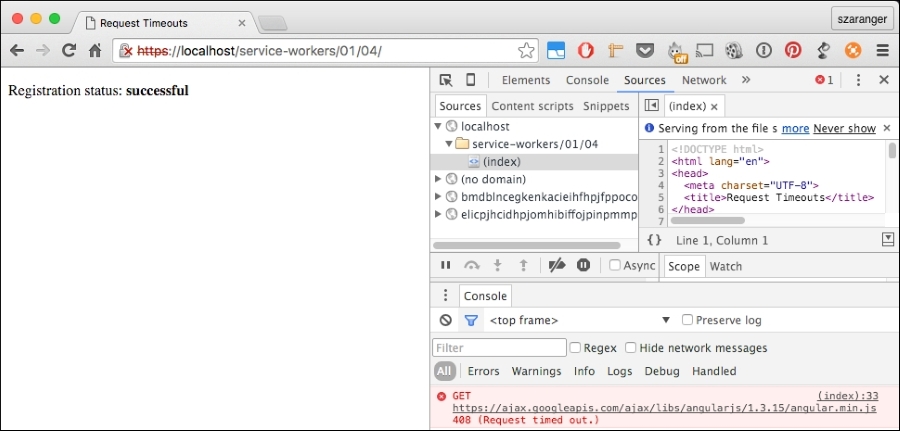
In our index.html file, we're fetching a large uncompressed jQuery library:
<script src="https://code.jquery.com/jquery-2.2.0.js"></script>
In our service-worker.js file, the event listener of the install event is calling the skipWaiting() method, which forces the waiting service worker to become the active service worker:
self.addEventListener('install', function(event) {
    self.skipWaiting();
});
The skipWaiting() method is used inside the active event handler, which in turn uses Clients.claim() to ensure that updates to the underlying service worker take effect immediately, for both the current client and all other active clients:
self.addEventListener('activate', function(event) {
    if (self.clients && clients.claim) {
        clients.claim();
    }
});
In event listener for fetch, we pass in a Promise.race() function where the first iterable, which is timeout(400), gets resolved first:
self.addEventListener('fetch', function(event) {
  if (/\.js$/.test(event.request.url)) {
    event.respondWith(Promise.race([timeout(400), fetch(event.request.url)]));
  } else {
    event.respondWith(fetch(event.request));
  }
});
We will elaborate on the Promise.race() function soon. The timeout() function returns a promise with 408, which is the code for the request timed out status.
The Promise.race() method returns a promise that resolves, or rejects, as soon as one of the promises in the iterable resolves or rejects, with the value or reason from that promise:
var p1 = new Promise(function(resolve, reject) {
    setTimeout(resolve, 400, "one");
});
var p2 = new Promise(function(resolve, reject) {
    setTimeout(reject, 100, "two");
});

Promise.race([p1, p2]).then(function(value) {
  // Not called
}, function(reason) {
  console.log(reason); // "two"
  // p2 is faster, so it rejects
});
As you can see, two is faster, so the result is reject.