


 Download code from GitHub
Installing with and without Automation Magic
While you can manually install Oracle Linux from a USB or an ISO image, at an enterprise level, it is more common to automate the installation. The Appendix – kickstart options at the end of this chapter covers the manual installation, which is easier to do when you have occasional installs.
Most data center installs use an automated method, as this allows you to scale quickly.
This chapter provides different recipes to help build an operational Preboot Execution (PXE; pronounced pixie) system.
PXE booting is a technology developed by Intel. It allows systems with the appropriate ISO (or OS RPMs) to boot from the network, downloading all the required files from a server. While there are older methods, such as the bootstrap protocol (BOOTP), the industry has rapidly adopted PXE boot as the most common standard. While PXE booting started with Intel systems, ARM systems can also boot using TFTP. For the PXE boot process to work, you would normally have a DHCP server and a PXE server on the network. A high-level summary of the process can be seen in the following diagram:

Figure 2.1 – PXE boot process
The following are each of the steps described at a high level:
- The PXE client will request an IP address from an available DHCP server.
- The first DHCP server on the network to respond to the client will provide it with an IP address, network mask, DNS information, default route, and other required network parameters.
- The PXE client will do a boot service discovery, looking for a PXE server. Optionally, the DHCP server can be configured to point to the PXE server to boot from.
- The PXE server sends the client the network bootstrap program and IP information on where to download the files. This enables the client to boot from the network to install an OS.
- The PXE client requests media (RPMs and control files) as needed from an HTTPS server. HTTPS is not the only protocol required; NFS and FTP servers can also be used, although HTTPS is the most common method. The PXE system also sends the kickstart parameters to the client via the kickstart file. These parameters contain the specifics to configure the system’s storage, network, and packages to be installed.
- The media server sends the files requested to the PXE client, allowing an OS to be installed.
When configuring the PXE server in this example, there are three components required:
- DHCP server: This assigns not only IP addresses to servers as they boot but also important parameters that enable PXE boot.
- Trivial File Transfer Protocol Daemon (TFTPD): This service works as a TFTP server, allowing the bootloader to run on the client, starting the OS installation.
- HyperText Transfer Protocol Daemon (HTTPD): This is a web server and is used to host config files and RPMs used for the installation.
Note
There are some other options, such as using dnsmasq as a combined server that works as a DHCP server, a TFTP server (most commonly TFTPD), and a DNS forwarder. However, in many enterprise environments, separate systems are needed. As an example, a Microsoft DHCP server may already be used on the network.
In this example, there are two logical servers running three different services, a DHCP server, a TFTP server on the first system. The second system is the PXE server and will also be the HTTP server used to serve up the Red Hat Package Manager (RPM) files and control files required for the installation. Both systems are multihomed and will be running DHCP and PXE on their secondary interface. The systems also have static IP addresses on the secondary interfaces.
We will cover the following main recipes, which make up the PXE feast, in this chapter:
- Automating the OS install options with kickstart
- DHCP server – more than just IPs
- Setting up a web server – HTTPD
- Serving up the boot – TFTPD
- Back in the day – a manual installation
Note
A multihomed server is a system that is connected to multiple networks at the same time. This is often done in enterprise data centers to isolate systems, while at the same time allowing a controlled system that allows some data to pass. It is possible to set up a PXE server on a single network.
Technical requirements
The easy way to create a new kickstart file requires building a new OS, as this process will automatically create the file, which can later be modified as needed. A PXE environment also requires additional systems or VMs for a DHCP server and HTTPS server. Before you start, you will first need to download an ISO image. Using a desktop virtualization product such as Oracle VM VirtualBox is recommended.
The related configuration files for many of the recipes in this book are available on GitHub, at https://github.com/PacktPublishing/Oracle-Linux-Cookbook.
Automating the OS install options with kickstart
The kickstart file is one of the most important parts of the automated install process. This file contains all the information required to automatically install and configure the OS. The kickstart file is a simple text file that contains the directions to allow an unattended installation.
Getting ready
In order to work with kickstart files, you will need somewhere to build the system, such as Oracle VM VirtualBox. This system can be used to create your first kickstart file, as well as testing new kickstart files before moving them into the PXE environment.
Note
Anaconda is the Oracle Linux installer. It can operate via an automated install using a kickstart file, or interactively via a graphic or text install interface.
How to do it…
While you can manually create a file from scratch, it is much easier to start with the file that Anaconda creates on installation. This kickstart file is created automatically when a manual is installed and saved on the new system in /root/anaconda-ks.cfg. This file can be easily edited and reused for future builds. Let’s look at the file by breaking it down into smaller sections. This system is a graphical installation. Other options are text or cmdline:
Note
There are many options for kickstart, and they are listed in Appendix – kickstart options.
#version=OL8
# Use graphical install
graphical
The repo used to install Oracle Linux was a directory that was loopback mounted from an ISO file. baseurl can also be an HTTPS server, an NFS location, or an FTP server. For example, --baseurl=https://pxe.m57.local/ol8 will tell kickstart to pull the RPMs from a web server:
repo --name="AppStream" --baseurl=file:///run/install/sources/mount-0000-cdrom/AppStream
The packages are the software packages selected. Names starting with an @ sign are package groups, and lines without @ are individual packages. Also, the ^ symbol is used to enable the installation of only the required packages in a group. If ^ is not set, all packages in the group are installed. In this example, the graphical-server-environment package group RPMs are installed as well as the kexec-tools package:
%packages
@^graphical-server-environment
kexec-tools
%end
This is where the default keyboard and language are selected:
# Keyboard layouts
keyboard --xlayouts='us'
# System language
lang en_US.UTF-8
This is the hostname for the new server. Ideally, it should be the Fully Qualified Domain Name (FQDN) for the system:
# Network information
network  --hostname=ol802.lab.m57.local
This is used to select a CD-ROM or a CD-ROM mounted on a filesystem as the installation media:
# Use CDROM installation media
cdrom
This is used to run the setup agent on the first boot:
# Run the Setup Agent on first boot
firstboot --enable
Here, the install disk is selected, as well as the configuration of the logical volume manager and filesystems:
ignoredisk --only-use=sda
# Partition clearing information
clearpart --none --initlabel
# Disk partitioning information
part /boot --fstype="xfs" --ondisk=sda --size=1024
part pv.116 --fstype="lvmpv" --ondisk=sda --size=80868
volgroup ol --pesize=4096 pv.116
logvol /home --fstype="xfs" --size=5120 --name=home --vgname=ol
logvol / --fstype="xfs" --size=51200 --name=root --vgname=ol
logvol /u01 --fstype="xfs" --size=10240 --name=u01 --vgname=ol
logvol /var --fstype="xfs" --size=5120 --name=var --vgname=ol
logvol swap --fstype="swap" --size=4056 --name=swap --vgname=ol
logvol /var/log --fstype="xfs" --size=5120 --name=var_log --vgname=ol
This is the time zone for the server:
# System timezone
timezone America/New_York --isUtc
An encrypted root password can be set on the new system. Normally, the password is encrypted, but optionally, you can use the –-plaintext option with a plaintext password. You can also generate an encrypted password using the python3 -c 'import crypt,getpass;pw=getpass.getpass();print(crypt.crypt(pw) if (pw==getpass.getpass("Confirm: ")) else exit())' Python command:
# Root password
rootpw --iscrypted $6$W5fC.GDUSIVXPDS7$zQFm49tGCtRbfyAd/0f57QcuPZYtOB/gobgN2oKNG
zqrseiNtm7QqkthCcdiNxGJhzLSIQpNyxRQXEPJPuaYM.
This enables kdump, allowing the kernel to save a crash dump to a device for troubleshooting:
%addon com_redhat_kdump --enable --reserve-mb='auto'
%end
This is the password policy for root, users, and Linux Unified Key Setup (LUKS) passphrases:
%anaconda
pwpolicy root --minlen=6 --minquality=1 --notstrict --nochanges --notempty
pwpolicy user --minlen=6 --minquality=1 --notstrict --nochanges --emptyok
pwpolicy luks --minlen=6 --minquality=1 --notstrict --nochanges --notempty
%end
You can edit the file as needed. Before using a new file, it can be tested with the ksvalidator command. This command is part of the pykickstart package, installed via dnf install -y pykickstart.
Once the package is installed, test a new kickstart file by running ksvalidator $FILE. A sample with an error will look like the following, where line 3 defines the install as xgraphical, which is an unknown option:
[root@localhost ~]# ksvalidator anaconda-ks.cfg
The following problem occurred on line 3 of the kickstart file:
Unknown command: xgraphical
Resolve the error and rerun the validation. In this example, graphical is the correct parameter to use. A clean validation returns nothing and will look as follows:

Figure 2.2 – Clean ksvalidator
Kickstart options!
Now that you have a basic understanding of the kickstart file, you can start adding new options. These options allow you to automate the installation and also grant you more control. The options are covered in Appendix – kickstart options.
How it works…
You can boot any system with kickstart manually by adding the ks parameter to the GRand Unified Bootloader (GRUB) entry. The format is ks=PATH_TO_FILE, where PATH_TO_FILE is a URL where the kickstart file can be read from. This is usually placed on an HTTP server that is accessible to clients.
DHCP server – more than just IPs
The DHCP server will be running a standard DHCP server that is available with Oracle Linux 8. Installation of DHCP is straightforward.
Getting ready
To set up a DHCP server, you will need an Oracle Linux 8 VM running on the same subnet that VMs that will be installed are using.
How to do it…
Install the DHCP server with the dnf install -y dhcp-sever command. The following screenshot shows the full process:
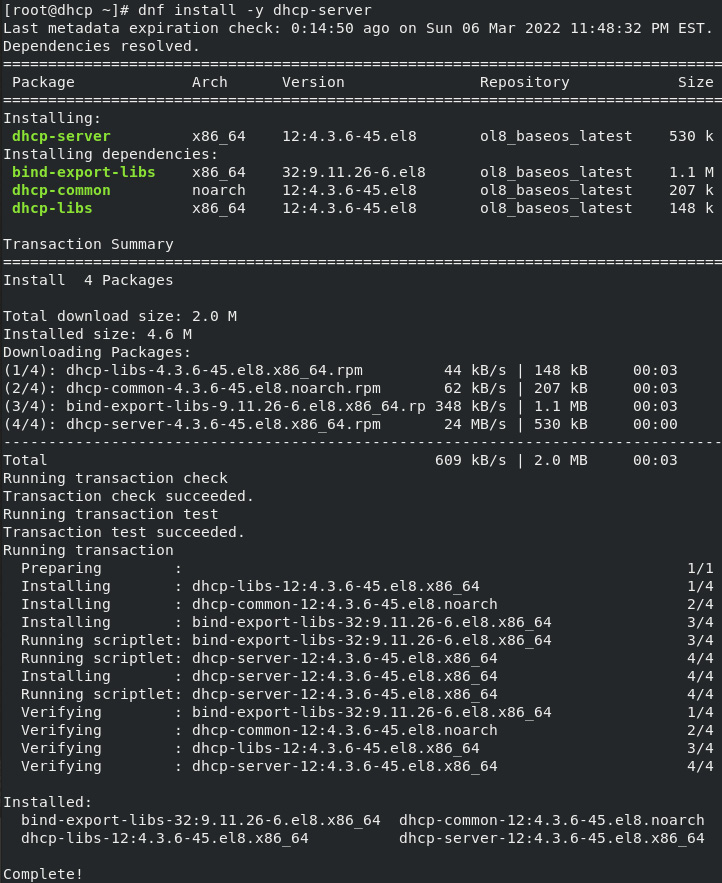
Figure 2.3 – DHCP server installation
Once installed, enable DHCP traffic through the firewall (as seen in the following screenshot) with the firewall-cmd --add-service=dhcp --permanent and firewall-cmd --reload commands:

Figure 2.4 – DHCP firewall commands
The DHCP server has a sample DHCP config file installed in /usr/share/doc/dhcp-server. This has sample config files for both IPv4 in /usr/share/doc/dhcp-server/dhcpd.conf.example and IPv6 in /usr/share/doc/dhcp-server/dhcpd6.conf.example. For this DHCP server, we will use IPv4 and copy the sample config file to /etc/dhcp/dhcpd.conf. There is an existing config file, but by default, it is mostly empty with no configuration and can be replaced as in the following screenshot:

Figure 2.5 – Copy dhcp.conf
Next, the config file will need to be updated, changing the IP address range, as well as adding an NTP server to the configuration with the option of option ntp-servers 192.168.200.1, which sets the NTP server to 192.168.200.1. While configuring a NTP server is optional, it is highly recommended. Additionally, when the PXE server is not the DHCP server, you will need to add the next server parameter to the subnet. This will point DHCP clients to the TFTP boot from the PXE server.
Note
If you are using an existing DHCP server, make sure you add the next-server parameter to point to the PXE server that has the TFTP server.
Since the TFTP server is running on the PXE server, the DHCP server will need the next server option to be set to the IP address of the PXE server. A complete sample config file is shown here:
# dhcpd.conf
#
# These options are common to all networks
option domain-name "lab.m57.local";
option domain-name-servers 192.168.56.10;
default-lease-time 600;
max-lease-time 7200;
# If the DHCP server is the main server for the network, this should be set authoritative;
# This sets where logs are sent. By default they are sent to syslog. You can reconfigure sysylog to send to a different location as needed.
log-facility local7;
subnet 192.168.56.0 netmask 255.255.255.0 {
  range dynamic-bootp 192.168.56.100 192.168.56.150 ;
  option broadcast-address  192.168.56.255;
  option routers 192.168.56.1;
  option domain-name-servers 192.168.56.10 ;
  option domain-name "lab.m57.local";
  option ntp-servers 192.168.200.1;
   next-server pxe.lab.m57.local;
}
# Hosts which require special configuration options can be listed here, with the host details. This could be used to hard-code an IP address to a host, or define host-specific parameters like a non-0standard vmunix filename or a fixed IP address.
host fixedhost {
  hardware ethernet 0:0:aa:bb:cc:dd;
  filename "vmunix.fixedhost";
  server-name "fixedhost.m57.local;
}
# When using a fixed IP address, it is more common to assign the host an IP address outside of the DHCP managed IP address range. set.
host fantasia {
  hardware ethernet 08:01:02:03:04:05;
  fixed-address fixedhost2.m57.local;
}
Next, we need to test the DHCP server. To do this, install the nmap program with dnf install -y nmap.
Nmap is a powerful utility and can be used for many things. It is most well known as a port scanning tool, letting the user scan networks looking for servers that respond to a ping with nmap -sP 192.168.200.1/28, as seen in the following screenshot:
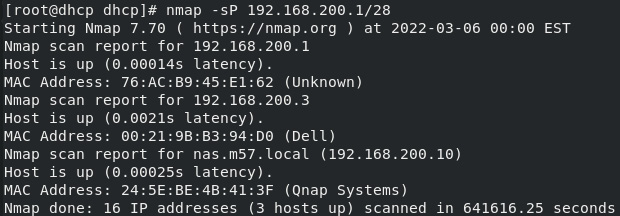
Figure 2.6 – Nmap ping scan
It can also be used to identify the OS and open ports of a specific server, with nmap 192.168.200.34 -O:
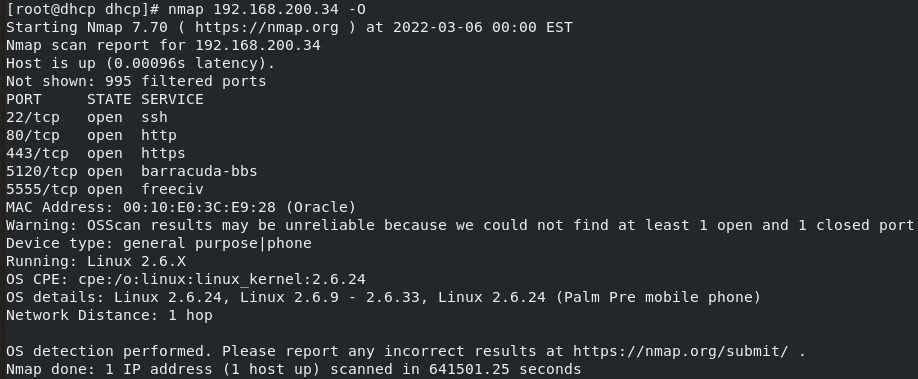
Figure 2.7 – Nmap ID server
While Nmap is a powerful tool for scanning networks, it can also be used for many additional tasks, including checking that a DHCP server is replying correctly. This is done with the broadcast-dhcp-discover script and is used via the nmnap ––script option. Additionally, if your system has multiple interfaces, you can specify the network interface used by the scan with the -e option. In this environment, the DHCP server is verified with the nmap --script broadcast-dhcp-discover -e enp0s8 command:
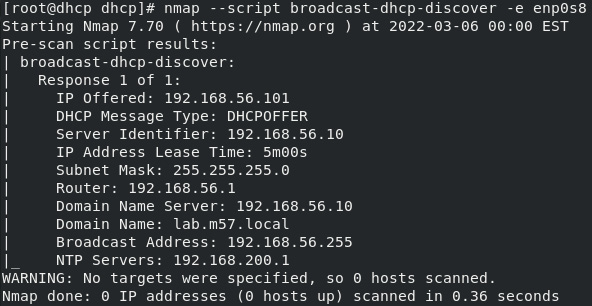
Figure 2.8 – Nmap DHCP discovery
We now know how the DHCP server works, so next is the Apache HTTPD server.
Setting up the web server – HTTPD
The next step for the PXE server is to install a web server. In this example, we will use Apache. Other web servers will also work, but Apache is one of the most common.
Getting ready
To set up an HTTP server, you will need an Oracle Linux 8 VM running in your environment. The server’s IP address should be routable to the subnets the VMs are using, and the firewall ports should allow HTTP/HTTPS traffic. Ideally, you should also have enough space for several ISO files. Normally, 20-30 GB is enough data space.
How to do it…
Starting the install of the Apache HTTPD server is simple; just run yum install -y httpd.
Once the web server is installed, copy the full ISO file to the server into a directory of your choice. In our example, OracleLinux-R8-U5-x86_64-dvd.iso is copied into /root, as seen in Figure 2.9.

Figure 2.9 – Oracle Linux ISO in /root
The next step is to mount the ISO file in a directory under docroot. With the standard install of Apache, docroot is in /var/www/html, so a directory named OL8 is created. When the ISO is mounted, it is more efficient to use a loopback mount method. This allows an ISO file to be mounted as a normal filesystem. Next, using a loopback mount, mount the ISO file using /var/www/html/OL8 as the mount point using the following command:
mount -o ro,loop /root/OracleLinux-R8-U5-x86_64-dvd.iso /var/www/html/OL8
Once mounted, a df command will show the mounted filesystem. The entire chain of commands can be seen in the following screenshot, Figure 2.10.
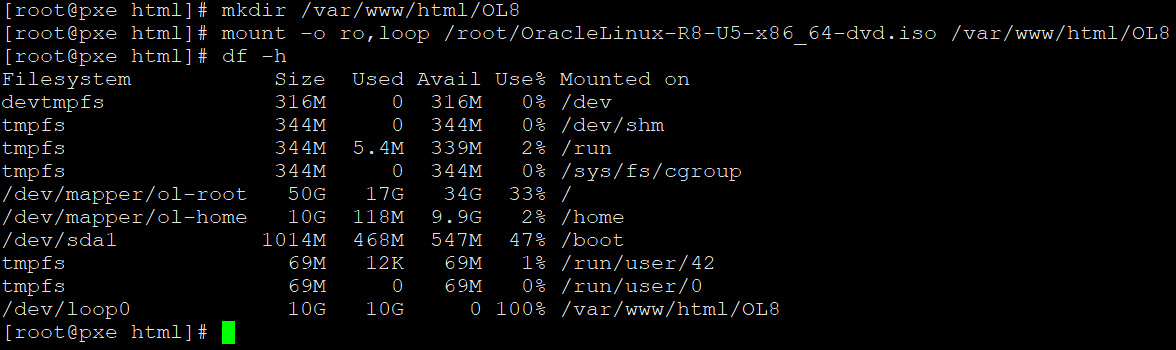
Figure 2.10 – ISO mounted
Now that the filesystem is mounted, let’s open up ports 80 and 443 in the firewall. This is easily done with firewall-cmd, adding both the http and https ports opened and saved as permanent changes to the firewall. Once the ports are opened, the firewall rules are reloaded. The following three commands are run to perform these tasks:
firewall-cmd --add-service=http --permanent
firewall-cmd --add-service=https --permanent
firewall-cmd --reload
Now that the firewall is opened, Apache is installed, and the ISO is mounted via a loopback, we can start the Apache server with the systemctl start httpd command.
You can verify that all is working as expected by pointing your browser to the server’s IP address and the OL8 directory, as seen in the following screenshot. This will show the contents of the ISO, including the release notes and the RPMs under the BaseOS directory, as seen in Figure 2.11.
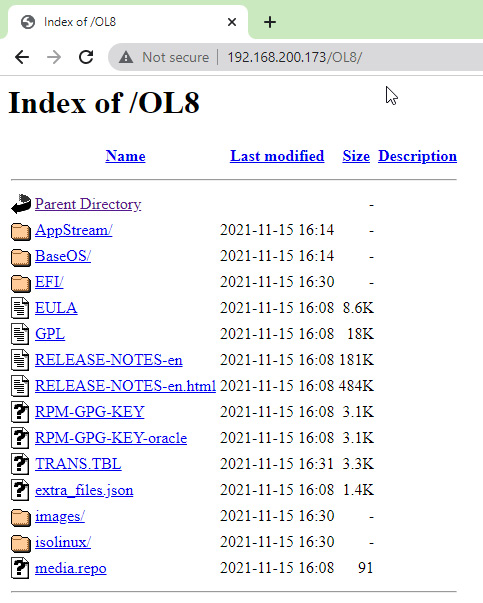
Figure 2.11 – ISO file accessible via httpd
Serving up the boot – TFTPD
TFTP is used for simple file transfers over the network. This is most often used to load the initial bootloader for an OS, or some firmware updates for embedded devices and older hardware. In the context of the PXE server, the TFTP system is used for the initial bootloader.
Getting ready
To set up a TFTP server, you will need an Oracle Linux 8 VM running in your environment. The server should be on the same network subnet that the systems being built are using. Ideally, you should also have enough space for several boot files. Normally, 5 GB is enough data space.
How to do it…
Installing TFTP is simple. Run the dnf install -y tftp-server command, as seen in Figure 2.12.

Figure 2.12 – TFTP installation
Once the installation is complete, we need to open up the firewall for TFTP and reload it:
firewall-cmd --add-service=tftp --permanent
firewall-cmd --reload
The output of these commands is as shown in the following screenshot:

Figure 2.13 – TFTP firewall
After installation and the firewall has opened, we need to prepare the system by installing the bootloaders, preparing an Oracle Linux 8 TFTP location, and creating a boot menu.
Note
This example is using a BIOS-based host. If you want to use a UEFI host, you will need to install grub2-efi and configure UEFI-specific parameters. The Oracle docs for this can be found at https://docs.oracle.com/en/operating-systems/oracle-linux/8/install/install-CreatingaNetworkInstallationSetup.html#uefi-clients.
To install the bootloaders for BIOS-based installs, we will install the syslinux package. The syslinux package includes bootloaders for network booting (PXELINUX), Linux (ext2/ext3/ext4) or btrfs filesystems (EXTLINUX), MS-DOS FAT filesystems (SYSLINUX), and bootable El Torito CD-ROMs (ISOLINUX). For network booting, we will be using PXELINUX:

Figure 2.14 – Syslinux installation
Next, we will copy the boot image file, pxelinux.0, and copy the file into /var/lib/tftpboot:
cp /usr/share/syslinux/pxelinux.0 /var/lib/tftpboot/
Then, we will create an Oracle Linux 8 boot directory under tftpboot:
mkdir /var/lib/tftpboot/ol8
Now, we need to copy over the PXE boot files from the ISO we previously mounted when installing the HTTP server to the new Oracle Linux 8 boot directory:
cp /var/www/html/OL8/images/pxeboot/* /var/lib/tftpboot/ol8/
Next, we need a boot menu. Luckily, we can copy over the samples and get things moving quickly. We only need the menu files, so using the following command to copy things works just fine:
cp -v /usr/share/syslinux/{ldlinux.c32,libcom32.c32,libutil.c32,menu.c32,vesamenu.c32} /var/lib/tftpboot/ Almost done here. To make a directory for the PXS config files and build the default menu, use the following:
mkdir /var/lib/tftpboot/pxelinux.cfg
We can finally install a config file. Copy this sample configuration file into /var/lib/tftpboot/pxelinux.cfg/default:
default linux-auto
prompt 1
timeout 60
display boot.msg
label linux-auto
  menu label ^Install OL8 in Graphical Mode using the kickstart file
  menu default
  kernel ol8/vmlinuz
  append initrd=ol8/initrd.img ip=dhcp inst.repo=http://pxe.lab.m57.local/ol8 ks=http://pxe.lab.m57.local/ks_files/ol8ks.cfg
label linux-manual
  menu label ^Install OL8 in Graphical Mode with manual input
  menu default
  kernel ol8/vmlinuz
  append initrd=ol8/initrd.img ip=dhcp inst.repo=http://pxe.lab.m57.local/ol8
label rescue
  menu label ^Rescue installed system
  kernel ol8/vmlinuz
  append initrd=ol8/initrd.img rescue
label local
  menu label Boot from ^local drive
  localboot 0xffff
In this sample, the default install will be linux-auto, and that will start in 60 seconds unless the user manually selects one of the following options:
linux-auto: This is the default and will install Oracle Linux using the kickstart parameterslinux-manual: This will kick off a traditional install or Oracle Linux, prompting the user to select all the options from Anaconda manuallyrescue: This will boot in rescue modelocal: This will boot from the existing local disk
You can easily modify the menus as needed to meet your specific needs. PXE booting, while daunting at first, provides a powerful tool to manage your Linux installations.
How it works…
When systems boot, they will load the bootloader based on the DHCP server config. This will then have the system boot from the TFTP server, starting the PXE process.
Back in the day – a manual installation
Automated installations are great, but for some admins, the complexity of configuring and maintaining the infrastructure to support an automated installation is more effort than doing a manual installation. This recipe will go over how the manual installation works.
Getting ready
To do this, you will need a system to install from. In the example, Oracle VM VirtualBox will be used, but it could just as easily be on a bare-metal server or a different hypervisor. You will also need installation media. Normally, an ISO works fine, but you can also use a boot ISO and an HTTP server, an FTP server, or even a network file share.
How to do it…
Regardless of whether you boot from an ISO, a USB stick, or even a kickstart file with a graphical installation option set, the process is the same!
If you are booting from a boot-only image, you will need to enable the network and then point to an installation source. This is shown in the next few steps. If you are installing from an ISO or USB, skip to the How it works… section:
- When booting from a boot image, you will need to select Install Oracle Linux X to start the process. When possible, use the latest version of Oracle Linux. When doing an installation you will get the first screen where you can test the boot image or continue:
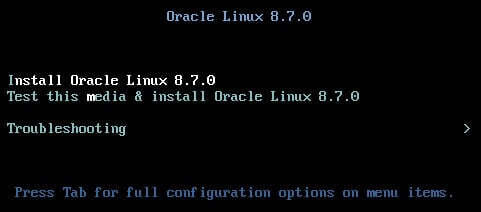
Figure 2.15 – Linux installer boot
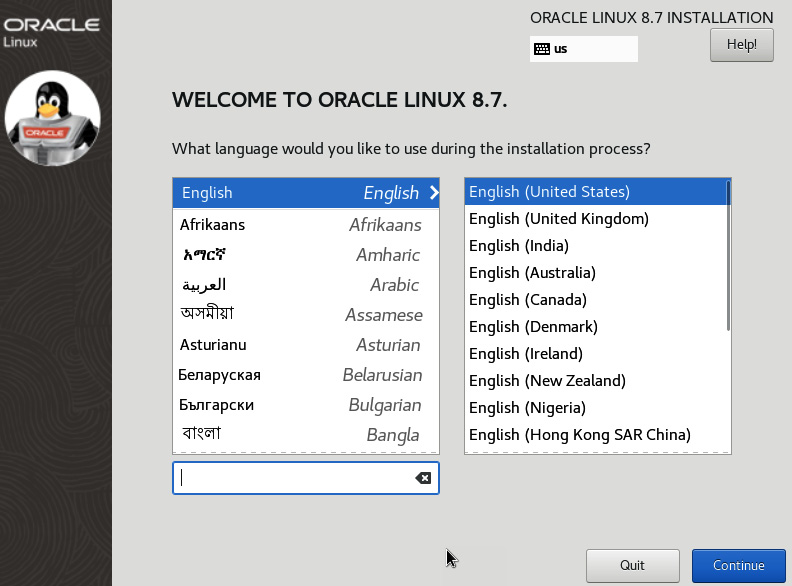
Figure 2.16 – Install language
- Click on Continue once you have picked your language. Next, you should see the INSTALLATION SUMMARY section:
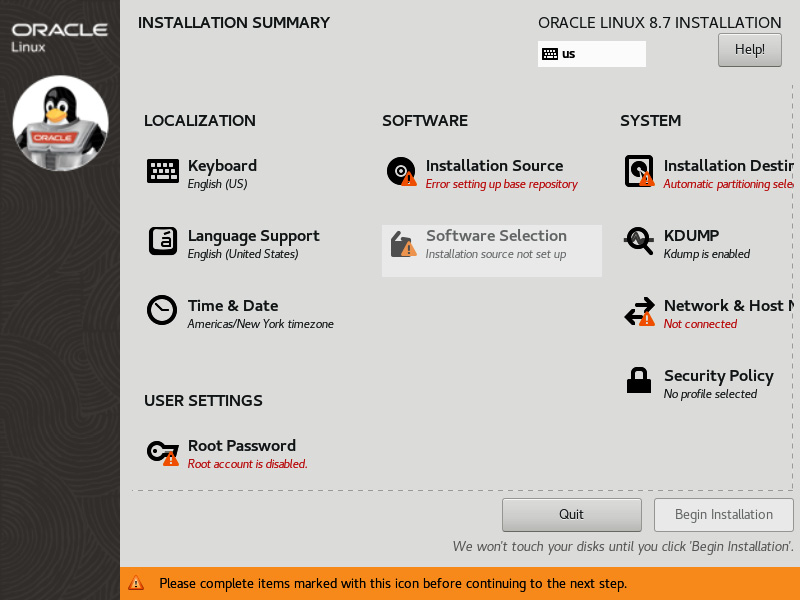
Figure 2.17 – Installation Summary
For now, we need to do two tasks:
- Enable the network
- Set Installation Source to Oracle’s yum repo
To enable the network, click on the Network & Host Name option.
- Here, you will need to switch Ethernet on, and also update the hostname with the name of the server. The network will automatically use DHCP to configure the boot image. You can optionally manually configure the IP stack by clicking the Configure option.
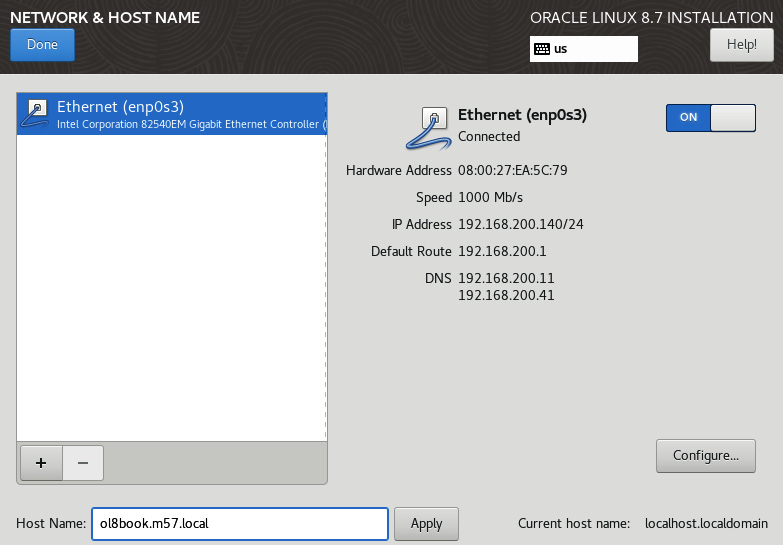
Figure 2.18 – Network & Host Name
- Next, click Apply and then Done. This will take you back to the INSTALLATION SUMMARY page. From there, we will need to select Installation Source to set where we will get the install files.
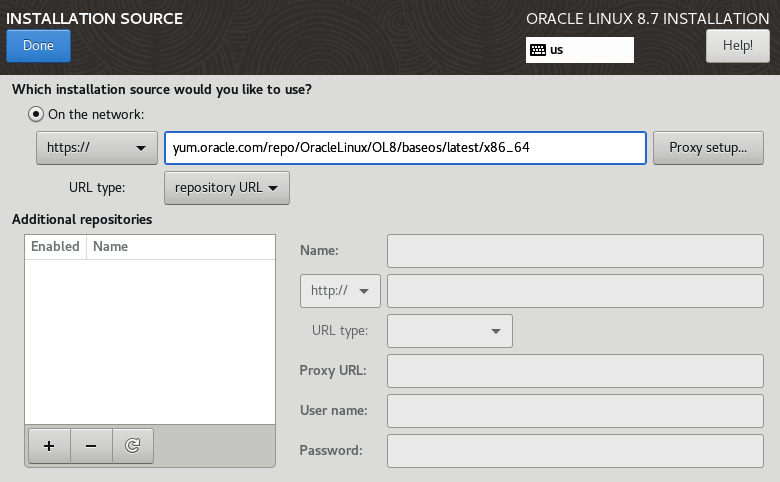
Figure 2.19 – Installation Source
In this example, we are using the Oracle Public YUM server as the installation source. You can optionally add additional repositories if needed, as well as set any proxy settings if required. You can also set an FTP:// patch for an NFS server path. Once you have a path, select Done.
- This will take you back to the INSTALLATION SUMMARY page. Wait a few minutes for the repo index to load. Once it loads, you should see the Installation Source option, as well as the option for Software Selection.
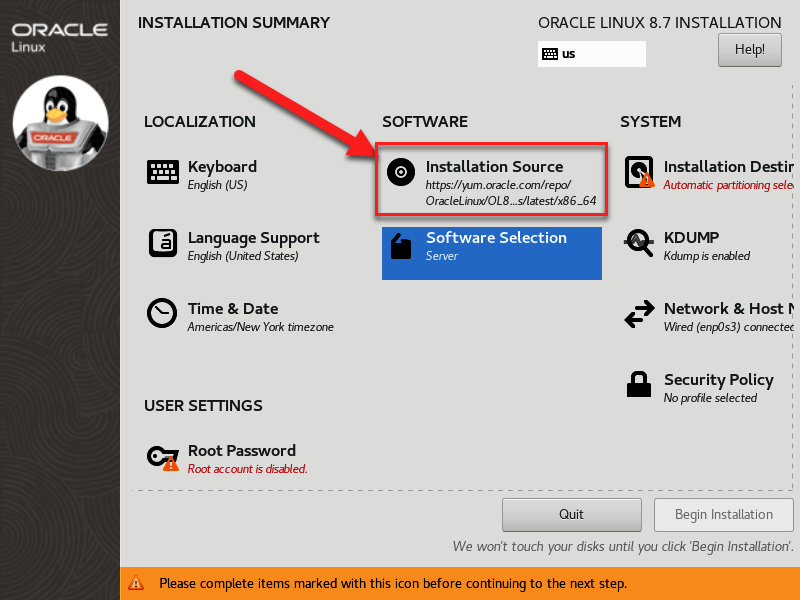
Figure 2.20 – Selecting Installation Source
Manually network booting is otherwise the same as an ISO or USB boot.
How it works…
A manual boot process is fairly simple to do. Once booted, on the INSTALLATION SUMMARY screen, you have many options:
- LOCALIZATION: This is where you can set settings for country-specific options language, keyboard type, time, and more:
- SOFTWARE: This sets the software sources and what software groups or packages will be installed:
- Installation Source: This sets the source and software being installed
- Software Selection: This sets what software groups and packages are being installed
- SYSTEM: These are system-level parameters:
- Installation Destination: This is the destination for the install. This includes the initial filesystem layout.
- KDUMP: This allows you to set up kdump, a kernel crash dump tool that writes system information to disk for analysis later.
- Network & Host Name: This is where you set the hostname and network information.
- Security Policy: This enables a more secure installation, allowing you to start with a system that meets popular security standards such as STIG and PCI-DSS.
- USER SETTINGS: This is where you can set users, groups, and passwords:
- Root Password: This sets the initial root password
Generally, the first setting that is set is the network. This is key for not only network installations but also setting up NTP for time synchronization:
- To set up the network, select Network & Host Name:
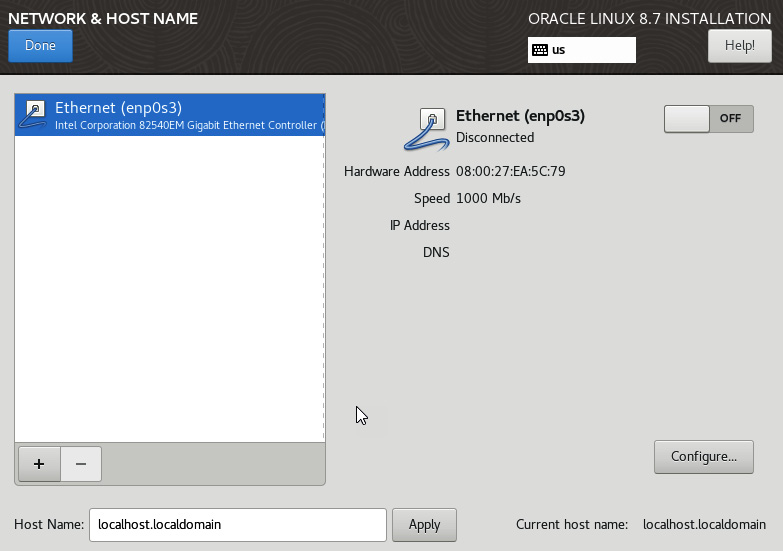
Figure 2.21 – Setting hostname and IP info
By default, the network port is not enabled and the hostname is not set. You can manually set the hostname. Don’t forget to use an FQDN when setting the hostname. This should include the name and the domain name. When you enable the network, the system will automatically grab DHCP IP info. If you want to manually configure this, click on Configure…:
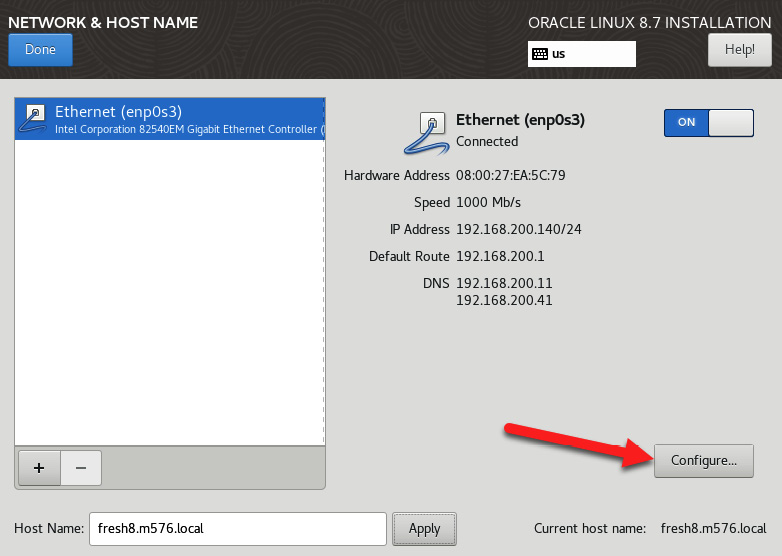
Figure 2.22 – Accessing manual network settings
- This will take you to the network details, where you can manually set the MTU, IP address, and other NIC-specific settings. You can also disable IPv6 if needed.
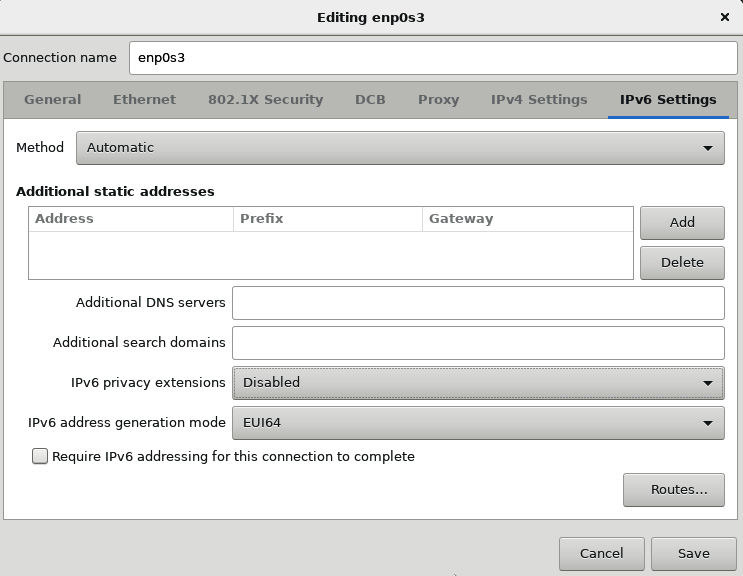
Figure 2.23 – Manual network settings
- Once the network is set, you can use network resources such as NTP servers to synchronize the clock. To do this, under TIME & DATE, click on the gears:
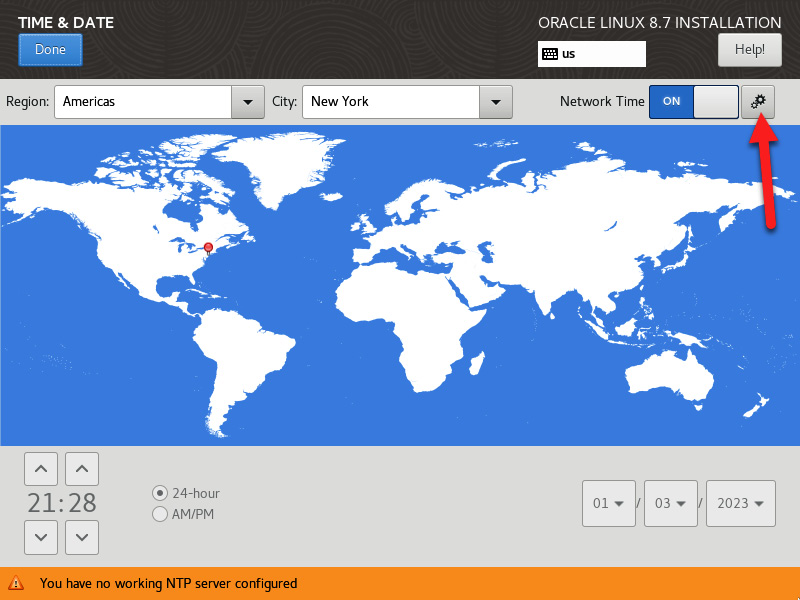
Figure 2.24 – Accessing NTP settings
- Then, you can add NTP servers. By default, a public server is used, but if you run local NTP servers, make sure you add those here.
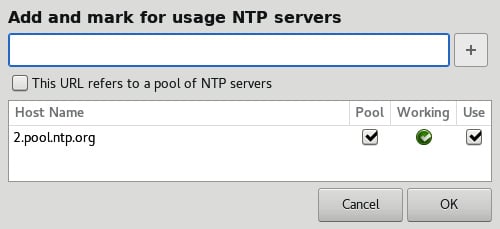
Figure 2.25 – NTP settings
- Next, additional software sources can be added under Installation Source as needed. This was done previously when doing a network install.
You can also set what RPM groups are installed, along with any additional software. This is done under SOFTWARE SELECTION:
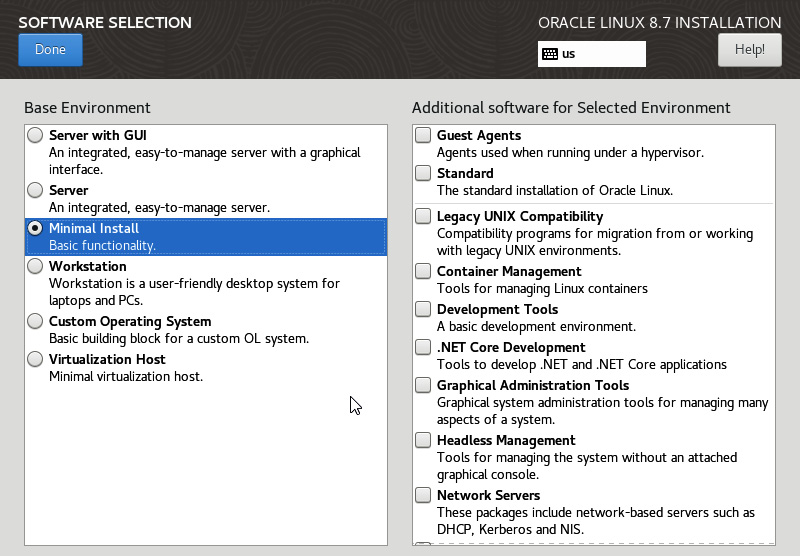
Figure 2.26 – Software Selection
- After setting Base Environment and adding any additional software, the next task is to set up the installation destination. This is done by clicking on Installation Destination.
From here, you should see the physical and logical drives available to the system. The default is to set Storage Configuration as Automatic, but let’s explore a different boot disk structure by selecting a custom configuration. Once Custom is selected, click on the Done button.
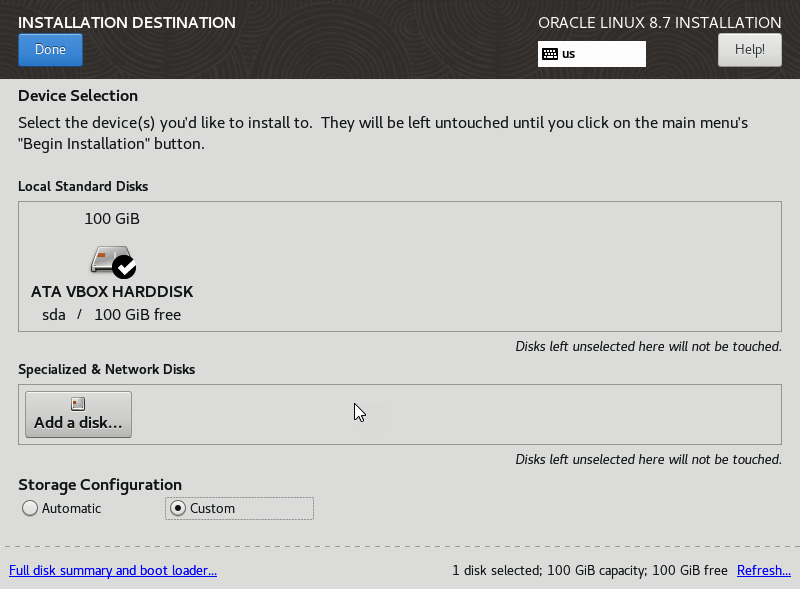
Figure 2.27 – Installation Destination
- From here, you can pick the default volume management strategy, as well as manually creating a new layout. Most systems will use an LVM install, as this gives you the flexibility to resize partitions down the road.
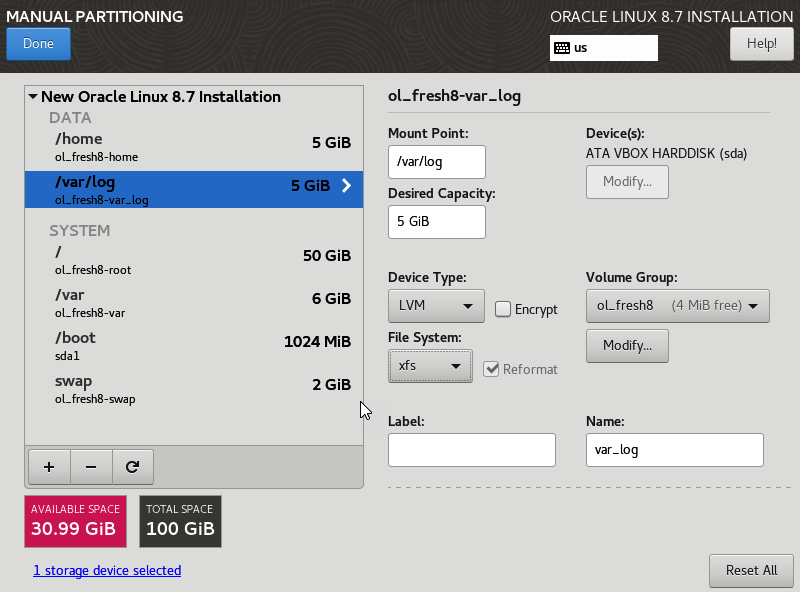
Figure 2.28 – Manual Partitioning
Don’t forget to click Done and accept all the changes to the layout.
- As a note, if you boot from a UEK-based install, you now have the option to use Btrfs as the root filesystem.
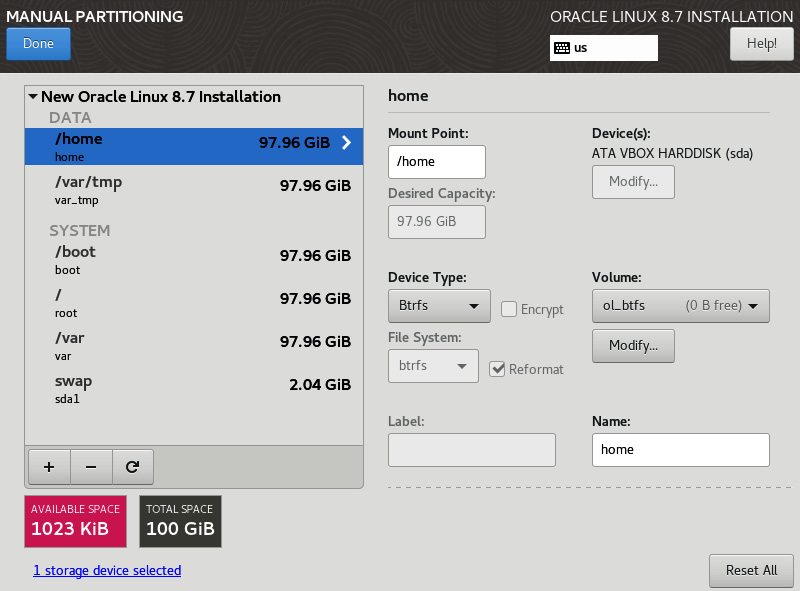
Figure 2.29 – Btfrs partitioning
Btrfs will look a little different, as the system combines the role of volume manager and filesystem into one system. This means at the time of installation, all of the filesystems will show all the space available. This can be updated after the OS is installed and a quota is set for each directory that needs to be limited. This is covered in the Btfrs recipes in Chapter 4.
You could finish up now by just giving root a password… but there is one more basic task, and that is to apply a security policy to the system. The security policy allows the installer to preconfigure the system to follow the policy set. This is very helpful when installing systems that support workloads such as HIPPA, PCI DSS for credit card processing, or STIG for public sector workloads.
- To set a policy, select Security Policy from Installation Summary:
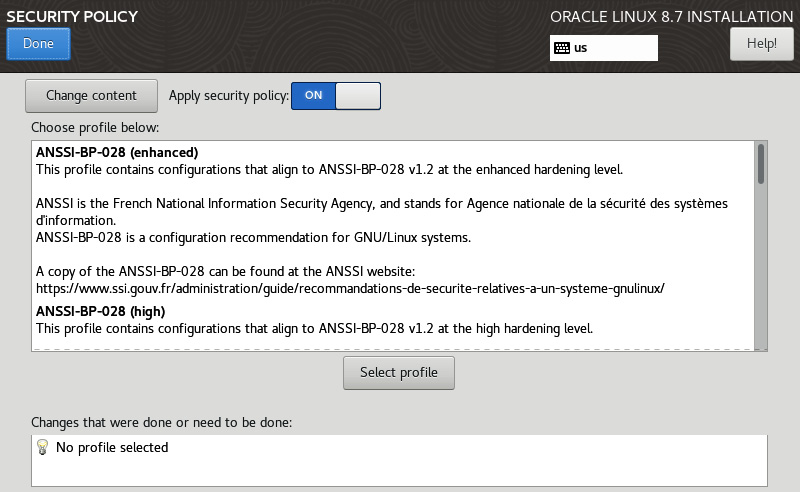
Figure 2.30 – Security Policy
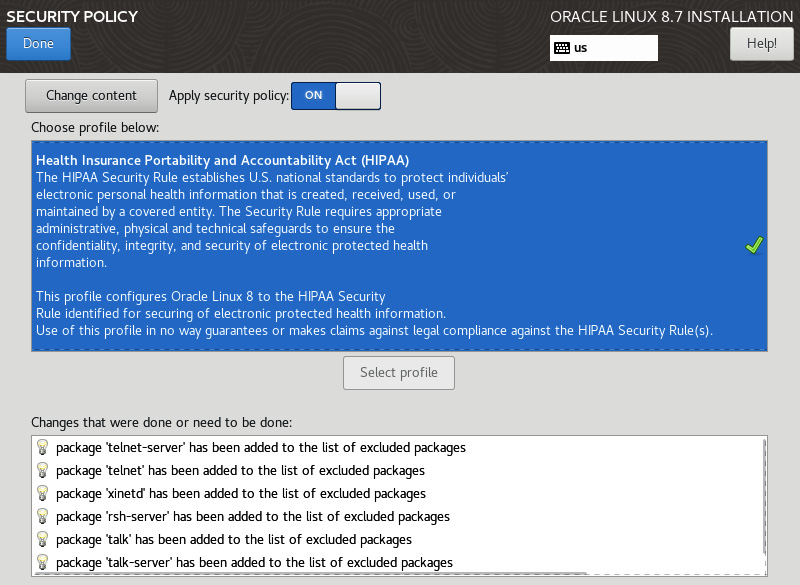
Figure 2.31 – Applying a security policy
You will now see the policy and a list of all the changes being made to the system. You will also see some changes that may need to be made to the filesystem layout. This is seen in policies such as STIG, where /var and /var/log need to be separate filesystems.
Once done, from the Installation Summary, click on Begin Installation to start the install.
Appendix – kickstart options
The following table covers the most popular options that control the installation and their syntax:
|
Option Name |
|
||
|
Description |
It configures the authentication options for the system using the |
||
|
Options |
See the |
||
|
Option Name |
|
||
|
Description |
This option is not recommended for production use. It is more of a troubleshooting command that makes the installer step through every screen, displaying them for a short amount of time. |
||
|
Options |
|
||
|
Option Name |
|
||
|
Description |
When used, the install runs in a non-interactive command-line mode. Any prompt from Anaconda for input stops the installation. Make sure to test with the |
||
|
Options |
None |
||
|
Option Name |
|
||
|
Description |
If used, the |
||
|
Options |
|
||
|
Option Name |
|
||
|
Description |
This configures the firewall on the installed system. |
||
|
Options |
|
||
|
Option Name |
|
||
|
Description |
This option can disable the running of the setup application when the system boots. If enabled, make sure you have |
||
|
Options |
|
||
|
Option Name |
|
||
|
Description |
The |
||
|
Options |
|
||
|
Option Name |
|
||
|
Description |
This option creates a user group on the system. |
||
|
Options |
|
||
|
Option Name |
|
||
|
Description |
If used, the system with halt after the installation is completed. This is the default completion method if no other method is set. Other completion methods are |
||
|
Options |
None |
||
|
Option Name |
|
||
|
Description |
This is useful for troubleshooting PXE installs. It controls the logging from the installer during the installation. It does not configure logging on the system being installed. |
||
|
Options |
|
||
|
Syntax |
|
||
|
Option Name |
|
||
|
Description |
When used, a shutdown and power-off are performed on the system after the installation completes. |
||
|
Options |
None |
||
|
Option Name |
|
||
|
Description |
It reboots the system after the install completes. |
||
|
Options |
|
||
|
Option Name |
|
||
|
Description |
Enables additional DNF/YUM repos as installation sources. Each repo will need its own line. |
||
|
Options |
|
||
|
Option Name |
|
||
|
Description |
Used to configure the initial policy and state of |
||
|
Options |
|
||
|
Option Name |
|
||
|
Description |
Runs the |
||
|
Options |
None |
||
|
Option Name |
|
|||
|
Description |
This adds an SSH key to the authorized keys files for the specified user. |
|||
|
Options |
|
|||
|
Option Name |
|
|||
|
Description |
When used, the installation runs in text mode. By default, the installer runs the GUI install method. Only one of the text/graphical options can be used. |
|||
|
Options |
|
|||
|
Option Name |
|
|||||
|
Description |
When used, it will use the URL specified for the install files from an ISO. URLs can be formatted for FTP, HTTP, or HTTPS. |
|||||
|
Options |
|
|||||
|
Option Name |
|
|||||
|
Description |
Creates a new user on the system |
|||||
|
Options |
|
|||||
Table 2.1 – Kickstart options