


 Download code from GitHub
Introduction to Docker
The first thing we will do in this chapter will be to explain the reasoning behind Docker and its architecture. We will cover Docker concepts such as images, layers, and containers. Next, we will install Docker and learn how to pull a sample, basic Java application image from the remote registry and run it on the local machine.
Docker was created as the internal tool in the platform as a service company, dotCloud. In March 2013, it was released to the public as open source. Its source code is freely available to everyone on GitHub at: https://github.com/docker/docker. Not only do the core Docker Inc. team work on the development of Docker, there are also a lot of big names sponsoring their time and effort to enhance and contribute to Docker such as Google, Microsoft, IBM, Red Hat, Cisco systems, and many others. Kubernetes is a tool developed by Google for deploying containers across clusters of computers based on best practices learned by them on Borg (Google's homemade container system). It compliments Docker when it comes to orchestration, automating deployment, managing, and scaling containers; it manages workloads for Docker nodes by keeping container deployments balanced across a cluster. Kubernetes also provides ways for containers to communicate with each other, without the need for opening network ports. Kubernetes is also an open source project, living on the GitHub at https://github.com/kubernetes/kubernetes. Everyone can contribute. Let's begin our journey with Docker first. The following will be covered in:
- We will start with the basic idea behind this wonderful tool and show the benefits gained from using it, in comparison to traditional virtualization
- We will install Docker on three major platforms: macOS, Linux, and Windows
The idea behind Docker
The idea behind Docker is to pack an application with all the dependencies it needs into a single, standardized unit for the deployment. Those dependencies can be binaries, libraries, JAR files, configuration files, scripts, and so on. Docker wraps up all of it into a complete filesystem that contains everything your Java application needs to run the virtual machine itself, the application server such as Wildfly or Tomcat, the application code, and runtime libraries, and basically everything you would install and deploy on the server to make your application run. Packaging all of this into a complete image guarantees that it is portable; it will always run in the same way, no matter what environment it is deployed in. With Docker, you can run Java applications without having to install a Java runtime on the host machine. All the problems related to incompatible JDK or JRE, wrong version of the application server, and so on are gone. Upgrades are also easy and effortless; you just run the new version of your container on the host.
If you need to do some cleanup, you can just destroy the Docker image and it's as though nothing ever happened. Think about Docker, not as a programming language or a framework, but rather as a tool that helps in solving the common problems such as installing, distributing, and managing the software. It allows developers and DevOps to build, ship, and run their code anywhere. Anywhere means also on more than one machine, and this is where Kubernetes comes in handy; we will shortly get back to it.
Having all of your application code and runtime dependencies packaged as a single and complete unit of software may seem the same as a virtualization engine, but it's far from that, as we will explain now. To fully get to know what Docker really is, first we need to understand the difference between traditional virtualization and containerization. Let's compare those two technologies now.
Virtualization and containerization compared
A traditional virtual machine represents the hardware-level virtualization. In essence, it's a complete, virtualized physical machine with BIOS and an operating system installed. It runs on top of the host operating system. Your Java application runs in the virtualized environment as it would normally do on your own machine. There are a lot of advantages from using virtual machines for your applications. Each virtual machine can have a totally different operating system; those can be different Linux flavors, Solaris, or Windows, for example. Virtual machines are also very secure by definition; they are totally isolated, complete operating systems in a box.
However, nothing comes without a price. Virtual machines contain all the features that an operating system needs to have to be operational: core system libraries, device drivers, and so on. Sometimes they can be resource hungry and heavyweight. Virtual machines require full installation, which sometimes can be cumbersome and not so easy to set up. Last, but not least, you will need more compute power and resources to execute your application in the virtual machine the hypervisor needs to first import the virtual machine and then power it up and this takes time. However, I believe, when it comes to running Java applications, having the complete virtualized environment is not something that we would want very often. Docker comes to the rescue with the concept of containerization. Java applications (but of course, it's not limited to Java) run on Docker in an isolated environment called a container. A container is not a virtual machine in the popular sense. It behaves as a kind of operating system virtualization, but there's no emulation at all. The main difference is that while each traditional virtual machine image runs on an independent guest operating system, the Docker containers run within the same kernel running on the host machine. A container is self-sufficient and isolated not only from the underlying OS, but from other containers as well. It has its own separated filesystem and environment variables. Naturally, containers can communicate with each other (as an application and a database container for example) and also can share the files on disk. Here comes the main difference when comparing to traditional virtualization because the containers run within the same kernel they utilize fewer system resources. All the operating system core software is removed from the Docker image. The base container can be, and usually is, very lightweight. There is no overhead related to a classic virtualization hypervisor and a guest operating system. This way you can achieve almost bare metal, core performance for your Java applications. Also, the startup time of a containerized Java application is usually very low due to the minimal overhead of the container. You can also roll-out hundreds of application containers in seconds to reduce the time needed for provisioning your software. We will do this using Kubernetes in one of the coming chapters. Although Docker is quite different from the traditional virtualization engines. Be aware that containers cannot substitute virtual machines for all use cases; a thoughtful evaluation is still required to determine what is best for your application. Both solutions have their advantages. On the one hand, we have the fully isolated secure virtual machine with average performance. On the other hand, we have the containers that are missing some of the key features, but are equipped with high performance that can be provisioned very fast. Let's see what other benefits you will get when using Docker containerization.
Benefits from using Docker
As we have said before, the major visible benefit of using Docker will be very fast performance and short provisioning time. You can create or destroy containers quickly and easily. Containers share resources such as the operating system's kernel and the needed libraries efficiently with other Docker containers. Because of that, multiple versions of an application running in containers will be very lightweight. The result is faster deployment, easier migration, and startup times.
Docker can be especially useful when deploying Java microservices. We will get back to microservices in detail in one of the coming chapters. A microservices application is composed of a series of discrete services, communicating with others via an API. Microservices break an app into a large number of small processes. They are the opposite of the monolithic applications, which run all operations as a single process or a set of large processes.
Using Docker containers enables you to deploy ready-to-run software, which is portable and extremely easy to distribute. Your containerized application simply runs within its container; there's no need for installation. The lack of an installation process has a huge advantage; it eliminates problems such as software and library conflicts or even driver compatibility issues. Docker containers are portable; they can be run from anywhere: your local machine, a remote server, and private or public cloud. All major cloud computing providers, such as Amazon Web Services (AWS) and Google's compute platform support Docker now. A container running on, let's say, an Amazon EC2 instance, can easily be transferred to some other environment, achieving exactly the same consistency and functionality. The additional level of abstraction Docker provides on the top of your infrastructure layer is an indispensable feature. Developers can create the software without worrying about the platform it will later be run on. Docker has the same promise as Java; write once, run anywhere; except instead of code, you configure your server exactly the way you want it (by picking the operating system, tuning the configuration files, installing dependencies) and you can be certain that your server template will run exactly the same on any host that runs Docker.
Because of Docker's reproducible build environment, it's particularly well suited for testing, especially in your continuous integration or continuous delivery flow. You can quickly boot up identical environments to run the tests. And because the container images are all identical each time, you can distribute the workload and run tests in parallel without a problem. Developers can run the same image on their machine that will be run in production later, which again has a huge advantage in testing.
The use of Docker containers speeds up continuous integration. There are no more endless build-test-deploy cycles; Docker containers ensure that applications run identically in development, test, and production environments. The code grows over time and becomes more and more troublesome. That's why the idea of an immutable infrastructure becomes more and more popular nowadays and the concept of containerization has become so popular. By putting your Java applications into containers, you can simplify the process of deployment and scaling. By having a lightweight Docker host that needs almost no configuration management, you manage your applications simply by deploying and redeploying containers to the host. And again, because the containers are very lightweight, it takes only seconds.
We have been talking a lot about images and containers, without getting much into the details. Let's do it now and see what Docker images and containers are.
Docker concepts - images and containers
When dealing with Kubernetes, we will be working with Docker containers; it is an open source container cluster manager. To run our own Java application, we will need to create an image first. Let's begin with the concept of Docker images.
Images
Think of an image as a read-only template which is a base foundation to create a container from. It's same as a recipe containing the definition of everything your application needs to operate. It can be Linux with an application server (such as Tomcat or Wildfly, for example) and your Java application itself. Every image starts from a base image; for example, Ubuntu; a Linux image. Although you can begin with a simple image and build your application stack on top of it, you can also pick an already prepared image from the hundreds available on the Internet. There are a lot of images especially useful for Java developers: openjdk, tomcat, wildfly, and many others. We will use them later as a foundation for our own images. It's a lot easier to have, let's say, Wildfly installed and configured properly as a starting point for your own image. You can then just focus on your Java application. If you're a novice in building images, downloading a specialized base image is a great way to get a serious speed boost in comparison to developing one by yourself.
Images are created using a series of commands, called instructions. Instructions are placed in the Dockerfile. The Dockerfile is just a plain text file, containing an ordered collection of root filesystem changes (the same as running a command that starts an application server, adding a file or directory, creating environmental variables, and so on.) and the corresponding execution parameters for use within a container runtime later on. Docker will read the Dockerfile when you start the process of building an image and execute the instructions one by one. The result will be the final image. Each instruction creates a new layer in the image. That image layer then becomes the parent for the layer created by the next instruction. Docker images are highly portable across hosts and operating systems; an image can be run in a Docker container on any host that runs Docker. Docker is natively supported in Linux, but has to be run in a VM on Windows and macOS. It's important to know that Docker uses images to run your code, not the Dockerfile. The Dockerfile is used to create the image when you run the docker build command. Also, if you publish your image to the Docker Hub, you publish a resulting image with its layers, not a source Dockerfile itself.
We have said before that every instruction in a Dockerfile creates a new layer. Layers are the internal nature of an image; Docker images are composed from them. Let's explain now what they are and what their characteristics are.
Layers
Each image consists of a series of layers which are stacked, one on top of the another. In fact, every layer is an intermediate image. By using the union filesystem, Docker combines all these layers into a single image entity. The union filesystem allows transparent overlaying files and directories of separate filesystems, giving a single, consistent filesystem as a result, as you can see the following diagram:
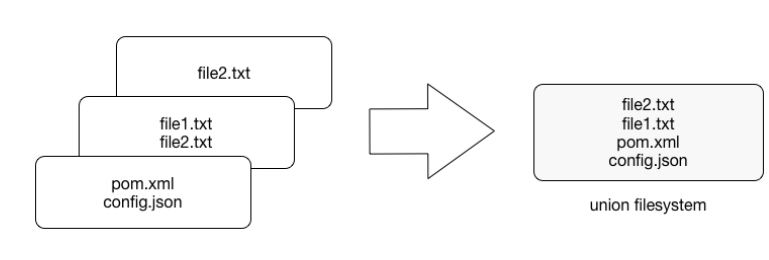
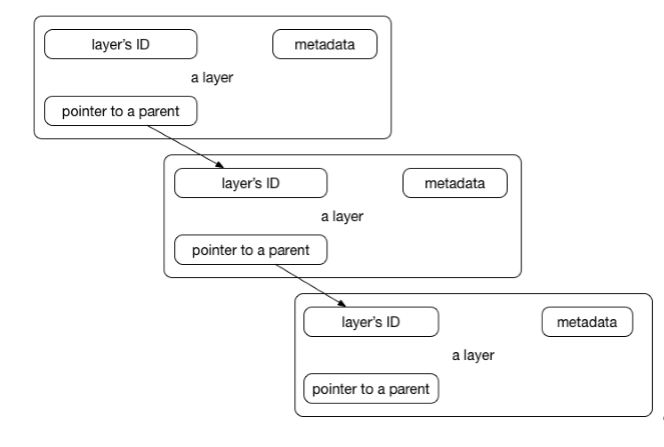
Contents and structure of directories which have the same path within these separate filesystems will be seen together in a single merged directory, within the new, virtual-like filesystem. In other words, the filesystem structure of the top layer will merge with the structure of the layer beneath. Files and directories which have the same path as in the previous layer will cover those beneath. Removing the upper layer will again reveal and expose the previous directory content. As we have mentioned earlier, layers are placed in a stack, one on the top of another. To maintain the order of layers, Docker utilizes the concept of layer IDs and pointers. Each layer contains the ID and a pointer to its parent layer. A layer without a pointer referencing the parent is the first layer in the stack, a base. You can see the relation in the following diagram:
Layers have some interesting features. First, they are reusable and cacheable. The pointer to a parent layer you can see in the previous diagram is important. As Docker is processing your Dockerfile it's looking at two things: the Dockerfile instruction being executed and the parent image. Docker will scan all of the children of the parent layer and look for one whose command matches the current instruction. If a match is found, Docker skips to the next Dockerfile instruction and repeats the process. If a matching layer is not found in the cache, a new one is created. For the instructions that add files to your image (we will get to know them later in detail), Docker creates a checksum for each file contents. During the building process, this checksum is compared against the checksum of the existing images to check if the layer can be reused from the cache. If two different images have a common part, let's say a Linux shell or Java runtime for example, Docker, which tracks all of the pulled layers, will reuse the shell layer in both of the images. It's a safe operation; as you already know, layers are read-only. When downloading another image, the layer will be reused and only the difference will be pulled from the Docker Hub. This saves time, bandwidth, and disk space of course, but it has another great advantage. If you modify your Docker image, for example by modifying your containerized Java application, only the application layer gets modified. After you've successfully built an image from your Dockerfile, you will notice that subsequent builds of the same Dockerfile finish a lot faster. Once Docker caches an image layer for an instruction, it doesn't need to be rebuilt. Later on, instead of distributing the whole image, you push just the updated part. It makes the process simpler and faster. This is especially useful if you use Docker in your continuous deployment flow: pushing a Git branch will trigger building an image and then publishing the application for users. Due to the layer-reuse feature, the whole process is a lot faster.
The concept of reusable layers is also a reason why Docker is so lightweight in comparison to full virtual machines, which don't share anything. It is thanks to layers that when you pull an image, you eventually don't have to download all of its filesystem. If you already have another image that has some of the layers of the image you pull, only the missing layers are actually downloaded. There is a word of warning though, related to another feature of layers: apart from being reusable, layers are also additive. If you create a large file in the container, then make a commit (we will get to that in a while), then delete the file, and do another commit; this file will still be present in the layer history. Imagine this scenario: you pull the base Ubuntu image, and install the Wildfly application server. Then you change your mind, uninstall the Wildfly and install Tomcat instead. All those files removed from the Wildfly installation will still be present in the image, although they have been deleted. Image size will grow in no time. Understanding of Docker's layered filesystem can make a big difference in the size of your images. Size can become a problem when you publish your images to a registry; it takes more requests and is longer to transfer.
Large images become an issue when thousands of containers need to be deployed across a cluster, for example. You should always be aware of the additivity of layers and try to optimize the image at every step of your Dockerfile, the same as using the command chaining, for example. We will be using the command chaining technique later on, when creating our Java application images.
Because layers are additive, they provide a full history of how a specific image was built. This gives you another great feature: the possibility to make a rollback to a certain point in the image's history. Since every image contains all of its building steps, we can easily go back to a previous step if we want to. This can be done by tagging a certain layer. We will cover image tagging later in our book.
Layers and images are closely related to each other. As we have said before, Docker images are stored as a series of read-only layers. This means that once the container image has been created, it does not change. But having all the filesystem read-only would not make a lot of sense. What about modifying an image? Or adding your software to a base web server image? Well, when we start a container, Docker actually takes the read-only image (with all its read-only layers) and adds a writable layer on top of the layers stack. Let's focus on the containers now.
Containers
A running instance of an image is called a container. Docker launches them using the Docker images as read-only templates. If you start an image, you have a running container of this image. Naturally, you can have many running containers of the same image. In fact, we will do it very often a little bit later, using Kubernetes.
To run a container, we use the docker run command:
docker run [OPTIONS] IMAGE [COMMAND] [ARG...]
There are a lot of run command options and switches that can be used; we will get to know them later on. Some of the options include the network configuration, for example (we will explain Docker's networking concepts in Chapter 2, Networking and Persistent Storage). Others, the same as the -it (from interactive), tell the Docker engine to behave differently; in this case, to make the container interactive and to attach a terminal to its output and input. Let's just focus on the idea of the container to better understand the whole picture. We are going to use the docker run command in a short while to test our setup.
So, what happens under the hood when we run the docker run command? Docker will check if the image that you would like to run is available on your local machine. If not, it will be pulled down from the remote repository. The Docker engine takes the image and adds a writable layer on top of the image's layers stack. Next, it initializes the image's name, ID, and resource limits, such as CPU and memory. In this phase, Docker will also set up a container's IP address by finding and attaching an available IP address from a pool. The last step of the execution will be the actual command, passed as the last parameter of the docker run command. If the it option has been used, Docker will capture and provide the container output, it will be displayed in the console. You can now do things you would normally do when preparing an operating system to run your applications. This can be installing packages (via apt-get, for example), pulling source code with Git, building your Java application using Maven, and so on. All of these actions will modify the filesystem in the top, writable layer. If you then execute the commit command, a new image containing all of your changes will be created, kind of frozen, and ready to be run later. To stop a container, use the docker stop command:
docker stop
A container when stopped will retain all settings and filesystem changes (in the top layer that is writeable). All processes running in the container will be stopped and you will lose everything in memory. This is what differentiates a stopped container from a Docker image.
To list all containers you have on your system, either running or stopped, execute the docker ps command:
docker ps -a
As a result, the Docker client will list a table containing container IDs (a unique identifier you can use to refer to the container in other commands), creation date, the command used to start a container, status, exposed ports, and a name, either assigned by you or the funny name Docker has picked for you. To remove a container, you can just use the docker rm command. If you want to remove a couple of them at once, you can use the list of containers (given by the docker ps command) and a filter:
docker rm $(docker ps -a -q -f status=exited)
We have said that a Docker image is always read-only and immutable. If it did not have the possibility to change the image, it would not be very useful. So how's the image modification possible except by, of course, altering a Dockerfile and doing a rebuild? When the container is started, the writable layer on top of the layers stack is for our disposal. We can actually make changes to a running container; this can be adding or modifying files, the same as installing a software package, configuring the operating system, and so on. If you modify a file in the running container, the file will be taken out of the underlying (parent) read-only layer and placed in the top, writable layer. Our changes are only possible in the top layer. The union filesystem will then cover the underlying file. The original, underlying file will not be modified; it still exists safely in the underlying, read-only layer. By issuing the docker commit command, you create a new read-only image from a running container (and all it changes in the writable layer):
docker commit <container-id> <image-name>
The docker commit command saves changes you have made to the container in the writable layer. To avoid data corruption or inconsistency, Docker will pause a container you are committing changes into. The result of the docker commit command is a brand new, read-only image, which you can create new containers from:

In response to a successful commit, Docker will output the full ID of a newly generated image. If you remove the container without issuing a commit first and then relaunch the same image again, Docker will start a fresh container without any of the changes made in the previously running container. In either case, with or without a commit, your changes to the filesystem will never affect the base image. Creating images by altering the top writable layer in the container is useful when debugging and experimenting, but it's usually better to use a Dockerfile to manage your images in a documented and maintainable way.
We have now learned about the build (Dockerfile and the image) and runtime (container) pieces of our containerization world. We are still missing the last element, the distribution component. The distribution component of Docker consists of the Docker registry, index, and repository. Let's focus on them now to have a complete picture.
Docker registry, repository, and index
The first component in Docker's distribution system is the registry. Docker utilizes a hierarchical system for storing images, shown in the following screenshot:

Images which you build can be stored in a remote registry for others to use. The Docker registry is a service (an application, in fact) that is storing your Docker images. The Docker Hub is an example of the publicly available registry; it's free and serves a huge, constantly growing collection of existing images. The repository, on the other hand, is a collection (namespace) of related images, usually providing different versions of the same application or service. It's a collection of different Docker images with the same name and different tags.
If your app is named hello-world-java and your username (or namespace) for the Registry is dockerJavaDeveloper then your image will be placed in the dockerJavaDeveloper/hello-world-java repository. You can tag an image and store multiple versions of that image with different IDs in a single named repository and access different tagged versions of an image with a special syntax such as username/image_name:tag. The Docker repository is quite similar to a Git repository. For example, Git, a Docker repository is identified by a URI and can either be public or private. The URI looks the same as the following:
{registryAddress}/{namespace}/{repositoryName}:{tag}
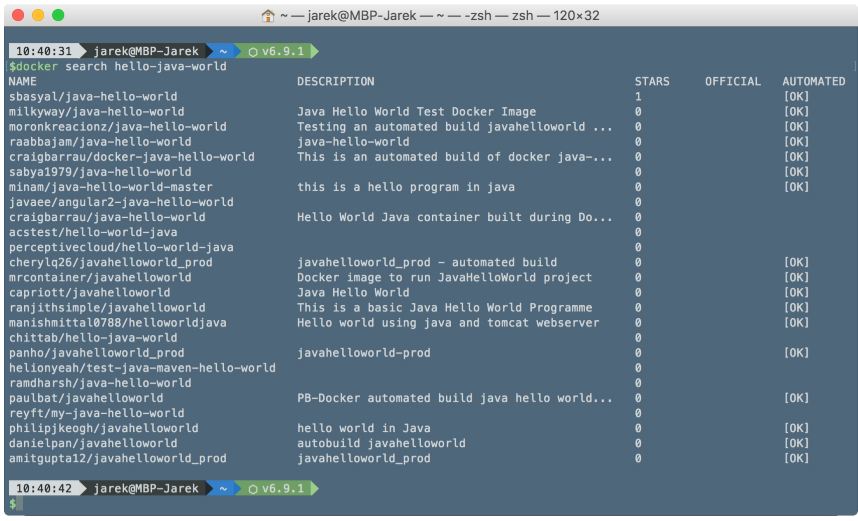
The Docker Hub is the default registry and Docker will pull images from the Docker Hub if you do not specify a registry address. To search an image in the registry, execute the docker search command; for example:
$ docker search hello-java-world
Without specifying the remote registry, Docker will conduct a search on the Docker Hub and output the list of images matching your search criteria:
The difference between the registry and repository can be confusing at the beginning, so let's describe what will happen if you execute the following command:
$ docker pull ubuntu:16.04
The command downloads the image tagged 16.04 within the ubuntu repository from the Docker Hub registry. The official ubuntu repository doesn't use a username, so the namespace part is omitted in this example.
Although the Docker Hub is public, you get one private repository for free with your Docker Hub user account. Last, but not least, the component you should be aware of is an index. An index manages searching and tagging and also user accounts and permissions. In fact, the registry delegates authentication to the index. When executing remote commands, such as push or pull, the index first will look at the name of the image and then check to see if it has a corresponding repository. If so, the index verifies if you are allowed to access or modify the image. If you are, the operation is approved and the registry takes or sends the image.
Let's summarize what we have learned so far:
- The Dockerfile is the recipe to build an image. It's a text file containing ordered instructions. Each Dockerfile has a base image you build upon
- An image is a specific state of a filesystem: a read-only, frozen immutable snapshot of a live container
- An image is composed of layers representing changes in the filesystem at various points in time; layers are a bit same as the commit history of a Git repository. Docker uses the layers cache
- Containers are runtime instances of an image. They can be running or stopped. You can have multiple containers of the same image running
- You can make changes to the filesystem on a container and commit them to make them persisted. Commit always creates a new image
- Only the filesystem changes can be committed, memory changes will be lost
- A registry holds a collection of named repositories, which themselves are a collection of images tracked by their IDs. The registry is same as a Git repository: you can push and pull images
You should now have an understanding of the nature of images with their layers and containers. But Docker is not just a Dockerfile processor and the runtime engine. Let's look at what else is available.
Additional tools
It's a complete package with a wide selection of tools and APIs that are helpful during the developer's and DevOp's daily work. There's a Kinematic, for example, a desktop developer environment for using Docker on Windows and macOS X.
From a Java developer's perspective, there are tools available, which are especially useful in a programmer's daily job, such as the IntelliJ IDEA Docker integration plugin (we will be using this add-on heavily in the coming chapters). Eclipse fans can use the Docker tooling for Eclipse, which is available starting with Eclipse Mars. NetBeans also supports Docker commands. No matter which development environment you pick, these add-ons let you download and build Docker images, create and start containers, and carry out other related tasks straight from your favorite IDE.
Docker is so popular these days, no wonder hundreds of third-party tools have been developed to make Docker even more useful. The most prominent of them is Kubernetes, which we are going to focus on in this book. But apart from Kubernetes, there are many others. They will support you with Docker-related operations, such as continuous integration/continuous delivery, deployment and infrastructure, or optimizing images. Tens of hosting services now support running and managing Docker containers.
As Docker captures more attention, more and more Docker-related tools pop-up almost every month. You can find a very well-crafted list of Docker-related tools and services on the GitHub awesome Docker list, available at https://github.com/veggiemonk/awesome-docker.
But there are not only tools available. Additionally, Docker provides a set of APIs that can be very handy. One of them is the Remote API for the management of the images and containers. Using this API, you will be able to distribute your images to the runtime Docker engine. There's also the Stats API that will expose live resource usage information (such as CPU, memory, network I/O, and block I/O) for your containers. This API endpoint can be used create tools that show how your containers behave; for example, on a production system.
As we now know the idea behind Docker, the differences between virtualization and containerization, and the benefits of using Docker, let's get to the action. We are going to install Docker first.
Installing Docker
In this section, we will find out how to install Docker on Windows, macOS, and Linux operating systems. Next, we will run a sample hello-world image to verify the setup and check if everything works fine after the installation process.
Docker installation is quite straightforward, but there are some things you will need to focus on to make it run smoothly. We will point them out to make the installation process painless. You should know that Linux is the natural environment for Docker. If you run the container, it will run on a Linux kernel. If you run your container on Docker running on Linux, it will use the kernel of your own machine. This is not the case in macOS and Windows; that's the reason why the Linux kernel needs to be virtualized if you want to run a Docker container on these operating systems. The Docker engine, when running on macOS or MS Windows, will use the lightweight Linux distribution, made specifically to run Docker containers. It runs completely from RAM, using only several megabytes, and boots in a couple of seconds. After the installation of the main Docker package on macOS and Windows, the OS built-in virtualization engine will be used by default. Therefore, there are some special requirements for your machine. For the newest, native Docker setup, which is deeply integrated into native virtualization engines present in your operating system, you will need to have 64-bit Windows 10 professional or enterprise. For macOS, the newest Docker for Mac is a native Mac application developed from scratch, with a native user interface, integrated with OS X native virtualization, hypervisor framework, networking, and filesystem. The mandatory requirement will be Yosemite 10.10.3 or newer. Let's begin with installing on macOS.
Installing on macOS
To get the native Docker version for your Mac, head to the http://www.docker.com and then the Get Docker macOS section. Docker for Mac is a standard, native dmg package you can mount. You will find just a single application inside the package:

Now just move the Docker.app into your Applications folder, and you are all set. Couldn't be easier. If you run Docker, it will sit as a small whale icon in your macOS menu. The icon will animate during the Docker startup process and stabilize after it finishes:
- If you now click the icon, it will give you a handy menu with the Docker status and some additional options:

- Docker for Mac has an auto-update capability, which is great for keeping your installation up to date. The first Preferences... pane gives you the possibility to automatically check for updates; it's marked by default:

- If you are a brave soul, you can also switch to the beta channel for getting updates. This way you can always have the latest and greatest Docker features, with the risk of decreased stability, as is always the case with beta software. Also take note that switching to the beta channel will uninstall your current stable version of Docker and destroy all of your settings and containers. Docker will warn you about this, to make sure you really want to do it:

- The File Sharing pane of the Preferences... will give you an option to mark macOS directories on your machine to be bind mounted into Docker containers you are going to run later. We will explain mounting directories in detail later on in the book. For the time being, let's just have the default set of selected directories:

- The Advanced pane has some options to adjust the resources of your computer that will be available for Docker, it will be the number of processors and memory amount. The default settings are usually a good start if you begin with Docker on macOS:

- The Proxies pane gives you the possibility to setup a proxy, if you need it on your machine. You can opt for using system or manual settings, as you can see in the following screenshot:

- On the next page, you can edit some Docker daemon settings. This will include adding registries and registry mirrors. Docker will use them when pulling the image. The Advanced tab contains a text field, in which you can enter the JSON text containing the daemon config:

- In the Daemon pane, you can also turn off Docker Experimental features. For some time now, Experimental features have been enabled by default. From time to time, a new version of Docker comes with new Experimental features. At the time of writing this book, they will include, for example, Checkpoint & Restore (a feature that allows you to freeze a running container by checkpointing it), Docker graph driver plugins (to use an external/out-of-process graph driver for use with the Docker engine as an alternative to using the built-in storage drivers), and some others. It's always interesting to see what new features are included in the new version of Docker. Clicking the link in the Daemon page will take you to the GitHub page which lists and explains all the new experimental features.
- The last Preferences... pane is the Reset. If you find that your Docker won't start or behaves badly, you can try to reset the Docker installation to the factory defaults:

You should be warned though, that resetting Docker to the factory state will also remove all downloaded images and containers you may have on your machine. If you have images that have not been pushed anywhere yet, having a backup first is always a good idea.
The Open Kitematic in the Docker menu is a handy shortcut to open the Kitematic application we have mentioned earlier. It's a desktop utility for using Docker on Windows and Mac OS X. If you do not have Kitematic installed already, Docker will give you a link with the installation package:

- If you run Kitematic, it will present you the Docker Hub login screen first. You can now Sign up to the Docker Hub and then log in providing your username and password:

Clicking on Skip For Now will take you to the images list without logging into the Docker Hub. Let's test our installation by pulling and running an image. Let's search for hello-java-world, as seen on the following screenshot:

After pulling the image from the registry, start it. Kitematic will present the running Container logs, which will be the famous hello world message, coming from a containerized Java application:

That's it for running the container in Kitematic. Let's try to do the same from the shell. Execute the following in the terminal:
$ docker run milkyway/java-hello-world
As a result, you will see the same greeting, coming from a containerized Java application, this time in the macOS terminal:

That's it, we have a native Docker up and running on our macOS. Let's install it on Linux, as well.
Installing on Linux
There are a lot of various Linux distributions out there and the installation process can be a little bit different for each Linux distribution. I'm going to install Docker on the latest, 16.04 Ubuntu desktop:
- First, we need to allow the apt package manager to use a repository over the HTTPS protocol. Execute from the shell:
$ sudo apt-get install -y --no-install-recommends apt-transport-https ca-certificates curl software-properties-common
- The next thing we are going to do is add Docker's apt repository gpg key to our apt sources list:
$ curl -fsSL https://download.docker.com/linux/ubuntu/gpg | sudo apt-key add –
- A simple OK will be the response if succeeded. Use the following command to set up the stable repository:
$ sudo add-apt-repository "deb [arch=amd64] https://download.docker.com/linux/ubuntu $(lsb_release -cs) stable"
- Next, we need to update the apt packages index:
$ sudo apt-get update
- Now we need to make sure the apt installer will use the official Docker repository instead of the default Ubuntu repository (which may contain the older version of Docker):
$ apt-cache policy docker-ce
- Use this command to install the latest version of Docker:
$ sudo apt-get install -y docker-ce
- The apt package manager will download a lot of packages; those will be the needed dependencies and the docker-engine itself:

- That's it, you should be all set. Let's verify if Docker works on our Linux box:
$sudo docker run milkyway/java-hello-world
- As you can see, the Docker engine will pull the milkyway/java-hello-world image with all its layers from the Docker Hub and respond with a greeting:

But do we need to run Docker commands with sudo? The reason for that is the Docker daemon always runs as the root user, and since Docker version 0.5.2, the Docker daemon binds to a Unix socket instead of a TCP port. By default, that Unix socket is owned by the user root, and so, by default, you can access it with sudo. Let's fix it to be able to run the Docker command as a normal user:
- First, add the Docker group if it doesn't already exist:
$ sudo groupadd docker
- Then, add your own user to the Docker group. Change the username to match your preferred user:
$ sudo gpasswd -a jarek docker
- Restart the Docker daemon:
$ sudo service docker restart
- Now let's log out and log in again, and execute the docker run command one more time, without sudo this time. As you can see, you are now able to work with Docker as a normal, non-root user:

- That's it. Our Linux Docker installation is ready to play with. Let's do an installation on the Windows box now.
Installing on Windows
The native Docker package can be run on 64-bit Windows 10 Professional or Enterprise. It uses the Windows 10 virtualization engine to virtualize the Linux kernel. This is the reason that the installation package does no longer contain the VirtualBox setup, as with the previous versions of Docker for Windows. The native application comes in a typical .msi installation package. If you run it, it will greet you with a friendly message, saying that it is going to live in your task bar tray, under the small whale icon, from now on:

The Docker's icon in the tray informs you about the Docker engine state. It also contains a small but useful context menu:

Let's explore the preferences settings and see what's available. The first tab, General, allows you to set Docker to run automatically when you log in. If you use Docker daily that may be the recommended setting. You can also mark to check for updates automatically and send usage statistics. Sending usage statistics will help the Docker team improve the tool in future versions; unless you have some mission critical, secure work to be done, I recommend turning this option on. This is a great way to contribute to future versions of this magnificent tool:

The second tab, Shared Drives, allows you to select the local Windows drives which will be available to the Docker containers you will be running:

We are going to cover Docker volumes in Chapter 2, Networking and Persistent Storage. Selecting a drive here means that you can map a directory from your local system and read that as a Windows host machine to your Docker container. The next preferences page, Advanced, allows us to make some restrictions on the Docker engine running on our Windows PC and also select the location of the virtual machine image with the Linux kernel:

The default values are usually good out of the box and unless you experience problems during the development process, I would recommend leaving them as they are. The Network lets you configure the way Docker works with the network, the same as subnet address and mask or DNS server. We are going to cover Docker networking in Chapter 2, Networking and Persistent Storage:

If you're behind a proxy in your network and would like Docker to access the Internet, you can set up the proxy settings in the Proxies tab:

The dialog is similar to what you find in other applications where you can define proxy settings. It can accept no proxy, system proxy settings, or manual settings (with a different proxy for HTPP and HTTPS communication). The next pane can be useful to configure the Docker daemon:

The Basic switch means that Docker uses the basic configuration. You can switch it to Advanced and provide a customized setting in a form of JSON structure. The Experimental features are the same as we have already mentioned during the Docker setup on macOS, this will be Checkpoint & Restore or enabling Docker graph driver plugins, for example. You can also specify a list of remote registries. Docker will be pulling images from insecure registries using just plain HTTP instead of HTTPS.
Using the Reset options on the last pane lets you restart or reset Docker to its factory settings:

Be aware though, that resetting Docker to its initial settings will also remove all images and containers currently present on your machine.
The Open Kitematic... option, which is also present in the Docker tray icon context menu, is a quick shortcut to launch Kitematic. If you do it for the first time and don't have Kitematic installed, Docker will ask if you would like to download it first:

That's it for installing Docker for Windows. It's a pretty painless process. As a last step of the installation process, let's check if Docker can be run from the command prompt, because it's probably the way you will be launching it in the future. Execute the following command in the command prompt or in the PowerShell:
docker run milkyway/java-hello-world

As you can see on the previous screenshot, we have a Hello World message coming from the Java application started as a Docker container.
Summary
That's it. Our Docker for Windows installation is fully functional. In this chapter, we have learned about the idea behind Docker and the main differences between traditional virtualization and containerization. We know a lot about Docker core concepts such as images, layers, containers, and registries. We should have Docker installed already on our local machine; it's now time to move on and learn about more advanced Docker features, such as networking and persistent storage.


