

After all the knowledge we have acquired so far, it is imperative that we put it to use. Let's make a simple animated slideshow, using the tips and tricks we have learned so far in this chapter. Follow these steps:
Create a 1,920 x 1,080 comp and call it
slideshow. Make the comp 20 seconds long.Move into the main
compfolder.Import four photos (each with 1,920 x 1,080 dimensions).
Put the photos into the
imagefolder.Make a new solid: Layer | New solid. Call this back, and make the color black.
Bring your first image into the timeline.
Hit S to get your scale. Adjust this so your image fits in the frame.
Spend some time adjusting your image in the comp. You may not need to adjust the scale. However, if you need to adjust the size of your image, press S to get the scale parameter.
Scrub the scale parameter to get the desired size:

Scaling an image
Let's add additional images to our slide show project. Follow these steps for adding images to your composition:
Bring in a second image
Adjust the scale
Repeat these steps for the remaining images
Select these layers and trim them so they are 3 seconds long
We are going trim our layers in the timeline. This will ensure that each image will be seen in the slide show for a certain amount of time:

Trimming layers
Let's follow these steps to trim the layers:
Select all layers to go to 3 second in the timeline
Select Alt + R bracket/option + R bracket (macOS) to trim the layers, or you can drag the layers to trim them
It's important to understand how to trim your layers for this project and other projects we will work on. Make sure your layers are lined up and trimmed:

Lining up the layers
After Effects has different types of assistance to help you with animation functions. We are going to use sequence layers. This will sort our layers across time. You can find this animation assistance on the top animation tab of your project window:

Sequence layers
Select All layers | Animation | Keyframe Assistance | Sequence Layers....
Notice that After Effects takes your layers and sequences them across your timeline evenly! The next step for our slideshow is at the end:

End of layer
The next step is to go 20 frames from the end of your layers (count backward from the end of the layer):

20 key frames
Next we are going to create a fadeout animation for our images:
Press T for the opacity parameter.
Click on the stop watch for opacity. This creates a key frame, which is the first step of any animation.
Go forward 20 key frames. Turn the opacity down to
0.
Your timeline should have two key frames. The first key frame is 100% opacity, and the last one will be 0% opacity.
You can test the animation by dragging the time indicator over the key frames. The image should be fading out:

Opacity
To make the layer beneath this image fade on as the top image is fading off, we need to adjust this second image:
Select the layer beneath the top layer.
Drag your bottom layer, or choose Alt + L bracket to trim your layer to that point.
The top layer will begin to fade out as the layer shown next will appear or fade on:

Adjusting the second layer
The goal is to have each photo fade into the next layer. This will happen over the course of 20 frames. It will be a slow fade. Repeat the preceding steps for each layer, and then proceed as follows:
Add a black solid layer, for the background
Move this layer to the bottom of the layers
One of the most common things that new After Effects users forget to do is trim the work area at the end of a project:
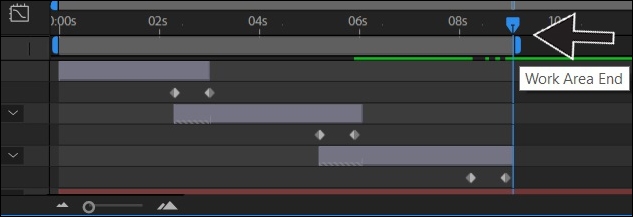
Slideshow trim work area
Drag the blue bar over from the right.
Drag this to the end of your layers, or move your time indicator at the end of your last layer and press the keyboard shortcut N, to trim the work area.
The final step is to preview your slideshow. Look for anything you'd like to adjust. You can always tweak any of the settings after creating a project.
Congratulations! You've created your first animated project in this book!
Press the space bar to preview your animated slideshow!