
When designing a performance-intensive program, the very first step is to write your code without bothering with small optimizations:
"Premature optimization is the root of all evil."
- Donald Knuth
In the early development stages, the design of the program can change quickly and may require large rewrites and reorganizations of the code base. By testing different prototypes without the burden of optimization, you are free to devote your time and energy to ensure that the program produces correct results and that the design is flexible. After all, who needs an application that runs fast but gives the wrong answer?
The mantras that you should remember when optimizing your code are as follows:
- Make it run: We have to get the software in a working state, and ensure that it produces the correct results. This exploratory phase serves to better understand the application and to spot major design issues in the early stages.
- Make it right: We want to ensure that the design of the program is solid. Refactoring should be done before attempting any performance optimization. This really helps separate the application into independent and cohesive units that are easier to maintain.
- Make it fast: Once our program is working and is well structured, we can focus on performance optimization. We may also want to optimize memory usage if that constitutes an issue.
In this section, we will write and profile a particle simulator test application. The simulator is a program that takes some particles and simulates their movement over time according to a set of laws that we impose. These particles can be abstract entities or correspond to physical objects, for example, billiard balls moving on a table, molecules in gas, stars moving through space, smoke particles, fluids in a chamber, and so on.
Computer simulations are useful in fields such as Physics, Chemistry, Astronomy, and many other disciplines. The applications used to simulate systems are particularly performance-intensive and scientists and engineers spend an inordinate amount of time optimizing these codes. In order to study realistic systems, it is often necessary to simulate a very high number of bodies and every small increase in performance counts.
In our first example, we will simulate a system containing particles that constantly rotate around a central point at various speeds, just like the hands of a clock.
The necessary information to run our simulation will be the starting positions of the particles, the speed, and the rotation direction. From these elements, we have to calculate the position of the particle in the next instant of time. An example system is shown in the following figure. The origin of the system is the (0, 0) point, the position is indicated by the x, y vector and the velocity is indicated by the vx, vy vector:
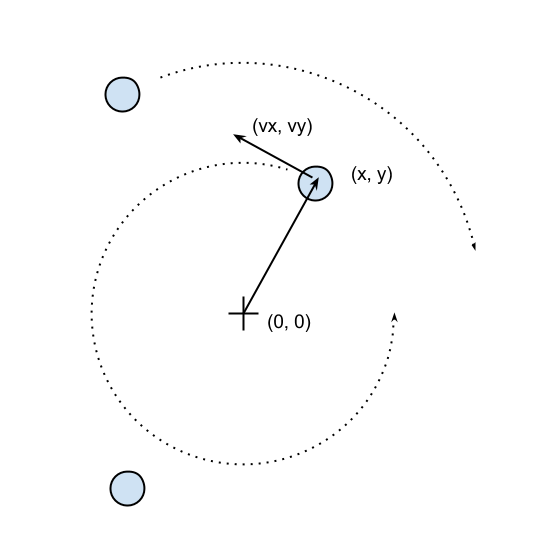
The basic feature of a circular motion is that the particles always move perpendicular to the direction connecting the particle and the center. To move the particle, we simply change the position by taking a series of very small steps (which correspond to advancing the system for a small interval of time) in the direction of motion, as shown in the following figure:
We will start by designing the application in an object-oriented way. According to our requirements, it is natural to have a generic Particle class that stores the particle positions, x and y, and their angular velocity, ang_vel:
    class Particle:
        def __init__(self, x, y, ang_vel):
            self.x = x
            self.y = y
            self.ang_vel = ang_vel
Note that we accept positive and negative numbers for all the parameters (the sign of ang_vel will simply determine the direction of rotation).
Another class, called ParticleSimulator, will encapsulate the laws of motion and will be responsible for changing the positions of the particles over time. The __init__ method will store a list of Particle instances and the evolve method will change the particle positions according to our laws.
We want the particles to rotate around the position corresponding to the x=0 and y=0 coordinates, at a constant speed. The direction of the particles will always be perpendicular to the direction from the center (refer to the first figure of this chapter). To find the direction of the movement along the x and y axes (corresponding to the Python v_x and v_y variables), it is sufficient to use these formulae:
v_x = -y / (x**2 + y**2)**0.5
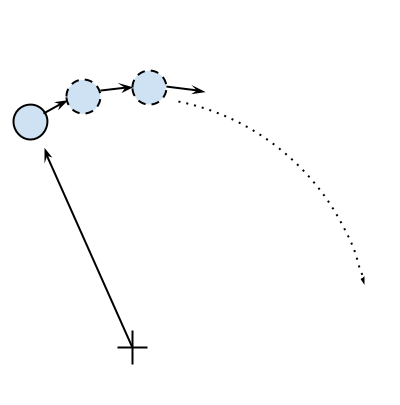
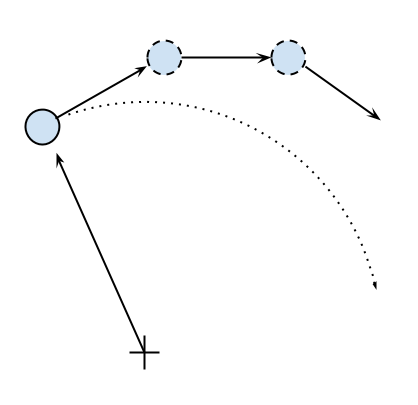
v_y = x / (x**2 + y**2)**0.5If we let one of our particles move, after a certain time t, it will reach another position following a circular path. We can approximate a circular trajectory by dividing the time interval, t, into tiny time steps, dt, where the particle moves in a straight line tangentially to the circle. The final result is just an approximation of a circular motion. In order to avoid a strong divergence, such as the one illustrated in the following figure, it is necessary to take very small time steps:
In a more schematic way, we have to carry out the following steps to calculate the particle position at time t:
- Calculate the direction of motion (
v_xandv_y). - Calculate the displacement (
d_xandd_y), which is the product of time step, angular velocity, and direction of motion. - Repeat steps 1 and 2 for enough times to cover the total time t.
The following code shows the full ParticleSimulator implementation:
    class ParticleSimulator:

        def __init__(self, particles):
            self.particles = particles

        def evolve(self, dt):
            timestep = 0.00001
            nsteps = int(dt/timestep)

            for i in range(nsteps):
                for p in self.particles:
                    # 1. calculate the direction
                    norm = (p.x**2 + p.y**2)**0.5
                    v_x = -p.y/norm
                    v_y = p.x/norm

                    # 2. calculate the displacement
                    d_x = timestep * p.ang_vel * v_x
                    d_y = timestep * p.ang_vel * v_y

                    p.x += d_x
                    p.y += d_y
                    # 3. repeat for all the time steps
We can use the matplotlib library to visualize our particles. This library is not included in the Python standard library, and it can be easily installed using the pip install matplotlib command.
Note
Alternatively, you can use the Anaconda Python distribution (https://store.continuum.io/cshop/anaconda/) that includes matplotlib and most of the other third-party packages used in this book. Anaconda is free and is available for Linux, Windows, and Mac.
To make an interactive visualization, we will use the matplotlib.pyplot.plot function to display the particles as points and the matplotlib.animation.FuncAnimation class to animate the evolution of the particles over time.
The visualize function takes a particle ParticleSimulator instance as an argument and displays the trajectory in an animated plot. The steps necessary to display the particle trajectory using the matplotlib tools are as follows:
- Set up the axes and use the
plotfunction to display the particles.plottakes a list of x and y coordinates. - Write an initialization function,
init, and a function,animate, that updates the x and y coordinates using theline.set_datamethod. - Create a
FuncAnimationinstance by passing theinitandanimatefunctions plus theintervalparameters, which specify the update interval, andblit, which improves the update rate of the image. - Run the animation with
plt.show():
    from matplotlib import pyplot as plt
    from matplotlib import animation

    def visualize(simulator):

        X = [p.x for p in simulator.particles]
        Y = [p.y for p in simulator.particles]

        fig = plt.figure()
        ax = plt.subplot(111, aspect='equal')
        line, = ax.plot(X, Y, 'ro')

        # Axis limits
        plt.xlim(-1, 1)
        plt.ylim(-1, 1)

        # It will be run when the animation starts
        def init():
            line.set_data([], [])
            return line, # The comma is important!

        def animate(i):
            # We let the particle evolve for 0.01 time units
            simulator.evolve(0.01)
            X = [p.x for p in simulator.particles]
            Y = [p.y for p in simulator.particles]

            line.set_data(X, Y)
            return line,

        # Call the animate function each 10 ms
        anim = animation.FuncAnimation(fig,
                                       animate,
                                       init_func=init,
                                       blit=True,
                                       interval=10)
        plt.show()
To test things out, we define a small function, test_visualize, that animates a system of three particles rotating in different directions. Note that the third particle completes a round three times faster than the others:
    def test_visualize():
        particles = [Particle(0.3, 0.5, 1),
                     Particle(0.0, -0.5, -1),
                     Particle(-0.1, -0.4, 3)]

        simulator = ParticleSimulator(particles)
        visualize(simulator)

    if __name__ == '__main__':
        test_visualize()
The test_visualize function is helpful to graphically understand the system time evolution. In the following section, we will write more test functions to properly verify program correctness and measure performance.