

An Secure Shell (SSH) is often the preferred method for making remote connections, as it allows only the Terminal connections and typically requires fewer resources.
An extra feature of SSH is the ability to transfer the X11 data to an X Windows server running on your machine. This allows you to start programs that would normally run on Raspberry Pi desktop, and they will appear in their own Windows on the local computer, as follows:
X11 forwarding on a local display
X11 forwarding can be used to display applications which are running on Raspberry Pi on a Windows computer.
If you are running the latest version of Raspbian, SSH, and X11 forwarding will be enabled by default (otherwise, double-check the settings explained in the How it works... section).
Linux and OS X have built-in support for X11 forwarding, but if you are using Windows, you will need to install and run the X Windows server on your computer.
Download and run xmingfrom the Xming site (http://sourceforge.net/projects/xming/).
Install xming, following the installation steps, including the installation of PuTTY if you don't have it already. You can also download PuTTY separately from http://www.putty.org/.
Next, we need to ensure that the SSH program we use has X11 enabled when we connect.
For Windows, we shall use PuTTY to connect to Raspberry Pi.
In the PuTTY Configurationdialog box, navigate to Connection | SSH | X11 and tick the checkbox for EnableX11 forwarding. If you leave the X display location option blank, it will assume the default Server 0:0 as follows (you can confirm the server number by moving your mouse over the Xming icon in the system tray when it is running):
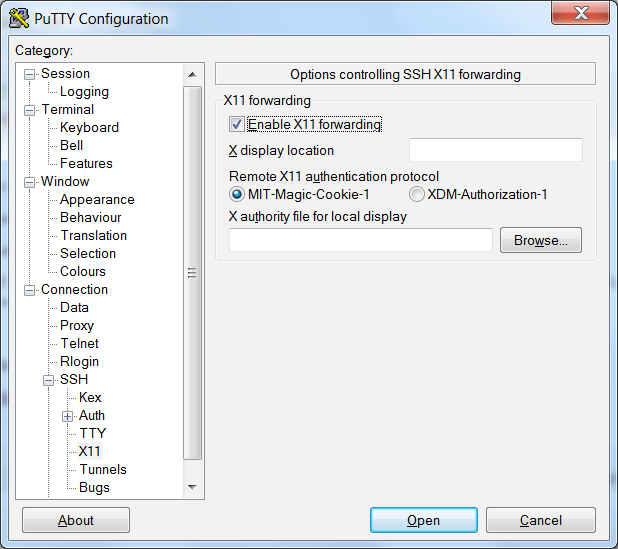
Enabling X11 forwarding within the PuTTY configuration
Enter the IP address of Raspberry Pi in the Session settings (you may also find that you can use Raspberry Pi's hostname here instead; the default hostname is raspberrypi).
Save the setting using a suitable name, RaspberryPi, and click on Open to connect to your Raspberry Pi.
You are likely to see a warning message pop up stating you haven't connected to the computer before (this allows you to check whether you have everything right before continuing):
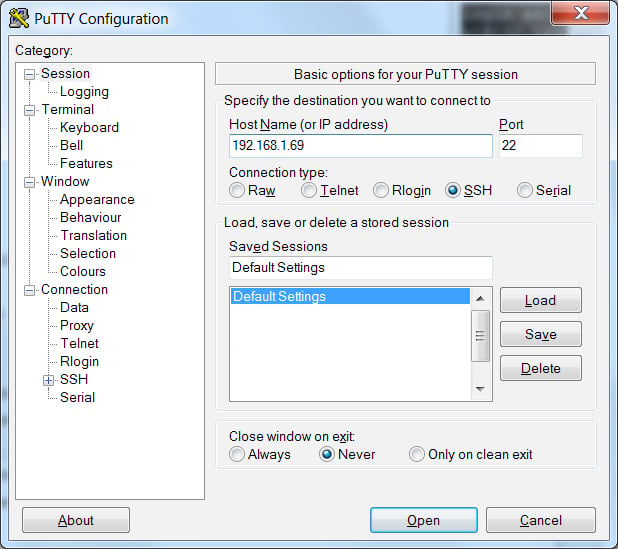
Opening an SSH connection to Raspberry Pi using PuTTY
For OS X or Linux, click on Terminal to open a connection to Raspberry Pi.
To connect with the default pi username, with an IP address of 192.168.1.69, use the following command; the -X option enables X11 forwarding:
ssh -X [email protected]All being well, you should be greeted with a prompt for your password (remember the default value for the pi user is raspberry).
Ensure that you have Xming running by starting the Xming program from your computer's Start menu. Then, in the Terminal window, type a program that normally runs within Raspberry Pi desktop, such as leafpad or scratch. Wait a little while and the program should appear on your computer's desktop (if you get an error, you have probably forgotten to start Xming, so run it and try again).
X Windows and X11 is what provides the method by which Raspberry Pi (and many other Linux-based computers) can display and control graphical Windows as part of a desktop.
For X11 forwarding to work over a network connection, we need both SSH and X11 forwarding enabled on Raspberry Pi. Perform the following steps:
- To switch on (or off) SSH, you can access
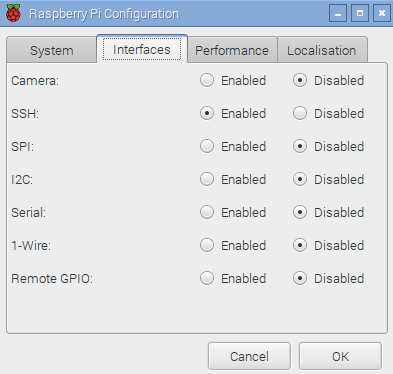
Raspberry Pi Configurationprogram under thePreferencesmenu on theDesktopand click onSSHwithin theInterfacestab, as shown in the following screenshot (SSH is often enabled by default for most distributions to help allow remote connections without needing a monitor to configure it):
The advanced settings menu in the raspi-config tool
- Ensure that X11 forwarding is enabled on Raspberry Pi (again, most distributions now have this enabled by default).
- Use
nanowith the following command:
sudo nano /etc/ssh/sshd_configX11Forwarding yes- Save if required by pressing Ctrl + X, Y, and Enter and reboot (if you need to change it) as follows:
sudo rebootSSH and X11 forwarding is a convenient way to control Raspberry Pi remotely; we will explore some additional tips on how to use it effectively in the following sections.
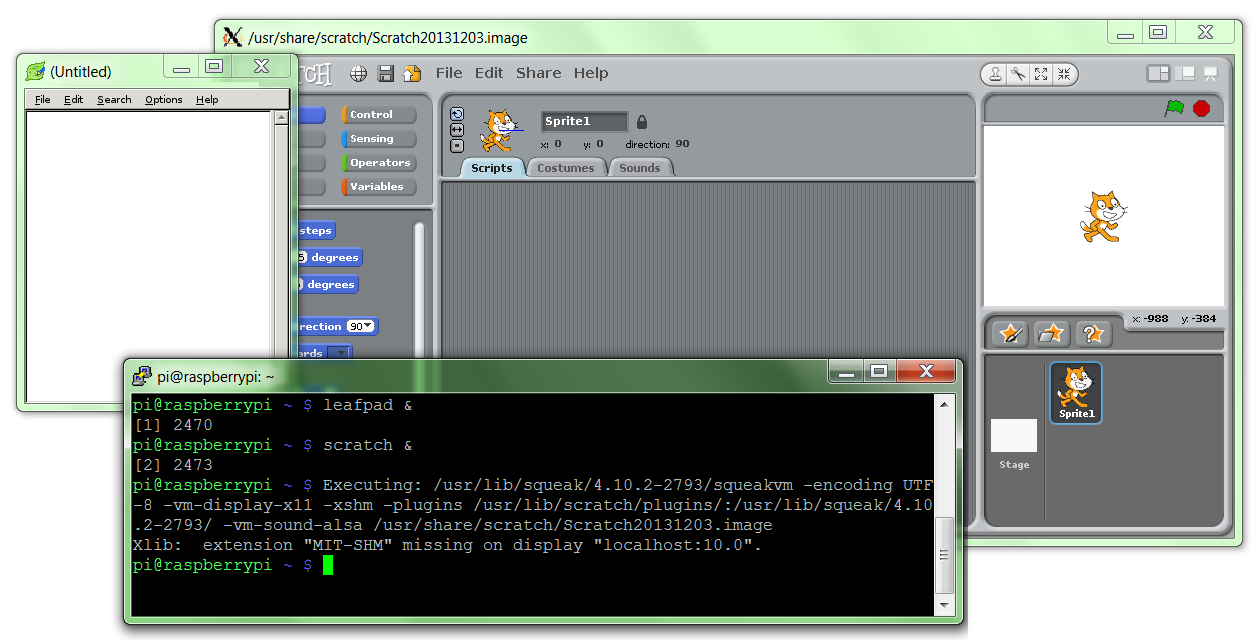
If you want to run an X program, but still be able to use the same Terminal console for other stuff, you can run the command in the background with & as follows:
leafpad &Just remember that the more programs you run, the slower everything will get. You can switch to the background program by typing fg and check for background tasks with bg.
You can even run a complete desktop session through X11, although it isn't particularly user friendly and VNC will produce better results. To achieve this, you have to use lxsession instead of startx (in the way you would normally start the desktop from the Terminal).
An alternative is to use lxpanel, which provides the program menu bar from which you can start and run programs from the menu as you would on the desktop.