

To do any programming, it's important you set up your development environment in a way that is conducive to easy, quick, and manageable programming techniques. This doesn't just mean stocking up on Mountain Dew and Hot Pockets, but also configuring your computer to best develop the specific application you're working on. In our case, we're going to configure ASP.NET 3.5, IIS, and Visual Web Developer on a workstation operating system. We'll also use Microsoft's SQL Server 2005 Express in our project. You always want a development environment as close to the environment you will deploy your application in, so we'll use IIS instead of the built-in development server in Visual Web Developer. If you are working on a system that doesn't support IIS, such as Windows XP Home, you can work with the development server and deploy to a web server with IIS, though you may need to reconfigure more settings that way.
Internet Information Services is Microsoft's web server, and comes with all versions of Microsoft's Windows Server products and many of its workstation operating systems such as Windows XP Pro and Windows Vista Ultimate. The version of IIS is tied to the operating system—Windows XP has version 5.1 and Windows Vista has version 7.0. For our development, it really won't matter which version you use, but there may be some configuration changes based on the version you have. IIS, regardless of version, is not normally installed on a system by default. If your system does not have IIS installed, you will need to install it using your original operating system disk.
Not all Windows operating systems have IIS, and some have only a limited version of IIS included. The following table lists what versions you'll find on which operating systems:
|
Operating System |
Version |
Limitations |
|---|---|---|
|
Windows XP Home |
None |
No IIS available |
|
Windows XP Pro |
5.1 |
Only one site, 10 connections |
|
Windows Vista Home Basic |
None |
No IIS available |
|
Windows Vista Home Premium |
7.0 |
Throttled to 10 concurrent connections |
|
Windows Vista Business |
7.0 |
Throttled to 10 concurrent connections |
|
Windows Vista Ultimate |
7.0 |
Throttled to 10 concurrent connections |
|
Windows Server 2003 |
6.0 |
None |
|
Windows Server 2008 |
7.0 |
None |
European editions of Windows Vista, N editions, have the same IIS version as their counterparts.
In Windows XP Pro, IIS is installed using the Add or Remove Programs applet found in the Control Panel.
1. Choose Add/Remove Windows Components on the left menu.
2. Highlight Internet Information Services (IIS) and click the Details button.
3. Check Documentation.
4. Check the Internet Information Services Snap-In.
5. Highlight World Wide Web Service and click Details.
6. Check the World Wide Web Service.
7. Click OK twice and then Next.
The IIS installation progress dialog will open and installation will complete quickly. You may be asked to insert the CD for the files.
To install IIS in Windows Vista, you must be an administrator or run as an administrator. In Windows Vista, IIS is installed using the Programs option in the Control Panel.
1. Click on Start and then Control Panel.
2. Choose Programs, then Turn on or off Windows features.
3. Expand Internet Information Systems and make sure the following are checked:
Under Web Management Tools:
IIS Management Console
IIS Management Scripts and Tools
IIS Management Service
Under World Wide Web Services:
Application Development Features—all
Common HTTP Features—all except Directory Browsing
4. Accept all other defaults and click OK to start installation.
You may be asked for the Windows Vista DVD, depending on how your system is configured. Don't worry about ASP.NET installation at this time.
Note
Installation order
It is important that you install IIS before you install ASP.NET so that ASP.NET will recognize that it will be used in IIS. If you have ASP.NET installed first, you will need to register IIS with ASP.NET before using it. You can do this using the aspnet_regiis.exe command found in all versions of the ASP.NET framework.
For our application, we'll be installing ASP.NET version 3.5, along with the 2.0 and 3.0 versions of the framework. The easiest way to install the ASP.NET frameworks is to use Windows Update, available in Windows XP and higher versions. Simply connect to Windows Update, expand the Optional Software section, and then choose everything related to ASP.NET. Repeat this process until you have installed all the security fixes and updates for all versions of ASP.NET.
You can download Visual Web Developer Express 2008, or VWD, from the Microsoft web site at http://www.microsoft.com/express/. Install VWD by following these steps:
1. Download Visual Web Developer Express and run the setup file.
2. Choose Next, and then accept the license terms.
3. Check the MSDN library option unless you are short on drive space or have a slow download link.
4. Accept the default installation location and click Install.
5. Restart your system when asked.
If ASP.NET is not installed, the VWD 2008 setup will install it for you. You can choose to use VWD 2005, but you will not have the IntelliSense or settings for the 3.5 framework as part of the IDE. You must register Visual Web Developer 2008 Express to continue using it after 30 days, but registration is free.
With all the software installed, your development environment still needs to be configured and tested. We do this in stages so that a failure at any stage is easy to diagnose. If we configured everything and then tested, it could be a problem with IIS, ASP.NET, SQL Server Express, Visual Web Developer, or almost anything else. The basis for serving a web site is web server software. In Windows it's IIS, so the first thing we'll configure and test is IIS.
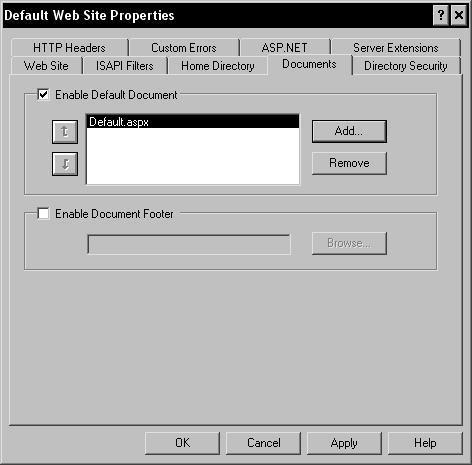
As we'll be developing our application in IIS, it's important that we configure IIS appropriately. Start by opening the IIS Manager in Administrative Tools and selecting the Default Web Site. Right-click this and choose Properties, displaying the properties dialog shown below:

The two tabs we are most interested in are the ASP.NET tab and the Documents tab. On the Documents tab, we set the default document and the file that IIS serves when no file is specified on the URL. Select the Documents tab and you will see a predefined list of default documents, in the order IIS will use if it finds them. For our application, we will use only Default.aspx as our default document. To help secure our site, we will remove all the other file names listed so that IIS will not serve them, even if they exist. After deleting these, and adding Default.aspx if it wasn't in your list to start, your Documents tab should look like the given screenshot:
The other tab we need to configure is the ASP.NET tab. On this tab we will set the ASP.NET version that our application will use. This can be confusing, as even though we will be using ASP.NET 3.5, the version set in IIS is ASP.NET 2.0. Remember, ASP.NET 3.0 and 3.5 are just extensions to ASP.NET 2.0, not a completely new version of the framework.
In the IIS Manager, select the ASP.NET tab. In the ASP.NET drop-down list, make sure that you select the 2.0 version of the framework, as shown in the following screenshot:

For IIS to serve ASP.NET applications, the folder that the application is in has to be defined as an application in IIS. By default, the root folder of a web site is an application, and that's what we will use for our CMS project. This is why you see the file location of c:\inetpub\wwwroot\web.config in the IIS ASP.NET configuration tab. If you are developing in a virtual folder or a subfolder of the root of your site, you will need to set that folder as an application in IIS. Chapter 12 has a section on setting folders as applications in IIS.
Windows Vista uses IIS 7, as does Windows Server 2008. This makes Vista an excellent development environment if the deployment server will be Windows Server 2008, as both Windows Vista (with Service Pack 1) and Windows Server 2008 share identical IIS versions. In addition, IIS 7 uses XML configuration files, making it very easy to deploy an application or entire site.
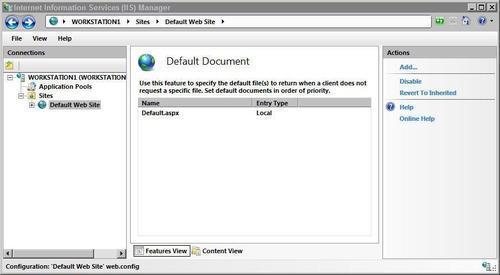
Open the IIS Manager in Vista under Administrative Tools and navigate to the default web site in the left menu. The Default Web Site page is displayed, and under the IIS section you'll find Default Document. Double-click it and the Default Document pane will open. Highlight any document that is not Default.aspx and delete it. If you do not have a Default.aspx document listed, click Add under the Actions menu on the righthand side and add it. When you have finished, the Default Document pane should look as shown in the following screenshot:
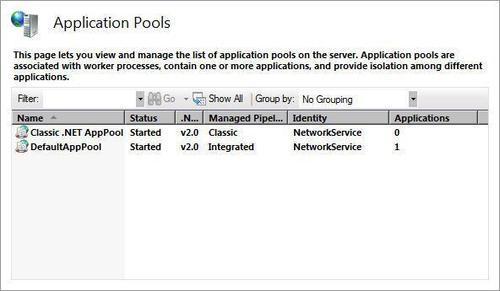
Windows Vista is easier than Windows XP when it comes to configuring the ASP.NET framework version. To begin with, Windows Vista and IIS 7 install out of the box, and configure for the ASP.NET 2.0 framework. Also, Windows Vista ASP.NET versions are configured on an application pool basis, so selecting the correct application pool is all you need to do for your application to run under ASP.NET 2.0. The default installation of IIS 7.0 includes two application pools, one using the new IIS 7 integrated pipeline and the other using the classic ASP.NET pipeline found in earlier versions.
This means that in the integrated pipeline, all requests to the server are processed by the ASP.NET DLL, while in the classic pipeline, requests are processed based on the file extension mapping. You normally need to worry about this only when you are migrating an application, but you can find a list of breaking changes for ASP.NET 2.0 applications running in the integrated pipeline at http://learn.iis.net/page.aspx/381/aspnet-20-breaking-changes-on-iis-70/.
For Windows Vista and IIS 7, all you need to do at this time is verify that the default application pool is set to version 2.0, as shown in the following screenshot:
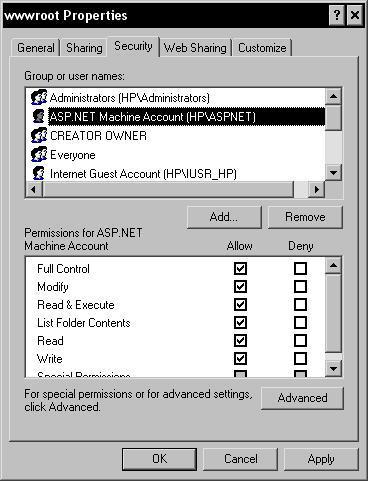
There is one additional step we need to take in setting up our web site. Since we will be altering files on the site using ASP.NET, we need to give permission to the ASP.NET process account to do so. For this we use NTFS permissions, also known as Windows file and folder permissions, to allow the proper account access to the system.
The default ASP.NET process account in Windows XP and IIS 5.1 is the ASP.NET account, while in Windows Server 2003 and IIS 6, as well as all versions of Windows with IIS 7, it is the NETWORK SERVICE account. These are less privileged accounts that the ASP.NET process runs under to provide additional security. Unless you have changed the default account, these are the accounts that need access to our web site files and folders.
To set NTFS permissions for these accounts, we need to open the file system using Windows Explorer or My Computer. In Windows Vista, you must be signed in as a local administrator to set permissions. Navigate to the root of your web site, the default is C:\inetpub\wwwroot\, and right-click on the folder, choosing Properties. On the Security tab, we need to add the proper account for our version of Windows. These accounts are hidden accounts, so simply type in the proper account name rather than searching for it. Also, these are local accounts. Therefore, if your system is part of a Windows domain, you may need to specify the system name such as {SystemName}/ASPNET before the account. Grant this account Full Control to the web folder. When you're finished, the Security dialog should look something like this:
There is no point in writing any application code if it won't work, so we need to test our installation and make sure that IIS will serve an ASP.NET page. The traditional test method for programming and web sites is with a "Hello World!" application, basically one that simply prints some text to the screen. We want one that uses some ASP.NET functionality, so ours won't simply display "Hello World!" in a browser window, which can also be done in plain HTML. What we need is an application like this:
<%@ Page Language="VB" %>
<script runat="server">
Sub Page_Load(Sender As Object, E As EventArgs)
HelloWorld.Text = "Hello World!"
End Sub
</script>
<html>
<head>
<title>ASP.NET Hello World</title>
</head>
<body>
<p><asp:label id="HelloWorld" runat="server" /></p>
</body>
</html>
Save this code as Default.aspx in the root of your web site, c:\inetpub\wwwroot\ would be the default, and you have a simpler application that uses an ASP.NET label control to display "Hello World!" in a browser. You can display this within Visual Web Developer, but that uses the development server contained in VWD 2008. What we want is to display this in the same way a browser would display it when browsing our CMS application.
Open a web browser and browse to http://localhost/. You should see a display similar to this:
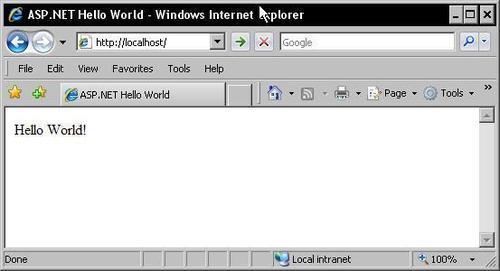
Okay, nothing spectacular, but it does prove that IIS is configured correctly to serve ASP.NET pages.
Note
Localhost
The location "localhost" that we browsed to has special meaning in the networking world. This name resolves to an IP address of 127.0.0.1, which is reserved in networking to mean the system that you are sitting at. In other words, using http://localhost/ in a browser will always bring up the web server on the system you are physically browsing from. It cannot be used from a second system, as "localhost" resolves to that second system on that second system.