

ADempiere requires a database to store its data. Currently, ADempiere officially supports both Oracle (XE) and PostgreSQL (EnterpriseDB) databases. The databases can be installed on the ADempiere server or onto a specific database computer server. In this book, we will set these databases up on an ADempiere server.
To support the open source movement, we will use PostgreSQL as our ADempiere database backend instead of Oracle. If you want to set up Oracle (XE) as your database backend, then visit http://www.adempiere.com/index.php/ADempiere_Installing for more information.
We can obtain PostgreSQL databases for Microsoft Windows from http://www.postgresql.org/download/windows. You will find an option to Download the one click installer or pgInstaller. Click on Download the one click installer, and you will be redirected to the Enterprise DB website: http://www.enterprisedb.com/products/pgdownload.do#windows. Download the installer for the Microsoft Windows operating system.
At the time of writing, the latest release of the PostgreSQL database for Windows is PostgreSQL 8.3.5. After we click on the download button on this site, we will be prompted to save the postgresql-8.3.5-2-windows.exe file (about 35.7 MB in size). Create a C:\download\database folder, and save this binary installation file to this location.
Double-click on the postgresql-8.3.5-2-windows.exe file to launch the Windows installer. During the installation, this installer will install additional required files for us automatically. It will install Microsoft Visual C++ 2005 Redistributable. When asked for the installation directory, point it to C:\download\database\postgresql\8.3, instead of the default installation directory, as shown in the following screenshot:

Click on Next, and you will be prompted with the data directory location confirmation. You can define your own data directory or location. On the author's computer, the data directory is left as it is—C:\download\database\PostgreSQL\8.3\data. Next, set a password for your Postgres account. In this installation, we use postgres as the default password for the Postgres account.
Leave the default Port used for this database as 5432, set Locale to English, United States, and proceed to complete your database installation.
On the final installation screen, you need to deselect the Launch Stack Builder at exit option.
The PostgreSQL database server for ADempiere has been successfully installed. During ADempiere installation, there are many PostgreSQL application tools (*.exe files) that can help you to manage your database. Most of these tools can be found in the %PostgreSQLHome%\bin folder.
Examples of these application tools are given in the following table:
|
No |
Tools name |
Description |
|---|---|---|
|
1 |
|
Tools for executing interactive PostgreSQL commands |
|
2 |
|
Tools for creating PostgreSQL users |
|
3 |
|
Tools for creating PostgreSQL databases |
These tools will be used throughout this book. In order to add these folders to our Path System variables, do the following:
Access the System Properties window via Start | Control Panel | System.
Select the Advanced tab, and then click on the Environment Variables button.
Edit the Path system variable, and add the following entry:
;C:\download\database\PostgreSQL\8.3\bin
Just like we verified the Java system variables, we should verify our PostgreSQL path. Previously, we used the SET command to accomplish this task. We shall use the path command to verify the path.
Open the DOS prompt command-line window and type:
C:\>path
Press Enter, and the system will display the current computer PATH. Ensure that we have C:\database\PostgreSQL\8.3\bin in the contents of PATH. The following is the screenshot from the author's computer:

The next procedure is to verify the additional PostgreSQL paths. Type the psql command on the command line, and press Enter. If we are prompted to enter a password, then our PostgreSQL path setting is working as expected. Press Enter, and the system will display the following information:
psql: fe_sendauth: no password supplied
Thus, we have completed the database installation and verification.
By default, the initial security configuration settings to access PostgreSQL databases are quite restrictive. This is a good practice as we can make sure that our databases can be accessed from trusted computers only. We can define an additional list of computers that can access our databases by altering some PostgreSQL configuration files.
The name of the client authentication configuration file is pg_hba.conf. It can be found in the %PostgreSQLHome%\data folder. This file contains the information shown in the following screenshot:
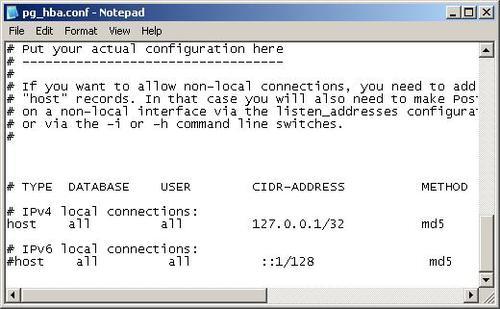
With this configuration, the database connection is accepted from a local computer only. If we wish to allow any computer within our local LAN, which is pre-installed with the ADempiere client—and let us assume that our computer server has a 10.10.101.107 IP address—then we should add the following two lines of configuration:
host adempiere adempiere 10.10.101.107/0 md5
host template1 postgres 10.10.101.107/0 md5
to our pg_hba.conf file.
Tip
The 10.10.101.107/0 defines the IP and subnet masks allowed. Visit http://en.wikipedia.org/wiki/Subnetwork for a further explanation.
The other client authentication file is postgresql.conf. It is present in the %PostgreSQLHome%\data\ folder. If we go through this file, then we will find the following information:
listen_addresses = '*'
The above statement means that the PostgreSQL database for Windows is listening and is ready to make a connection with all of the available computer addresses. Leave this configuration unchanged, and our client will have a connection without any problems.
Refer to the PostgreSQL documentation for more detailed information. This document can be accessed from Start | All Programs | PostgreSQL 8.3 | Documentation (or Start | Programs | PostgreSQL 8.3 | Documentation on the Windows classic menu) for more detailed information.
For security reasons, the current Microsoft Windows installation's best practice is to block all incoming connections to unrecognized ports. We need to tell Microsoft Windows which port is being used by the PostgreSQL database by default.
During our PostgreSQL database installation, we used port 5432 as the standard database communication port on all of the connected computers within our network (including the host or database server itself). We will open this port from the Windows firewall, which can be accessed from Start | Control Panel | Windows Firewall.
Select the Exception tab, and click on the Add port button. Complete the PostgreSQL Name field, and enter 5432 as the Port number. Ensure that you select TCP instead of UDP. Click on the OK button.