
In this section, I'm going to get together all the pieces that you will need for the remainder of this book. If you would like to follow along with the rest of this book, then this section is crucial.
The software that we will download and install includes the following:
The Java SE Development Kit (JDK) version 6.0
A download verifier
Apache Ant 1.7.1
Subversion 1.6.3
Eclipse 3.5 Galileo
The workstation that I use throughout this book runs a Microsoft Windows operating system (XP Professional or Vista).
Note
The version numbers that are specified were current at the time of writing this text. However, with the speed of product cycles in the open source arena, it is likely that newer versions will be available by the time you read this.
JDK 6 can be found at http://java.sun.com/javase/downloads/index.jsp.
As with every download page on the Sun web site, there are enough choices to make your head spin. For our needs, we need the plain vanilla JDK 6.0 that at the time of writing is JDK 6 Update 14.
Once you've picked the Platform: (Windows) and Language: (Multi-language), you will end up with a file named jdk-6u14-windows-i586.exe on your workstation.
Execute this file to install it. Once you have accepted the terms and conditions, and have picked an install directory, the installation process will begin.
Once the JDK has been installed, the installer will prompt you to install the JRE. You may do so if you wish.
Most open source software is hosted on multiple mirror sites, and you are expected to pick your nearest mirror from which to download it. A key question here is how do you ensure that the file that you just downloaded is an exact copy of the version that the open source team intended for download, and there isn't a malicious hacker chuckling with glee to see you install a Trojan on your workstation?
There are a couple of answers to this question—using PGP keys or using a message digest.
The former is more secure as it uses public key cryptography, but as a result is also more complex.
The latter, while simpler to use, is not quite as secure, as the most common digest algorithm (MD5) has some well documented flaws, allowing different files to generate the same digest. In addition, the MD5 digest value itself may have been modified by the hacker so that it matches the compromised file.
Using the principle that any security is better than none, you would compute the MD5 message digest for the downloaded file, and compare that computed value against the published digest for the file.
You can download a digest generator from either www.formilab.ch/md5/ or www.nullriver.com/index/products/winmd5sum.
For example, the MD5 digest for the ZIP file distribution of Tomcat 6.0.18 is:
f7d0c15df19fedf52476767f7ce0b6f8
*apache-tomcat-6.0.18.zip
Apache Ant or Another Neat Tool is a build automation utility that owes its existence to James Duncan Davidson and Tomcat. It originated as a tool used to build Tomcat itself. But its widespread popularity ensured that it was promoted into its own project, independent of Tomcat, in January 2000.
As Ant is written in Java, it inherits its Write Once Run Anywhere aspect, making it platform independent. Its build directives (by default, in a file named build.xml) are written using XML - another cross platform advantage.
Ant build directives take the form of targets that describe the actions or tasks that must be performed, whether creating, deleting, or copying files and directories, setting classpaths, compiling Java classes, or even packaging your applications.
The ability to define dependencies on targets adds to its flexibility. You can indicate that a compile target depends on other targets that clear out the output directories, fetch the latest changes from your source code repository, and set the classpath.
Finally, throw in the ability to define your own targets, and the sky's the limit!
Download the latest version from http://ant.apache.org/bindownload.cgi and extract the Ant distribution. The version that was current when I wrote this, was Ant 1.7.1.
You need to add Ant to your PATH. On Windows, this is accomplished by opening the System Properties box - by right clicking your My Computer icon and clicking Properties. Pick System from the Control Panel's classic view or press the keyboard shortcut Windows + Pause/Break.
On the Advanced system settings tab, click on Environment Variables tab and edit the Path variable. Add [ANT_HOME]\bin to the end of the path variable, replacing [ANT_HOME] with the absolute path to the location where you extracted the downloaded file.
Note that path variables in Windows are delimited by a semicolon.
Next, we need a way to retrieve the latest version of the Tomcat source code, which is currently housed in a Subversion repository.
Subversion was conceived in 2000, when CollabNet, Inc. decided that it was time to write a brand new version control system, and brought on Karl Fogel to head this effort. The stated goal of the original team was to write a better version of CVS, while retaining the familiar elements of CVS, to make it easier for developers to switch without much effort.
Subversion has since dethroned CVS as the system of choice. In particular, it has been adopted as the standard version control mechanism by the Apache Software Foundation.
Subversion, like CVS, uses a copy-modify-merge model. In the copy phase, each developer makes a private copy of the project's source code on to their individual workstations. This copy acts as a sandbox within which each developer may work.
In the modify phase, each developer makes changes in his or her own working copy. The changes made by one developer are not visible to the others. If you need visibility into another developer's changes, you would need to update your working copy from the repository.
In the merge phase, a developer commits his changes back into the source code. If a file was modified by another developer since you checked out your copy, you would then need to merge your changes back into the repository resolving any conflicts as necessary.
Get the latest version of the Subversion Command-Line Client for Windows from http://www.collab.net/downloads/subversion/, which is currently 1.6.3. Execute the downloaded file, CollabNetSubversion-client-1.6.3-3.win32.exe.
The installation is fairly straightforward and only requires that you specify a path name for your installation.
To verify that the software was successfully installed, run the svn --version command from the command prompt. This command should output the version of Subversion that is installed on your workstation.
You have two options when trying to download the Tomcat source. You could either use the Subversion version control software, which was described in the last section, or you could simply download the compressed source distribution of Tomcat as a ZIP file. The former option is preferred if you expect to be developing in Tomcat, whereas the latter is simply a snapshot of the code at a given version.
To obtain the latest source code for Tomcat from the Subversion repository at the ASF, change your working directory to where you want to download your working copy (for example, c:\tomcat), and execute the following at the command line (all on one line):
svn checkout http://svn.apache.org/repos/asf/tomcat/tc6.0.x/trunk/
When this completes, you will notice that your current directory now contains a trunk subfolder with the source directories for Tomcat.
Note
The above command downloads the most up-to-date version of the source trunk and may result in code that may differ from the descriptions in this text.
If you would like to ensure that you are working with the exact codebase covered in this book, then you should use the following command instead:
svn checkout http://svn.apache.org/repos/asf/tomcat/tc6.0.x/tags/TOMCAT_6_0_20/
This is the 'copy' phase of your interaction with the Subversion version control system. The result of this operation is to make a local copy of Tomcat's latest development code line from the Subversion repository. This lets you play in your own little sandbox, making changes and experimenting for as long as you need.
If you'd rather not install Subversion, a less invasive option would be to simply download the Tomcat source from the Source Code Distributions section at http://tomcat.apache.org/download-60.cgi.The source for a previous version can be downloaded from http://archive.apache.org/dist/tomcat/tomcat-6/. The only downside with this approach is that the source distribution does not contain a project file for use with the Eclipse IDE. To get these files, point your browser at http://svn.apache.org/repos/asf/tomcat/tc6.0.x/trunk (or to http://svn.apache.org/repos/asf/tomcat/tc6.0.x/tags/TOMCAT_6_0_20 for the version used in this book) and download the .classpath and .project files. Ensure that the downloaded files are named exactly the same as their originals.
Now, we're ready to get started with building the source that we just downloaded. This is a two step process that utilizes the power of Ant and the build.xml file that exists in the trunk directory. First change directory to the directory to which your source code has been downloaded (or unzipped.).
ant download
The download target downloads a number of binaries that are needed for this build. These artifacts are downloaded to the folder that is identified by the base.path property in the Ant build.properties.default file. By default, this will be /usr/share/java. However, you can change this to a different absolute path such as c:/tomcat/downloads/trunk.
The files that are downloaded include:
The native Tomcat connectors (currently at version 1.1.15).
The Commons daemon library (version 1.0.1), which is used with
jsvc—a Java Service Wrapper that is used to run Tomcat as a non-root user listening on the privileged port 80 on non Windows operating systems.The Eclipse JDT JAR, which is used by Tomcat to compile JSPs.
The Nullsoft Scriptable Install System (NSIS)—an open source system to create Windows installers.
The Commons Collections library.
The Commons Database Connection Pool (version 1.2.2) and Commons Pool (version 1.4). The
build-tomcat-dbcpAnt target renames the packages for these Commons projects, for example, by replacingorg.apache.commonswithorg.apache.tomcat.dbcp. The stated goal here is to ensure that the DBCP and Pool classes, used by Tomcat internally, do not conflict with any versions of DBCP or Pool classes that are packaged with individual web applications.
Note
Download errors
I have noticed that the download target sometimes fails when trying to unzip the NSIS with the following error: java.io.IOException: Negative seek offset
In such cases, a manual workaround is to simply download the target ZIP file (in this case http://downloads.sourceforge.net/nsis/nsis-2.37.zip) and unzip it to the folder into which the build script is downloading files. Then, ensure that the test file is present, which in this case is c:/tomcat/downloads/trunk/nsis-2.37/makensis.exe.
We're finally ready to build Tomcat using Ant, so run the deploy target.
ant deploy
This target compiles the Java code and builds the binary distribution of Tomcat. Note that you can omit the target name because deploy is defined as the default target in the build.xml file. So the following would be equivalent:
ant
The deploy target builds the Tomcat binaries and copies files out to output\build.
From the output\build\bin directory within your Tomcat trunk folder, execute the startup.bat batch file.
startup
This starts up your Tomcat server in a separate command window. Reassuring log messages should be output to your console as shown.

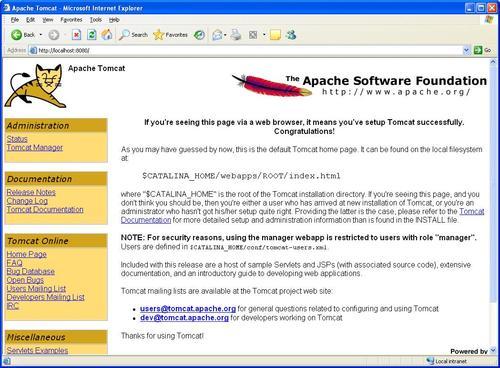
Now, using your favorite browser, type in the URL http://localhost:8080, and marvel at what you have wrought.
Finally, to shut down your server, execute the shutdown.bat batch file.
shutdown
This command closes down the Tomcat server gracefully, and you're done.
We're now on to the home stretch. The ultimate prize for us is to be able to use an IDE to run the Tomcat server. What would be more appropriate for investigating Tomcat, than the free and full featured open source IDE—Eclipse!
Note
While you can simply use your favorite IDE, the Tomcat source distributions include project metadata files only for the Eclipse IDE.
In particular, let's pick Eclipse Galileo, which is the most recent in an annual series of releases that package multiple major projects. Previous releases have been code named Callisto, Europa, and Ganymede.
Galileo was released in June 2009, and includes the core Eclipse project along with almost three dozen other major projects, including the Web Tools Platform project, the Rich Ajax Platform project, and the SOA Tools Platform project.
Eclipse downloads are available at http://www.eclipse.org/downloads/. Make sure that you pick the Eclipse IDE for Java EE Developers version. For Windows, this results in the file eclipse-jee-galileo-win32.zip being copied down to your workstation.
Note
Eclipse for 64-bit Windows
The above link works fine for downloading Eclipse for the most common platforms, including 64-bit Linux. However, you have to work a bit harder to get the 64-bit version for Windows. The downloads for the Eclipse project are available at http://download.eclipse.org/eclipse/downloads/. For safety, click the link associated with the Latest Release version, which is currently at 3.5. These downloads are named eclipse-SDK-[versionNumber]-[platform].zip. For Vista 64, this download is eclipse-SDK-3.5-win32-x86_64.zip.
Unzip the Eclipse distribution to a folder of your choice, and execute eclipse.exe to verify that your IDE starts up.
At startup, you are prompted for a workspace location. A workspace folder is used to house your projects as well as to store metadata about your plugins and your IDE preferences.
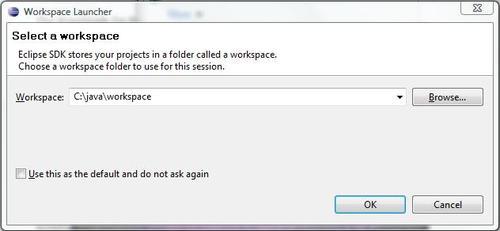
In this dialog, you can either point to an existing workspace folder if you have one, or to a new folder location. It is recommended that you pick a folder that lies outside of your Eclipse installation directory so that when you upgrade your Eclipse version, you can simply delete the old installation folder without losing your workspace.
Once Eclipse starts up, dismiss the Welcome screen to proceed to the Workbench, and then select the Window | Preferences menu option to display the Preferences dialog.
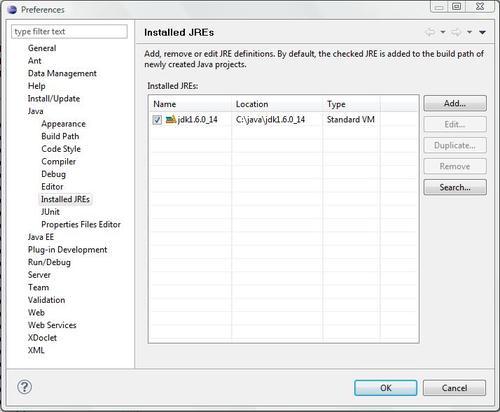
In the left pane of this dialog, drill down to Java | Installed JREs, and verify that your previously installed version of JDK 6 shows up. If it doesn't, then click on the Add button to add a reference to your JDK.
We will also set up two classpath variables as shown next— ANT_HOME to point at the base directory for your Ant installation and TOMCAT_LIBS_BASE to point to the directory that holds the files downloaded by the download ant target that you executed while building Tomcat.
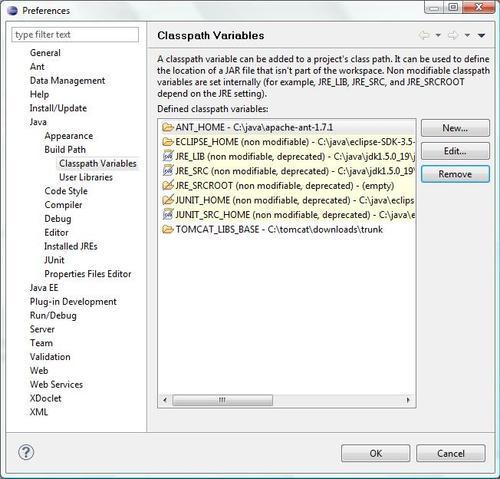
Note
If you are building a non-trunk version of Tomcat, then ensure that your TOMCAT_LIBS_BASE classpath variable points to the path to where the ant download target downloads its dependencies.
Next, import the project file that is present in the working copy of the Tomcat trunk. Choose File | Import to open the Import dialog. From this dialog, choose General | Existing Projects into Workspace to import the Eclipse project present in the Tomcat trunk into your new workspace.
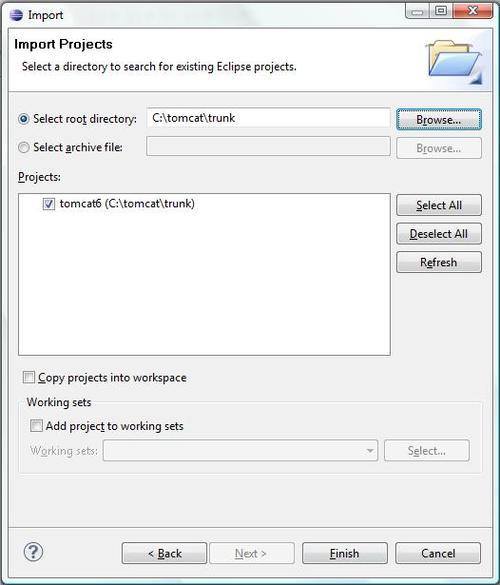
Click on Finish to import the project.
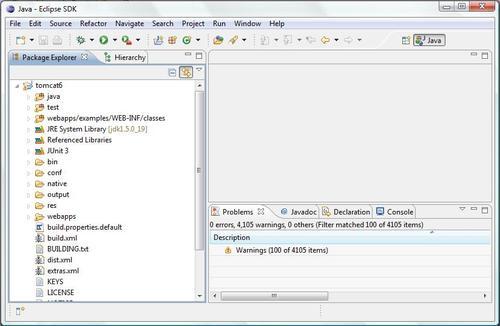
A project build begins automatically, and you will get the following screen.
To start up your Tomcat server from within Eclipse, create a Run configuration by choosing the Run | Run Configurations… menu option, and select org.apache.catalina.startup.Bootstrap as the Main class.
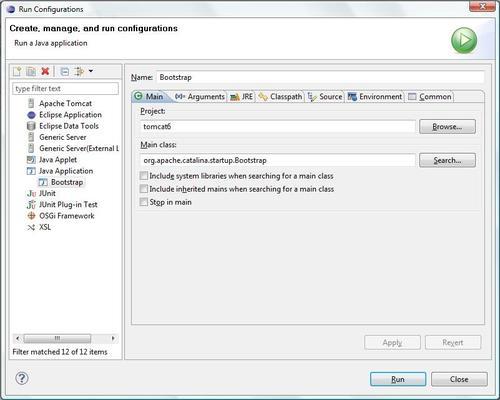
Click on Run, and watch the Console pane for output indicating that Tomcat was successfully started.
Now browse on over to http://localhost:8080 to view the Tomcat welcome page.
Congratulations! You're done.
For now, play with this code by placing breakpoints and stepping through interesting code sections. We'll explore these sections in far greater detail in the chapters to come.
In the next couple of chapters, we'll regroup and visit concepts that are necessary for the exploring that we'll be doing in later chapters.