Now that TYPO3 is setup, TemplaVoila is installed, and we have an HTML template to start with, we can run the magical TemplaVoila Wizard to create a whole site in just a couple of mouse clicks. I know this section has a lot of pages for a couple of mouse-clicks, but it's important to understand what we're clicking on this for the first time.
If you log in to the backend of TYPO3 right now, you will see we have a website with absolutely no pages. When we go through the wizard, it will perform three tasks:
Map dynamic content areas to our HTML template
Generate some basic TypoScript for our menus
Create sample content to test our new template
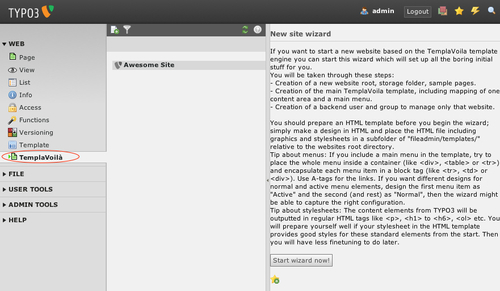
We are ready to start, so go ahead and choose the TemplaVoila module in the left frame to enter the New site wizard as shown in the following screenshot:
 |
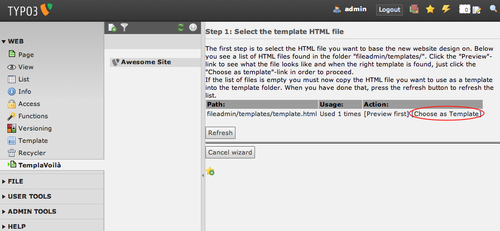
The first thing we need to do is select our HTML template. As we only have one HTML file in the fileadmin/templates/ directory, the only choice will be our new file, template.html. Click on [Choose as Template].
 |
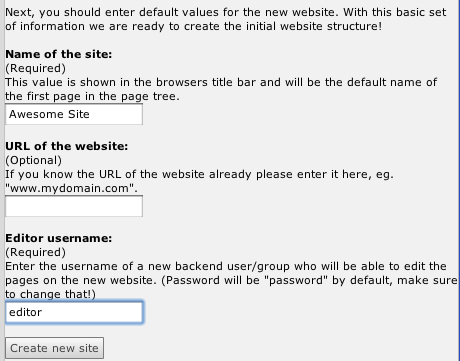
Once we click on Start wizard now! we are looking at a screen where we can set basic information for our website. The name of our website is required to establish a unique name for our website, but the URL of the website is not required. Running the wizard will create a new editor in the backend, so the username field is required. In the example below, I have named this user editor. The values that we fill in here are used to start adding content to the database, set our URL in TypoScript, and create a new user, but all of these settings can be easily changed later if necessary. Once you've filled in required information, click on Create new site.
 |
The screenshot that we just saw is just an introduction screen for the wizard with an animation to explain the mapping process. Click on the Start the mapping process button near the bottom of the page.
Now that we are starting the mapping process, we are presented with the default TemplaVoila editing pages. Make sure you are on the Mapping tab.
 |
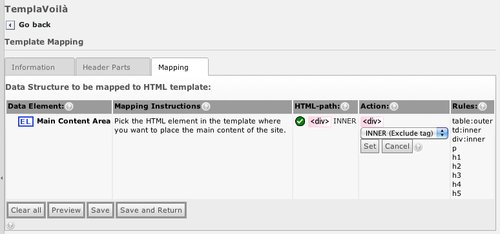
This page is the heart of TemplaVoila mapping. You'll notice that this page has five columns, and understanding them now will introduce you to some of the TemplaVoila concepts, and will save you from frustration later on.
Each template field is referred to as a Data Element in the mapping section of TemplaVoila. Basically, every template section that will be replaced with TYPO3 data (menus, content elements, and so on) is considered a data element in our template. Each template in TemplaVoila uses a special Data Structure object to define all of the data elements such as Main Content Area or Main menu that will be available for mapping. When we are creating TemplaVoila templates from scratch, we must define data elements by creating a data structure. We are going to be editing data structures to add our own data elements in Chapter 3. This first time, though, we are going to use the data structure from the wizard because it already includes all the data elements we need.
The next column, Mapping Instructions, is a simple text area for notes in the data structure. The mapping instructions are not binding, but they are used as plain instructions from the creators of the data structure (the TemplaVoila creators, in this case) to the template object mappers (that is you and me, the users of the wizard). We can see, for example, that the default Data Structure includes instructions to map the Main menu element to …the HTML container element where you want the automatically made menu items to be placed.
Once we have mapped an element, the mapped tag will show up in the HTML-path column along with the mode, as we saw with the root data element discussed earlier. The "mode" of a data element refers to inner and outer mapping. If a data element is mapped with INNER selected, then the HTML tag from the template will remain untouched, and the TYPO3 content will go inside it. In OUTER mode, the tag will be replaced by the TYPO3 content. We don't need to worry about changing the mode yet, but it can be handy in special circumstances when we want TYPO3 to add in its own tag and class information.
The action column simply holds the buttons for mapping, re-mapping, and changing the mode of a data element.
The rules, as the name implies, are the technical restrictions or allowances that the data template creators have written into the structure. In this first template, the rules will only allow the root data element to be mapped to a body tag, but they allow any of the other data elements to be mapped to almost any container tag. The main content area can even be mapped to paragraph and header tags, if we so desire. As an example, TemplaVoila will not allow us to choose a span tag in the mapping windows for the main content area, because it is not allowed in the set of rules. As developers, we will normally allow mapping to most HTML containers like the example discussed earlier, but it can be helpful to be more restrictive to avoid unintended mappings.
Now that we understand what's possible on the mapping page, we can start mapping the elements. We're going to map the main content area first, so go ahead and click on the Map button in the main content area row. This will take us to the mapping screen, and we can choose an editing mode from the Mapping Window drop-down. Mode: Exploded Visual will show the rendered view of the template with clickable areas for mapping, or we can choose Mode: HTML Source to navigate through the HTML source code. For our purposes, we can map in the exploded visual mode. To map the correct content tag, we'll just click on the div button with the content ID (circled in the following screenshot). If we hover over the div button, we can see the class, ID, and full path so we can identify it better:
 |
After we have chosen the mapping target, the next page prompts us to specify whether we are using INNER or OUTER mapping before we set the changes in the database. We will choose the default INNER mapping from drop-down in the action column because we do not want the div to be replaced with TYPO3 content; we want our TYPO3 content to go inside of the div tag. If we chose OUTER mapping, then the generated TYPO3 content would replace the div tags instead of just the content inside the tags. Now we can click on Set to save our mapping to the database, and the wizard will take us back to the main mapping section.
 |
We've now successfully mapped our first element! I'll give you a minute to celebrate, because you deserve it. You now officially have all the skills you need to complete the rest of this section, and I'll just be here with a little bit of guidance.
Our next step is mapping the main menu, and it will work exactly as you'd expect. Go ahead and click on the Map button in the Main Menu row of the mapping page. We are going to choose the tag with the ID menu-area for the main menu, and choose the inner mapping mode. Remember to click on Set at the end to save your changes. For the sub menu, go ahead and repeat the same steps with the submenu element and the list tag with the ID submenu-area.
You'll notice that we have five buttons on the bottom of our mapping page that we can use while we are mapping our template:
Clear all will clear all of the mappings in the current template. This is helpful if we just need to start over.
Preview will show us a preview of our template as it is currently mapped with unique example content to show the data elements.
Save will save our current mapping.
Save and Return will save our current mapping and return us to the list of templates. If we are running the TemplaVoila Wizard, it will take us to the next step in the wizard process.
Revert will revert all of our changes since the last save.
Now that we have mapped our basic elements, go ahead and click on the Save and Return button at the bottom of the page.
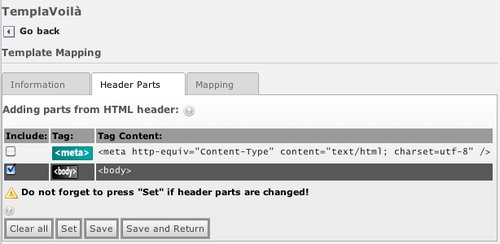
Once you click on Save and Return, we are taken to the next step in the wizard where we are told about mapping the HTML header parts for our template. TemplaVoila allows us to select portions of our HTML template header area to be included in the final TYPO3 output. This is helpful if we want to map CSS or JavaScript directly in the HTML. Any part of the header that we do not choose during this process will be ignored by TYPO3 when it renders our page. Right now, we don't have any special information in our header, so we are going to uncheck all of the boxes and click on Set. Once we've clicked on Set, TYPO3 will remember our choice, and we can click on Save and Return without losing information. If we do not click on Set, then TYPO3 will not remember what we checked and unchecked, so it will revert to the default, or what was last set.
 |
After we save, the wizard is ready to start creating our menus. TemplaVoila analyzes the HTML template we have mapped to give us good default TypoScript code for our main menu. Just to make sure it is correct, it will show us what it plans to create on the next screen, as shown in the following code snippet. If the wizard has evaluated our template correctly, the default TypoScript should look like this:
lib.mainMenu = HMENU
lib.mainMenu.entryLevel = 0
lib.mainMenu.wrap = <ul id="menu-area">|</ul>
lib.mainMenu.1 = TMENU
lib.mainMenu.1.NO {
allWrap = <li class="menu-item">|</li>
}
If you have worked with TypoScript before, this code will probably be familiar to you as the basic code for all menus when you are first learning. If you don't understand the menu code yet, don't worry. We will learn how to create menus with TypoScript in Chapter 4:
lib.mainMenu = HMENU
lib.mainMenu.entryLevel = 0
lib.mainMenu.wrap = <ul id="menu-area">|</ul>
lib.mainMenu.1 = TMENU
lib.mainMenu.1.NO {
allWrap = <li class="menu-item">|</li>
}
Go ahead and click on the Write main menu TypoScript code button.
Next will be to create the submenus for our site. The TypoScript will be almost exactly the same, except we will be using an object called subMenu and we are going to set the entry level to 1. Here is what the default code should look like:
lib.subMenu = HMENU
lib.subMenu.entryLevel = 1
lib.subMenu.wrap = <ul id="submenu-area">|</ul>
lib.subMenu.1 = TMENU
lib.subMenu.1.NO {
allWrap = <li class="submenu-item">|</li>
}
Click on the Write sub menu TypoScript code button at the bottom of the page. Once you have chosen to write the code, the next page will only have one final button to click that says Finish Wizard!