
ChronoForms is all about creating forms so this is where all the proper action starts.
Forms in Joomla! can do many things, from the very simple example that we will create here, to complex multi-page forms that change depending on the entries that are made, do calculations, send e-mails, and update databases. However, the basic building blocks are just the same.
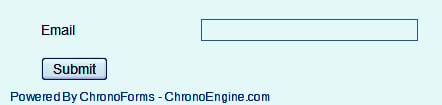
In this recipe, we're going to create just about the simplest form possible. It's a newsletter signup with just one field for an e-mail address and a submit button:
1. Go to the ChronoForms Forms Manager and click on Form Wizard, or choose Components | ChronoForms | Form Wizard from the Administrator Menus.
The Form Wizard tab opens up looking like this:

2. There are four steps that the Wizard can help with, though we're only going to use Step 1 Design your form here. There's an empty work area with Preview and Save icons to the top left and a Toolbox to the right with a Properties box below it that is currently empty. To the top right of the image is a Cancel button in case you change your mind.
3. For our form we want a textbox for the e-mail address. Use your mouse to drag the Textbox entry from the Toolbox into the empty workspace.

4. Once you drop the textbox into the workspace, you can see a new form element. When that is clicked, the Properties box for the form element opens up under the Toolbox.

This isn't the world's easiest screen layout but it will be fine once you get used to it.
5. There are a whole row of properties that you can set, but we're only going to change one right now. Click the form element so that the Properties box is open, then go to the input marked Label and delete the Click Me to Edit text; instead type
Email. Then click Apply at the bottom of the Properties box.Although you can type into the input box in the workspace at the left, that has no effect. So, just leave it empty. You should only make changes in the Property box.
6. When you've relabeled the element, drag a Button into the workspace.

The button is automatically labelled as a Submit button. You can change this in the (much smaller) Properties box, but we'll leave it just as it is for now.
7. Now click the "blue screen" icon at the top left of the workspace to see a preview of our form.
The preview opens in a "modal" window over the working area. While this is open you will not be able to access the administrator menus or tools. The preview is shown in the following screenshot:

8. Perfect, now we just need to save it. Close the Form Preview window from the close link at the top right-hand corner, and then click the "floppy disk" icon to save the form.

9. Type a name in the box. Let's use "newsletter_signup" and click Save.
Note
Warning: The text box here will accept almost anything but some choices of name will cause problems later. The rule to follow is: Only use
a-z 0-9and underscore (no capital letters, no spaces, no dashes, or any other special or accented characters). We'll see these same rules applied later to names and IDs, and it's useful to be consistent here.10. When you click Save, you'll be taken back to the Forms Manager, where there should now be a form in the list.

Reading across the form row, the entries are :
#
(form number):This is just the place in the list and may changeForm ID: The unique ID of the form
Checkbox: A check box is used for selecting the form when we want to work with some ChronoForms features
Name: This is a link, if you click it the Form will open for editing
Link: We'll come back to this in a minute
Emails and Tables Connected: We'll save this for later
Publish: The red icon shows the form is not available in the site front end and an error message will be displayed if the link is clicked
11. Click the publish icon now to make this form available and, after a moment, the icon should change to a green tick to show that the form is now published.
12. Go back to the Link column and click on the form link there. This will open the form in a new browser window or tab showing the form as it will appear on your website.
13. And there we have it, our first fully-functioning ChronoForms form.
You can submit it, but nothing will happen yet. We have to set up a little more code to tell ChronoForms what to do when the submit button is pressed.
There's been quite a lot going on behind the scenes here. The ChronoForms Form Wizard builds a set of Form HTML for your form. It also applies some CSS styling and sets up the framework for a lot more features and functionality that we will come to shortly.
Here's the Form HTML that's been generated for this form, copied from inside the Form Editor, as we'll see later:
<div class="form_item"> <div class="form_element cf_textbox"> <label class="cf_label" style="width: 150px;"> Email</label> <input class="cf_inputbox" maxlength="150" size="30" title="" id="text_0" name="text_0" type="text" /> </div> <div class="cfclear"> </div> </div> <div class="form_item"> <div class="form_element cf_button"> <input value="Submit" name="button_1" type="submit" /> </div> <div class="cfclear"> </div> </div>