
In this recipe, I have adapted what is known as "staircase writing". It is what occurs to you as you descend stairs at the end of the evening. The French call it "L'espirit d'escalier". We are not going to tell the students to go down the stairs with their notebook to write a beautiful story. Instead, my proposal is to draw stairs with keywords and events. We are going to draw a set of stairs in Microsoft Word, and then upload it to Moodle. Let's Moodle it!
We are going to open a new file in Microsoft Word. While doing so, we are going to draw a staircase, and then add some key, linking words. The main purpose is to supply our students with enough tools to gather the data and write a beautiful piece of writing.
First of all, you are going to open a new file and draw the staircase. Then add the key, linking words that you want your students to use. To draw the staircase, you can decide either to draw it or to upload a clipart in Word. In this case, I decided to draw it and here are the steps to follow:
1. Choose Insert Shapes and click on the Elbow Connector.
2. Draw the staircase using the elbow connector. After drawing it, you can add 3D effects so that it looks like a staircase. Then add a title and the description of the activity, as shown in the following screenshot:

The activity is already done, but in Microsoft Word. What we need to do is upload this activity in Moodle and let our students write. These are the steps that you need to follow in order to design this activity. We are going to use two types of activities; static and dynamic. The static activity is to upload the Microsoft Word file into Moodle and the dynamic activity is to create a Journal and a link towards the Microsoft Word file so that students are to read the file and write the activity in Moodle through the Journal. It is not as difficult as it sounds. Let's Moodle it!
1. Click on Add a resource and select Link to a file or a website.
2. In the Name block, write Connecting stairs.
3. In the summary, you can write the description of the activity.
4. Click on Choose or upload a file.
5. Then click on Upload a file.
6. Click on Browse and look for your file.
7. Select your file, click on it, and then click on Open.
8. Click on Upload a file again.
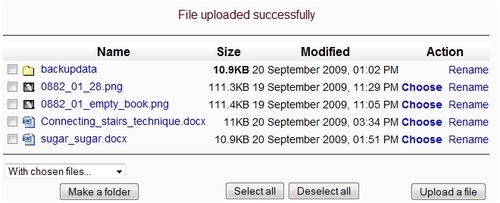
9. Your file has just uploaded. Now click on Choose as shown in the following screenshot:
10. Click on Save and return to course.
11. You have done part of this task. What you now need to do is create the dynamic activity for the students so that they can use this file.
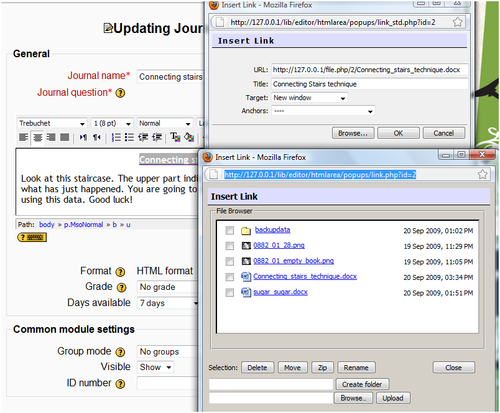
We can also create a link to the file designed in Microsoft Word. We can do this using the insert a link icon.
We have to link the file in Microsoft Word that we have just uploaded into Moodle with an activity. By default, this activity doesn't allow us to upload a file. But we are going to do it using a link. Follow these steps:
2. Complete the Journal name block with the title of the activity.
3. Write the description of the activity in the Journal question block. Highlight the words Connecting stairs technique in the Journal question block and click on the chain icon.
4. Click on Browse and click on the file you want to upload.
5. Write a title in the Title block.
6. In the Target block, choose New window, as shown in the next screenshot: