
Let's get familiar with the basics of the PrestaShop back office administration that relates to the theming of the shop front or front office of your PrestaShop store.
Now, using the default theme in PrestaShop, have a look at your current storefront and how the theme is governed by the back office control. By looking at this, you can tell which back office item you need to modify, replace, or set according to your needs.
Basically, the layout can be seen here in the following screenshot:
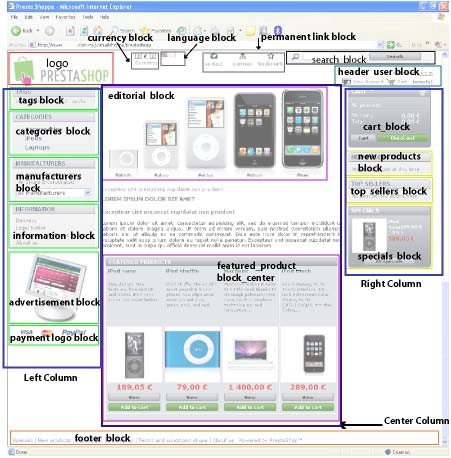
Now this is how your back office administration panel, which controls these blocks, should look. The default theme has three columns (left, center, and right columns). Each column comprises a number of blocks which are moveable. For example, within the Right Column, there are cart_block, new products block, top seller block, and specials block. These blocks can be displayed within the left block as well. We also have a header user and footer block where you can install blocks for a number of modules.
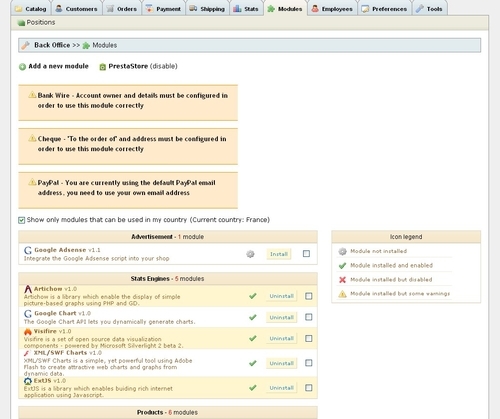
Next, we will look at the back office, as shown in the following screenshot:
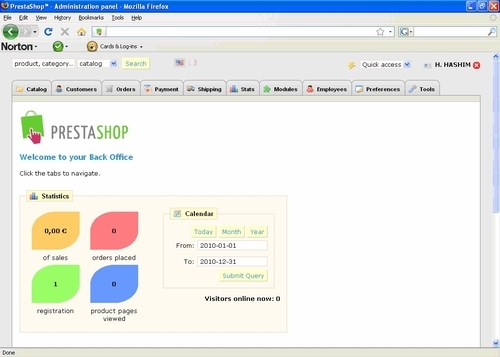
There are ten tabs, which are named Catalog, Customers, Orders, Payment, Shipping, Stats, Modules, Employees, Preferences, and Tools.
They are all important and useful if you know how to manipulate them to improve the efficiency of your store's administration and operation. However, to modify your store theme, just a few of them will be necessary and we will get an overview of those here.
The tabs in the back office that control the look of your shop are:
Preferences
Modules
Catalog
Tools
The most important tab, when it comes to modifying the default theme, is probably the Preferences tab. Go to Back Office | Preferences, and you will see something like the following screenshot. This is the Preferences landing page, which is also referred to as General.
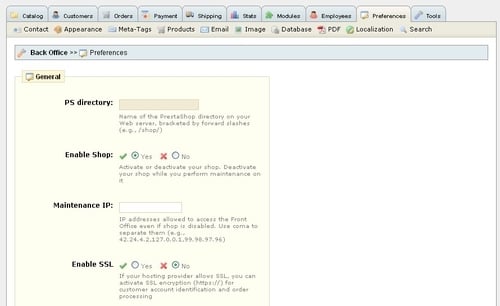
You will see a few things, such as the following:
PrestaShop directory —This is where the default directory is located in your server. It can be blank if the default directory is at the root of your public HTML folder, whereas, in the example, a new directory named prestash was created when installing the software.
Enable Shop —You set the enable or the activated state for your shop or if it is already deactivated.
Maintenance IP —You specify the IP address allowed to access the Front Office even if the shop is disabled.
Enable SSL —Enabled or disabled depending on If your hosting provider allows SSL, you can activate SSL encryption (https://) for customer account identification and order processing.
Increase Front Office security —This states, Enable or disable token on the Front Office in order to improve PrestaShop security
Friendly URL —Enable only if your server allows URL rewriting (recommended). This feature will require a creation of an .htaccess file.
Back Office help boxes —Enable yellow help boxes which are displayed under form fields in the Back Office. This can be set to yes or no.
Terms of service —When you design the site, you need to decide if customers are required to accept or decline terms of service before their order will be processed. Terms of service are used to prevent legal problems.
Offer gift-wrapping —If you enable this, gift-wrapping suggestions will be offered to the customer, and the customer will be able to leave a message to be printed alongside the order.
Offer recycled-packaging —If you like, you can also suggest recycled packaging to customer.
Cart re-display at login —If enabled, the contents of the user's last shopping cart will be recalled and displayed upon the next time the user logs in.
Round mode —You can choose the rounding of prices, rounding always superior, inferior or classical rounding.
Automatically check updates to modules —New modules and updates are displayed on module page.
Timezone —You can also set the timezone of the store. Currently, it is quite exhaustive, and includes almost every available zone such as Africa, America, Asia, Europe, Pacific, Australia, Chile, Indian, Canadan and the GMT, PST, and so on.
v1.1 theme compatibility —If enabled, the shop will use a PrestaShop v1.1 theme (SSL will generate warnings in the customer's browser).
Although most of these are not directly related to your theme development mission, it is useful to know some of the key options and tabs that make PrestaShop work.
Next, the Preferences tab comprises the settings controlling the sub-items, which we will briefly explain as follows:
Contact: Go to Back Office | Preferences | Contact. Here you will get to set the Shop name, Shop e-mail which will be used to contact the administrator, you can fill in your shop Registration information here, along with the Shop address, Country, Phone, and Fax number. However, the only required fields are the top two, that is, the Shop name and the Shop e-mail address.

Appearance : The sub items in the Appearance section are for selecting your Header logo and Favicon. This is the most important stub to control the appearance of your site. Click on Back Office | Preferences | Appearance | Themes and you can see the thumbnail of the theme applied to your shop. By default, we only have one theme choice, that is, prestashop. If you have more than one theme installed, you will see more thumbnails next to the default theme. You will be able to change the Header logo and Favicon through this tab as well.

If you have added a new theme, it will be displayed next to the PrestaShop theme thumbnail in the Themes section, as shown in the preceding screenshot. For PrestaShop 1.3 and above, a new item is added on this page where a link Live from PrestaStore! is provided for purchasing readymade themes.
Meta-Tags : Click on each of the "edit" icons (the pencil-like icon on the right) and edit the meta tags of each page. If you need to add a new meta tag for a different page, just add a new page and proceed with editing the page title, meta description, and meta keywords.

Products : The Products sub tab is important as it sets how the products are featured on your store. Here you can choose how your products are displayed in the front office.

Email: Use this setting to determine how the e-mails are sent by the back office (through the PHPmail() function or through an SMTP server).

Image: This can be used to customize the different sizes used by PrestaShop to display your images and regenerate all your thumbnails.

Here, the next action will be to either add a new type of thumbnail, and set the width and height of it, or you can edit the existing thumbnails (for example, small, medium, and so on) and decide which type of thumbnails (to refer the thumbnail and specific height and width of each type of thumbnails) should be applied to either Products, Categories, Manufactures, Suppliers, and Scenes.

Database: This sub-item sets the server, database, prefix, username, and password. This is related to the
config/settings.inc.phpfile. This configures the connection settings between PrestaShop and its MySQL database.PDF: The PDF sub-item sets the encoding for any PDF invoices and the font used in the PDF invoices. The language setting by default is English.
Localization: Strangely, the Localization sub-item only allows you to specify the weight unit of the store. In most cases the weight unit will be kg.
Search: The Search setting allow site visitor to search for words which are based on your configuration here. For example, if you're looking for "a large box of dark chocolate", it will only search for "large" and "chocolate", as the other words are less commonly searched for Depending on this configuration setting, you can set the minimum word length to be two characters, as the value three means that only words of four characters or longer, whereas the value two allows the user to search for three character words.

The next important tab would be the Catalog attributes.
The Catalog comprises the controlling tab for the categories and products you are showcasing in your store. In this tab, you will have a number of sub-items that will require you to key in data. This tab controls a number of modules as well, such as the CATEGORIES block and the FEATURED PRODUCTS block. We will explore this in more detail in Chapter 3, Customizing PrestaShop Theme Part 2.
Tracking provides a snapshot of what is empty, disabled, and out of stock categories.
Manufacturers tab is where you can edit information of their products, add new manufacturers, or insert their logos
Suppliers tab is similar to manufacturers, except that the suppliers' information fields do not include address information like the manufacturers' do.
Attributes and groups tab is where you can find out the attributes of a group. For example, you can add colors as one of the attributes.
Features tab will allow more information to be provided to the visitors for valuable comparison on the products' features.
Image mapping allows a pop-up to appear displaying a brief description of the product when customer hovers over the image with the mouse. When clicked, it opens to the product's full product page. This relates to Preferences | Image, which we explained in the previous section where image thumbnails are generated according to the size specified.
It is best if you have some images ready for the product's photo or edited images when working on this.
This is perhaps the tab where you will do the most work, as this is where you can install or enable the modules to customize your pages according to your needs. This is also where you may decide on the location of the modules within your site pages. We will cover the modules and how to move them around (transplanting, positioning, and moving them within columns and within the pages) in Chapter 2, Customizing PrestaShop Theme Part I in greater detail.
The Modules tab allows you to control the modules you want to use in the store. You will be able to transplant the modules and move them around according to the site navigation. You can move them up or down of the columns, you may also position them in the left or the right column, and you may disable them.
In the version prior to PrestaShop 1.3, you also have the option whether you want to add a new module or purchase one from the PrestaStore. However, after v1.3 was released, this has been disabled.
The list of the existing modules that are readily available in PrestaShop 1.3.1 are:
Advertisement – 1 module
Stats Engine – 5 modules
Products module – 6 modules
Payment – 8 modules
Tools – 14 modules
Blocks – 23 modules
Stats – 25 modules
In order to make the modules work, you will have to check if it is installed and enabled. PrestaShop buttons are simple; when you see the Uninstall button, which is towards the rightmost portion of each module, it indicates the module has already been installed. If you see a 'tick' next to the installation button, it means that the module is already in the enabled state. Some will need to be configured where >>Configure is shown next to the module title and descriptions.
The one that controls the images that appear on your main page can be found at Modules | Tools | Home text editor v1.5. All you need to do is make sure it is installed and enabled. By clicking >>Configure, you will be taken to a page where you may modify it according to your requirements.
A number of tools are provided to simplify your task in making your PrestaShop store work. The following explains in brief what each sub-item in the Tools tab does:
Languages—This tab is where you set the language interface. The default languages included in the PrestaShop pack are English and French. You can add new languages and set the default language option here.
Translations —Here you can modify translations, import or export language packs, or copy data from one language to another.
Tabs —Here you get to see a list of all the tabs you used in your store's back office admin. It also indicates the parent or child tab. You can add or delete new items here, or move them to the left or right according to your preferences.
Quick Accesses —Here you decide whether to make a page open in a new window or not. This is more for the admin tools.
Aliases —This can be used to assist with searching when a site visitor keys in a particular word. It is particularly useful for items which may be typed in wrongly, but yet you have the product in your listing.
Import —You can efficiently upload categories, products, attributes, customers addresses, suppliers, and manufacturers data in a
.CSVfile to expedite your logistics.Subdomains —Cookies are different on each sub domain of your website. If you want to use the same cookie, please add the sub domains used by your shop. The most common is subdomain
www.DB backup —Back up your files often to make sure you don't lose information if something happens to your hosting.
CMS —This one is particularly useful in theming, as it is also makes the pages linkable to the modules or buttons you create on your home page. The listing in this CMS relates to the Footer link module. When configuring the Footer link module, links you checked (selected) in the particular module will appear at the bottom of your page in the footer block (if you are using the default theme).
Generators —This is useful for generating .
htaccessand arobotfile, especially related to SEO. You need to have access to your server host to create the necessary thing before generating this.