Book Image

Ext GWT 2.0: Beginner's Guide

By : Daniel Vaughan
Book Image

Ext GWT 2.0: Beginner's Guide

By: Daniel Vaughan

Overview of this book

<p>Ext GWT, also known as GXT, takes Google Web Toolkit one step further by providing a wide range of powerful user interface components. It allows a developer to create powerful web applications that are almost like desktop applications. However to leverage all the features of this powerful Java library for creating desktop-style web applications, you need to learn how and when to use the right user interface component.<br /><br />Ext GWT 2.0: Beginner's Guide is a practical book that teaches you how to use the EXT GWT library to its full potential. It provides a thorough and no-nonsense explanation of the Ext GWT library, what it offers and how to use it through practical examples. This book provides clear, step-by-step instructions for getting the most out of Ext GWT and offers practical examples and techniques that can be used for building your own applications in EXT GWT<br /><br />This book gets you up and running instantly to build powerful Rich Internet Applications (RIA) with Ext GWT. It then takes you through all the interface-building widgets and components of Ext GWT using practical examples to demonstrate when, where, and how to use each of them. Layouts, forms, panels, grids, trees, toolbars, menus, and many other components are covered in the many examples packed in this book. You will also learn to present your data in a better way with templates and use some of the most sought-after features of Ext GWT in your web applications such as drag-and-drop and charts. Throughout the book a real application is built step by step using Ext GWT and deployed to Google App Engine.</p> <p>Imagine how great you'll feel when you're able to create great-looking desktop-style user interfaces for your web applications with Ext GWT!</p>
Table of Contents (17 chapters)
Ext GWT 2.0 Beginner's Guide
Credits
About the Author
About the Reviewers
Preface
Index

Time for action – preparing the project to use GXT


  1. Earlier we set up a GXT user library. We now need to include it to the build path of our newly created GWT project and the lib folder of the war folder.

    Build path: Right-click on the FirstApp project and select Properties. Select Java Build Path and then select the Libraries tab. Click on the Add Library button, select User Library and click on the Next button. Now select the GXT_2_2_0 user library. Click on the Finish button and then on OK.
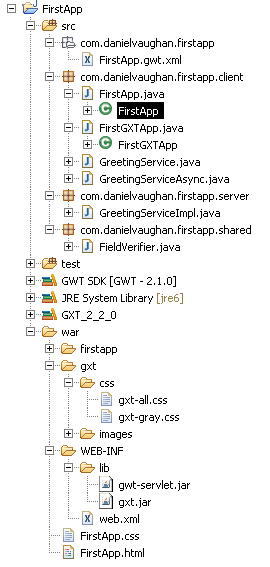
    War: Copy the gxt.jar file to the war\WEB-INF\lib folder of your project.

    Your project structure should now look like this:

  2. The GWT module file contains the entry point for a GWT application together with references to any additional libraries it uses. The module file always ends in gwt.xml and is in the root package of the source folder. In this case, it is named FirstApp.gwt.xml. In order to use GXT, there needs to be an entry added to this file.

    The default GWT module file also contains a reference to the default GWT style sheet. This can be removed.

    The line that we need to add should be put in the "Other module inherits" section as follows:

    <inherits name='com.extjs.gxt.ui.GXT' />

    The complete file should now look like this:

    <?xml version="1.0" encoding="UTF-8"?>
      <module rename-to='firstapp'>
        <!-- Inherit the core Web Toolkit stuff.-->
        <inherits name='com.google.gwt.user.User' />
    
        <!-- Other module inherits-->
        <inherits name='com.extjs.gxt.ui.GXT' />
    
        <!-- Specify the app entry point class.-->
        <entry-point class='com.danielvaughan.firstapp.client.FirstApp' />
    
        <!-- Specify the paths for translatable code-->
        <source path='client' />
    
      </module>
  3. We now need to modify the host HTML file. In this project, it is named FirstApp.html and is located in the war folder. Edit this file, including the GXT stylesheets, by adding the following line into the head section beneath the existing stylesheet link:

    <link type="text/css" rel="stylesheet" href="gxt/css/gxt-all.css">
  4. Finally, we need to copy the GXT stylesheet and image resources into the project's war folder.

    Create a folder named gxt in the war folder, go to the location where you originally unzipped your downloaded GXT package, and open the resources folder. Now copy both the css and images folders into the newly created gxt folder.

Your war folder should now look like this:

What just happened?

We have configured our project so that it now has all the dependencies it needs for making use of GXT features.