
When creating rigs for 3D characters in Blender, there is one mistake that is probably the most common of all, and it is also responsible for lots of headaches in the future: the orientations of the bone chains.
Every time we have to create a bone chain to allow our character to do a specific movement, some people (maybe in a hurry) often overlook this foundation of a good character rig. Since our characters and its bones live in a three-dimensional space, everyone familiar with 3D concepts should know that they are subject of the three world axes: X, Y and Z.
Along these concepts, we should be comfortable with the idea of "local" and "global" coordinates. Global coordinates are the ones relative to the scene: every scene has its Up or Down (Z axis), Left or Right (X axis), and Front or Back (Y axis) coordinates. Every object in a scene also has its own, or local, coordinates to allow easier transformations. To make an analogy with our world, "going East" would be the global coordinates while "turning right" refers to your local coordinates.
For instance, we should be allowed to bend a character forward regardless of its rotation and position relative to the scene. This "bending forward" would be too difficult to achieve using only the global coordinates; that's why we can use the local ones.
Using the concept of local coordinates, we have also to define some conventions such as which axis we are talking about when bending "forward". We have to pay attention to the sane organization of the bones, where a chosen local axis (for instance, local X) would be the same for all "forward" transformations, be it a finger or a knee. The character Otto, which is used throughout this book, uses the X local axis for the most common transformations, such as for bending the elbows and knees, closing the fingers, or bending the torso forward. This makes it easier to pose our character without having to worry about which axis you should use: if in doubt, use X!
Here we'll see how to create and correct bone chains in order for them to be more coherent and easier to manipulate.
Let's suppose you want a chain with three bones for a finger:
Open the file
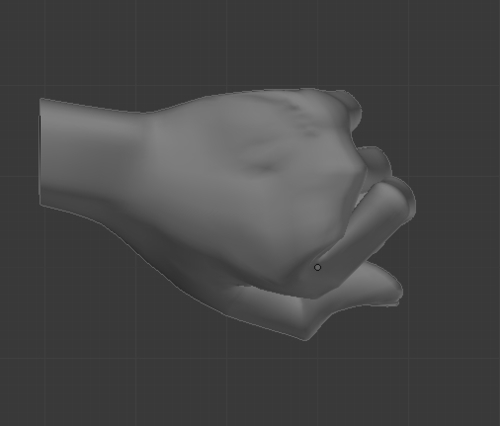
001-Orientation.blendfrom this book's support files. You'll see a hand model with four of its finger bones already set. I've let the ring finger for you to rig, like in the next screenshot:
Position your 3D cursor where the first finger bone should be created: select your mesh, enter the Edit Mode (Tab), select a vertex or group of vertices at the base of the finger and press Shift + S. Choose Cursor to Selected.
Go back to Object Mode (Tab), select the armature, enter its Edit Mode (Tab) and press Shift + A to add a new bone under the cursor location.
Note
In order to view better what we're doing, I've enabled the X-Ray and Axes display modes, in the Properties panel, under the Object Data tab.
Now you just move the tip of this bone until the finger's first joint and extrude the bone two times, right? WRONG!
Extruding bones is just what one would normally do in order to create a bone chain, but that brings to our new bones some unwanted rotations.
Select the tip of your bone and move (press the G key) it until the tip of the finger, as seen in the next screenshot:

Select your entire bone, open the Specials menu (press the W key), and choose Subdivide. Select one of the bones and repeat this process.
Move (press the G key) the joints to the appropriate places of the finger, and the orientations will be consistent. Note that the X axis of each bone is always pointing toward us, while the other bones on the hand have their Z axes pointing up. We need them all consistent.
Select the bones you have just created, press Ctrl + R, and type 90. This will correct their rotations, making their Z axes point toward us (check the Axis conventions section at the end of this recipe to know more about this).
Select the hand mesh, hold Shift, select a bone, and press Ctrl+ P. Choose With Automatic Weights to get a basic deformation on the hand.
Now you can rotate the bones under their local X axis (R + X + X) to see what happens.
Note
When you tell Blender to rotate (R), move (G), or scale (S) an object, you can use some key modifiers to tell it in which axis that transformation must happen. If you press X, Y, or Z one time, you're telling it that one of these global coordinates must be used. If you press the modifier key twice (X + X, Y + Y, or Z + Z) you're demanding that the transformation happen regarding that local coordinate.
When using a correct bone orientation upon its creation, you avoid the need to correct the armature later. The orientation of the bones is often overlooked, and problems at this stage will be painfully noticed on later stages, when the animator tries to move the bones in a coherent way.
To demonstrate that, I've created the index finger bones with the usual "extrude" technique. Let's say the animator wants to close the fingers: this should be accomplished by selecting each bone and pressing R to rotate and X twice to select the local X axis. The next image shows the results of the previous action with the bones hidden, to demonstrate how the extruding technique on the index finger leads to unwanted results. We wanted to close the finger, not twist it like that. An animator would have a hard time trying to figure out which axis should be used for every finger. Talk about being counterproductive!
What if you have already created bone chains with this orientation disorder? Do you have to recreate everything from scratch? No, there's hope for us all. This process is just to avoid the need for correcting the bones later, by creating them with the right orientations from the beginning. This means we can adjust the orientation by hand at any moment.
You can always correct or define the orientation of a bone through its Roll value. In the Armature's Edit Mode, select the bone(s) that you want to correct, press Ctrl + R, and move your mouse. As with any transformation in Blender, you can use it along with Ctrl (to do it in steps of five degrees) or Shift (to get softer transformations).
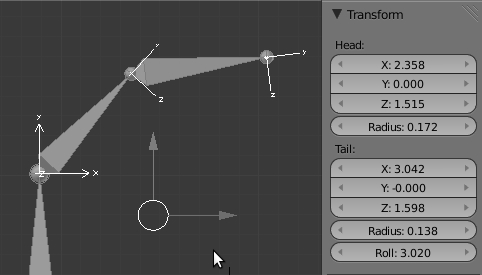
You can manually view and set the Roll angle of a bone through the Properties Panel (press the N key), just below the Radius slider, as shown in the following screenshot:
Another shortcut for automatically correcting the Roll value is Ctrl + N, which tells Blender to guess what the best roll angles are based on their Z axes, which will all point to the same direction ("Up" or the cursor location).
Another important thing to keep in mind when creating bones is axis conventions. It means you should always set the "front" of a bone to a given axis. This "front" is the default axis for a transformation, usually a rotation.
For instance, a humanoid character has some default movements, such as bending an elbow, knee, or finger. The bones for all these parts point in different directions, but you can set their roll values in a way that the animator's life becomes a little easier. A common approach is setting the X axis of a bone as the default transformation angle, so when the animator wants to bend and elbow, a knee, or a finger, it's just a matter of using the X local axis for that. There's no need to wonder "what local axis should I use for this transformation?". In the case of our armature, we can select all the bones, press Ctrl + R, and type 90, so the bones' X axes point at us in the Front view.
This way you get consistence throughout your rig, which is a must in professional workflows. I've seen rigs where different fingers in a hand required a different default axes for bending. A nightmare!
A very cool way to add new bones and chains is by using the Rigify add-on which comes bundled with Blender 2.5. You can enable it in the User Preferences Window (press Ctrl + Alt + U), in the Add-ons tab.
With this add-on enabled you can add predefined bone chains for body parts or even a full human body. The great advantage is that you don't need to worry about names or orientations, since they come configured. You only have to worry about correctly adjusting the preset chains to the proportion of your character mesh.
Chapter 5: Controlling fingers