

When creating rigs, we often face situations where we need to alter between two states or properties. The most iconic case is to alter from Inverse Kinematics (IK) to Forward Kinematics (FK) back and forth for a limb.
Forward Kinematics is the default state of regular chains of bones. When you move, rotate, or scale a bone in FK mode, all of its children bones inherit the same transformation. Therefore, we can say that the movement of a chain of bones in FK is driven by its base bone. It is often used for arm controllers when the character does not have its hands on a fixed position (such as doing push-ups).
Inverse Kinematics, on the other hand (no pun intended), works the opposite way: the movement of a chain of bones in IK is driven by its tip. It is often used for leg controllers, when the position of the foot bone drives the leg bones above it, and for arm controllers when the character does have its hands on a fixed position.
Since we may need to alter between IK and FK for an arm, for example, we can create specific controls to achieve that. These controls are normally made with bones that don't deform the mesh with some custom shapes applied to them.
Open the file 001-IK_FK_Switcher.blend
from the book's support files. The file has an arm mesh with three chains properly named and grouped: one for the mesh deformation (green), one to act as the IK chain (blue), and another for the FK chain (red), as we can see in the following screenshot:
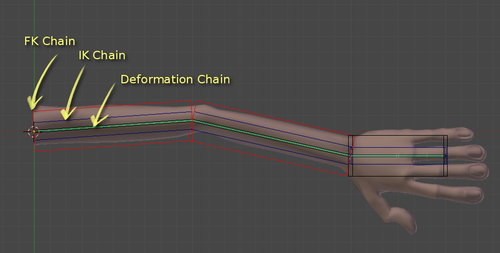
The three chains have the exact same position, scale, rotation, and orientation on the 3D scene. This is crucial to make our setup work as expected.
There is also a fourth chain with only one bone to act as the switcher interface. The bones are presented in B-Bone wireframe visualization with X-Ray enabled, which allows us to view them through the arm mesh and with different widths, since they are all on the same position.
Each bone on the deformation chain has two Copy Rotation constraints applied to it: one pointing to its relative bone on the IK chain and other to the one on the FK chain.
Note
Constraints are restrictions applied to objects or bones. There are currently more than 20 types of constraints built in Blender with a variety of purposes. The Copy Rotation constraint used here is pretty straightforward: the constrained bone (on the deformation chain) will copy the rotation of a target (a bone on the IK or FK chain). To add a Copy Rotation constraint to a bone in Pose Mode, first select the target bone (the one which will have the rotation copied), hold Shift, select the bone which will receive the constraint, press Ctrl + Shift + C, and choose Copy Rotation on the pop-up menu.
The constraints on each bone act in opposite ways, so we need a way to alter their influence in order to make only one operational at a time. We're going to use the switcher bone to drive the influence of each constraint: when the IK chain has full influence over the deformation chain, the FK will have none, and vice versa.
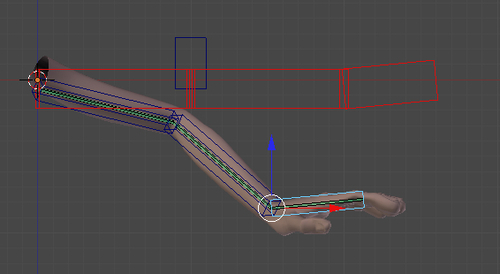
Select each of the green deformer bones and take a look at the Bone Constraints tab in the Properties window. You'll see that each bone has two Copy Rotation constraints already set: one for the IK chain with an influence of 1, and other to the FK chain, with zero influence. If you move the bone called IK_hand, you'll see that the green chain will follow it properly, while the FK chain in red stands still, as shown in the following screenshot:
Select the bone D_arm and go to its Bone Constraints tab under the Properties window. Under the first constraint, named IK_arm, right-click on the Influence slider and select Add Driver as seen in the next screenshot. You'll see that the Graph Editor window above the 3D View gets updated and the Influence slider turns into a pink color:

Under the Graph Editor, click on the driver on the left-hand side panel. Its properties will be shown on the Properties Panel (N). Navigate to the Drivers session, leave it as Scripted Expression, and change the Expr field to
var.Below the Add Variable button, leave the first list value as Transform Channel, select the Armature object on the Ob/Bone field and the bone called IK_FK_switcher.
Since we need this switcher bone to act as a horizontal slider, keep the X Location value and just enable Local Space. The next image shows our driver set:

Go back to the Bone Constraints tab under the Properties window. Now, instead of creating the driver from scratch, let's use one of the new useful features in Blender 2.5: right-click on the pink Influence slider on the IK_arm constraint and select Copy Driver. Next, right-click on the Influence slider from the FK_arm constraint and select Paste Driver. Now, both constraints will have the same driver.
Since we need this FK driver to act contrary to the IK, head over the Graph Editor and click on the FK driver (named Influence (D_arm: FK_arm)). On the Properties Panel (N) at the right, you'll see that all values were copied from the first driver. Since we need an inverted mapping, just change the Expr field value to 1-var. That's all we need to do create the inverted driver. The next screenshot shows the driver setup values:

Note
Regular drivers act on an ascendant curve with linear mapping, meaning that a value of zero on the driver object will make the driven channel have the same value. When creating switchers, we need an ascendant and one descendant mapping. This way we can increase the amount of influence of one driver while decreasing the concurrent one. As a tip, leave your desired driver in the default state with a descendant mapping.
Now you should use the drivers set for the D_arm bone constraints as reference to the remaining bones on the deformation chain. You can use the process described in step 5 to copy the driver from the IK_arm constraint and paste it to the IK_forearm and IK_hand constraints. Do the same to the FK constraints and you're done. No need to change anything in the drivers values.
When you finish setting up the remaining drivers, move the FK and IK bones to different locations and switch the IK-FK slider: you'll see that the deformation bones (and the arm) alter between chains as you move the slider. The next screenshot shows the switcher in an intermediate position, where the deformation bones (and the arm) act under the influences of both IK (blue, medium width) and FK (red, fatter) chains.

The file 001-IKFK-Switcher-complete.blend has this complete example for your reference.
The logic behind a switcher is pretty simple, but the amount of chains and constraints may cause a little confusion. The deformation chain bones have two constraints each: one Copy Rotation with target to the FK chain and another one to the IK chain. The drivers are set in a inverse way: if IK has an ascending mapping on the Graph Editor, the FK must have a descending one. The controller bone does the rest: adding to one property reduces the opposite at the same amount.
The switcher that we've just created is basically an interface to control a feature in our rig, and the principle behind it can (and should) be used to control various other rigging features beyond IK-FK. As a rigger, you should be ready to use all features that Blender offers you to make your rig easier to use and understand.
With custom shapes and colors, we can create special interfaces as the slider used in this recipe. As we saw here, a single controller bone can drive more than one property in your rig.
In addition to these colors and shapes, user interface bones should also have constraints applied. In our example, the slider acts under a Limit Location constraint, which allows its transformation only on the local X axis, and just between the values 0 and 1.
More complex controls can act on some properties from its X location and other ones from its Z location, as drivers for facial controls.
Along with bones, your custom interfaces may have simple meshes to indicate the purpose of that control, such as the one on this recipe indicating the range and the IK and FK positions. It's a good idea to make such meshes un-selectable using the Outliner: just disable the pointer icon next to its name. This avoids unwanted selections, since the interface meshes act just as a visual guide. It's also interesting to make these interface meshes children of the Armature object to make them hierarchically related to it.
Blender 2.5 also enables us to add buttons and sliders to the application user interface through Python scripts. Although they are not difficult to create, they are beyond the scope of this book.
The Copy Rotation constraints are not the only ones to be used when creating IK-FK switchers. You can also add StretchTo constraints to the deformation chain bones in order to make them stretch and match the sizes of FK or IK chains without changing the models' volume.
The StretchTo constraints should be added on a similar way: two for each bone of the deformation chain. Each constraint should be mapped to the relevant bone of the IK or FK chain, and its influence slider must have a Driver pointing to the switcher bone. These stretching constraints should be used in conjunction with the Copy Rotation ones.
Chapter 5: Hands down! The Limbs Controllers