Book Image

Moodle 2.0 Course Conversion Beginner's Guide

Book Image

Moodle 2.0 Course Conversion Beginner's Guide

Overview of this book

Schools, colleges and universities all over the world are installing Moodle, but many educators aren’t making much use of it. With so many features, it can be a hassle to learn – and with teachers under so much pressure day-to-day, they cannot devote much time to recreating all their lessons from scratch.This book provides the quickest way for teachers and trainers to get up and running with Moodle, by turning their familiar teaching materials into a Moodle e-learning course.This book shows how to bring your existing notes, worksheets, resources and lesson plans into Moodle quickly and easily. Instead of exploring every feature of Moodle, the book focuses on getting you started immediately – you will be turning your existing materials into Moodle courses right from the start.The book begins by showing how to turn your teaching schedule into a Moodle course, with the correct number of topics and weeks. You will then see how to convert your resources – documents, slideshows, and worksheets, into Moodle. You will learn how to format them in a way that means students will be able to read them, and along the way plenty of shortcuts to speed up the process.By the end of Chapter 3, you will already have a Moodle course that contains your learning resources in a presentable way. But the book doesn’t end there– you will also see how to use Moodle to accept and assess coursework submissions, discuss work with students, and deliver quizzes, tests, and video. Throughout the book, the focus is on getting results fast – moving teaching material online so that lessons become more effective for students, and less work for you.
Table of Contents (17 chapters)
Moodle 2.0 Course Conversion Beginner's Guide
Credits
About the Author
About the Reviewers
www.PacktPub.com
Preface
Index

Time for action – adding a wiki


  1. Choose the topic you want to add your new wiki to, click on Add an activity... and select Wiki from the list.

  2. The name of my new wiki is going to be "Student Diary". Enter a name for your wiki.

  3. Write a brief summary of the wiki. This is shown above every page. Try to keep it short and descriptive.

  4. I'm going to click on the Type option and select Individual from the list. Choose the type of wiki that best suits your needs.

  5. Scroll to the bottom of the page and press the Save and return to course button. You'll see your new wiki listed on the course front page:

What just happened?

I now have a new wiki. If I click on the link to the wiki on the course front page, I am presented with an option to create a new empty page and give it a name:

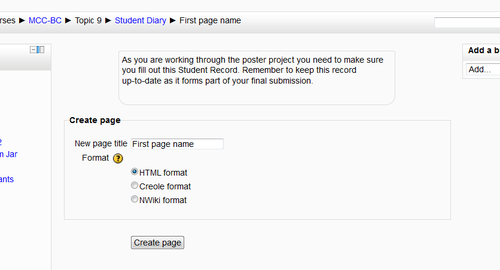
I'm going to call my new page "Student Diary Introduction" (rather than "First page name"), leave the Format as the default HTML format, and press the Create page button.

So how do you actually start editing a wiki?

Editing a wiki...