

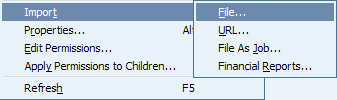
Locally saved files can be imported into the Workspace for use by the user or other individuals. The first step in importing a document into the Workspace is to logon to the Workspace and browse the Explore window to the area of interest. Once a folder has been selected, the Import can be initiated by selecting the File menu, highlighting Import, and selecting the File menu option. The import is also commonly initiated by right-clicking inside the folder of the Workspace, highlighting Import, and selecting the File option as shown in the following screenshot:
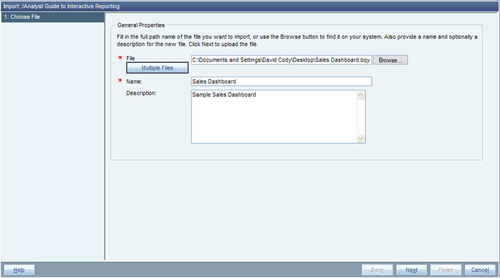
Once the file import option has been selected, the Import window appears inside the Workspace, as shown in the following screenshot. The first step in importing a document into the Workspace is to select the file to import.
Note
The Multiple Files button cannot be used for Interactive Reporting documents. Interactive Reporting documents must be imported one file at a time.
Use the Browse button to select the Interactive Reporting (BQY) file of interest. Once the file has been selected, the path to the document will be shown in the File box and the Name field will be populated with the filename. The filename may be edited at this time or can be changed at any time by editing the file properties:
Once the file has been selected and the name has been set, click on the Next button at the bottom of the screen to continue. The next screenshot shows the next step in the file import process.
Note
Notice the left menu of the Import window. The Import module has identified the file type as an Interactive Reporting document and shows the four steps necessary to complete the import of this file type.
The second step in the import process is to set the connection file for the data model. The connection files are called OCE files, or Interactive Reporting Database Connection files (previously called Open Catalogue Extension files). These OCE files contain the information needed for the document to make a connection to the database to run a query. Each Query/DataModel in the document is displayed to allow for the selection of a connection file in the import.
Note
A connection file does not need to be set to any of the Query sections to import a file to the Workspace. The connection files are only needed to allow the document to process and refresh data from a data source. It is acceptable to leave the connections blank if the desired intent is not to process the document.
The first step in setting the connection file is to select the connection file of interest from the Connection drop-down box.
Note
The connection files shown in the Connection drop-down box are configured by system administrators and permissions are set to users/groups. Environments may be setup to not show any connection files in this drop-down box, thus preventing the user from setting a connection to the document.
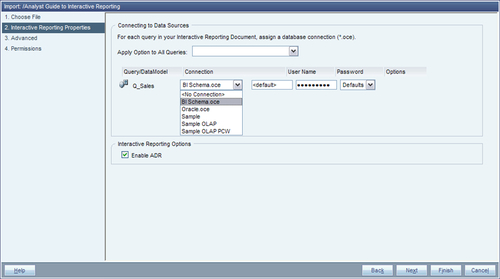
Typically, connection files are well organized and set with well defined names to provide the user with adequate information to make a selection. Once the preferred connection files are set to the document, a few different options can be set to configure the username and password for the document. Each authentication method can be set individually for each query or the same option can be applied for all queries using the Apply Option to All Queries drop-down box at the top of the screen.
Three options exist for entering the password for the connection file. In most cases, the Use Default User Name & Password option from the Apply Option to All Queries drop-down is used to set the username and password. This option uses the username and password stored in the connection file when it was imported into the Workspace (if configured). The other options require the user to know the database username and password. The Prompt option prompts the user for the username and password when the document attempts to connect or reconnect to a database during use. The final option is the blank option in the Options drop-down menu or is named Specify Now in the Apply Option to All Queries menu. This option requires the user to input the username and password into the User Name and Password boxes on the screen.
Once the connection files have been configured, click on the Next button at the bottom of the screen to proceed to the Advanced options configuration:
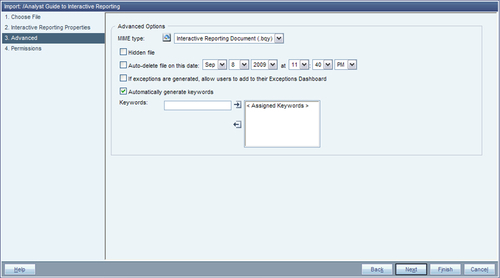
The Advanced page shown in the previous screenshot contains the ability to change the file type, make the file hidden, set an auto delete date, leverage exceptions, and manually or automatically generate keywords. Most users skip the advanced settings, but users may be interested in setting an auto-delete date or hiding the file. Users can view hidden files by selecting the Show Hidden item from the View menu in the Explore window. After configuring or electing not to configure any of the advanced settings, click on the Next button at the bottom of the screen to move to the final step.
The following screenshot shows the Permissions configuration, the final step in importing an Interactive Reporting document:
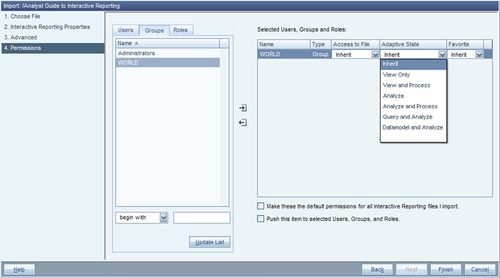
Understanding the Permissions interface and settings is the key to correctly configuring the permissions for the document. The window on the left is used to search for users, groups, or roles to be set to the document. The window on the right shows the users, groups, and roles that have been selected, and the buttons in the middle are used to add or remove users, groups, and roles from the assignment window. Once items have been added to the assignment window, the user, group, or role is given access to the file and an adaptive state. Access to File controls the ability the user/group/role has to edit the document and includes the following properties:
The Inherit selection is used to not specify access for that particular user / group / role. This selection should be used when the user/group/role is contained in another user or group that is also selected to the document.
Selecting No Access prevents the selected user/group/role from accessing the document.
The View selection provides the user/group/role with the ability to view the document but not modify or save changes.
The Modify selection provides the user/group/role with the ability to modify the file and document properties, but not to configure permissions or delete the file.
The Full Control selection provides full access to the document properties including the ability to provision the document to other users.
The Adaptive State controls the level of access within the Interactive Reporting document and includes the following settings:
The Inherit property behaves similarly to the file access Inherit property, where the selection is used to not provide a specific type of restriction to the document. This selection should be used when the user/group/role is contained in another user or group that is also selected to the document.
The View Only property provides the user/group/role with the ability to view but not modify, process, or conduct analysis in the document.
The View and Process property is similar to the View Only property, but the query sections in the document can be processed to refresh the document data.
The Analyze property allows for the modification of the reporting sections in the document but does not contain the ability to process the document.
The Analyze and Process property is similar to the Analyze property but allows the document to be processed and refreshed with data.
The Query and Analyze property allows the user to have full access to the document sections including the ability to modify and process queries. This property does not allow the ability to edit any DataModel sections.
The DataModel and Analyze selection provides full access to every section of the document.
To perform a simple permission configuration, select the User or Group tab from the Permissions interface. Search for the item of interest by using the textbox and Update List button. Once the desired item is shown in the window, highlight the item and click the button in the middle with the arrow to the right in order to move the item into the assignment window. Finally, use the drop-down menus to set the Access to the File and the Adaptive State of the document.
Note
Configuring permissions can become complex based on multiple users, groups, and role assignments coupled with the ability to set independent file access and adaptive state for each item.
The last step in the import process is to click on the Finish button at the bottom of the screen. Once completed, the Import window will disappear and the Explore window will become active showing the newly imported document.