
So far we have seen some of the most important cross-module concepts and configurations, which serve as the foundation of PeopleSoft Financial applications. Another important system feature that controls how the system features are controlled for each individual system user is related to setting up user preferences. Technically speaking, this is more of a personalization feature that will drive which users get to do what as far as various PeopleSoft modules are concerned. Nonetheless, this is a crucial task that needs to be performed.
An important prerequisite for doing this task is of course creating user IDs in the first place. However, we'll discuss that in the PeopleSoft Security chapter.
Follow this navigation to access the User Preferences page:
Set Up Financials/Supply Chain | Common Definitions | User Preferences | Define User Preferences
The following screenshot shows the main User Preferences page. It contains hyperlinks to module specific user preference pages under Product Preference section. Hyperlinks for common user preferences are grouped under the General Preference section;

As you can see, this page allows us to define user preferences for various PeopleSoft modules as well as certain specific features such as Pay cycle. We'll quickly go through the settings for the financial modules and the cross-module preference options.
Click the Overall Preferences hyperlink to set up cross-module preferences. The following screenshot shows the Overall Preferences tab. This tab specifies the default Business Unit, SetID, and the Localization Country for the given user ID:
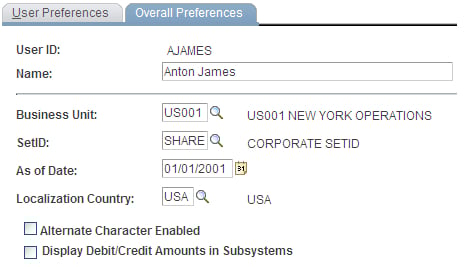
As you can see from the screenshot, for the user Anton James, the system will always use US001 as the Business Unit and SHARE as the SetID whenever he accesses a PeopleSoft page to enter a new transaction or retrieve data from the database. Of course, the user can always change this value, but defaulting simplifies the job to a large extent.
Click the Process Group hyperlink on the main User Preferences page.
The following screenshot shows the Process Group tab. This tab contains important configuration options for Accounts Payable and Receivable module features that can be selectively enabled for specific users:
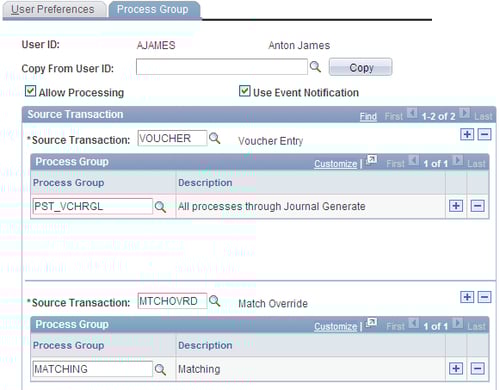
Source Transaction indicates a specific system feature from the Receivable or Payable module. PeopleSoft allows us to select from a group of 25 such system features. The screenshot shows two sample source transactions: VOUCHER (Voucher entry) and ARPAYWS (AR Payment Worksheet).
VOUCHER controls the processing options for the voucher entry function in Payable, while ARPAYWS controls the actions that a user can perform for Payment worksheets in the Receivable module.
In other words, we have just allowed Anton to use these two system features, while preventing him from using the remaining 23.
The Process Group indicates what level of privileges is granted to a user for a selected source transaction.
For example, PeopleSoft offers us the following options (Process Groups) as far as payment worksheets are concerned: ARACTIONA (Do not post), ARACTIONL (Batch standard), ARACTIONN (Batch priority), ARPOST (Post now), ARPOSTGL (Post now through to GL). To perform his job, Anton needs to be able to post the payment worksheets to GL. Thus, we will select the value ARPOSTGL in the Process Group field.
Allow Processing flag controls if on-demand processing is enabled for this user. PeopleSoft allows system users to run certain batch processes from the transaction screens. For example, a user can execute batch processes such as Voucher Post, Journal Generator, and so on. from the voucher entry page itself. He/She need not navigate to a different page just to run that particular process. This is known as on-demand processing.
Click the Billing hyperlink on the main User Preferences page.
The following screenshot shows the Billing tab.
Billing user preferences primarily control which batch processes are executed (or skipped) when they are triggered from a button on the Billing pages. Note that this doesn't apply if the batch processes are executed from their dedicated run control pages.
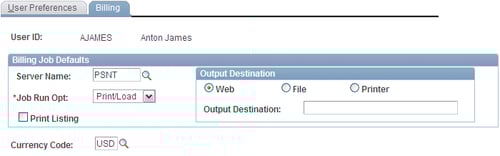
Server Name specifies the default server where the Billing processes will be executed.
Job Run Opt specifies if certain Billing processes are excluded from being executed. Selecting the 'Print/Load' option means the system runs all the processes in the multi-process job. Selecting the 'No Load' option skips the following processes: Currency Conversion, Load AR, Pre-load, Load GL, Commitment Control, and Standard Form 1080 and 1081 processes. We'll discuss these processes in Chapter 3, PeopleSoft Billing Module.
Click the General Ledger hyperlink on the main User Preferences page.
The next screenshot shows the General Ledger tab:
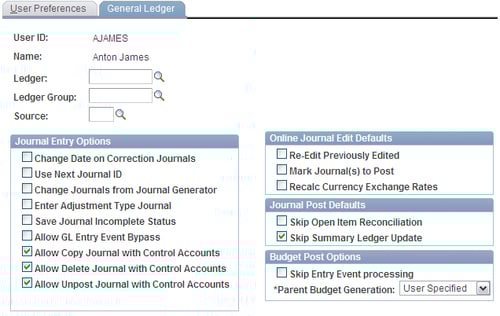
Use Next Journal ID field controls if this user can manually enter a journal ID when he/she enters a new journal. If this checkbox is selected, while creating a new journal, the system automatically disables the journal ID field and assigns the next number to the new journal. This is an important option to enforce the system generated numbering for GL users.
If the Change Journals from Journal Generator checkbox is selected, the user can modify the chartfields and amounts for the journals created by Journal Generator process. In PeopleSoft GL, journals can be either manually entered or created automatically by Journal Generator process. Manual journals can always be modified by system users. However limiting the capability to modify Journal Generator journals to only a select few users greatly improves the controls.
Click the Procurement | Payables hyperlink on the main User Preferences page.
The following screenshot shows the Payable Online Vouchering secondary page:
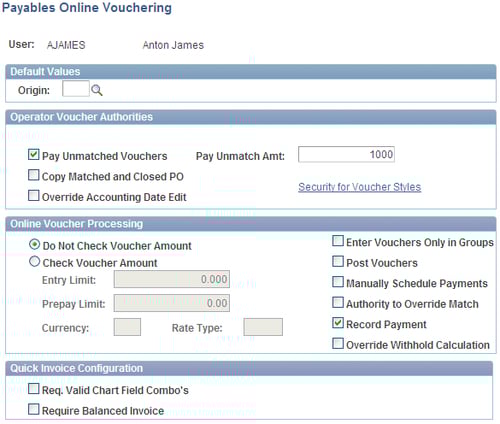
Pay Unmatched Vouchers and Pay Unmatch Amt: Typically when a voucher (vendor invoice) needs to be paid, it is first matched with a valid purchase order. This ensures that vendor payment is for a genuine purchase we made. If the system is configured accordingly, it does not pay a voucher unless it is matched.
However selecting the Pay Unmatched Vouchers checkbox allows a user to bypass the matching requirement and pay a voucher even if it is not matched. The Pay Unmatch Amt field specifies the maximum amount that can be paid without matching. As you can imagine, this is a very critical control mechanism and this privilege should be given (if at all) to only a few users.
Check Voucher Amount: If a user is responsible for entering vouchers in the Accounts Payable module, a limit can be placed on the maximum amount of voucher that he/she can enter. To do so, select the Check Voucher Amount button and enter the maximum permissible amount in the Entry Limit field along with the Currency.
Post Vouchers: Voucher amounts do not become part of total outstanding vendor liability until they are 'posted'. This field controls if a user can post an approved voucher.
Authority to Override Match: As mentioned earlier, matching process validates if a voucher is valid by checking it against a purchase order. If an error is found, the process marks the voucher as an exception (in other words, 'invalid'). Selecting this checkbox allows a user to override it and force a voucher to skip the matching process.
Click the Receivab les Data Entry 1 hyperlink on the main User Preferences page.
The following screenshot shows the Receivables Data Entry 1 tab:

Group Unit: In Accounts Receivable parlance, Group Unit refers to the business unit that tracks outstanding customer invoices (known as 'items').
Deposit Unit: In Accounts Receivable terms, Deposit Unit refers to the business unit that receives customer payments.
The business unit value used in these fields is used as the default value by the system whenever the user accesses the Receivable pages. The user can of course override these default values. However this greatly reduces the data entry efforts.
Click the Receivables Data Entry 2 hyperlink on the main User Preferences page.
The following screenshot shows the Receivables Data Entry 2 tab. This tab contains user preference options for the user to perform two important functions: Payment worksheets and Maintenance worksheets:
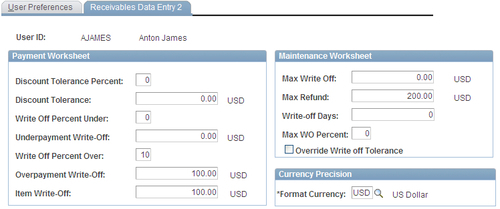
Payment worksheets are used to apply customer payment to its outstanding invoices. Maintenance worksheets are used to write off customer invoice amounts (partially or completely) and issue refunds to customers. For example, there may be an outstanding invoice for USD 1000. However it turns out that this customer may not (or will not) pay this amount (due to a variety of reasons). If he/she can pay only a part (say USD 700), we need to write off the remaining USD 300 (30% of the invoice amount). On the other hand, if the customer cannot pay anything, we will need to write off the entire amount of USD 1000.
Options under the Payment Worksheet section:
Discount Tolerance Percent, Discount Tolerance: These fields determine the upper limit of discount that can be given to a customer (known as 'unearned discount').
Write Off Percent Under, Underpayment Write-Off: When a customer pays less than the invoice amount, it is known as 'underpayment'. These fields determine the upper limit for the underpayment that can be written off.
Write Off Percent Over, Overpayment Write-Off: When a customer pays more than the invoice amount, it is known as 'overpayment'. The additional amount received can be written off rather than returning it to the customer. These fields determine the upper limit for the overpayment that can be written off.
Item Write - Off: This field determines the maximum amount that a user can write off on a payment worksheet.
Options under the Maintenance Worksheet section:
Max Write Off, Max WO Percent: These fields determine the maximum amount that a user can write off using a maintenance worksheet.
Max Refund: This field specifies the maximum amount that a user can refund to a customer.
Write - Off Days: This field determines the minimum age of an invoice before it can be written off.
Override Write off Tolerance: This powerful option enables a user to override all write off limits (specified for Business Unit, Customer and so on. Of course, the maximum write-off limits placed for the user still apply.