

In this recipe, we will look at creating a skeleton plugin. We will use the Atlassian Plugin SDK to create the skeleton!
Make sure you have the Atlassian Plugin SDK installed and a version of JIRA 4.x running on your local machine.
Open a command window and go to the folder where you want to create the plugin.
Note
Make sure you use a directory without any spaces because there are known issues with the SDK not working in directories with spaces in it. See https://studio.atlassian.com/browse/AMPS-126 for details.
Type
atlas-create-jira-pluginand press Enter.Enter the
groupIDwhen prompted. GroupID would normally be coming from your organization name and mostly resembles the Java package. Of course, you can enter a different package name as we move forward if you want to keep it separate. GroupID will be used to identify your plugin along withartifactId.For example:
com.jtricks.demo.Enter the
artifactId—the identifier for this artifact. Do not use spaces here.For example:
demoplugin.Version—the default version is1.0-SNAPSHOT. Enter a new version if you want to change it or press Enter to keep the default.For example:
1.0Package—press Enter if the package value is same as thegroupID. If not, enter the new value here and press Enter.For example,
com.jtricks.mypackageConfirm the selection when prompted. If you want to change any of the entered values, type
Nand press Enter.Wait for the
BUILD SUCCESSFULmessage. You might see a few warnings which can be ignored.
A skeleton plugin is nothing but a set of directories and sub directories along with a pom.xml (Maven Project Object Model) file and some sample Java and XML files in the appropriate folders.
Here is a snapshot of how the project will look like in Eclipse. It also shows the design view of the default atlassian-plugin.xml file:
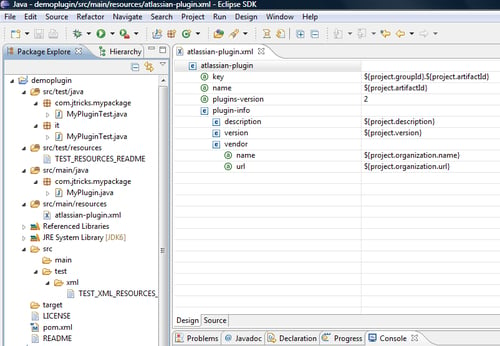
As you can see, there is a pom.xml at the root level and a src folder. A sample LICENSE file and a README file are also created for you at the root level.
Under the src folder, you will find out two folders, main and test, with identical folder structure. All your main Java code goes under the main folder. Any JUnit tests you write will go into the same location under the test folder. There is an additional folder, it, under the test folder where all the integration tests will go!
You will find the plugin descriptor under src/main/resources with sample values already populated in it. The values in the preceding screenshot are populated from the pom.xml. In our case, the plugin key will be populated as com.jtricks.demo:demoplugin when the plugin is built.
There are two more folders under the src/test. src/test/resources, which will hold any resources required for unit tests or integration tests, and the src/test/xml folder can hold the XML data from any other JIRA instance. If the XML is supplied, the SDK will use it to configure the JIRA instance before running the integration tests.
So, that is our plugin Skeleton. All that is pending is some useful Java code and proper module types in the atlassian-plugin.xml file!
Sometimes, for the geeks, it is much easier to run a single command to create a project without bothering about the step-by-step creation. In this section, we will quickly see how to do it. We will also have a look at how to create an Eclipse project if you opt out of installing m2eclipse.
You can ignore the interactive mode by passing the parameters like groupID, artifactId, and so on, as arguments to the atlas-create-jira-plugin command.
atlas-create-jira-plugin -g my_groupID -a my_artefactId -v my_version -p my_package –non-interactive
In this example, for the values we saw previously, the single line command will be:
atlas-create-jira-plugin -g com.jtricks.demo -a demoplugin -v 1.0 -p com.jtricks.mypackage –non-interactive
You can pick and choose the parameters and provide the rest in an interactive mode as well!
If you are not using m2eclipse, just run the following command from the folder where you have the
pom.xml file:
atlas-mvn eclipse:eclipse
This will generate the plugin project for Eclipse and you can then import this project into the IDE.
Type atlas-mvn eclipse:clean eclipse:eclipse if you want to clean the old project and create again!
With IDEA or m2eclipse, just opening a file will do. That is, you can just import the project using the option File | Import | Existing Maven Projects, and select the relevant project.