The most common method of running a report is from the Reports menu, which is located on any of the ACT! views. Ironically, you'll even find the Reports on the menu bar in the Reports view, which we will be covering later in this chapter.
Some of you may have used other software programs that allow you to filter a report after you run it. For example, your accounting software might let you run a Profit and Loss statement, and then change the date range once the report is run.
ACT! works a bit differently. The ACT! Reports offer only very basic filtering options; if a report doesn't contain the filter options you're looking for then you must do the filtering prior to running the report. For example, if you wanted to create a Phone List report of all of your customers, you'd first need to Create a Lookup or run a query for the customers in your database.
Follow these steps to run a report:
 |
The Reports menu includes a main area of contact reports, as well as sub-areas for Group, Company, and Opportunity Reports. While this organization seems like a good idea on paper, in reality over half of the ACT! Reports are not listed on the ACT! Reports menu.
As we mentioned earlier, there are over 60 reports that come with ACT! out of the box. However, because the Reports menu is a carry-over from a much older version of ACT!, you'll find fewer than 30 of the ACT! Reports actually listed in the Reports menus. And, to make finding a report even more difficult, ACT!'s file structure places all of the reports in a single folder rather than organizing the reports into more logical sub-folders.
If the report you wish to run is not listed under the Reports menu, click Group Reports, Company Reports, or Opportunity Reports to see more choices. And if you still can't find the report you'd like then click Other Contact Reports... to see all of the ACT! Reports.
It may be helpful to have an idea about the information that appears in a few of the ACT! Reports.
The first three reports listed in the Reports menu (the Contact Report, Contact Directory, and Phone List) will provide you with a full page, paragraph, or a single line of information about your current Lookup of contacts
The History Summary reports give you a physical count of the various cleared history items
The Source of Referrals report is based on information that you've inputted into the Referred by field
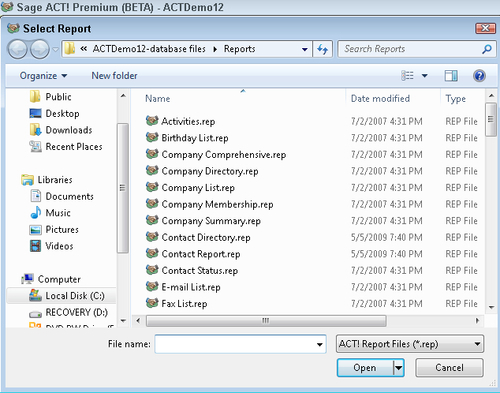
You'll see 10 Contact reports listed on the top half of the reports menu. These reports are all based on the generic contact ACT! fields that come with a basic ACT! database. You'll also notice an option for Other Contact Reports... at the bottom of this list. Unfortunately, clicking this option will result in the Select Report dialog box you see in the following screenshot, which shows you not just additional contact reports but it also all of the ACT! Reports:
 |
In addition to showing you additional Contact ACT! Reports, it also shows you additional Group, Company, and Opportunity Reports as well.
If you navigate from the basic reports menu to the Group, Company, or Opportunity reports sub-menus, you'll notice that they all contain an other section like the one you see in the following screenshot:
 |
You probably expect that if you click the Other Group Reports… option you'll be transported to a listing of various other Group reports not included in the Reports menu. Unfortunately, you're taken back to the Select Report dialog box shown earlier that lists all of the ACT! Reports.
It might seem to be a logical assumption that if you are in the Groups view and click on Reports in the menu bar, you'll see a list of all the Group reports, and that if you are in the Company view you can click on Reports, and you'll be treated to a list of Company reports. However, the Report menu is exactly the same in every one of the ACT! views.


