

The information you will learn here can be applied to more than page defaults. This is likely the most common place you should use it. We are going to make one minor change in the code that we were using in order to make a new page. We will use the <cfparam> tag to set the default values as shown in the following code:
<!--- Example: 1_12.cfm --->
<!--- Processing --->
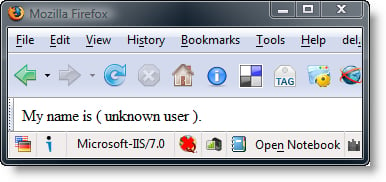
<cfparam name="url.name" default="( unknown user )">
<!--- Content --->
<cftry>
<cfoutput>
My name is #url.name#.<br />
</cfoutput>
<cfcatch>
<cfdump var="#cfcatch#">
</cfcatch>
</cftry>Here we see that the default value is displayed in the browser:
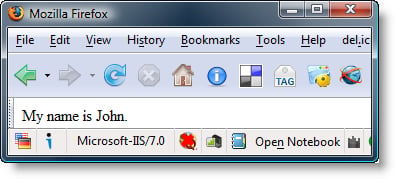
Now, we have learned how to catch and handle exceptions. We have also learned how to prevent this type of error in ColdFusion. In the previous code, we created a default value for the URL structure variable to prevent an error condition and handle it as a predictable exception. If we add the name back to the URL as shown below it still works as expected:
We have one more thing that we need to do in order to understand URL structure. We need to add some standard HTML links on the page and then click on them to see what happens. We will be creating two styles of links.
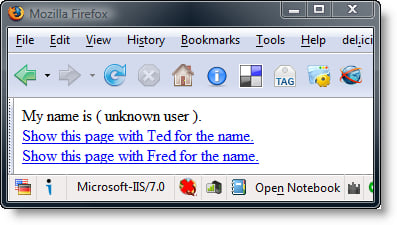
The first link we will be creating is a static link. This link will point back to our dynamic page to show us the one form of interaction through URL variables:
<!--- Example: 1_13.cfm --->
<!--- Processing --->
<cfparam name="url.name" default="( unknown user )">
<!--- Content --->
<cftry>

  <cfoutput>
    My name is #url.name#.<br />

    <a href="?name=Ted">Show this page with Ted for the name.</a><br />
    <a href="?name=Fred">Show this page with Fred for the name.</a><br />
  </cfoutput>

  <cfcatch>
    <cfdump var="#cfcatch#">
  </cfcatch>
</cftry>
This page contains two hyperlinks to pass url variables back to the sever:
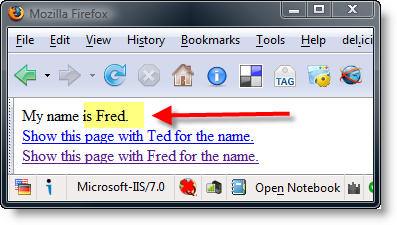
Click on either link and you will see the variable that is stored in the link that is passed through to the page when it loads next time from the server. You will also note that the address bar will show the variables passed in via URL requests that reload pages. We will click on Fred to try it out:
It should be apparent that URL variables can come from more than one location. We have seen them originate in the address bar and now in web page links.
Tip
Live applications should have information coming in validated to prevent hackers from messing with data and to make sure data is complete.
Our last use of URL variables for now will be for doing some processing that actually changes based on the links we click on. Enter the following code and give it a try:
<!--- Example: 1_14.cfm --->
<!--- Processing --->
<cfparam name="url.counter" default="10">
<cfparam name="url.calculate" default="0">

<cfset url.counter +=  url.calculate>

<!--- Content --->
<cfoutput>
  I have #url.counter# cars.<br />

  <a href="?calculate=1&counter=#url.counter#">Add One.</a><br />
  <a href="?calculate=-1&counter=#url.counter#">Subtract One.</a><br />
</cfoutput>
Here we see links that pass both the calculation value and the current calculation value:
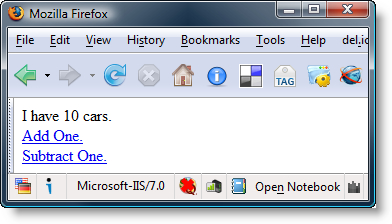
You can click on add and subtract as many times as you wish. The point is this page has just become very interactive. The counter is passed back through the link we click onto the server from the web page. Notice, as we have told you, that when using the variables to create content, we must wrap them inside a <cfoutput> tag pair and surround the variables with (#) pound symbols.
This will be our last version of the script. It will be a bit fancier than the other scripts we have written. We are going to create a custom structure and see how to interact with that structure using what we have learned so far in this chapter:
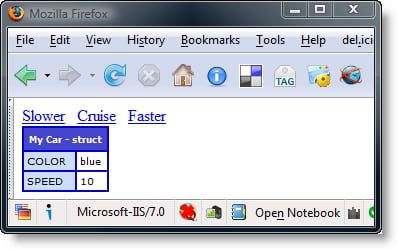
<!--- Example: 1_15.cfm ---> <!--- Processing ---> <cfparam name="url.speed" default="10"> <cfparam name="url.acceleration" default="0"> <cfscript> myCar = structNew(); myCar.color = "blue"; myCar.speed = url.speed + url.acceleration; </cfscript> <!--- Content ---> <cfoutput> <a href="?acceleration=-1&speed=#myCar.speed#">Slower</a> <a href="?speed=#myCar.speed#">Cruise</a> <a href="?acceleration=1&speed=#myCar.speed#">Faster</a><br /> <cfdump var="#myCar#" label="My Car"> </cfoutput>
This browser window lets us see the results of the car structure variables as we click to modify our current speed:
We have learned that creating a new structure is done by assigning a value to the variable using the function structNew(). You can nest structures inside of structures in addition to actual variable storage containers. It's the first step towards packaging your data inside your application. As applications grow, you will not want everything with simple variables setting at the root level of your variable structure. That would be impossible to maintain.
Another note is that we have persisted the values of the speed of the car by passing through the URL variables. We will learn additional ways of making our values last from one page call to the next. We learned the basics concepts of the structure and gained an understanding of URL variables.