
Up to this point, almost everything we have talked about gives you a basic understanding of developing user interfaces in Silverlight regardless of whether it is intended for the phone or for the web. With the introduction of Windows Phone 7, Microsoft introduced two new controls, namely, the panorama and pivot controls. These two controls provide the rich sliding motion that is very common in many of the Windows Phone 7 interfaces.
The panorama control allows you to create content beyond the extent of the physical device.
To get started with the panorama control in Visual Studio, create a new project and select the Windows Phone Panorama Application:
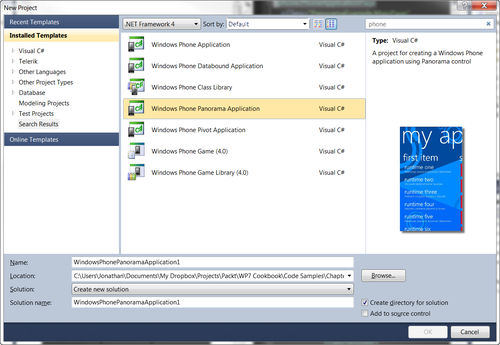
This will create a new project which is already setup and ready to go for using the panorama control. You do not have to use this project template to use this control. It is just a good starting point if this is the desired design of your application.
Now let's do a little customization to the current application to give you a feel of how the control works. As you can see when running the application, as you drag the interface to the left or right side the content, header, and background, all move independently as to give it a much more fluid look and feel.
Let's do some simple customization to this project. Let's first change the text that says My application to say ACME Company:
1. To do this, select the panorama control in the design surface in Visual Studio and then set the property of the title to ACME Company in the property window, which is found by right-clicking the panorama control and clicking Properties as follows:

Now let's make the data in the two panes a little more interesting. For the first one, let's mimic what we have done in earlier recipes and give the locations of ACME Company.
2. To do this, navigate to the
SampleData/MainViewModelSampleData.xamland double-click on it. Let's change the data to look more like this:<local:MainViewModel xmlns="http://schemas.microsoft.com/winfx/2006/xaml/ presentation" xmlns:x="http://schemas.microsoft.com/winfx/2006/xaml" xmlns:local="clr-namespace:PanoramaExample" SampleProperty="Sample Text Property Value"> <local:MainViewModel.Items> <local:ItemViewModel LineOne="Main Office" LineTwo="123 Main St. New York, NY" LineThree="(123) 123-1234"/> <local:ItemViewModel LineOne="satellite Office" LineTwo="123 Elm St. Bronx, NY" LineThree="(123) 321-1234"/> </local:MainViewModel.Items> </local:MainViewModel>
3. Rebuild the application by right-clicking the project and selecting the rebuild option. You will see that this updates the design surface. Now let's run the application and see how this looks in the emulator. The first thing you will notice is that the emulator and the design time don't match! Don't worry, this was expected.
4. To change the actual runtime data, let's open up the ViewModels | MainViewModel.cs. Let's delete the lines from the section under the comment about inserting sample data and let's insert it with real sample data. Let's consolidate it to just two lines that look like this:
this.Items.Add(new ItemViewModel() { LineOne = "Main Office", LineTwo = "123 Main St. New York, NY", LineThree = "(123) 123-1234" });
this.Items.Add(new ItemViewModel() { LineOne = "Satallite Office", LineTwo = "123 Elm St. Bronx, NY", LineThree = "(123) 321-1234" });
Now this has also been an extremely simple overview of not only the Panorama control but also some basic data binding techniques and architecture that is called MVVM (Model-View-View Model), which we will cover in much greater depth in a later chapter.
As far as the actual Panorama control, it is actually very simple. The panorama control is made up of the control that can only contain Panorama Item controls, those which can hold other controls. This is very similar to how the other controls we have used in the chapter work, except it renders differently and offers a more specialized interface.
You can see the extent of the XAML here:
<!--Panorama control-->
<controls:Panorama Title="ACME Company">
<controls:Panorama.Background>
<ImageBrush ImageSource="PanoramaBackground.png"/>
</controls:Panorama.Background>
<!--Panorama item one-->
<controls:PanoramaItem Header="first item">
<!--Double line list with text wrapping-->
<ListBox Margin="0,0,-12,0" ItemsSource=" {Binding Items}">
<ListBox.ItemTemplate>
<DataTemplate>
<StackPanel Margin="0,0,0,17" Width="432">
<TextBlock Text="{Binding LineOne}" TextWrapping="Wrap" Style="{StaticResource PhoneTextExtraLargeStyle}"/>
<TextBlock Text="{Binding LineTwo}" TextWrapping="Wrap" Margin="12,-6,12,0" Style="{StaticResource PhoneTextSubtleStyle}"/>
</StackPanel>
</DataTemplate>
</ListBox.ItemTemplate>
</ListBox>
</controls:PanoramaItem>
<!--Panorama item two-->
<!--Use 'Orientation="Horizontal"' to enable a panel that lays out horizontally-->
<controls:PanoramaItem Header="second item">
<!--Double line list with image placeholder and text wrapping-->
<ListBox Margin="0,0,-12,0" ItemsSource=" {Binding Items}">
<ListBox.ItemTemplate>
<DataTemplate>
<StackPanel Orientation="Horizontal" Margin="0,0,0,17">
<!--Replace rectangle with image-->
<Rectangle Height="100" Width="100" Fill="#FFE5001b" Margin="12,0,9,0"/>
<StackPanel Width="311">
<TextBlock Text="{Binding LineOne}" TextWrapping="Wrap" Style="{StaticResource PhoneTextExtraLargeStyle}"/>
<TextBlock Text="{Binding LineTwo}" TextWrapping="Wrap" Margin="12,-6,12,0" Style="{StaticResource PhoneTextSubtleStyle}"/>
</StackPanel>
</StackPanel>
</DataTemplate>
</ListBox.ItemTemplate>
</ListBox>
</controls:PanoramaItem>
</controls:Panorama>