
The Content Browser opens with each session of UDK. It can be a good idea to use two monitors with UDK and push it off onto a second screen. In older versions, the editor would first display the Start Page, which is essentially a web page within the editor that shows news and tips. Looking at the top of this window, you'll see tabs that include Content Browser, Actor Classes, Levels, Scene, Groups, and Start Page. We are going to be dealing with just the Content Browser and Actor Classes here.
The Content Browser is quite large, so make sure you know how to resize windows and move them around to make screen space. If you accidentally close the Content Browser, press Ctrl + Shift + F to open it back up. In the top of the main editor you will see a graphic icon which also opens it [ ![]() ] (dating back to Unreal, the game from which UDK springs, the icon is meant to be a U for Unreal, but it's scaled down to illegibility). Its location in the editor is shown here:
] (dating back to Unreal, the game from which UDK springs, the icon is meant to be a U for Unreal, but it's scaled down to illegibility). Its location in the editor is shown here:

On either side of the Content Browser you'll find black vertical strips with gray triangle arrows. These expose or hide panels for viewing your current UDK folder structure (Packages List on the left-hand side), and sorting objects through user tags (Tags List on the right-hand side, as shown here).
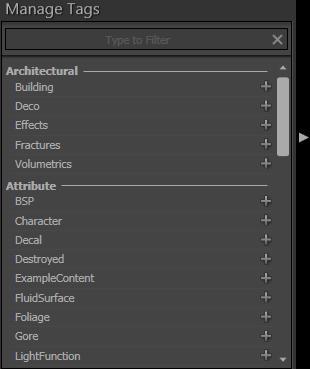
The tags won't be that useful to start with, since this is a tool for arranging large sets of content, but since the arrow icon is near the often used asset list slider you may hit it by mistake and be momentarily disoriented by the tags emerging into view. To use tags, notice how the tag categories have a + icon on the right-hand side which highlights green on mouse-over:

These are used to apply a tag to objects you have already highlighted in the Browser. Highlighted objects are framed in yellow and their tags, if any, are shown in the Applied Tags panel at the very top of the tags area when that is exposed. You can search tags using the field called Type to Filter. If you right-click on a tag, you will see a pop-up menu for further adjusting tags. If you create a tag of your own this way it will appear in whichever Group was current at the time (or one you then assign, as shown here).
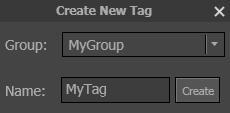
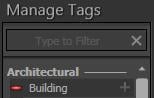
You can also use the [ ![]() ] Create Tag icon at the bottom of the tags panel, which defaults to a group called None. Next to Create Tag is an icon named Destroy. If you press it, the – icon appears next to each tag, as shown next. They highlight red on mouse over, allowing you to destroy by clicking:
] Create Tag icon at the bottom of the tags panel, which defaults to a group called None. Next to Create Tag is an icon named Destroy. If you press it, the – icon appears next to each tag, as shown next. They highlight red on mouse over, allowing you to destroy by clicking:
Once you are used to tagging, you can search the Browser with a 'tagged' or 'untagged' or 'both' filter, shown in the Status panel of the main search tool:
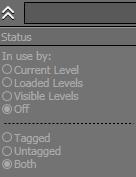
The status of a search is quite important as it defines the scope of the search either narrow or wide. If you have ticked the radio button to limit your search to the current level (In Use By: Current Level) [ ![]() ] and you are starting a scene, you won't see many UDKGame
assets at all, just some assets used by the Engine.
] and you are starting a scene, you won't see many UDKGame
assets at all, just some assets used by the Engine.

Above the Status section of the search tool, there is the icon [ ![]() ]. This simply minimizes the search filters so you can see more of the content. Next to this is a Type here to search (Ctrl + Shift + F) field. At the right of this type field (and also the tags type field) is the [
]. This simply minimizes the search filters so you can see more of the content. Next to this is a Type here to search (Ctrl + Shift + F) field. At the right of this type field (and also the tags type field) is the [ ![]() ] icon which will clear text. Beside it, a spanner icon [
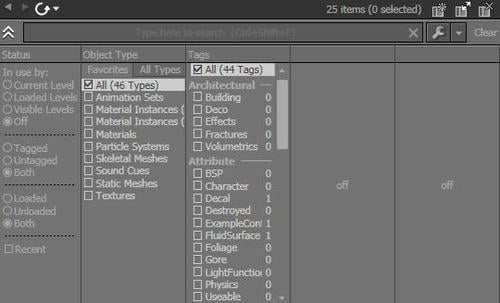
] icon which will clear text. Beside it, a spanner icon [ ![]() ] provides access to the kind of 'match any' and 'match all' that Find tools usually have. Next to the spanner icon is a text button called Clear. This not only removes text in the search field but also any ticked entries in the search by Object Type and Tags areas seen in the next screenshot:
] provides access to the kind of 'match any' and 'match all' that Find tools usually have. Next to the spanner icon is a text button called Clear. This not only removes text in the search field but also any ticked entries in the search by Object Type and Tags areas seen in the next screenshot:
Above the search filter panel there are some small icons that are really useful for those often using the Content Browser (which is everyone really). Two left and right triangle arrows [ ![]() ] allow us to browse using a kind of history of filter and search settings. There is also a Refresh button (Ctrl + F5) [
] allow us to browse using a kind of history of filter and search settings. There is also a Refresh button (Ctrl + F5) [ ![]() ] alongside these which can ensure your search
shows everything current. On the right-hand side of these buttons are three square icon [
] alongside these which can ensure your search
shows everything current. On the right-hand side of these buttons are three square icon [ ![]() ] that allow control of the Browser window itself. You can duplicate a new tabbed Browser window, you can float the Browser (and re-dock it into tabs), and you can kill off duplicated Browsers (the original one ignores this command).
] that allow control of the Browser window itself. You can duplicate a new tabbed Browser window, you can float the Browser (and re-dock it into tabs), and you can kill off duplicated Browsers (the original one ignores this command).

Shown here is a slightly atypical arrangement of the Content Browser. The folder structure usually exposed on the left-hand side is toggled to hidden. Using the layout buttons at the bottom of the image, the panel showing asset icons has been switched to horizontal split view to also show the names of assets as well. The search filters below the text field have been minimized. Tags have been applied to the highlighted SoundCue. Double-clicking an asset will open it in an editor for inspection, or in the case of a SoundCue, preview how it sounds. You can also press Space to preview highlighted sounds. Previously created assets which have not been used or loaded yet in the current editing session are marked in one corner with a small orange box icon [ ![]() ] in one
corner. Click this to Fully Load the asset. It saves memory to load only the assets you need. The assets are sorted here by Date Added rather than by Name (bottom of the image). The icon size has been reduced to
] in one
corner. Click this to Fully Load the asset. It saves memory to load only the assets you need. The assets are sorted here by Date Added rather than by Name (bottom of the image). The icon size has been reduced to 64 x 64 (also at the bottom of the image). Finally, the frame dimensions of the views have been altered by dragging on their edges.
This example is shown to indicate how the UI of the Browser is flexible and packed full of search and layout tools designed to enable ready access to game content.
Editing assets shown in the Browser is usually done by right-clicking on them and choosing the appropriate task. You will have noticed that right-clicking everywhere in UDK typically provides access to tools related to what is selected in the scene or highlighted in the Content Browser. Using the Find in Content Browser... command through right-clicking over a scene actor is very useful, and likewise so is right-clicking over an asset in the browser to access the Find Package command . Both allow us to find any assets related to the current one. Because a lot of UDK assets are intended to be modular, this is particularly important. Also, right-clicking an object in the Content Browser lets you access any examples of the asset already in the scene through the command Select Level Actors Using This Object. Right-clicking in empty space in the assets panel of the Content Browser lets you create new items, which leads us to the next topic.