
In order to control the software development lifecycle, SCM employs a series of concepts and techniques. We will take a look at some of these key concepts and techniques, what they are, and how they work. In this section you will learn about the following:
Resource Management: Managing source code files, project files, documents, images, etc., in a central area commonly called repository, database, or depot.
Workspaces: Providing a private work area for each project participant, separate from the other participants (architects, developers, testers, etc.).
Resource Versioning: Maintaining different resource versions as the project evolves using file revisions stored as file deltas.
Cooperation Support: Managing the interaction between the project participants using operations like check out, check in, and merge.
History Management: The ability to view, manage, and mark resource versions using labels.
Build and Release Management: The ability to manage project builds and releases in order to ensure that the configuration for the resources used in the builds is marked, known, and reproducible.
Parallel Development: The ability to work in parallel on more than one project version by branching multiple codelines and later merging them.
Let's discuss each of these topics, one at a time.
In order to build any system, you need resources. When you build a house, you need bricks, cement, roof, windows, doors, and so on. The same concept applies to software systems. Your resources, however, will consist of source code files, image files, configuration files, and so on (depending on your project type).
Managing resources is an essential aspect in building any kind of system. When it comes to software, these resources must be identified and organized in a way that provides flexibility as well as security. We can achieve this organization by storing the resources in a managed area. This area is commonly referred to as a repository, database, or depot where every resource of the project resides.
The repository is the place where all the source code files, images, documents, configuration files, and all the software components concerning the project are stored. In a traditional way, they are organized in a hierarchy of logical files and folders, a virtual file system tree. Security is also enforced because the repository provides a single point of access for everything the project needs in order to be successfully built.
The following figure represents a simplified repository structure:
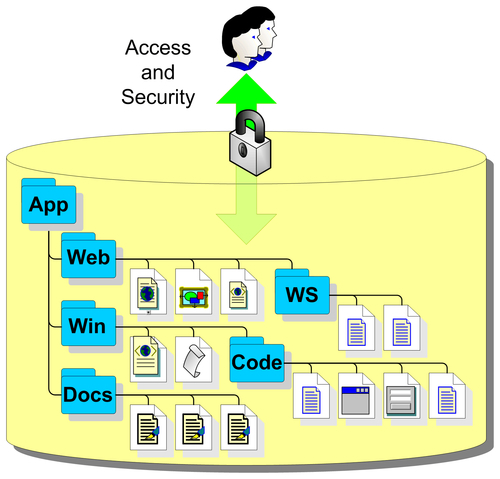
Typically we create a new repository when we start development on a new product. We create a base project structure and add it to a new repository. The logical repository structure matches the project structure.
Some of the main reasons to have a central repository are:
Easy sharing among users.
Easy management: The assets kept in the repository are stored in a single place where they are easy to control, back up, and restore.
Security: Provides strict access control for the items in the repository.
Logging: The ability to maintain logs of user activity in the repository.
The best physical location of the repository is on a dedicated server machine as this simplifies repository management and security, and gives an optimal performance. To ensure the maximum operation uptime and disaster recovery, the server should be equipped with:
A Redundant Array of Independent Disks (RAID) to prevent disastrous disk failure cases.
Redundant power supplies to prevent power loss in the case of power supply failure.
An Uninterruptible Power Supply (UPS) in case of an environmental power loss.
While RAID systems and UPS are fairly cheap nowadays, if you cannot afford such configuration it is wise to think of other methods of ensuring repository safety. Users sometimes make the mistake of thinking their source code is a hundred percent safe once it has been added to a source control management repository. Creating disk backups of the repository is a smart choice and a must when RAID configurations are not used.
Different SCM systems store the repository using files on the server's file system, a database system, or a hybrid between these two. Apart from the actual resources, a repository must keep resource metadata, or data about the resources such as file history. The metadata grows side by side with the resources in the repository and adds to its size.
Having only one repository may seem a good idea. However keeping many unrelated projects in one repository can have an impact on performance. Many SCM systems are capable of managing multiple distinct repositories. To obtain maximum performance it's better to store resources that belong to different products using different repositories.
Many SCM systems also have remote user support. Remote users can access the repository from thousands of miles away through the Internet using different protocols. However, exposing the server on the Internet presents a high security risk. To protect the server from Internet threats, a firewall must be configured to allow only authorized connections.
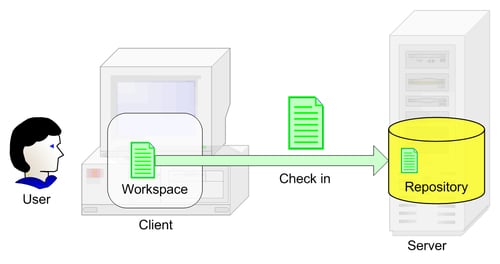
So far we have a place to store our software projects. But we need a place to work and develop our projects, and to test our new ideas that might or might not work. For that purpose, SCM systems have workspaces.
While the repository is stored in a central area on the server machine, its users (developers, testers, etc.) work individually on different machines. The SCM system has to provide a workspace area for each of them and be able to synchronize the workspace with the repository when this is required. Different SCM systems name this workspace differently: working folder, working directory, sandbox, view, enlistment, etc.
The purpose of the individual workspace is to provide users with an area where they can work separated from the repository and to isolate each user from the others. This is done in order to prevent one user's changes from affecting the others while they are working. Users make changes to the workspace content, adding, modifying, and deleting files without the worry that they might affect the repository or anybody else for that matter.
To synchronize the workspace with the repository, SCM systems have basic commands that perform actions to:
Add(used to add new files or folders to the repository)Get(used to copy files or folders from the repository to the workspace)Save(used to save back the changes from the workspace to the repository)
The actual names for these commands differ from one SCM tool to another but all have them.
The repository starts as an empty storage area for the new product. After creating a basic organization of the project, we add it to the repository using the Add command. This operation adds our initial project structure to the repository from which other users can Get it.
The workspace starts as an image of the repository at a given point in time on the users' machines, having no real new value. They use the Get command to obtain the contents of the repository.
In contrast with the repository, a workspace can get very messy. Tying to implement a new feature or trying to fix a bug can lead to the contents of the workspace failing to even compile. Maybe the changes that at first seemed a good idea don't seem such a good idea after a while. All those changes can simply be discarded and the workspace be recreated from the repository. If, however, the changes are functional, then the workspace suddenly acquires value. As soon as this happens we want to make sure we save these changes in the repository where they are safe and everybody else can see and use them.
Note
Best Practice
Do not let the workspace acquire too much value. Instead, synchronize the changes to the repository as often as possible.
While storing the projects to the latest resource versions, the repository has what a simple storage server doesn't. It has a timeline, a way to keep a record of resource history—resource versioning.
A fundamental feature of the repository is its ability to store all the versions of the resources it contains. During the development process, resources in the repository change and evolve as the project evolves. Resources are modified, renamed, and moved from one folder to another, new resources are added, and others are deleted. All these operations are part of the day-to-day work. The repository keeps track of these operations and provides the ability to view its state at any time in the past. It remembers every operation ever performed. If we wish we can view, compare, and restore any old resource version. Unfortunately it cannot provide us with a view of the future, but that's where we come into play, right?
Resource changes are stored by the repository as revisions.
Each time a resource is changed and saved back to the repository, a revision is created. Thus, a resource evolves as a succession of revisions, usually referred to by successive numbers such as 1, 2, 3 or 1.1, 1.2, 1.3 etc.
There are two modes of keeping revisions. One is called per-file revision numbering, where every resource has independent revision numbers. Consecutive revisions have different contents.
Another revision mode uses global revision numbering. For each resource change, the entire folder structure is updated with a new revision number regardless of the fact that other resources haven't changed. In this mode, consecutive revisions of a file may, or may not have different contents.
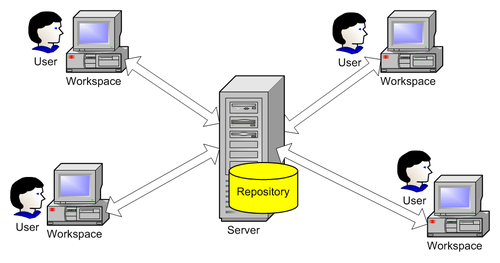
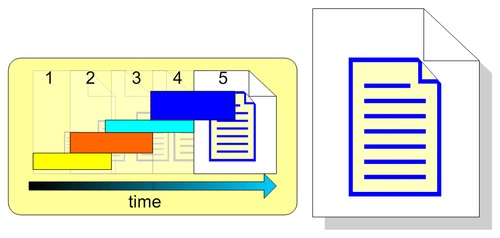
The following figure shows a resource that has evolved over the course of five revisions:
The repository keeps every revision with the ability to retrieve any one of them.
But how does the repository keep resource versions? One simple solution would be to keep a copy of every version of a resource. While this solution is very simple, it has a major disadvantage: as time passes, these copies occupy more and more disk space. This makes repository management harder, lowers performance, and is inefficient.
For example, let's say we have a 1MB file stored in the repository. This may be a document specifying project specifications. Every once in a while we alter this document by making small changes to it. Every revision we create will be about the same size, so after four changes this file could take as much as 5MB. And this is just for one file.
Usually, only a small part changes between successive revisions, so two successive revisions differ only by a small percentage. A cleverer idea would be to save only the difference between the two revisions.
The difference between the two revisions is called a delta. Keeping only the delta and not having redundant information allows us to use the storage space very efficiently and increase performance. When getting a resource version, the deltas will be applied against a base version and the resource will be reconstructed at that point in time.
Using deltas, after four small changes, our 1MB document will not take as much as 5MB anymore, adding just the space to save the deltas.
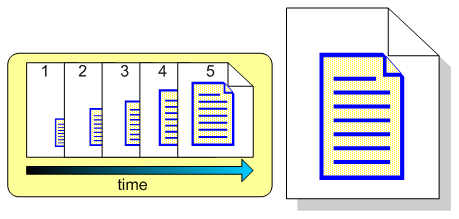
The following figure shows how the latest resource version is constructed using the base version and the forward deltas:
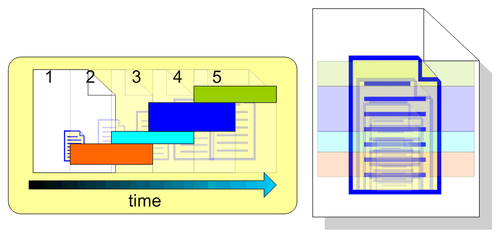
This approach helps in retrieving old versions very fast, but as we retrieve newer versions, more and more deltas have to be combined resulting in greater overhead. As most of the time we retrieve the latest version, we have to deal with this overhead every time.
To overcome this, another approach is to keep the latest file version and use reverse deltas. Older versions are kept as differences of newer versions. The latest version is always available and the overhead associated with combining deltas is eliminated:
For best performance, these two approaches can be combined using forward and reverse deltas, by keeping a full version after a number of consecutive deltas. Retrieving a certain version means that deltas are applied against the nearest full version.
The repository uses deltas for other operations like renaming resources and moving them between folders. These operations have to be remembered because they are a part of the history. Getting the state of a project at a point in time means these operations have to be remembered and applied when this is necessary.
Until now, we have seen how the SCM system manages to isolate users from affecting one another. But, if we look at a bigger picture, these users form a team that should work together on the product development. The SCM system also has to be able to manage how users work together.
Cooperation support is an essential SCM feature because software development is usually done by a number of participants working in a team. While team members work in a personal workspace, they must be able to collaborate in a congruent way while minimizing conflicts, like the need to work on the same repository resources.
Let's imagine a situation in which you need to work on a source code file to fix a bug. You get the file and work on it in your private workspace. At the same time, your teammate Lisa needs to modify the same file. She gets the file and starts to modify it. After you finish your work, you save the file back to the repository, happy to have fixed the bug. Later, when Lisa finishes her changes as well, she saves the file too, overwriting your changes.
When two or more users need to work on the same resource from the repository, the SCM system must be able to handle this situation and prevent one user from accidentally overwriting other user's changes. This is an essential requirement. Without this support, team collaboration would be a very hard if not an impossible thing to accomplish.
In order to manage cooperation support, SCM systems employ several mechanisms, providing commands like:
Check OutModify/EditCheck inMergeCommit/SubmitUndo Check Out
Before we explore the cooperation models, let's take a look at these operations and understand their specifics. SCM tools can support all of them or only a subset as some of them accomplish the same operation. The difference is the cooperation model and the context in which they are used.
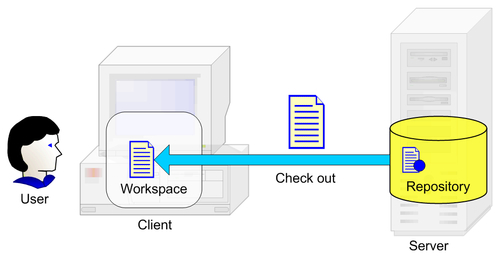
When we want to get a resource from the repository with the purpose of making changes to it, we perform a check-out operation on that resource. This indicates that we will change the contents of the resource and the SCM system will mark the resource in the repository to indicate to the other users that the specified resource is being used.
Depending on the cooperation model used, a check-out operation can lock the resource in the repository so other users cannot change it or it can only mark it as being used, allowing others to still change it. We will learn more about this in the Cooperation Models section.
When we need to modify multiple related resources, a check-out operation will be performed for every resource we need to change.
This is the action of making changes to the resources in our workspace, including working on source code files, configuration files, documents, etc.
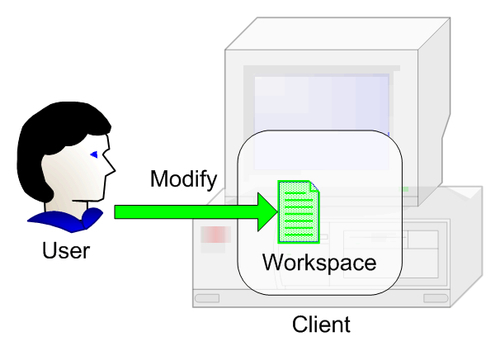
This is where we edit our project's resources and perform the necessary work.
This operation ends a check-out operation. After we've modified the resources, we must save them back to the repository. This is accomplished using a check-in operation. This indicates to the SCM system that the modified resources need to be saved and reintegrated into the repository.
Not all SCM systems require checking out a resource before modifying it. For such systems, the check in command is replaced by Commit/Submit and is used to push changes from the workspace to the repository.
Note
Best Practice
Every resource change can and should be associated with a comment that explains what was modified and why. SCM tools provide a special area for these comments when checking files in. Give a detailed explanation about what was changed and why, as it will help in easily identifying bugs and other issues.
After the check-in operation, the SCM tool will save the modified resources back to the repository and if necessary remove their lock so other users can modify them.
Note
At this point, we must be careful not to break the repository state by checking in code that will not build and affect the entire team when they get the latest changes.
As we saw in the Resource Versioning section, checking in files creates file revisions in the repository and generates deltas that add to the files history.
Note
Best Practice
When using multiple resources, in order not to break the repository state by checking in only parts of the changes, group the related changes together and save them to the repository in one operation. Also, do not begin to work on several issues at the same time and avoid checking out files that you are not sure you will need. Only check out files when you need them.
To support logical grouping of operations, some SCM tools use the notion of a change set. A change set represents a grouping of changes in multiple resources that must be made all at the same time. These may constitute a bug fix, a new feature, or any other set of related changes.
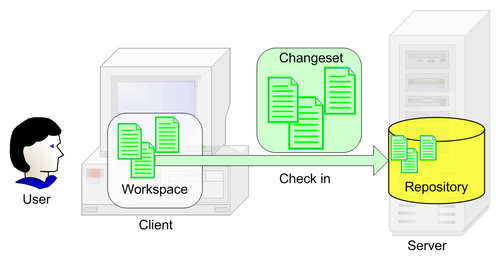
To ensure that all grouped changes are submitted to the repository in one operation, some SCM tools use atomic transactions. An atomic transaction is an operation in which either all changes are made or, if any one of them cannot be made, none are made. This ensures the repository is not updated with only half the changes but with all the changes at once, ensuring its integrity.
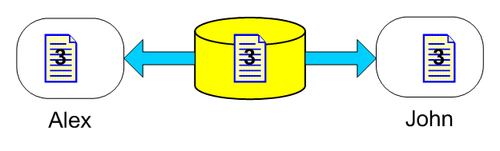
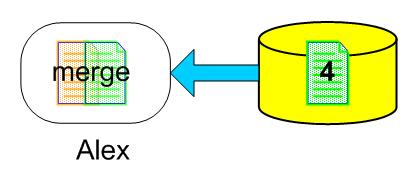
Let's imagine that one user, Alex, needed to work on a source code file. When he began to work, he checked out version 3 from the repository. While he was working, John, another user also checked out the same version and began working (in this case the SCM tool's configuration allows multiple users to check out the same resource).
Let's say John finishes the work before Alex does and checks in the file into the repository. Now, the repository contains a new revision for that file, version 4.
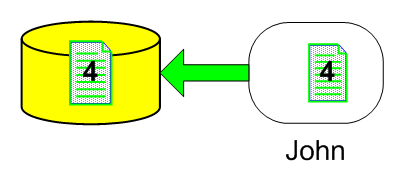
After Alex finishes making his changes he wants to save them. But now he is not saving the file after version 3, which he got when he began to work, but against version 4 which contains new changes.

These changes have to be integrated in Alex's file before he can check in his work. The SCM system has to provide a way to handle this situation. The solution is a file merge. Merging is the process by which we create a new version (revision) of a file, based on the other two file versions.
These file versions started with a common ancestor, in our case version 3. Alex needs to check in his changes and while doing so he has to integrate John's changes into his file, otherwise he would overwrite John's changes. He needs to merge his file against the latest version in the repository.
There are two ways to perform a merge operation:
Automatic merge
Manual merge
An automatic merge is attempted by the SCM system. If it doesn't detect any conflicts, the automatic merge will succeed and Alex can then verify the new merged version, make sure it is working, and save it to the repository.
Note
Best Practice
Always verify the contents of the merged file before saving it to the repository. This ensures that you will not break the project build.
Conflicts occur when changes made in one file overlap the changes made in the other. Usually this is caused by making changes to the same line numbers in the file. In this case an automatic merge cannot be performed.
A manual merge leaves Alex with the responsibility of conciliating changes. For this purpose SCM systems have specialized tools called three-way merge tools, that present in a graphical user interface the three file versions that must be merged. These file versions are: the latest file version in the repository (in our case version 4), the file containing Alex's changes, and the base file version for these two files (in our case version 3) into which Alex must merge the changes to construct the final version. The tool shows the conflicts found between the latest file version and Alex's version. Alex can choose the way he wants to resolve them having the ability to edit the resulting merged file. For file merging to be successful, all conflicts must be resolved.
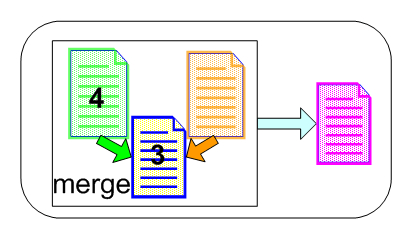
After resolving all the conflicts and creating the merged file we have to make sure the file is working (doesn't break the build). We can finally check it in into the repository where it would create a new revision (in our case version 5).

In this example Alex only needed to merge his changes into a file that was newer by only one version. But if Alex took longer to make his changes, the repository could have been updated with more new versions. The longer he took to make his changes the greater the possibility for the file in the repository to be updated with several versions. Instead of merging his changes into version 4, he would have had to merge them into let's say version 10. This increases the possibility of merge conflicts that he must resolve.
Note
Best Practice
When using file merge, we must integrate our changes as often as possible to avoid merging conflicts.
We can also stay up to date with the repository version of a file by periodically getting the file from the repository and merging it into our workspace file. This way we can resolve possible conflicts incrementally and we can incorporate the repository changes into our changes along the way.
Note
The merging operations using this approach can be applied on text files. They can also be applied on binary files by using merge tools that are capable of merging them. Many SCM tools have the possibility of specifying custom merge tools for different files. If there are no tools available for merging binary files, then these files cannot be merged and they should never be changed by multiple users at the same time.
This operation's results are similar to the check-in operation. The difference is that usually this operation ends a series of changes started without a check-out operation and which are saved using an atomic transaction as we will see shortly in the Cooperation Models section.
If for some reason we checked out something by mistake or we decide we no longer want to check in some or all of our changes, we can use the Undo Check Out command. This undoes the check out restoring the repository to the state it was before we performed the check out and deletes the changes in our workspace. However, we have the option of undoing the check out in the repository while keeping the changes in our workspace.
We saw what operations SCM tools employ to manage user cooperation. Let's take a look now at the cooperation models and the commands that are associated with them.
To manage user cooperation, SCM systems employ two main cooperation models:
Check Out-Modify-Check In
Modify-Merge-Commit
The fundamental difference between these two models is the degree of control versus the freedom they offer.
The Check Out-Modify-Check In model emphasizes more control and most of the time requires a connection to the repository, especially when checking out and checking in the resources. It may or it may not allow multiple users to modify resources at the same time.
The Modify-Merge-Commit model is more relaxed when it comes to repository availability, requiring a connection only when committing the changes back to the repository. However, more freedom means more risk of conflicts.
The Check Out-Modify-Check In model has two sub-models of operation:
Exclusive Check-Out Model
Multiple Check-Out Model
The Exclusive Check-Out Model uses a pessimistic concurrency scheme characterized by a Lock-Modify-Unlock mode of operation. It allows only one user at a time to modify a resource. Typically, our workflow activity when using this model is an iteration of these three operations:
1. Check out: When we need to make changes to a resource, we begin with a check-out operation during which:
Depending on the settings or the SCM tool's characteristics, the resource is copied from the repository into the workspace using a
Getcommand to ensure we are working on the latest version, otherwise the resource is checked out using the version from our workspace.A lock operation is performed on the resource in the repository to prevent other users from checking out the file while we are using it.
The resource in our workspace is prepared for writing and marked as checked out.
Other attempts by other users to modify the same resource will fail as the resource is specifically locked.
2. Modify: We modify the contents in the resource. We must test the changes to ensure that the changes do not break the project build.
3. Check in: After we are done with making changes, we perform a check-in operation. This operation:
Saves the new file version in the repository
Unlocks the resource so other users can change on it
Undoes the marking of the resource as being checked out
This model has the advantage of never having to deal with merging our changes into another file version because nobody else can modify the file while we are working. However, it has the big disadvantage that the longer we take to make our changes, the more we disallow other users to make changes to the file if they need to, imposing a serial development approach as opposed to a concurrent development approach. If concurrent development is more suited to your development style then you can use the Multiple Check-Out Model.
The Multiple Check-Out Model uses an optimistic concurrency scheme characterized by a Copy-Modify-Merge mode of operation, allowing multiple users at a time to modify a resource. When using this model, we go through the following operations:
1. Check out: When we need to make changes to a resource, we begin with a check-out operation during which:
If necessary, the resource is copied from the repository into our workspace using a
Getcommand to ensure we are working on the latest version, otherwise the resource is checked out using the version from our workspace.The resource in our workspace is prepared for changing and marked as checked out.
With this operation we have a local working copy on which we perform our changes. The check out is done when we begin to make changes to the resource but the SCM system doesn't lock the resource in the repository. Other users can perform check-out operations on it independently and work concurrently on the same resource.
2. Modify: We modify the contents of the resource. We must test the changes, to ensure that the changes do not break the project build.
3. Merge: After we are done with making changes, a merge operation is performed against the two resource versions, the one in the repository and the one in our workspace. This can be either done using an explicit get operation or during the check-in operation.
4. Check in: After we resolve all the possible conflicts that may appear, we perform a check-in operation during which:
The new file version is saved in the repository
The resource is unmarked as being checked out
This model has the advantage of concurrent development as it doesn't lock the resource during the check-out operation. Multiple users can modify the resource at the same time. However, the more the users change the same resource, the more conflicts can arise, making it difficult to merge the changes.
When using Check Out-Modify-Check in, use the check-out model that best suits your needs. If you want exclusive access to resources, use the exclusive check-out model to prevent other users from changing them at the same time. If, however, you are interested in a concurrent development approach, use the multiple check-out model to allow multiple users to work on the same resources at the same time.
Let's now talk about the other cooperation model, the Modify-Merge-Commit model.
This model is similar to the Multiple Check-Out Model we saw earlier, the main difference being that it doesn't use check outs in any way. As a result nobody knows for sure if somebody is modifying a resource. This model is used by some SCM tools as a disconnected working model when a connection to the repository is not available. The typical succession of operations performed when using this model is:
1. Modify: We can start modifying any resource in the workspace without performing a check-out operation and without the need to have a connection to the repository. The resources in the workspace are always ready to be modified.
2. Merge: After making the changes to the resources, we must merge them into the latest repository versions. This can be done using automatic merging or, if conflicts are detected, using manual merging.
3. Commit: This operation is the equivalent of the check-in operation. After resolving all possible conflicts, the changes are committed by simply saving the resources in the repository. The difference from the check-in operation is somewhat semantic. Since the resource wasn't initially checked out and marked as check-out, it cannot be checked in and unmarked as checked out. The commit operation is used just to synchronize the workspace with the repository by committing the workspace changes to the repository.
This model is very simple as it doesn't require checking out and checking in resources, maximizing concurrent development. We can start modifying resources as soon as we need to, without worrying that the resource may be locked by another user as in the Exclusive Check-Out Model. This is especially useful when working offline when we don't have a network connection with the repository. The only time a network connection is required is when we need to merge and commit our changes.
However, this freedom comes at a cost. Not being required to check out our resources, even for informational purposes only, makes it likely that multiple users perform changes on the same resources. This can cause conflicts and increases the risks when merging the changes back into the repository.
We've seen that apart from the fact that the repository provides us with a place to store our resources, it provides us with resource versioning, adding another dimension to what would otherwise be just a storage area—time. Every resource version we check in into the repository creates a revision that becomes a part of history, our development history, keeping a record of our project evolution. This is an essential ability as we can always go back to a certain point in time if we need to. SCM systems provide the ability to browse, search, sort, and filter the history of a project.
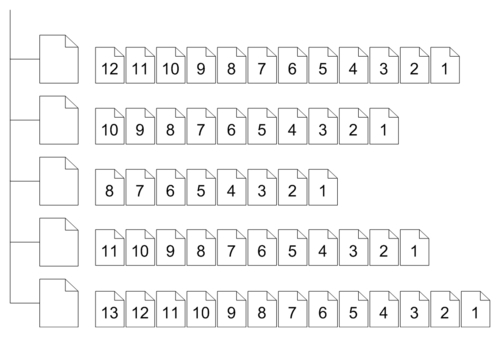
The following figure shows a group of five different resources with several different revisions.
As time passes, however, this record becomes bigger and bigger. Searching for something specific could be like searching for a needle in a haystack. To identify important development events, SCM systems provide labels or tags.
Labels are an important feature for managing repository history. They provide a way to associate a friendly name with a specific version of an entire project, a folder, or a single resource, taking a repository snapshot at a certain moment in time that you can identify later when needed. We can create a label on the current repository state or, as supported by some SCM systems, on past states, based on certain information like a specific date.
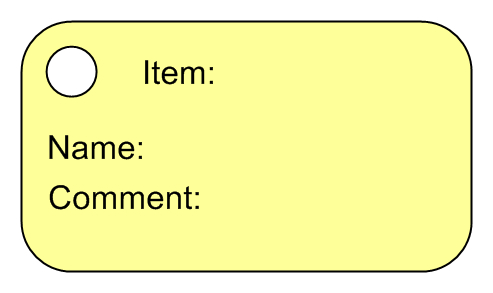
When creating a label we must provide some information consisting of:
Item: This represents the resources we are labeling and it can be a project, a folder, or a file.
Name: A label's name is usually a short description for the label. This can be anything from a version number to a short sentence.
Comment: This is the place where we can enter some detailed information about the label. Not all SCM systems, however, provide this field.
Labels allow us to make a repository snapshot. But when and why is it worth using labels?
Usually we use labels before or after an important event. We use labels to identify important events like:
Project changes: If we need to make some important project changes, we want to mark the project's state, to have a snapshot of the latest project structure before beginning to make them.
Project builds: Just like project changes, we want to keep track and identify project builds. This feature can be used by automatic building tools when getting the latest version of the resources in the repository to label the specific versions used in the build.
Project releases: Releasing a project is a big development event. We want to make really sure we know which resource versions were used to build a production project version.
The figure below shows the same group of files using labels:
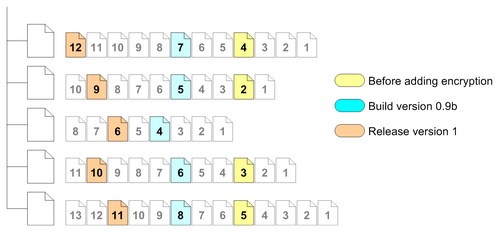
The first label was applied before, let's say, encryption was added to the project. If we later wanted to see what the project's state was before adding encryption, we could get the specific version using this label.
The second label was applied when building the 0.9b project version. This makes retrieving the project's state at that time very easy.
The third label was applied when version 1 was released. Again, retrieving the specific project version is very easy.
Note
Best Practice
Use labels as often as you can as they are an efficient way to mark a specific project state.
We can use labels with any other events when we need to have a snapshot of the project's state. If later we want to recreate the exact snapshot generated by the label, we can simply get the specific resource versions from the repository associated with the label.
We've so far seen the advantages of Software Configuration Management. We have a centralized place to safely store our project resources—the repository, we have workspaces to do our work and keep every user separate, we have cooperation support to work concurrently on the project, we have resource versions and history, and we have history management to keep track of project versions.
Building is the process of transforming the human-readable source code files into binary machine-level executable files by combining configuration items, using building scripts, make files, compilers, linkers, and other tools, and creating a version of a software program. Building can take from a few files to several hundreds or thousands of files making it a delicate process. While every developer performs test builds in the workspace to ensure that the changes made do not break the repository state, when it comes to building the entire configuration to release a project version, different policies have to be in place.
We saw the ability of the repository to record specific configurations: how labels can be used to create repository snapshots. Having all source code files in a managed central area, the repository, allows for greater control over the build process, controls specific project configurations ensuring they can be reproduced in the future, and adds the ability to automate the build process.
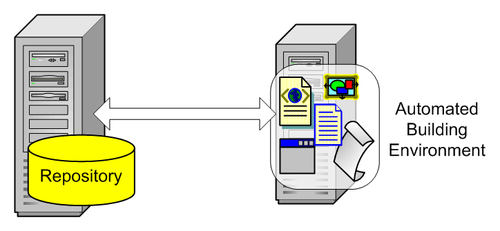
Automating the building process brings great benefits and boosts the productivity as possible problems are spotted earlier and on a regular basis. This can be achieved by using frequent integrity builds with regression testing (sanity builds), using automated building and testing environments.
Release management is closely related to build management as a release is in fact a production build of the project. Release management is the process of releasing a built and tested system into the production environment with the scope of making the application available to the end users. When releasing a product version, the configuration used to generate the release build must be recorded and stored to ensure that at a later time the build can be reproduced identically. This allows us to see exactly what resource versions were used in the build and be able to release future improvements and bug fixes based on that configuration.
Upon releasing the first version of a product, things aren't very complicated. The entire development team effort is focused on developing this first version. But as the product comes together and the moment for it to be released is nearing, things change.
After the first version is released the effort is divided into at least two paths, one to continue the development towards the next release and the second to maintain the released version. These efforts must be conducted in parallel and SCM must be able to cope with this situation. For these cases SCM provides support for parallel development.
Let's imagine the following situation. We are working on our product and here comes the time to release our first version. Intensive testing is done by the test team to ensure there are no bugs and everything works as it should. Meanwhile, the development team can go ahead and start the development towards the next product version. While the first version is under testing we don't want to modify the repository with new changes that would make testing a never ending story. So, what can we do?
One method would be to stop or freeze development on the project until the first version is tested and released, allowing only modifications related to the release. This approach, however, causes development to come to a complete stop, affecting productivity.
Another method would be to create a new repository, copy all the resources from the first one and continue development in the new repository while testing is being done in the first. So far so good, but there's a good chance the testing process finds some bugs the developers did not catch. The bugs are fixed in the first repository used for the release, but they are still to be fixed in the second one. For every change in the first repository there has to be a change in the second one. And somebody has to do it manually.
But wait, there's more. Let's say we managed to release our version and we are happy we can continue to work towards the next one. Some time after the release, however, some more issues appear that were not caught by the testing process. We must fix these issues and create service packs to patch the already installed production release.
We can find ourselves in two situations depending on the method we used to manage the release. If we used the freeze method to stop development in the repository until the release is out, now the repository contains new changes since the release version. Fixing those issues in the current version cannot be accomplished as it contains new unfinished and untested features implemented for the next release. But fortunately we labeled the release version and now we can retrieve it and fix those issues separately. After fixing the issues in the release version and creating the service pack, we have to again fix them in the current development version manually.
The same operation applies if we used the second method by using two repositories. After fixing the issues in the first repository we have to manually apply them to the second. And we must do this every time a new issue appears.
So far we have only one released version but imagine having more, maybe having one customized for a specific customer. As you can see this is not a very elegant approach, is error prone, and time consuming.
It would be much better if we could somehow continue development on new features while still releasing our upcoming versions and doing bug fixes at the same time. Fortunately SCM deals with these issues too. For this purpose, SCM defines the concept of parallel development. Parallel development means working in parallel on more than one product version in the same repository.
This is where we need to define the concept of codelines.
A codeline represents a project's development evolution across time, having a continuous history. A codeline has a point in time where it began to exist and evolve with its own history.
When we begin working on a product, we create a codeline and we develop our project on this codeline.
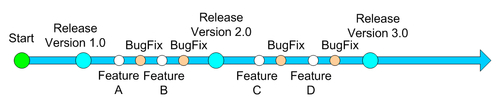
As time passes, the project evolves, reaching several milestones. Milestones are important events in the course of the development effort like version releases. Until we reach our first product version, we can work on a single development codeline. When time comes to release a new version we must stabilize the codeline by testing it and fixing the bugs found. While doing so we may want to continue working towards the next version while being able to integrate changes we made in the testing process. After releasing one version, we will have to maintain it and fix all the bugs that testing didn't discover. Using just a singe codeline makes development follow a single path and suffers from the problems we discussed earlier as project freezes when approaching a release and maintenance problems.
The solution is to have more than one codeline and be able to create new codelines as necessary. To enable this scenario SCM systems support branches.
Branches are used to split codelines from other codelines, creating several development paths. The terminology comes from the analogy with a real tree. The first codeline is the tree trunk. Then, by splitting other codelines we create branches.
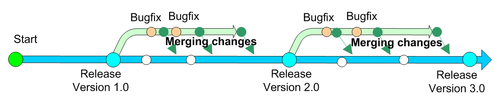
The following figure shows how branching allows us to continue development on the project while maintaining different project versions:
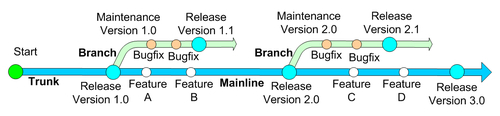
We begin development in a single codeline that forms the trunk or mainline and head towards our first release. Upon releasing the first version, instead of freezing development we create a new codeline by creating a branch from the mainline. This new codeline will support testing and maintenance on the first release, evolving in parallel with the mainline. Detected issues and bugs are fixed and service packs are built and released on this new maintenance branch. The case is the same for the next releases.
As we continue to work towards the next product releases in the mainline, we want to integrate the bug fixes performed in the maintenance line. Because the maintenance line is branched from the mainline, it has a common history until the branching occurred. What this means, is that although they were separated at a certain point in time, they still share common content. How can we integrate the fixes from the maintenance line in the mainline? The answer becomes very simple if we make a connection with the Multiple Check Out or the Modify-Merge-Commit model. If we consider that branches are concurrent modifications performed by users in their workspaces on a base resource version, then integrating those modifications back into the repository involves a merge operation.
Although the concept of merging branches is similar to merging resource versions, in the context of merging branches the result of the merge operation is slightly different. While in merging resources we make a single version out of other different versions, in merging branches we are in fact integrating changes performed in one branch into another branch. After the merge operation the two branches still exist, one or both of them being updated with changes performed in the other. In our example, changes performed in the maintenance line are merged into the mainline:
Using parallel development solves many problems. In this case we used a maintenance branch for every release. Changes to the maintenance branch are merged into the mainline. Branching is a powerful mechanism allowing development on several codelines at the same time. This allows for greater control over the software configuration and adds the ability to strictly control product releases and any other milestone.