As AR has become increasingly popular in the media over the last few years, unfortunately, several distorted notions of Augmented Reality have evolved. Anything that is somehow related to the real world and involves some computing, such as standing in front of a shop and watching 3D models wear the latest fashions, has become AR. Augmented Reality emerged from research labs a few decades ago and different definitions of AR have been produced. As more and more research fields (for example, computer vision, computer graphics, human-computer interaction, medicine, humanities, and art) have investigated AR as a technology, application, or concept, multiple overlapping definitions now exist for AR. Rather than providing you with an exhaustive list of definitions, we will present some major concepts present in any AR application.
The term Augmented Reality itself contains the notion of reality. Augmenting generally refers to the aspect of influencing one of your human sensory systems, such as vision or hearing, with additional information. This information is generally defined as digital or virtual and will be produced by a computer. The technology currently uses displays to overlay and merge the physical information with the digital information. To augment your hearing, modified headphones or earphones equipped with microphones are able to mix sound from your surroundings in real-time with sound generated by your computer. In this book, we will mainly look at visual augmentation.
The TV screen at home is the ideal device to perceive virtual content, streamed from broadcasts or played from your DVD. Unfortunately, most common TV screens are not able to capture the real world and augment it. An Augmented Reality display needs to simultaneously show the real and virtual worlds.
One of the first display technologies for AR was produced by Ivan Sutherland in 1964 (named "The Sword of Damocles"). The system was rigidly mounted on the ceiling and used some CRT screens and a transparent display to be able to create the sensation of visually merging the real and virtual.
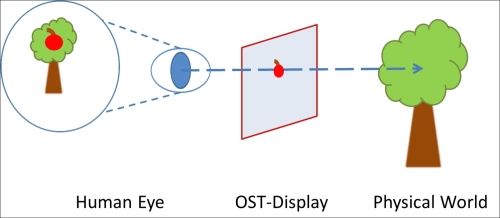
Since then, we have seen different trends in AR display, going from static to wearable and handheld displays. One of the major trends is the usage of optical see-through (OST) technology. The idea is to still see the real world through a semi-transparent screen and project some virtual content on the screen. The merging of the real and virtual worlds does not happen on the computer screen, but directly on the retina of your eye, as depicted in the following figure:
The other major trend in AR display is what we call video see-through (VST) technology. You can imagine perceiving the world not directly, but through a video on a monitor. The video image is mixed with some virtual content (as you will see in a movie) and sent back to some standard display, such as your desktop screen, your mobile phone, or the upcoming generation of head-mounted displays as shown in the following figure:
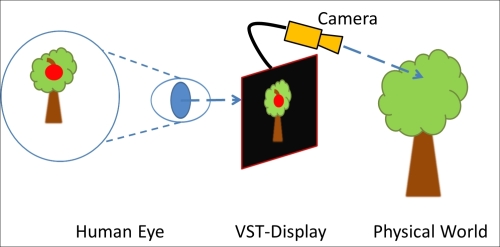
In this book, we will work on Android-driven mobile phones and, therefore, discuss only VST systems; the video camera used will be the one on the back of your phone.
With a display (OST or VST) in your hands, you are already able to superimpose things from your real world, as you will see in TV advertisements with text banners at the bottom of the screen. However, any virtual content (such as text or images) will remain fixed in its position on the screen. The superposition being really static, your AR display will act as a head-up display (HUD), but won't really be an AR as shown in the following figure:
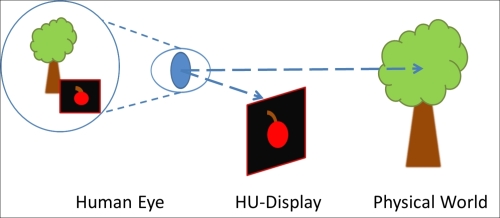
Google Glass is an example of an HUD. While it uses a semitransparent screen like an OST, the digital content remains in a static position.
AR needs to know more about real and virtual content. It needs to know where things are in space (registration) and follow where they are moving (tracking).
Registration is basically the idea of aligning virtual and real content in the same space. If you are into movies or sports, you will notice that 2D or 3D graphics are superimposed onto scenes of the physical world quite often. In ice hockey, the puck is often highlighted with a colored trail. In movies such as Walt Disney's TRON (1982 version), the real and virtual elements are seamlessly blended. However, AR differs from those effects as it is based on all of the following aspects (proposed by Ronald T. Azuma in 1997):
It's in 3D: In the olden days, some of the movies were edited manually to merge virtual visual effects with real content. A well-known example is Star Wars, where all the lightsaber effects have been painted by hand by hundreds of artists and, thus, frame by frame. Nowadays, more complex techniques support merging digital 3D content (such as characters or cars) with the video image (and is called match moving). AR is inherently always doing that in a 3D space.
The registration happens in real time: In a movie, everything is pre-recorded and generated in a studio; you just play the media. In AR, everything is in real time, so your application needs to merge, at each instance, reality and virtuality.
It's interactive: In a movie, you only look passively at the scene from where it has been shot. In AR, you can actively move around, forward, and backward and turn your AR display—you will still see an alignment between both worlds.
Building a rich AR application needs interaction between environments; otherwise you end up with pretty, 3D graphics that can turn boring quite fast. AR interaction refers to selecting and manipulating digital and physical objects and navigating in the augmented scene. Rich AR applications allow you to use objects which can be on your table, to move some virtual characters, use your hands to select some floating virtual objects while walking on the street, or speak to a virtual agent appearing on your watch to arrange a meeting later in the day. In Chapter 6, Make It Interactive – Create the User Experience, we will discuss mobile-AR interaction. We will look at how some of the standard mobile interaction techniques can also be applied to AR. We will also dig into specific techniques involving the manipulation of the real world.
Previously in this chapter, we discussed what AR is and elaborated on display, registration, and interaction. As some of the notions in this book can also be applied to any AR development, we will specifically look at mobile AR.
Mobile AR sometimes refers to any transportable, wearable AR system that can be used indoors and outdoors. In this book, we will look at mobile AR with the most popular connotation used today—using handheld mobile devices, such as smartphones or tablets. With the current generation of smartphones, two major approaches to the AR system can be realized. These systems are characterized by their specific registration techniques and, also, their interaction range. They both enable a different range of applications. The systems, sensor-based AR and computer vision-based AR, are using the video see-through display, relying on the camera and screen of the mobile phone.
The first type of system is called sensor-based AR and generally referred to as a GPS plus inertial AR (or, sometimes, outdoor AR system). Sensor-based AR uses the location sensor from a mobile as well as the orientation sensor. Combining both the location and orientation sensors delivers the global position of the user in the physical world.
The location sensor is mainly supported with a GNSS (Global Navigation Satellite System) receiver. One of the most popular GNSS receivers is the GPS (maintained by the USA), which is present on most smartphones.
Note
Other systems are currently (or will soon be) deployed, such as GLONASS (Russia), Galileo (Europe, 2020), or Compass (China, 2020).
There are several possible orientation sensors available on handheld devices, such as accelerometers, magnetometers, and gyroscopes. The measured position and orientation of your handheld device provides tracking information, which is used for registering virtual objects on the physical scene. The position reported by the GPS module can be both inaccurate and updated slower than you move around. This can result in a lag, that is, when you do a fast movement, virtual elements seem to float behind. One of the most popular types of AR applications with sensor-based systems are AR browsers, which visualize Points of Interests (POIs), that is, simple graphical information about things around you. If you try some of the most popular products such as Junaio, Layar, or Wikitude, you will probably observe this effect of lag.
The advantage of this technique is that the sensor-based ARs are working on a general scale around the world, in practically any physical outdoor position (such as if you are in the middle of the desert or in a city). One of the limitations of such systems is their inability to work inside (or work poorly) or in any occluded area (no line-of-sight with the sky, such as in forests or on streets with high buildings all around). We will discuss more about this type of mobile AR system in Chapter 4, Locating in the World.
The other popular type of AR system is computer vision-based AR. The idea here is to leverage the power of the inbuilt camera for more than capturing and displaying the physical world (as done in sensor-based AR). This technology generally operates with image processing and computer vision algorithms that analyze the image to detect any object visible from the camera. This analysis can provide information about the position of different objects and, therefore, the user (more about that in Chapter 5, Same as Hollywood – Virtual on Physical Objects).
The advantage is that things seem to be perfectly aligned. The current technology allows you to recognize different types of planar pictorial content, such as a specifically designed marker (marker-based tracking) or more natural content (markerless tracking). One of the disadvantages is that vision-based AR is heavy in processing and can drain the battery really rapidly. Recent generations of smartphones are more adapted to handle this type of problem, being that they are optimized for energy consumption.
So let's explore how we can support the development of the previously described concepts and the two general AR systems. As in the development of any other application, some well-known concepts of software engineering can be applied in developing an AR application. We will look at the structural aspect of an AR application (software components) followed by the behavioral aspect (control flow).
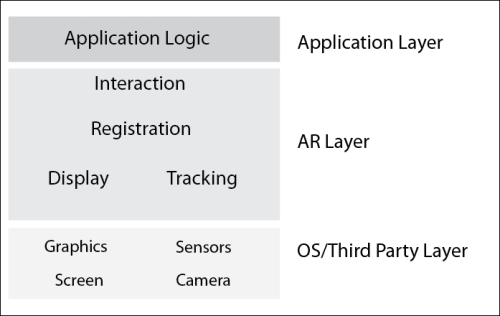
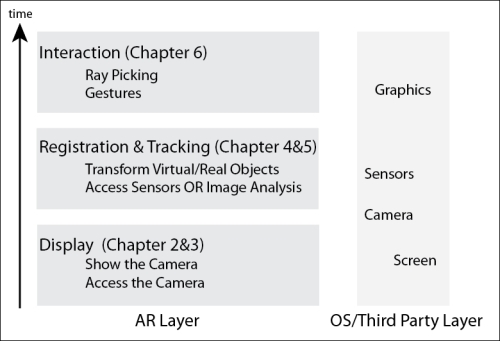
An AR application can be structured in three layers: the application layer, the AR layer, and the OS/Third Party layer.
The application layer corresponds to the domain logic of your application. If you want to develop an AR game, anything related to managing the game assets (characters, scenes, objects) or the game logic will be implemented in this specific layer. The AR layer corresponds to the instantiation of the concepts we've previously described. Each of the AR notions and concepts that we've presented (display, registration, and interaction) can be seen, in terms of software, as a modular element, a component, or a service of the AR layer.
You can note that we have separated tracking from registration in the figure, making tracking one major software component for an AR application. Tracking, which provides spatial information to the registration service, is a complex and computationally intensive process in any AR application. The OS/Third Party layer corresponds to existing tools and libraries which don't provide any AR functionalities, but will enable the AR layer. For example, the Display module for a mobile application will communicate with the OS layer to access the camera to create a view of the physical world. On Android, the Google Android API is part of this layer. Some additional libraries, such as JMonkeyEngine, which handle the graphics, are also part of this layer.
In the rest of the book, we will show you how to implement the different modules of the AR layer, which also involves communication with the OS/Third Party layer. The major layers of an AR application (see the right-hand side of the following figure), with their application modules (the left-hand side of the following figure), are depicted in the following figure:
With the concept of software layers and components in mind, we can now look at how information will flow in a typical AR application. We will focus here on describing how each of the components of the AR layer relate to each other over time and what their connections with the OS/Third Party layer are.
Over the last decade, AR researchers and developers have converged toward a well-used method of combining these components using a similar order of execution—the AR control flow. We present here the general AR control flow used by the community and summarized in the following figure:
The preceding figure, read from the bottom up, shows the main activities of an AR application. This sequence is repeated indefinitely in an AR application; it can be seen as the typical AR main loop (please note that we've excluded the domain logic here as well as the OS activities). Each activity corresponds to the same module we've presented before. The structure of the AR layer and AR control flow is, therefore, quite symmetric.
Understand that this control flow is the key to developing an AR application, so we will come back to it and use it in the rest of the book. We will get into more details of each of the components and steps in the next chapter.
So, looking at the preceding figure, the main activities and steps in your application are as follows:
Manage the display first: For mobile AR, this means accessing the video camera and showing a captured image on the screen (a view of your physical world). We will discuss that in Chapter 2, Viewing the World. This also involves matching camera parameters between the physical camera and the virtual one that renders your digital objects (Chapter 3, Superimposing the World).
Register and track your objects: Analyze the sensors on your mobile (approach 1) or analyze the video image (approach 2) and detect the position of each element of your world (such as camera or objects). We will discuss this aspect in Chapter 4, Locating in the World and Chapter 5, Same as Hollywood – Virtual on Physical Objects.
Interact: Once your content is correctly registered, you can start to interact with it, as we will discuss in Chapter 6, Make It Interactive – Create the User Experience.
If you want to develop Augmented Reality applications for Android, you can share the majority of tools with regular Android developers. Specifically, you can leverage the power of the widely supported Google Android Developer Tools Bundle (ADT Bundle). This includes the following:
Besides this standard package common to many Android development environments, you will need the following:
The JME Java OpenGL® game engine is a free toolkit that brings the 3D graphics in your programs to life. It provides 3D graphics and gaming middleware that frees you from exclusively coding in low-level OpenGL® ES (OpenGL® for Embedded Systems), for example, by providing an asset system for importing models, predefined lighting, and physics and special effects components.
The Qualcomm® VuforiaTM SDK brings state-of-the art computer vision algorithms targeted at recognizing and tracking a wide variety of objects, including fiducials (frame markers), image targets, and even 3D objects. While it is not needed for sensor-based AR, it allows you to conveniently implement computer vision-based AR applications.
The Google Android NDK is a toolset for performance-critical applications. It allows parts of the application to be written in native-code languages (C/C++). While you don't need to code in C or C++, this toolset is required by VuforiaTM SDK.
Of course, you are not bound to a specific IDE and can work with command-line tools as well. The code snippets themselves, which we present in this book, do not rely on the use of a specific IDE. However, within this book, we will give you setup instructions specifically for the popular Eclipse IDE. Furthermore, all development tools can be used on Windows (XP or later), Linux, and Mac OS X (10.7 or later).
On the next pages, we will guide you through the installation processes of the Android Developer Tools Bundle, NDK, JME, and VuforiaTM SDK. While the development tools can be spread throughout the system, we recommend that you use a common base directory for both the development tools and the sample code; let's call it AR4Android (for example, C:/AR4Android under Windows or /opt/AR4Android under Linux or Mac OS X).
You can install the ADT Bundle in two easy steps as follows:
Download the ADT Bundle from http://developer.android.com/sdk/index.html.
After downloading, unzip
adt-bundle-<os_platform>.zipinto theAR4Androidbase directory.
You can then start the Eclipse IDE by launching AR4Android/adt-bundle-<os_platform>/eclipse/eclipse(.exe).
Tip
Please note that you might need to install additional system images, depending on the devices you use (for example, version 2.3.5, or 4.0.1). You can follow the instructions given at the following website: http://developer.android.com/tools/help/sdk-manager.html.
For the Android NDK (version r9 or higher), you follow a similar procedure as follows:
Download it from http://developer.android.com/tools/sdk/ndk/index.html.
After downloading, unzip
android-ndk-r<version>Y-<os_platform>.(zip|bz2)into theAR4Androidbase directory.
JME is a powerful Java-based 3D game engine. It comes with its own development environment (JME IDE based on NetBeans) which is targeted towards the development of desktop games. While the JME IDE also supports the deployment of Android devices, it (at the time this book is being written) lacks the integration of convenient Android SDK tools like the Android Debug Bridge (adb), Dalvik Debug Monitor Server view (DDMS) or integration of the Android Emulator found in the ADT Bundle. So, instead of using the JME IDE, we will integrate the base libraries into our AR projects in Eclipse. The easiest way to obtain the JME libraries is to download the SDK for your operating system from http://jmonkeyengine.org/downloads and install it into the AR4Android base directory (or your own developer directory; just make sure you can easily access it later in your projects). At the time this book is being published, there are three packages: Windows, GNU/Linux, and Mac OS X.
Tip
You can also obtain most recent versions from http://updates.jmonkeyengine.org/nightly/3.0/engine/
You need only the Java libraries of JME (.jar) for the AR development, using the ADT Bundle. If you work on Windows or Linux, you can include them in any existing Eclipse project by performing the following steps:
Right-click on your AR project (which we will create in the next chapter) or any other project in the Eclipse explorer and go to Build Path | Add External Archives.
In the JAR selection dialog, browse to
AR4Android/jmonkeyplatform/ jmonkeyplatform/libs.You can select all JARs in the lib directory and click on Open.
If you work on Mac OS X, you should extract the libraries from jmonkeyplatform.app before applying the same procedure as for Windows or Linux described in the preceding section. To extract the libraries, you need to right-click on your jmonkeyplatform.app app and select Show Package contents and you will find the libraries in /Applications/jmonkeyplatform.app/Contents/Resources/.
Please note that, in the context of this book, we only use a few of them. In the Eclipse projects accompanying the source code of the book, you will find the necessary JARs already in the local lib directories containing the subset of Java libraries necessary for running the examples. You can also reference them in your build path.
Note
The reference documentation for using JME with Android can be found at http://hub.jmonkeyengine.org/wiki/doku.php/jme3:android.
VuforiaTM is a state-of-the-art library for computer vision recognition and natural feature tracking.
In order to download and install VuforiaTM, you have to initially register at https://developer.vuforia.com/user/register. Afterwards, you can download the SDK (for Windows, Linux, or Mac OS X) from https://developer.vuforia.com/resources/sdk/android. Create a folder named AR4Android/ThirdParty. Now create an Eclipse project by going to File | New | Project ... named ThirdParty and choose as location the folder AR4Android/ThirdParty (see also the section Creating an Eclipse project in Chapter 2, Viewing the World). Then install the VuforiaTM SDK in AR4Android/ThirdParty/vuforia-sdk-android-<VERSION>. For the examples in Chapter 5, Same as Hollywood – Virtual on Physical Objects and Chapter 6, Make It Interactive – Create the User Experience, you will need to reference this ThirdParty Eclipse project.
The Augmented Reality applications which you will learn to build will run on a wide variety of Android-powered smartphone and tablet devices. However, depending on the specific algorithms, we will introduce certain hardware requirements that should be met. Specifically, the Android device needs to have the following features:
A back-facing camera for all examples in this book
A GPS module for the sensor-based AR examples
A gyroscope or linear accelerometers for the sensor-based AR examples
Augmented Reality on mobile phones can be challenging as many integrated sensors have to be active during the running of applications and computationally demanding algorithms are executed. Therefore, we recommend deploying them on a dual-core processor (or more cores) for the best AR experience. The earliest Android version to deploy should be 2.3.3 (API 10, Gingerbread). This gives potential outreach to your AR app across approximately 95 percent of all Android devices.
Note
Visit http://developer.android.com/about/dashboards/index.html for up-to-date numbers.
Please make sure to set up your device for development as described at http://developer.android.com/tools/device.html.
In addition, most AR applications, specifically the computer-vision based applications (using VuforiaTM), require enough processing power.


