

We have seen how to use atlas-cli to reload a plugin without having to restart atlas-run. It is a pretty good way to save time, but Atlassian have walked the extra mile to develop a plugin named
FastDev, which can be used to reload plugin changes during development to all Atlassian applications including JIRA. And that, from the browser itself!
Create a plugin and use atlas-run to run the plugin as discussed in the aforementioned recipe. Let us assume we are doing it on the plugin we created in the previous recipe—the one with the sample Web Item. If we run this sample Web Item plugin, using atlas-run, we can access JIRA at port 2990 as mentioned earlier, and the Web Item will look as highlighted in the following screenshot:
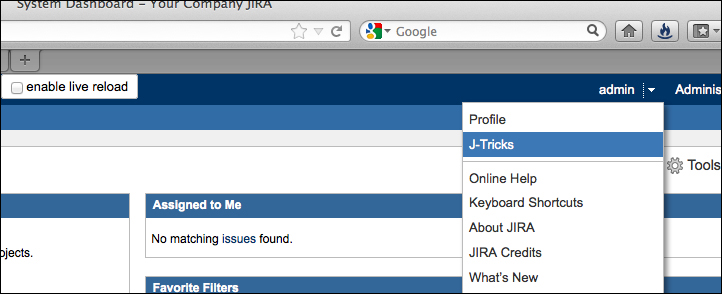
As you can see, the J-Tricks link appears along with the Profile link under the personal section. But what if you wanted the link at the jira-help section, along with Online Help, About JIRA, and so on?
Following are the simple steps to make the aforementioned change to the plugin and reload it using FastDev:
Access the FastDev servlet on the browser using the following path:
http://localhost:2990/jira/plugins/servlet/fastdevYou will find the servlet as shown in the following screenshot:

Make the change to your plugin. In this example, the change is pretty small. All we do is modify the
atlassian-plugin.xmlfile to change thesectionattribute in theweb-itemmodule fromsection="system.user.options/personal"tosection="system.user.options/jira-help".Click on the Scan and Reload button on the servlet (shown in the previous screenshot). On clicking the button, FastDev will reload the plugin. You can track the progress and see the logs on the browser itself, as shown in the following screenshot:

Once the plugin is successfully reloaded, you will see the following screenshot with a success message:

Reload the JIRA page to see if the change is effective. In our example, the new screen will be as follows:

As you can see, the J-Tricks link has moved to the help section.
When the Scan and Reload button is clicked, FastDev looks for files that have changed since the last time a plugin was installed. If it detects any changes, it starts a Maven process that reinstalls the plugin.
Note
More information on FastDev can be found at https://developer.atlassian.com/display/DOCS/Automatic+Plugin+Reinstallation+with+FastDev.
There is more to FastDev than the default configurations. They can be set in your plugin's pom.xml file by adding the required property to the systemPropertyVariables node. You will find the details in the Atlassian documentation (see the previous note box), but the most useful ones are mentioned later.
While looking for changes, FastDev ignores certain files such as .js or .css files that don't need a reinstall of the plugin. The following table shows the full list of files/directories that are ignored:
|
Type |
Property name |
Default(s) |
|---|---|---|
|
Directory |
|
|
|
Extension |
|
|
|
File |
|
– |
If you want to ignore additional files or directories, you can add them using the preceding properties, shown as follows:
<systemPropertyVariables>
...
  <fastdev.no.reload.directories>
    images
  </fastdev.no.reload.directories>
  <fastdev.no.reload.extensions>
    classpath
  </fastdev.no.reload.extensions>
  <fastdev.no.reload.files>
    ${basedir}/src/main/resources/LICENSE.txt
  </fastdev.no.reload.files>
</systemPropertyVariables>