

The user interface in VS2013's IDE has several differences from VS2012 and the previous versions of Visual Studio. Let's take a look at what is available in this recipe.
All you will need for this recipe is a copy of VS2013 so that you can follow along with where different options are located. The following screenshot provides an overview of what will be covered:
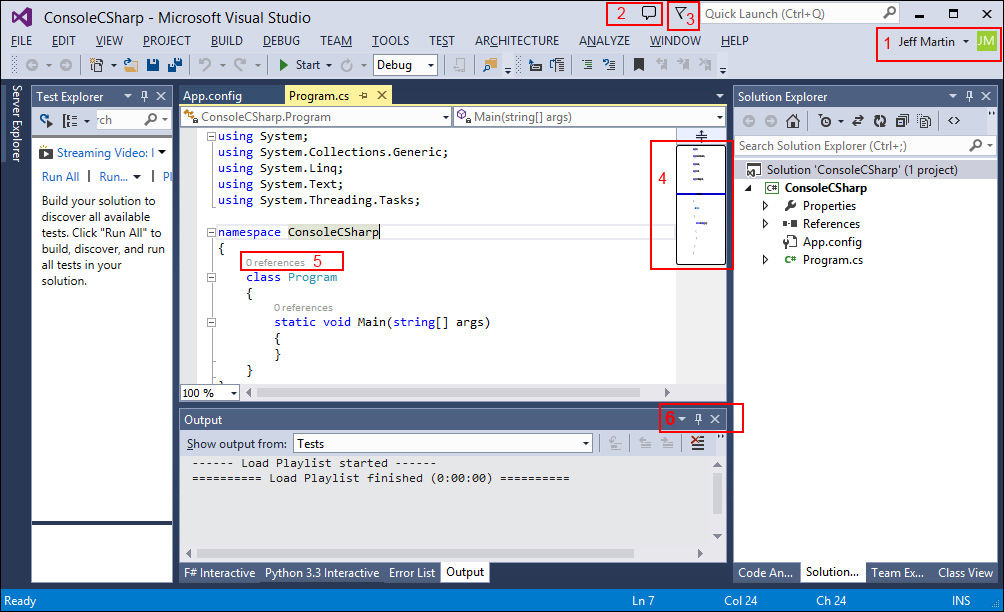
The legend for the highlighted items in the preceding screenshot is as follows:
The user's account entry/selection is indicated with 1
The notification center is indicated with 2
The Feedback menu is indicated with 3
The scrollbar thumbnail is indicated with 4
CodeLens (Ultimate only) is indicated with 5
The editor window controls are indicated with 6
Over the next few pages, we are going to take a firsthand look at the new areas of the Visual Studio IDE. You may follow along with your own project or use the sample project where indicated.
Feedback
This screenshot shows the choices available when the Feedback menu is accessed by clicking on the chat balloon (far left icon):

Indicated by a chat balloon, the feedback icon provides an immediate way to send feedback to Microsoft from within VS2013. When the chat balloon is clicked, a drop-down list appears, allowing you to select from either Send a Smile (indicating a positive commentary) or Send a Frown (indicating negative commentary). Functionally, there is no difference in the dialog box that appears, but the choice of a smile or frown allows you to provide context for your remarks so that there is no ambiguity in your message. Each option allows you to include an e-mail address so Microsoft has a way to respond, and the frown option has an additional checkbox to indicate whether or not your comments are describing a bug.
The menu also provides the ability to report a bug and access the MSDN forums within Visual Studio. Both options provide a quick way to accomplish these tasks so that you make a report or seek help and get back to coding with minimal distractions.
Notifications
Between the Feedback icon and the Quick Launch field is the flag icon representing notifications:

In the preceding screenshot, you can see that one update is pending. The notification flag is designed to provide an unobtrusive alert when updates to VS2013 and the installed packages are available. Notifications listed in the sidebar are color-coded with yellow and red, which are used to indicate medium and high priorities respectively. Examples of notifications that could appear include notices about updates to Visual Studio, updates to installed extensions or samples, or notices alerting that the trial period is ending. Notifications may be dismissed en masse, and once they are dismissed they do not reappear.
User account
If you have signed in to VS2013 with a Microsoft account (see the Synchronizing settings recipe), this area displays the graphical avatar along with your account's display name. The following screenshot shows the difference in the display that occurs when you log in:
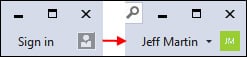
It also provides a way to sign in if you have not done so, or if you wish to change the active account being used. In the preceding screenshot, the left-hand side has the text Sign in, and a grey icon indicates that the user has yet to login. On the right-hand side, you can see the difference when the user has logged in, as the username has replaced the Sign in text, and the gray icon has changed to reflect the user's avatar (which in this case is a green icon overlaid with the white initials of the user's name).
Scroll bar thumbnail
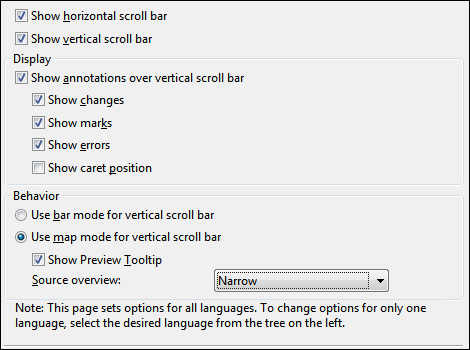
The scroll bar has expanded its usefulness in VS2013. You can now customize it to show your overall position in a source file, and provide a tool tip that lets you examine code elsewhere in your current file without changing your current location. The new option is called map mode, as opposed to the historical behavior that is called bar mode (which is the traditional scrollbar appearance and behavior). All aspects of the map mode are customizable, including whether it appears at all, its width (narrow, medium, or wide), and the ability to show the preview tool tip.
The following screenshot shows these features in action:
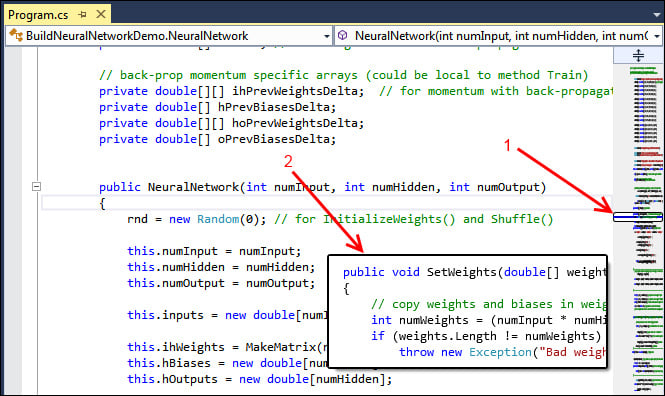
The preceding screenshot shows the scroll bar configured to be in map mode. The first arrow (marked as 1) indicates that what is being displayed in the editor is located relative to the overall source file. The second arrow (marked as 2) is pointing to the preview tool tip that appears when your mouse cursor hovers over the scroll bar.
The scroll bar's pull down feature remains. When it's used to split the main window, it allows for two independent viewing panes of the same file, and each can have their own independent vertical scroll bar. In the split view mode, both vertical scroll bars share the same options (width, bar mode versus map mode, and so on).
The following screenshot lists all of the options available for configuring the scroll bar's functionality. It can be accessed directly by right-clicking on the vertical scroll bar and selecting Scroll Bar Options…. Alternatively, it is accessible in VS2013's main Options dialog box by navigating to Tools | Options, with the scroll bar settings listed under Text Editor | All Languages | Scroll Bars. For additional customizations, you may set the language (C++, C#, and so on) settings for the scroll bar in the Options dialog box if desired:
Peek Definition
Visual Studio has had the Go To Definition (F12) option for several versions now. When we right-click on a method, or move the cursor to it, selecting the Go To Definition option will automatically bring you directly to the file with the corresponding definition. While you can easily navigate back and forth with (Ctrl + -) and (Ctrl + Shift + -), sometimes changing the open file is not what you would like to do. Enter Peek Definition (Alt + F12). This allows you to select a method and look it up, but instead of switching to the appropriate file, VS2013 will create a mini-window within your current editor. The following screenshot shows the results of using the Peek Definition option on the ConfigureAuth() method:
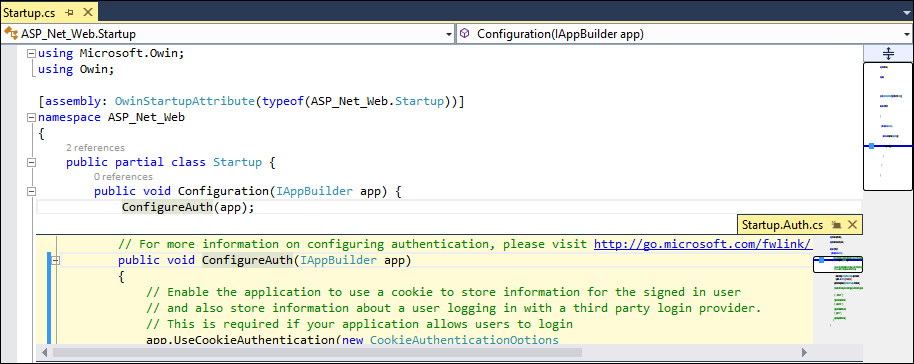
Sequential peeks can be performed, each opening via a tabbed interface. Navigation between these tabs (represented by circles) can be done via the mouse or keyboard: peek forward (Ctrl + Alt + =) and peek backward (Ctrl + Alt + -). The Peek Definition window uses the same scroll bar behavior as that of the parent editing window, and this behavior can be changed in either window by right-clicking on the scroll bar and selecting Scroll Bar Options....
CodeLens (Visual Studio Ultimate Only)
CodeLens, also known as code information indicators, is a feature specific to VS2013 Ultimate. Activated by default, CodeLens provides real-time meta-information about the file you open in your main editor window:
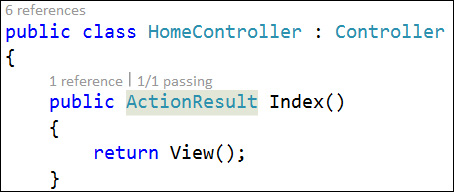
As illustrated in the preceding screenshot, shown inline with your code will be light colored term references, and the results of executed tests for each method/function as marked by the passing term. The references term indicates the number of places a method is used, and can also display a pop-up window on a mouse over that shows where it has been used. Likewise, the passing term relays the unit test results inline. While working with projects checked out from Team Foundation Server (TFS), CodeLens will also display the most recent author of the method in question. Clicking on that name will pop up a details window listing the change history.
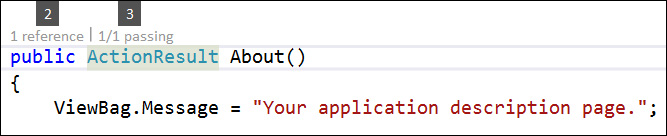
If you would prefer to keep your hands on the keyboard, holding down Alt will bring up hotkeys that can be used to select among the features discussed earlier. The following screenshot illustrates these options, with Alt + 2 opening a pop-up dialog box listing references for the selected method and Alt + 3 listing details about unit tests. The display options for CodeLens are labelled as Code Information Indicators in the Options dialog box and can be found under Text Editor | All Languages | Code Information Indicators:
Code Maps (Visual Studio Ultimate Only)
VS2013 Ultimate continues the use of a code visualization tool that Microsoft calls Code Maps to provide a representation of the open project. The following screenshot shows Code Maps in action:
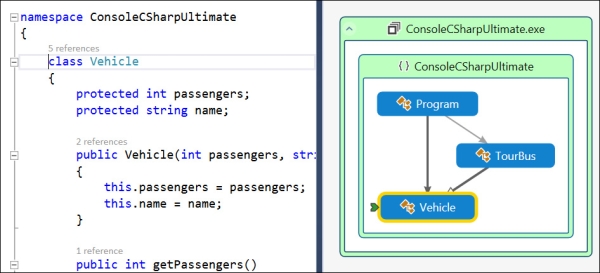
Code Maps can be created and used in VS2013 Ultimate, but VS2013 Premium and VS2013 Professional can only consume them. However, users of Premium and Professional can interact with the maps and add comments/flags as they are reviewed. Code Maps can be activated in an editor window via Ctrl + `, which is Ctrl plus the backquote key (typically found sharing a key with tilde). It can also be called by right-clicking in the editor window on a particular method or class that you want to map.
Once generated, the map may be manipulated in several ways, including zooming and the ability to expand to show related elements. Individual elements may be double-clicked so that they are brought up in the code editor for closer analysis. An element may also be right-clicked when in the Code Map for further navigation options (Go To Definition, Show Base Types, and so on) or to be commented on. This is particularly helpful for large or complex code bases where a map can assist in comprehension by visualizing the relationships and adding commentary external to the source code.
The Code Map indicates your position from the active editor window on the map with a green arrow icon. In the preceding example's screenshot, the editor is in the Vehicle class, which is pointed to on the Code Map by the green arrow.
The Choosing a version of Visual Studio 2013 section in the Preface
For an exhaustive list of differences between VS2012 and VS2013, refer to the MSDN article at http://msdn.microsoft.com/en-us/library/bb386063.aspx.