
In this section, we will go through the installation process for System Center Configuration Manager 2012 R2. So far, we have gone through the requirements, prerequisites, and MS SQL Server installation. The next step is to install System Center Configuration Manager 2012 R2 itself:
Insert the installation media and when the wizard starts, click on Install:

Then, just click on Next:

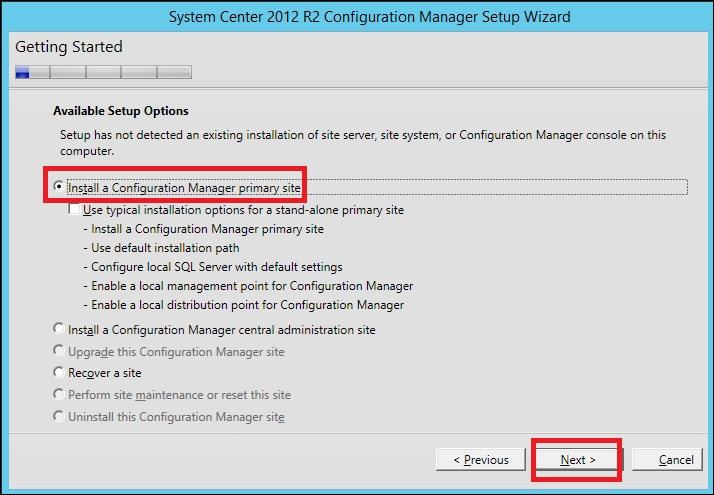
Now, you have to choose an option from the Available Setup Options window. You can select any one of the following options:
Install a Configuration Manager primary site
This is an option for small- and medium-sized organizations that run less than 100,000 clients.
Install a Configuration Manager central administration site
This is an option for large organizations that run more than 100,000 clients. You can install a central administration site and have multiple primary sites under it.
Select your option and click on Next:
Enter your license code and click on Next:

Click on I accept these license terms and then on Next:

Check all the three checkboxes and click on Next:

In this step, you can either download the required files or use the previously downloaded files. In the Prerequisites for System Center Configuration Manager 2012 R2 section, two tools have been explained, which can be used to predownload these files. If the files are predownloaded, you have to choose the path to the location of the files. Choose your option and click on Next:

In this step, you have to choose the languages you want to install. This will be the language displayed in the System Center Configuration Manager 2012 R2 console and reports:


In this step, you have to enter values for the following fields:
Site code
This is the code that uniquely identifies your site and can consist of numbers and letters.
Site name
This is the name that uniquely identifies your site.
Installation folder
This is the location of System Center Configuration Manager 2012 R2 in the filesystem. You can find more guidelines on installation folder recommendations for production environments at the following link:
http://technet.microsoft.com/en-us/library/hh846235.aspx#BKMK_ReqDiskSpace
Select Install the Configuration Manager console and click on Next:

In this step, you can choose from the following options:
In this step, you have to enter your MS SQL Server's name. If you are using MS SQL Server Cluster, enter your MS SQL Server cluster's name for SQL Server name (FQDN). Enter the instance's name and the database's name and click on Next:

In this step, you have to enter your SMS provider (FQDN). The SMS provider is used by the System Center Configuration Manager console and Resource Explorer, and it uses WMI to read and write to the site database. Enter your primary site server's name in the SMS Provider (FQDN) field and click on Next:

In this step, select Configure the communication method on each site system role and click on Next:

In this step, check the Install a management point and Install a distribution point checkboxes. These site system roles are used for content distribution and management with configuration data from clients:

Go through all the settings and click on Next:

Run a prerequisite check, and if it is completed without errors, click on Begin Install:

