
Oracle JDeveloper is Oracle's strategic development tool and the only tool with full support for all aspects of ADF development. While Oracle offers a lot of functionalities for Eclipse (with Oracle Enterprise Pack for Eclipse), they have also clearly stated that JDeveloper is the preferred tool for building Oracle ADF applications.
JDeveloper is freely available for download and use from the Oracle Technology Network (otn.oracle.com)—look under Downloads and then Developer Tools. If you don't already have a free Oracle account, you will have to create one.
The illustrations in this book use JDeveloper 12c, Version 12.1.2.0.0. If a later version of JDeveloper is out by the time you read this book, use that instead. The basics of ADF development have not changed over the last couple of years, so you should be able to immediately find the dialogs and options you are looking for. In addition, since Oracle has built a very large application based on JDeveloper, you can be sure that there will be a simple migration path moving forward.
The following steps describe how to create a workspace for an ADF enterprise application—if you want to use this chapter as a hands-on exercise, use the suggested values in each step:
Start JDeveloper.
Navigate to File | New | Application. Choose ADF Fusion Web Application. JDeveloper offers you many other types of applications, including ADF Java Desktop Application, but you want an ADF Fusion Web Application. Click on OK.
Give your application the name,
XdmPoC, choose where to put it in the filesystem (you can leave the default—just note where your projects are stored), and provide an Application Package Prefix. Use your organization Java prefix followed by your project abbreviation (for the Proof of Concept, usecom.dmcsol.xdmpoc).Tip
Java package prefix
Traditionally, package names start with your organization's Internet domain with the elements reversed. So, if your company domain is
mycompany.com, your package names would all start withcom.mycompany. However, some organizations (such as Oracle) feel that their names are sufficiently unique, and they don't need to include the firstcom.If your organization has ever used Java earlier, your Java package prefix has probably already been chosen and documented somewhere. Ask around.
You can simply click on Next through the rest of the wizard.
This will create a new application containing the two projects, Model and ViewController. In the main window, JDeveloper will show you the application checklist, as shown in the following screenshot:

The application checklist actually gives a great overview of the steps involved in building an ADF application, and if you click on the little triangles to expand each step, you'll see links to the relevant JDeveloper functionality for that step, together with links to the relevant places in the documentation. It even has checkboxes that you can check as you complete the different phases in developing your ADF application.
JDeveloper contains a lot of different windows and panels for different purposes. The preceding screenshot shows the most commonly used panels, but you can toggle each of the many panels on and off using the Window menu.
If you have not worked with JDeveloper earlier, please take a moment to familiarize yourself with the typical panels shown in the preceding screenshot:
In the middle is the main window where you will be configuring business components, designing pages, and writing code.
Below the main window is the Log window showing system messages, compiled results, deployment messages, and many other types of information.
In the top-left corner is the Applications window where you can see all of the components in your workspace in a hierarchical structure.
In the bottom-left corner is the Structure window. This important window shows the detailed structure of the component you are working on. For example, when you are working on a page in the main window, the Structure window will show a tree with all of the components on the page.
In the top-right corner is the Resources window showing connections to the application servers, databases, and so on. The Components window will also appear as a separate tab in this location when editing a page, allowing you to select components to add to the page.
In the bottom-right corner is the Properties window where you can inspect and set properties on the currently selected item.
You can rearrange these panels to your liking by grabbing the tab at the top of each panel and dragging it to a new location, or even dragging it out of JDeveloper to make it a floating window. This can be useful if you have multiple monitors. If you accidentally change the layout to something you don't like, you can always navigate to Window | Reset Windows To Factory Settings.
Before you start working with JDeveloper, you should set the preferences (under Tools | Preferences). There are literally hundreds of preferences to set, most of which will not mean anything to you yet. The defaults are mostly fine, but feel free to change the settings. The Help section explains the various options well.
One setting that you should change is the business package naming. Open the ADF Business Components node and choose Packages. Set values for Entity, Association, View Object, View Link, and Application Module, as shown in the following screenshot:
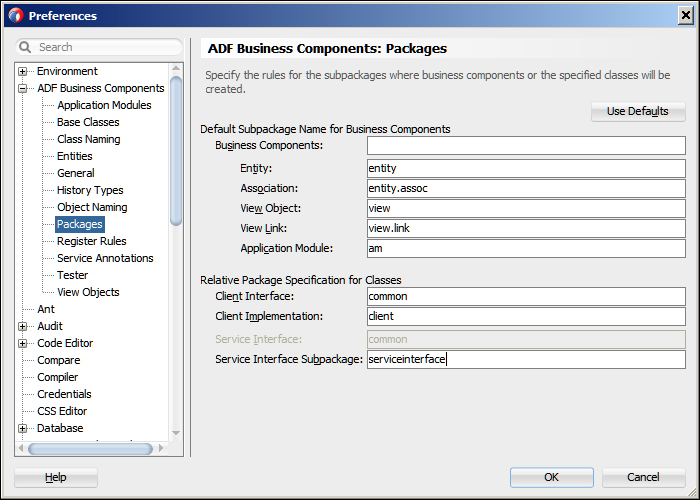
These settings tell JDeveloper to place different types of business components in separate Java subpackages for an easier overview when you have many components. These are just defaults to create a good starting point. As you build your application, you might decide to move your business components and classes to other packages, and JDeveloper makes this safe and easy.
You should also set Encoding on the Environment node to UTF-8 to have all of your files created in UTF-8 for maximum cross-platform portability. (If you're using Microsoft Windows, this value is probably set to a default Windows character encoding.)