

In most cases, it is enough to use a STUN server to establish a peer-to-peer direct connection. Nevertheless, you will often need to utilize TURN servers—mostly for clients located in big companies (because of firewall policy and tricky NAT) and some specific countries (because of firewalls and access limits).
In this section, we will download, install, and do the basic configuration of a TURN service. Then, we will utilize it in our WebRTC application. A TURN server can be installed under different platforms, although we will cover a Linux box use case only. Thus, for this recipe, you will need a Linux box installed.
For this recipe, we will use rfc5766-turn-server—a free and open source implementation of the TURN and STUN servers. Download its source code from its home page at https://code.google.com/p/rfc5766-turn-server/.
First, we will shortly cover the installation and basic configuration of the TURN server. After that, we will learn how to use it in the application.
If you have TURN server already installed, you can skip this section and go directly to the next one.
I assume that you have downloaded rfc5766-server already and unpacked it. So, let's install and configure your own TURN server:
Go to the
rfc5766-serverfolder with the following command:cd ~/turnserver-4.1.2.1Build the server:
./configure
make
sudo make install
After that, you can start the server—it will detect all the network options automatically:
turnserverYou will see diagnostic messages in the console:
0: ===========Discovering relay addresses: =============
0: Relay address to use: x.x.x.x
0: Relay address to use: y.y.y.y
0: Relay address to use: ::1
0: =====================================================
0: Total: 3 relay addresses discovered
0
0: =====================================================
Now it is time to perform some configuration steps and tune your fresh TURN server for your requirements.
By default, the TURN server doesn't have any configuration file. We need to create this configuration file from the default configuration file supplied with the server:
sudo cp /usr/local/etc/turnserver.conf.default /usr/local/etc/turnserver.conf
Open the turnserver.conf file and edit it according to your requirements. We will not cover all the TURN options here, but just basic configuration items that might be important:
Listening IP: This option determines the IP addresses that will be used by the TURN server while operating. By default, this option will do it automatically. Nevertheless, it is a good idea to set the obvious IP addresses you would like the server to use:
listening-ip=Relay IP: In this option, you can explicitly set up IP address that should be used for relay. In other words, if you have two IP addresses, one of them can be
listening-ipand the second onerelay-ip.relay-ip=Verbosity: In this option, you can set a level of verbosity. By default, the TURN server will not print extra details on its work, but for debugging and diagnostic purposes, it might be very useful to set the verbose level to normal. For that, you should place the word
verbosein the configuration file. If you would like to refer to more details, you should write the word with capital V—Verbose—so the server will print as much debugging details as possible.Anonymous access: You can enable anonymous access during the development process, if you're sure that your TURN server is protected by network firewall and nobody can use it. Otherwise, you should not enable this option especially on production systems:
no-auth
Note
In this recipe, we haven't covered TURN authentication—this topic is covered in Chapter 2, Supporting Security.
At this stage, you have your own TURN server with basic configuration, which can be used in WebRTC applications.
When you create a peer connection object, you usually use some construction like the following one:
var pc;
pc = new RTCPeerConnection(configuration);
Here, configuration is an entity that contains different options to create a peer connection object. To utilize your TURN server, you should use something like the following:
var configuration = {
  'iceServers': [
    {
      'url': 'stun:stun.l.google.com:19302'
    },
    {
      'url': 'turn:turn1.myserver.com:3478?transport=udp',
    },
    {
      'url': 'turn:turn2.myserver.com:3478?transport=tcp',
      'credential': 'superuser',
      'username': 'secretpassword'
    }
  ]
}
Here, we will ask the WebRTC API (actually, we will ask the web browser) to use one of three ways when establishing a peer connection:
Public STUN server provided by Google.
TURN server with anonymous access. You will use this notation to utilize the TURN server installed and configured in this recipe.
TURN server with authentication. In Chapter 2, Supporting Security, we will cover the topic of security and authentication within the scope of a TURN server. To utilize a server that uses authentication, you should use this notation.
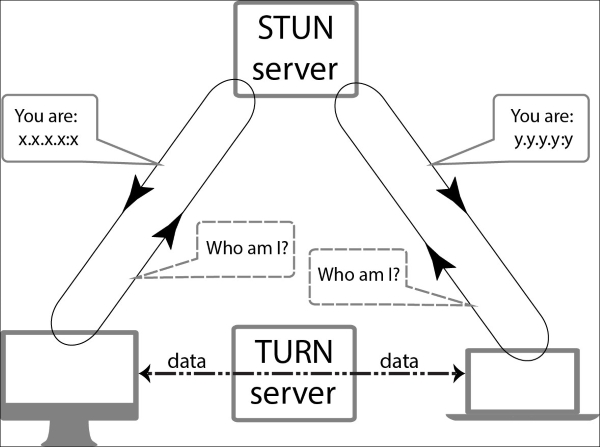
In some cases, when clients use NAT and firewalls, it is impossible to establish a peer connection using STUN. This situation often appears when a client is located in a corporative network with a strict policy. In such a case, the only way to establish the connection is to use the TURN server.
The TURN server works as a proxy—all the data between peers (including audio, video, and service data) goes through the TURN server.
The following diagram shows how all the components operate with each other:
In this recipe, we covered only one TURN solution, open source and popular, but there are other solutions in the world that could also be suitable for you:
TurnServer: This is also free and open source. For more information, refer to http://turnserver.sourceforge.net.
Numb: This is not software that you can download and install, but a service where you can create an account and get access to a configured TURN server. For more details, refer to http://numb.viagenie.ca.
Of course, there are even more different solutions and services available.
For details on TURN servers, refer to RFC 5766 at http://tools.ietf.org/html/rfc5766
For details regarding STUN (another useful technology with the scope of developing WebRTC-based services), you can also take a look at the Configuring and using STUN recipe