
In this section, we will quickly install and configure both ArcGIS for Desktop and ArcGIS for Server on your new machine so that we can carry on with the exercise. You will need the ArcGIS for Desktop and ArcGIS for Server media CD-ROM. We will start by installing ArcGIS for Desktop, which uses the default installation configurations, and then we will install and configure ArcGIS for Server.
Before we start, we need to install Microsoft .NET Framework 3.5 SP1, which can be found in the installation media. Follow these steps to start the installation:
Log in to the machine as the administrator user or any user who has administrative privileges on this machine. I will be using the
Administratoruser.Install Microsoft .NET Framework 3.5 SP1 and wait for the installation to finish. If you are using Windows Server, the framework can be installed from Server Manager by adding the Application Server role (see the following screenshot for more details). If the application server role is already installed, it will be marked as (Installed), as shown in the following screenshot:

After you install the framework, go ahead and run the ArcGIS for Desktop installation file. Make sure you don't have any previous ArcGIS installations on this machine. You can read the following online guide to install ArcGIS for Desktop:
http://resources.esri.com/help/9.3/arcgisdesktop/installGuides/ArcGIS_Desktop/whnjs.htm
After the installation is complete, authorize the product by providing it with the proper license. You can get a 60-day trial version from the product website (www.esri.com).
ArcGIS for Desktop installs two main applications, ArcMap and ArcCatalog both of which we will be using in this book. ArcMap will be the software, which views and authors the map, and ArcCatalog will be used to manage the GIS database.
Now we need to install and configure ArcGIS for Server. We need to work with Version 10.1 and above since prior to that, ArcGIS for Server had a different architecture. Follow these steps to install ArcGIS for Server:
Log in to the machine as the administrator user or any user who has administrative privilege on this machine. I will be using the
Administratoruser.Run the installation file for ArcGIS for Server and choose ArcGIS for Server.
Accept and approve the license agreement and click on Next.
In the Select Features dialog box, make sure all features are selected to be installed and click on Next.
Keep the default path for Python and click on Next.
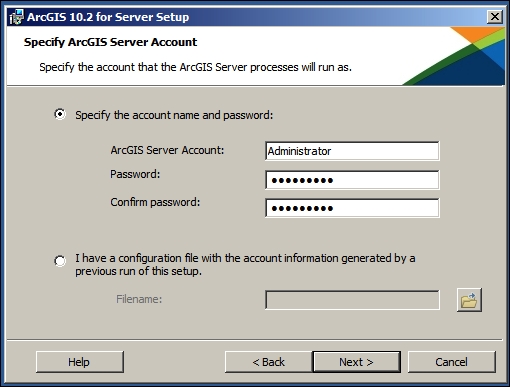
In the Specify ArcGIS Server account, type in the Windows username and password you have used. Remember, it should have administrator privileges. In my case, it is the Administrator user. Click on Next to continue, as shown in the following screenshot:
Choose to not export the configuration file and click on Next.
Click on Install to start the installation process.
When the installation is complete, the installer will ask you to authorize your ArcGIS for Server. Use the license provided by your Esri distributor and click on Finish.
A browser with a new website will be opened. This will ask you to create a new server site or join an existing one. Choose to Create New Site and click on Next.
In the Primary Site Administrator account page, type
siteadminin the Username section, enter a password, and click on Next. This is the account we will use to publish the Bestaurant service to ArcGIS for Server. Make sure to remember these credentials.Keep the default configuration directories and click on Next.
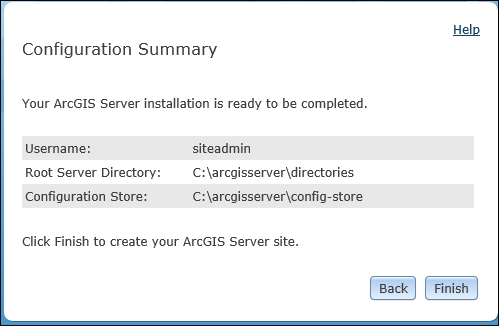
In the Configuration Summary, click on Finish. You should see a similar summary page as shown in the following screenshot:
Close the browser and restart your machine.
You just finished installing ArcGIS for Desktop and Server. Next we will look at to publishing the service.
Note
Note that this is a very basic installation manual and should not be followed for production environment. For advanced configurations and production setup, read my other book Administering ArcGIS for Server, published by Packt Publishing. You can also read more about this in the Esri online documentation (http://resources.esri.com/).