
In this chapter, we will cover the following recipes:
- Installing the Tizen SDK
- Installing the Tizen SDK on Windows
- Installing the Tizen SDK on Mac OS
- Installing the Tizen SDK on Ubuntu
- Managing extension packages
- Customizing the Tizen IDE
- Setting the Active Secure profile
- Tizen Web Simulator
- Tizen Emulator
- Getting started with Smart Development Bridge
- Using Smart Development Bridge
This chapter offers an introduction to the tools required for the development of Tizen applications. Detailed descriptions of the steps required for the installation of the SDK on three supported operating systems (GNU/Linux, Windows, and Mac OS) are provided. Furthermore, this chapter contains an overview of the development environment, the Web Simulator, the device Emulator, and the user manual for Smart Development Bridge (SDB).
The first step of starting Tizen application development is to download the Tizen SDK and install it. The installation is similar on all supported operating systems. This recipe explains the basics of the installation process of Tizen SDK 2.2.1. Details and notes of each of the supported operating systems are discussed in the subsequent recipes of this chapter.
The SDK contains all the tools required for the development of both native and web Tizen applications. It consists of an IDE based on Eclipse, Emulator, Simulator for web applications, a tool chain, several sample applications, and full documentation. The Tizen SDK is compatible with the following platforms:
The minimum hardware requirements of the development systems are as follows:
Note
The Tizen SDK can be downloaded for free from the Tizen Project website at https://developer.tizen.org/downloads/tizen-sdk.
More details about the hardware requirements for the Tizen SDK are available at https://developer.tizen.org/downloads/sdk/installing-sdk/prerequisites-tizen-sdk.
Although officially Ubuntu is the only supported Linux distribution, some people have managed to make it work on other distributions such as Fedora and Arch Linux.
For network installation, please perform the following steps:
- Begin by downloading the Tizen SDK Install Manager.
- Launch the downloaded file and then click on Next on the first screen, as shown in the following screenshot:
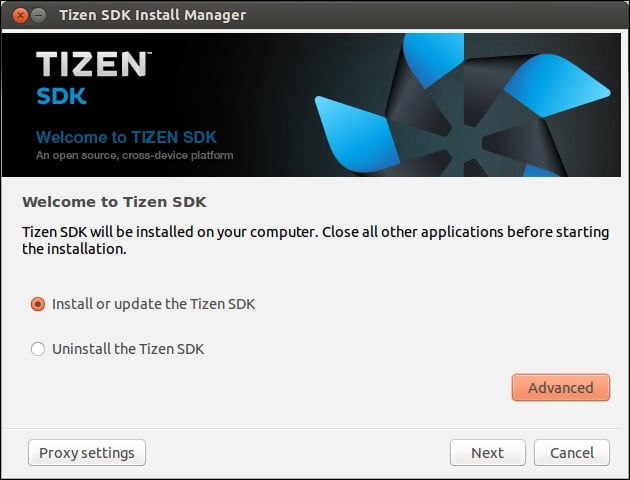
The Tizen SDK Install Manager screen
- On the second screen, accept the terms and conditions and again click on Next.
- Select the components you want to install and click on Next. Finally, specify the directory where the SDK will be installed and click on the Install button.
If you prefer offline installation, then please follow these steps:
- Download the SDK Install Manager.
- When the download finishes, launch the downloaded file.
- Select Advanced.
- Go to the Advanced Configuration window. Click on the corresponding radio button for SDK Image.
- Browse to the SDK image file, click on OK, and after that, click on Next.
- On the next screen, the terms and conditions will be displayed. Click on Next after accepting them.
- Select the components you want to install and click on Next.
- Finally, choose the directory where the SDK will be stored and hit the Install button.
compatible with the following platforms:
The minimum hardware requirements of the development systems are as follows:
Note
The Tizen SDK can be downloaded for free from the Tizen Project website at https://developer.tizen.org/downloads/tizen-sdk.
More details about the hardware requirements for the Tizen SDK are available at https://developer.tizen.org/downloads/sdk/installing-sdk/prerequisites-tizen-sdk.
Although officially Ubuntu is the only supported Linux distribution, some people have managed to make it work on other distributions such as Fedora and Arch Linux.
For network installation, please perform the following steps:
- Begin by downloading the Tizen SDK Install Manager.
- Launch the downloaded file and then click on Next on the first screen, as shown in the following screenshot:
The Tizen SDK Install Manager screen
- On the second screen, accept the terms and conditions and again click on Next.
- Select the components you want to install and click on Next. Finally, specify the directory where the SDK will be installed and click on the Install button.
If you prefer offline installation, then please follow these steps:
- Download the SDK Install Manager.
- When the download finishes, launch the downloaded file.
- Select Advanced.
- Go to the Advanced Configuration window. Click on the corresponding radio button for SDK Image.
- Browse to the SDK image file, click on OK, and after that, click on Next.
- On the next screen, the terms and conditions will be displayed. Click on Next after accepting them.
- Select the components you want to install and click on Next.
- Finally, choose the directory where the SDK will be stored and hit the Install button.
network installation, please perform the following steps:
- Begin by downloading the Tizen SDK Install Manager.
- Launch the downloaded file and then click on Next on the first screen, as shown in the following screenshot:
The Tizen SDK Install Manager screen
- On the second screen, accept the terms and conditions and again click on Next.
- Select the components you want to install and click on Next. Finally, specify the directory where the SDK will be installed and click on the Install button.
If you prefer offline installation, then please follow these steps:
- Download the SDK Install Manager.
- When the download finishes, launch the downloaded file.
- Select Advanced.
- Go to the Advanced Configuration window. Click on the corresponding radio button for SDK Image.
- Browse to the SDK image file, click on OK, and after that, click on Next.
- On the next screen, the terms and conditions will be displayed. Click on Next after accepting them.
- Select the components you want to install and click on Next.
- Finally, choose the directory where the SDK will be stored and hit the Install button.
Tizen applications can be developed on Microsoft Windows even though Tizen is a Linux-based operating system. This recipe will reveal details of the installation process of the SDK on Windows.
One of the reasons a lot of mobile application developers use Mac OS is that it is required for the development of iOS applications. Unlike iOS, the development tools for Tizen do not have such limitations, and they can be installed on Mac OS as well as other popular desktop operating systems.
If you plan to develop native Tizen applications on Mac OS X, install command-line tools following the Apple guidelines for the version of Mac OS X that you are using (https://developer.apple.com/library/ios/technotes/tn2339/_index.html).
On Mac OS X 10.7.5 (also known as Mac OS X Lion) or later, the Install Manager might fail due to the security settings of the operating system. These settings have to be modified to temporarily prevent the Mac OS X Gatekeeper from blocking the Install Manager and to allow you to proceed with the Tizen SDK installation. Please perform the following steps to configure Gatekeeper on Mac OS X and to solve the issue:
- Click on the Apple Menu button in the upper-left corner of the main screen of the Mac OS X interface.
- Select System Preferences.
- Click on Security & Privacy.
- Select the General tab.
- To configure the settings, click on the locker icon in the lower-right corner, enter the administrative user's password, and click on Unlock.
- Set Allow apps download from to Anywhere and confirm the change.
- Launch the Tizen Install Manager again and complete the installation.
dmg extension.
If you plan to develop native Tizen applications on Mac OS X, install command-line tools following the Apple guidelines for the version of Mac OS X that you are using (https://developer.apple.com/library/ios/technotes/tn2339/_index.html).
On Mac OS X 10.7.5 (also known as Mac OS X Lion) or later, the Install Manager might fail due to the security settings of the operating system. These settings have to be modified to temporarily prevent the Mac OS X Gatekeeper from blocking the Install Manager and to allow you to proceed with the Tizen SDK installation. Please perform the following steps to configure Gatekeeper on Mac OS X and to solve the issue:
- Click on the Apple Menu button in the upper-left corner of the main screen of the Mac OS X interface.
- Select System Preferences.
- Click on Security & Privacy.
- Select the General tab.
- To configure the settings, click on the locker icon in the lower-right corner, enter the administrative user's password, and click on Unlock.
- Set Allow apps download from to Anywhere and confirm the change.
- Launch the Tizen Install Manager again and complete the installation.
.dmg file and launch it by following the provided instructions in the recipe Installing the Tizen SDK.
version of Mac OS X that you are using (https://developer.apple.com/library/ios/technotes/tn2339/_index.html).
On Mac OS X 10.7.5 (also known as Mac OS X Lion) or later, the Install Manager might fail due to the security settings of the operating system. These settings have to be modified to temporarily prevent the Mac OS X Gatekeeper from blocking the Install Manager and to allow you to proceed with the Tizen SDK installation. Please perform the following steps to configure Gatekeeper on Mac OS X and to solve the issue:
- Click on the Apple Menu button in the upper-left corner of the main screen of the Mac OS X interface.
- Select System Preferences.
- Click on Security & Privacy.
- Select the General tab.
- To configure the settings, click on the locker icon in the lower-right corner, enter the administrative user's password, and click on Unlock.
- Set Allow apps download from to Anywhere and confirm the change.
- Launch the Tizen Install Manager again and complete the installation.
Ubuntu is the only Linux distribution that is recommended and fully supported by the Tizen SDK. Additional software has to be installed prior to launching the Tizen SDK Install Manager on Ubuntu.
The full installation process can be divided into four milestones:
Visit tizen.org to get the Tizen SDK or just execute the following commands to download Tizen SDK 2.2.1 using your web browser or command-line tool such as wget. For example, if you have a 32-bit version of Ubuntu, then you can run the following command in the terminal:
wget https://cdn.download.tizen.org/sdk/InstallManager/tizen-sdk-2.2.1/tizen-sdk-ubuntu32-v2.2.71.bin
The URL of the installation file for the 64-bit version is slightly different, so it can be downloaded by executing the following command:
wget https://cdn.download.tizen.org/sdk/InstallManager/tizen-sdk-2.2.1/tizen-sdk-ubuntu64-v2.2.71.bin
Oracle JRE must be installed before launching the Tizen SDK.Please note that OpenJDK is not supported. Please follow these steps if you do not have Oracle JRE installed:
- Visit the Oracle website and, depending on the version of Ubuntu that you are using, download the 32-bit or 64-bit JRE 7 for Linux as a
tararchive available at http://www.oracle.com/technetwork/java/javase/downloads/jre7-downloads-1880261.html. - Decompress all files from the downloaded
archive.tar -xzf jre-*.tar.gzfile. - Create a directory for the JRE files. After that, move the extracted files into the directory by executing the following command:
sudo mkdir -p /usr/lib/jvm/jre1.7.0sudo mv jre1.7.0_45/* /usr/lib/jvm/jre1.7.0/. - If Java is not present, please install it. Otherwise, it is recommended that you update it by using the following command:
sudo update-alternatives --install /usr/bin/java java /usr/lib/jvm/jre1.7.0/bin/java 0
Ensure that the following packages are installed:
Users of Ubuntu 12.10 or any older version should install the package gksudo as well by executing the following command:
If you are unsure which install type is appropriate for your needs, it is recommended that you select Typical.
In this section, you will learn how to troubleshoot your GNU/Linux installation of Tizen.
- Unable to launch the Tizen IDE due to missing or incompatible version of JRE (SDK runs on Eclipse, which requires JRE, JRE 6, or a newer package is required).
If you encounter such a problem, please make sure that an appropriate JRE version has been installed on the development system before launching the installer of the Tizen SDK.
- Unable to run the installation due to missing packages (Missing "expect" "gtk2-engines-pixbuf" "libgnome2-0" "qemu-user-static" "libwebkitgtk-1.0-0" package(s)).
If you encounter such a problem, please install the missing packages using the shell command
apt-get. - Problem with installing Oracle Java on an Ubuntu machine.
If you encounter such a problem, install
java-package. Then, convert the downloaded Oracle JDK/JRE archive into a.debfile. - Exception when Eclipse is launched (Exception in thread "main" org.eclipse.swt.SWTError: No more handles [Unknown Mozilla path (MOZILLA_FIVE_HOME not set)] error pops up).
If you encounter such a problem, please install the
libwebkitgtk-1.0-0package usingapt-get. - The Tizen IDE does not display the Event Injector.
If you encounter such a problem, make sure that the Ajax Tool Framework plugin for Eclipse is installed.
- Vertical scroll bars are not shown properly.
To disable the overlay scrollbar in the latest versions of Ubuntu, execute the following command:
>gsettings set com.canonical.desktop.interface scrollbar-mode normal - SDB not working on Ubuntu 13.10 64-bit (sdb: error while loading shared libraries: libudev.so.0: cannot open shared object file: No such file or directory).
If you encounter such a problem, apply the following workaround for Ubuntu 13.10 64-bit at your own risk to temporarily solve the issue until an update of the SDK is available:
- Please refer to the Getting started with Smart Development Bridge recipe about SDB if you are interested in registering SDB as a global command.
- For up-to-date information, please refer to the Tizen wiki article Install Tizen SDK on Ubuntu, which has been maintained by the author of this book since March 26, 2013 at https://wiki.tizen.org/wiki/Install_Tizen_SDK_on_Ubuntu.
libudev.so.1 should be applied to run SDB. Please check the troubleshooting section of the recipe for more information about fixing SDB on Ubuntu 13.10.
The full installation process can be divided into four milestones:
Visit tizen.org to get the Tizen SDK or just execute the following commands to download Tizen SDK 2.2.1 using your web browser or command-line tool such as wget. For example, if you have a 32-bit version of Ubuntu, then you can run the following command in the terminal:
wget https://cdn.download.tizen.org/sdk/InstallManager/tizen-sdk-2.2.1/tizen-sdk-ubuntu32-v2.2.71.bin
The URL of the installation file for the 64-bit version is slightly different, so it can be downloaded by executing the following command:
wget https://cdn.download.tizen.org/sdk/InstallManager/tizen-sdk-2.2.1/tizen-sdk-ubuntu64-v2.2.71.bin
Oracle JRE must be installed before launching the Tizen SDK.Please note that OpenJDK is not supported. Please follow these steps if you do not have Oracle JRE installed:
- Visit the Oracle website and, depending on the version of Ubuntu that you are using, download the 32-bit or 64-bit JRE 7 for Linux as a
tararchive available at http://www.oracle.com/technetwork/java/javase/downloads/jre7-downloads-1880261.html. - Decompress all files from the downloaded
archive.tar -xzf jre-*.tar.gzfile. - Create a directory for the JRE files. After that, move the extracted files into the directory by executing the following command:
sudo mkdir -p /usr/lib/jvm/jre1.7.0sudo mv jre1.7.0_45/* /usr/lib/jvm/jre1.7.0/. - If Java is not present, please install it. Otherwise, it is recommended that you update it by using the following command:
sudo update-alternatives --install /usr/bin/java java /usr/lib/jvm/jre1.7.0/bin/java 0
Ensure that the following packages are installed:
Users of Ubuntu 12.10 or any older version should install the package gksudo as well by executing the following command:
If you are unsure which install type is appropriate for your needs, it is recommended that you select Typical.
In this section, you will learn how to troubleshoot your GNU/Linux installation of Tizen.
- Unable to launch the Tizen IDE due to missing or incompatible version of JRE (SDK runs on Eclipse, which requires JRE, JRE 6, or a newer package is required).
If you encounter such a problem, please make sure that an appropriate JRE version has been installed on the development system before launching the installer of the Tizen SDK.
- Unable to run the installation due to missing packages (Missing "expect" "gtk2-engines-pixbuf" "libgnome2-0" "qemu-user-static" "libwebkitgtk-1.0-0" package(s)).
If you encounter such a problem, please install the missing packages using the shell command
apt-get. - Problem with installing Oracle Java on an Ubuntu machine.
If you encounter such a problem, install
java-package. Then, convert the downloaded Oracle JDK/JRE archive into a.debfile. - Exception when Eclipse is launched (Exception in thread "main" org.eclipse.swt.SWTError: No more handles [Unknown Mozilla path (MOZILLA_FIVE_HOME not set)] error pops up).
If you encounter such a problem, please install the
libwebkitgtk-1.0-0package usingapt-get. - The Tizen IDE does not display the Event Injector.
If you encounter such a problem, make sure that the Ajax Tool Framework plugin for Eclipse is installed.
- Vertical scroll bars are not shown properly.
To disable the overlay scrollbar in the latest versions of Ubuntu, execute the following command:
>gsettings set com.canonical.desktop.interface scrollbar-mode normal - SDB not working on Ubuntu 13.10 64-bit (sdb: error while loading shared libraries: libudev.so.0: cannot open shared object file: No such file or directory).
If you encounter such a problem, apply the following workaround for Ubuntu 13.10 64-bit at your own risk to temporarily solve the issue until an update of the SDK is available:
- Please refer to the Getting started with Smart Development Bridge recipe about SDB if you are interested in registering SDB as a global command.
- For up-to-date information, please refer to the Tizen wiki article Install Tizen SDK on Ubuntu, which has been maintained by the author of this book since March 26, 2013 at https://wiki.tizen.org/wiki/Install_Tizen_SDK_on_Ubuntu.
tizen.org to get the Tizen SDK or just execute the following commands to download Tizen SDK 2.2.1 using your web browser or command-line tool such as wget. For example, if you have a 32-bit version of Ubuntu, then you can run the following command in the terminal:
wget https://cdn.download.tizen.org/sdk/InstallManager/tizen-sdk-2.2.1/tizen-sdk-ubuntu32-v2.2.71.bin
The URL of the installation file for the 64-bit version is slightly different, so it can be downloaded by executing the following command:
wget https://cdn.download.tizen.org/sdk/InstallManager/tizen-sdk-2.2.1/tizen-sdk-ubuntu64-v2.2.71.bin
Oracle JRE must be installed before launching the Tizen SDK.Please note that OpenJDK is not supported. Please follow these steps if you do not have Oracle JRE installed:
- Visit the Oracle website and, depending on the version of Ubuntu that you are using, download the 32-bit or 64-bit JRE 7 for Linux as a
tararchive available at http://www.oracle.com/technetwork/java/javase/downloads/jre7-downloads-1880261.html. - Decompress all files from the downloaded
archive.tar -xzf jre-*.tar.gzfile. - Create a directory for the JRE files. After that, move the extracted files into the directory by executing the following command:
sudo mkdir -p /usr/lib/jvm/jre1.7.0sudo mv jre1.7.0_45/* /usr/lib/jvm/jre1.7.0/. - If Java is not present, please install it. Otherwise, it is recommended that you update it by using the following command:
sudo update-alternatives --install /usr/bin/java java /usr/lib/jvm/jre1.7.0/bin/java 0
Ensure that the following packages are installed:
Users of Ubuntu 12.10 or any older version should install the package gksudo as well by executing the following command:
If you are unsure which install type is appropriate for your needs, it is recommended that you select Typical.
In this section, you will learn how to troubleshoot your GNU/Linux installation of Tizen.
- Unable to launch the Tizen IDE due to missing or incompatible version of JRE (SDK runs on Eclipse, which requires JRE, JRE 6, or a newer package is required).
If you encounter such a problem, please make sure that an appropriate JRE version has been installed on the development system before launching the installer of the Tizen SDK.
- Unable to run the installation due to missing packages (Missing "expect" "gtk2-engines-pixbuf" "libgnome2-0" "qemu-user-static" "libwebkitgtk-1.0-0" package(s)).
If you encounter such a problem, please install the missing packages using the shell command
apt-get. - Problem with installing Oracle Java on an Ubuntu machine.
If you encounter such a problem, install
java-package. Then, convert the downloaded Oracle JDK/JRE archive into a.debfile. - Exception when Eclipse is launched (Exception in thread "main" org.eclipse.swt.SWTError: No more handles [Unknown Mozilla path (MOZILLA_FIVE_HOME not set)] error pops up).
If you encounter such a problem, please install the
libwebkitgtk-1.0-0package usingapt-get. - The Tizen IDE does not display the Event Injector.
If you encounter such a problem, make sure that the Ajax Tool Framework plugin for Eclipse is installed.
- Vertical scroll bars are not shown properly.
To disable the overlay scrollbar in the latest versions of Ubuntu, execute the following command:
>gsettings set com.canonical.desktop.interface scrollbar-mode normal - SDB not working on Ubuntu 13.10 64-bit (sdb: error while loading shared libraries: libudev.so.0: cannot open shared object file: No such file or directory).
If you encounter such a problem, apply the following workaround for Ubuntu 13.10 64-bit at your own risk to temporarily solve the issue until an update of the SDK is available:
- Please refer to the Getting started with Smart Development Bridge recipe about SDB if you are interested in registering SDB as a global command.
- For up-to-date information, please refer to the Tizen wiki article Install Tizen SDK on Ubuntu, which has been maintained by the author of this book since March 26, 2013 at https://wiki.tizen.org/wiki/Install_Tizen_SDK_on_Ubuntu.
your GNU/Linux installation of Tizen.
- Unable to launch the Tizen IDE due to missing or incompatible version of JRE (SDK runs on Eclipse, which requires JRE, JRE 6, or a newer package is required).
If you encounter such a problem, please make sure that an appropriate JRE version has been installed on the development system before launching the installer of the Tizen SDK.
- Unable to run the installation due to missing packages (Missing "expect" "gtk2-engines-pixbuf" "libgnome2-0" "qemu-user-static" "libwebkitgtk-1.0-0" package(s)).
If you encounter such a problem, please install the missing packages using the shell command
apt-get. - Problem with installing Oracle Java on an Ubuntu machine.
If you encounter such a problem, install
java-package. Then, convert the downloaded Oracle JDK/JRE archive into a.debfile. - Exception when Eclipse is launched (Exception in thread "main" org.eclipse.swt.SWTError: No more handles [Unknown Mozilla path (MOZILLA_FIVE_HOME not set)] error pops up).
If you encounter such a problem, please install the
libwebkitgtk-1.0-0package usingapt-get. - The Tizen IDE does not display the Event Injector.
If you encounter such a problem, make sure that the Ajax Tool Framework plugin for Eclipse is installed.
- Vertical scroll bars are not shown properly.
To disable the overlay scrollbar in the latest versions of Ubuntu, execute the following command:
>gsettings set com.canonical.desktop.interface scrollbar-mode normal - SDB not working on Ubuntu 13.10 64-bit (sdb: error while loading shared libraries: libudev.so.0: cannot open shared object file: No such file or directory).
If you encounter such a problem, apply the following workaround for Ubuntu 13.10 64-bit at your own risk to temporarily solve the issue until an update of the SDK is available:
- Please refer to the Getting started with Smart Development Bridge recipe about SDB if you are interested in registering SDB as a global command.
- For up-to-date information, please refer to the Tizen wiki article Install Tizen SDK on Ubuntu, which has been maintained by the author of this book since March 26, 2013 at https://wiki.tizen.org/wiki/Install_Tizen_SDK_on_Ubuntu.
Tizen is an open source software platform and it is very flexible. Third-party individual developers or companies can develop extension packages for the Tizen SDK. Other developers can use and abuse third-party packages in their applications using specific repositories. Some extensions for the Tizen SDK are available at https://developer.tizen.org/downloads/add-on-sdks.
Please perform the following steps to add extra repositories and install additional packages:
- Launch the Tizen SDK Install Manager.
- Click on Next to proceed.
- Select Extra Repository to open a dialog.
- Click on Add.
- Set an external server as well as the name of a repository and click on OK. The repository information will be displayed in the previous window. Click on OK again.
- Select the required packages and click on Install.
Perform the following actions to remove an extra repository and all packages installed from it:
Each repository contains additional packages that are optional and can be added or deleted by the developer at any time. A repository is specified by a URL, so it is mandatory to have a network connection to the repository's server to download any of its packages. If you are experiencing issues connecting to a repository using HTTP Secure (HTTPS), you can try using the same URL with HTTP.
Each repository contains additional packages that are optional and can be added or deleted by the developer at any time. A repository is specified by a URL, so it is mandatory to have a network connection to the repository's server to download any of its packages. If you are experiencing issues connecting to a repository using HTTP Secure (HTTPS), you can try using the same URL with HTTP.
The default and recommended IDE that is included in the Tizen SDK is based on Eclipse. Eclipse is an open source software, and through the years it has become a de facto standard for the development of applications for mobile platforms. Developers with experience in Android, Bada, Symbian, and BlackBerry 10 are already familiar with Eclipse as it, or IDEs based on it, is used for application development for these platforms.
Note
Android developers should note that there is a difference in the way Eclipse is provided for Tizen compared to Android. Android Development Tools (ADT) is a plugin for Eclipse that can be downloaded and installed. Unlike ADT, the Tizen IDE is provided in the Tizen SDK bundle, and at the moment, a separate plugin is not available.
A welcome screen will be displayed on the first start screen of the Tizen IDE. Click on Workbench to open the Tizen Web perspective and start developing applications. If you want to have a look at the documentation, select any of the other three options. You can get back to the home screen at any time by navigating to Help | Welcome. If you are searching for Tizen's official development documentation, just navigate to Help | Help Contents.
Execute the following actions to change the background color of the text editor:
Perform the following steps if you want to change the fonts:
These are the most popular and important views in the Tizen IDE:
- Project Explorer View: This view shows all resources in the current workspace. From the Project Explorer View, you can manage projects, open and edit files, and execute operations such as building packaging and signing and validating widgets or applications. Right-click inside this view to open a context menu with all options. If the Project Explorer View is missing from the current perspective of the Tizen IDE, you can add it by selecting Window | Show View | Other... | General | Project Explorer.
- Properties View: This view shows the name and the basic properties of a selected resource. To view more details about a resource, right-click on it and select Properties. To add it to the current perspective of the Tizen IDE, navigate to Window | Show View | Other… | General | Properties.
- Log View: This is a vital tool to track bugs and investigate the behavior of applications running on the Tizen Emulator or a device connected to the development system. Log messages are displayed within Log View while an application is running. The following message types are supported:
verbose,debug,info,warning,error, andfatal. The log output can be configured to filter only specific message types using the V, D, Z, I, W, E, and F software buttons. Next to them are situated the buttons for additional tabs for logging with more filtering options that can be added, edited, and removed. An option to export logs is also available. If Log View is not visible, enable it by activating the following option, Window | Show View | Log. - Console View: This view offers several types of consoles that are useful during the deployment and debugging of Tizen applications. If the console is not visible, navigate to Window | Show View | Console to add it to the current perspective of the Tizen IDE. To change the settings of the console, go to Window | Preferences | Run/Debug | Console.
- Connection Explorer View: The list of connected devices and emulators is displayed at this view. It provides options for exploring their filesystems and transferring files. Select an item from the list and right-click on the item to see a menu with all available actions. To add the Connection Explorer to the current perspective of the Tizen IDE, navigate to Window | Show View | Other... | Tizen.
It is mandatory to create and set a secure profile in order to successfully deploy and debug applications on a Tizen device. My personal observation is that a lot of developers experience issues due to the secure profile when they are deploying an application on a device for the first time. This recipe explains a couple of ways to generate a certificate and set it on the Tizen IDE.
If an Active Secure profile is not set, the following error message will be displayed on the screen when you try to run an application on a device or emulator from the Tizen IDE:

The recommended way is to generate a certificate through the Tizen IDE. The steps are as follows:
- Launch a terminal and navigate to the directory
<Tizen SDK install directory>/tools/certificate-generator/. - If you are working on a Unix-like operating system, such as Mac OS or Linux, execute
certificate-generator.sh. If you are using Windows, you should runcertificate-generator.bat. - You will be prompted to type the information about the certificate. After filling in all details, the certificate will be generated.
- Launch the Tizen IDE because the generated certificate has to be set in it.
- Navigate to Window | Preferences.
- Navigate to Tizen SDK | Security Profiles.
- Click on the Add button.
- Enter a name for the profile.
- Type in the path to the certificate's file.
- Finally, click on the OK button to save all settings.
The creation process of the certificate is similar no matter which approach or operating system you prefer to use. Both the batch file for Windows and the bash script for Linux and Mac OS run CertificateGenerator.jar through the java -jar command. This tool is written in Java and its file format is
Java archive (JAR). The advantage of using Java for these kinds of applications is the multiplatform compatibility of Java, as the same code works on any of the operating systems supported by the Tizen SDK: Linux, Mac OS, and Windows.
generate a certificate through the Tizen IDE. The steps are as follows:
- Launch a terminal and navigate to the directory
<Tizen SDK install directory>/tools/certificate-generator/. - If you are working on a Unix-like operating system, such as Mac OS or Linux, execute
certificate-generator.sh. If you are using Windows, you should runcertificate-generator.bat. - You will be prompted to type the information about the certificate. After filling in all details, the certificate will be generated.
- Launch the Tizen IDE because the generated certificate has to be set in it.
- Navigate to Window | Preferences.
- Navigate to Tizen SDK | Security Profiles.
- Click on the Add button.
- Enter a name for the profile.
- Type in the path to the certificate's file.
- Finally, click on the OK button to save all settings.
The creation process of the certificate is similar no matter which approach or operating system you prefer to use. Both the batch file for Windows and the bash script for Linux and Mac OS run CertificateGenerator.jar through the java -jar command. This tool is written in Java and its file format is
Java archive (JAR). The advantage of using Java for these kinds of applications is the multiplatform compatibility of Java, as the same code works on any of the operating systems supported by the Tizen SDK: Linux, Mac OS, and Windows.
batch file for Windows and the bash script for Linux and Mac OS run CertificateGenerator.jar through the java -jar command. This tool is written in Java and its file format is
Java archive (JAR). The advantage of using Java for these kinds of applications is the multiplatform compatibility of Java, as the same code works on any of the operating systems supported by the Tizen SDK: Linux, Mac OS, and Windows.
Tizen Web Simulator is a simplified tool to test and debug web applications. It is included in the Tizen SDK. Web Simulator is available under Apache Software License v.2.0 because it is based on the Ripple-UI Framework, which was initially developed by BlackBerry (known in the past as research in motion) to test BB10 HTML5 WebWorks applications. Web Simulator offers the following features:
- Guest modifications that provide a JavaScript backend that simulates Tizen Web APIs
- Configuration panes to emit events and messages related to the geolocation, sensors, acceleration, and messaging capabilities of the Tizen software platform
- Customization of the behavior of the simulator via a variety of preferences
- Please refer to the recipes in Chapter 11, Debugging Apps in Tizen, to learn how to simulate events and debug applications using the Web Simulator.
- Please refer to the recipes in Chapter 11, Debugging Apps in Tizen, to learn how to simulate events and debug applications using the Web Simulator.
- Please refer to the recipes in Chapter 11, Debugging Apps in Tizen, to learn how to simulate events and debug applications using the Web Simulator.
config.xml when the web application is launched. By default, the name of the file is index.html.
- Please refer to the recipes in Chapter 11, Debugging Apps in Tizen, to learn how to simulate events and debug applications using the Web Simulator.
- Chapter 11, Debugging Apps in Tizen, to learn how to simulate events and debug applications using the Web Simulator.
The device Emulator is a virtual machine based on the open source project Quick Emulator (QEMU). It provides full stacks of the Tizen platform. Emulator Manager and Event Injector are also provided among the Emulator tools of the SDK. Unlike the simulator, the emulator provides strict implementation of the device specifications and there are no guest modifications. Please note that Tizen SDK 2.2.1 supports only the x86 machine architecture for guests.
QEMU, the engine behind the Tizen Emulator, is an open source project for a visualization machine that allows you to run a separate operating system as just another task on the desktop of your development machine. The Android emulator is also based on QEMU. For more information about QEMU and details regarding its licenses, please visit http://wiki.qemu.org/.
The Tizen Emulator supports a variety of features, and the most important features are as follows:
- Input system: The emulator provides a virtual touchscreen and its drivers are different from the ones for the physical devices.
- Virtual sensor: Values related to acceleration, light, gyroscope, proximity, motion, location, and battery are received through the Event Injector.
- Telephony: Voice calls, call waiting, outgoing call barring, and messaging are supported through the Event Injector. Video calls, call forwarding, incoming call barring, emulator-to-emulator calls, and SMS are not supported.
- Power management: The emulator offers internal implementation to turn on and off the display.
- Supported media formats and codes: Encoding of H.264 and decoding of AAC+, enhanced AAC+, and FLAC are not supported on the emulator.
Please ensure that you are running the Tizen Emulator on a computer with a minimum screen resolution of 1280 x 1024 pixels and the latest version of graphical drivers with OpenGL support. It is recommended to use an Intel CPU with Virtualization Technology (VTx). The performance of the emulator depends on the hardware of the computer and it might work slowly on low resource machines. Details about the requirements for the Tizen Emulator are available at https://developer.tizen.org/downloads/sdk/installing-sdk/prerequisites-tizen-sdk.
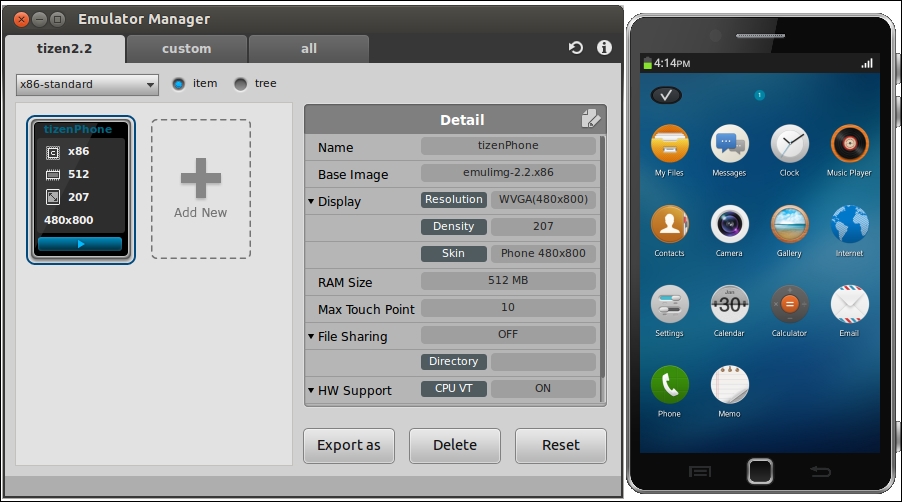
To create new instances of the Tizen Emulator, launch the Emulator Manager and click on the button with the label Create New VM.
Both skin options such as the height and width of the resolution as well as various QEMU options can be specified as arguments of the command. For details of the supported options, please check the user manual in the official Tizen SDK 2.2.1 development documentation:
https://developer.tizen.org/dev-guide/2.2.1/org.tizen.gettingstarted/html/dev_env/emulator_startup_options.htm
- You can communicate with the running Tizen emulator using Smart Development Bridge (SDB). For more information and details, please check the next recipe. Descriptions and examples of deploying and running applications on the emulator as well as simulating events with the Event Injector are available in Chapter 11, Debugging Apps in Tizen.
Virtualization Technology (VTx). The performance of the emulator depends on the hardware of the computer and it might work slowly on low resource machines. Details about the requirements for the Tizen Emulator are available at https://developer.tizen.org/downloads/sdk/installing-sdk/prerequisites-tizen-sdk.
To create new instances of the Tizen Emulator, launch the Emulator Manager and click on the button with the label Create New VM.
Both skin options such as the height and width of the resolution as well as various QEMU options can be specified as arguments of the command. For details of the supported options, please check the user manual in the official Tizen SDK 2.2.1 development documentation:
https://developer.tizen.org/dev-guide/2.2.1/org.tizen.gettingstarted/html/dev_env/emulator_startup_options.htm
- You can communicate with the running Tizen emulator using Smart Development Bridge (SDB). For more information and details, please check the next recipe. Descriptions and examples of deploying and running applications on the emulator as well as simulating events with the Event Injector are available in Chapter 11, Debugging Apps in Tizen.
Tizen Emulator, launch the Emulator Manager and click on the button with the label Create New VM.
Both skin options such as the height and width of the resolution as well as various QEMU options can be specified as arguments of the command. For details of the supported options, please check the user manual in the official Tizen SDK 2.2.1 development documentation:
https://developer.tizen.org/dev-guide/2.2.1/org.tizen.gettingstarted/html/dev_env/emulator_startup_options.htm
- You can communicate with the running Tizen emulator using Smart Development Bridge (SDB). For more information and details, please check the next recipe. Descriptions and examples of deploying and running applications on the emulator as well as simulating events with the Event Injector are available in Chapter 11, Debugging Apps in Tizen.
- Chapter 11, Debugging Apps in Tizen.
Smart Development Bridge (SDB) is a command-line tool for communication with the Tizen emulator or connected Tizen devices. Its role in Tizen is the same as the role of Android Debug Bridge (ADB) in Android. SDB is an essential part of the Tizen SDK and it is installed with it. SDB manages multiple device connections and provides basic commands for application development and debugging. The main features of SDB are as follows:
SDB works as a typical client-server application and it consists of three main components:
- A client that runs on the development system and can be invoked from the command line using the SDB command.
- A server that manages the connection and the communication with the Tizen Emulator and devices. It runs as a background process on the development system.
- A daemon that runs on each Tizen Emulator or device.
To add SDB to the environmental path of Windows 7, perform the following steps:
To add SDB to the environmental path for all users on Mac OS X Leopard and above, create a text file at the directory /etc/paths.d/ and set the location of SDB within it using root privileges, for example, sudo -s 'echo "<tizen_sdk>/sdb" > /etc/paths.d/sdb'.
tizen_sdk/SDK/sdb. To use the client, an SDB command must be executed within its directory unless the sdb location has been added to the environmental path variable.
To add SDB to the environmental path of Windows 7, perform the following steps:
To add SDB to the environmental path for all users on Mac OS X Leopard and above, create a text file at the directory /etc/paths.d/ and set the location of SDB within it using root privileges, for example, sudo -s 'echo "<tizen_sdk>/sdb" > /etc/paths.d/sdb'.
environmental path of Windows 7, perform the following steps:
To add SDB to the environmental path for all users on Mac OS X Leopard and above, create a text file at the directory /etc/paths.d/ and set the location of SDB within it using root privileges, for example, sudo -s 'echo "<tizen_sdk>/sdb" > /etc/paths.d/sdb'.
SDB is a powerful tool with a lot of capabilities and features. Although you can successfully develop applications using the Tizen IDE without even knowing what SDB is, it is recommended to explore the options of the tool. SDB is a developer's best friend when it comes to management of a connected device, transferring files, and debugging applications.
Perform the following steps to enable and use SDB:
- Make sure that the date and time on your devices is correct.
- Enable the developer mode and USB debugging on a Tizen device by navigating to Settings | Developer options | USB debugging.
- Connect the Tizen device to a computer.
- Run the SDB command in a console using the following syntax:
sdb [option] <command> [parameters]
According to the Tizen 2.2.1 official development guide, the values provided for option in the preceding command can be:
-d: This stands for select device. This sends the specified command to a connected USB device. Please note that this option will fail if multiple Tizen devices are attached over USB.-e: This option is used to control an emulator. The error handling is similar to that of the option-d. If multiple emulators are running, this command will fail and an error will be returned. Direct the command to the only running emulator and return an error if more than one emulators are present.-s <serial number>: Tizen devices or emulators that are attached to a developer's computer are identified by their serial number. The-soption should be followed by the serial number of the device and SDB will take care to target the command only to the specified device.
The following is a list of all the supported SDB commands with some brief information about them:
- The information provided by the log buffers of a device might be valuable during the debugging of Tizen applications. More details and advanced usage examples of
sdb dlogare available in Chapter 11, Debugging Apps in Tizen. - The full list of SDB supported commands as of Tizen SDK 2.2.1 is available at https://developer.tizen.org/dev-guide/2.2.1/org.tizen.gettingstarted/html/dev_env/commands.htm.
sdb dlog are available in
- Chapter 11, Debugging Apps in Tizen.
- The full list of SDB supported commands as of Tizen SDK 2.2.1 is available at https://developer.tizen.org/dev-guide/2.2.1/org.tizen.gettingstarted/html/dev_env/commands.htm.