
There are two ways to take on migration from an Eclipse project to a Gradle-based project:
Use the import wizard in Android Studio to handle migration automatically
Add a Gradle script to the Eclipse project and set everything up manually
Most projects are simple enough for the import wizard to be able to convert everything automatically. If there is something the wizard cannot figure out, it might even give you hints as to what you need to change for it to work.
Some projects, though, might be extremely complicated and require a manual conversion. If you have a huge project and you prefer to convert the project in steps, instead of all at once, it is possible to execute Ant tasks, or even entire Ant builds from Gradle. Doing that, you can do the transition at the pace you prefer and convert all the components slowly.
To start the import wizard, you need to open Android Studio, click on the File menu and then on Import Project..., or on the Android Studio start screen, click on Import Non-Android Studio project.
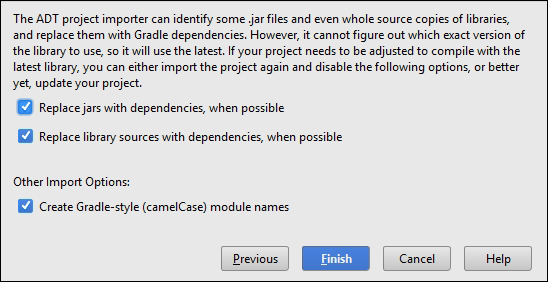
If you convert a project with JAR files or library sources, the import wizard will suggest replacing those with Gradle dependencies. These dependencies can come from local Google repositories (such as the Android Support Library) or even from a known online repository central. If no matching Google or online dependencies are found, the JAR file is used, as it was before. The import wizard creates at least one module for your app. If you have libraries with source code in your project, those are converted to modules as well.
This is what the import wizard looks like:
Studio creates a new folder to make sure you do not lose anything when you convert, and you can easily compare the outcome of the import wizard with the original. When the conversion is done, Android Studio opens the project and shows an import summary.
The summary lists any files that the import wizard decided to ignore and did not copy to the new project. If you want to include those anyway, you have to manually copy them to the new project. Right below the ignored files, the summary shows any JAR files that the import wizard was able to replace with Gradle dependencies. Android Studio tries to find those dependencies on JCenter. If you are using the Support Library, it is now included in the Google repository that is downloaded to your machine using the SDK manager, instead of a JAR file. Finally, the summary lists all the files that the import wizard has moved, showing their origin and destination.
The import wizard also adds three Gradle files: settings.gradle and build.gradle on the root, and another build.gradle in the module.
If you have any libraries that include source code, the import wizard turns those into Gradle projects as well and links everything together as necessary.
The project should now build without any issues, but keep in mind that you might need an Internet connection to download some of the necessary dependencies.
Projects that are more complicated might require extra work though, so next we will take a look at how to do the conversion manually.
There are multiple ways to go about manually migrating to a Gradle-based Android project. It is not required to change to the new directory structure, and it is even possible to run Ant scripts from your Gradle scripts. This makes the process of migrating very flexible, and it can make the transition easier for larger projects. We will look at running Ant tasks in Chapter 9, Advanced Build Customization.
If you do not want to move files around, it is possible to keep the Eclipse folder structure in your project. To do that, you need to change the source set configuration. We mentioned source sets earlier when talking about the project structure. Gradle and the Android plugin have their defaults, as usual, but it is possible to override those.
The first thing you need to do is to create a build.gradle file in the project directory. This file should apply the Android plugin and define the required properties for Gradle and the Android plugin. In its simplest form, it looks like this:
buildscript {
    repositories {
        jcenter()
    }
    dependencies {
        classpath 'com.android.tools.build:gradle:1.2.3'
    }
}

apply plugin: 'com.android.application'

android {
    compileSdkVersion 22
    buildToolsVersion "22.0.1"
}
Then you can start by changing the source set. Usually, overriding the main source set to comply with the Eclipse structure looks like this:
android {
  sourceSets {
    main {
      manifest.srcFile 'AndroidManifest.xml'
      java.srcDirs = ['src']
      resources.srcDirs = ['src']
      aidl.srcDirs = ['src']
      renderscript.srcDirs = ['src']
      res.srcDirs = ['res']
      assets.srcDirs = ['assets']
    }

  androidTest.setRoot('tests')
  }
}
In the Eclipse folder structure, all source files will reside in the same folder, so you need to tell Gradle that all these components can be found in the src folder. You only need to include the components that are in your project, but adding them all does no harm.
If you have any dependencies on JAR files, you need to tell Gradle where the dependencies are located. Assuming the JAR files are in a folder called libs, the configuration looks like this:
dependencies {
    compile fileTree(dir: 'libs', include: ['*.jar'])
}
This one-liner includes every file with the extension .jar inside the libs directory as a dependency.
If you decide to convert to the new project structure manually, you need to create a few folders and move some files. This table shows an overview of the most important files and folders, and where you need to move them to convert to the new project structure:
|
Old location |
New location |
|---|---|
|
|
|
|
|
|
|
|
|
|
|
|
If you have any unit tests, you need to move the source code for those to app/src/test/java/ to have Gradle recognize them automatically. Functional tests belong in the app/src/androidTest/java/ folder.
The next step is to create a settings.gradle file in the root of the project. This file needs to contain only one line, and its purpose is to tell Gradle to include the app module in the build:
include: ':app'
When that is ready, you need two build.gradle files for a successful Gradle build. The first one belongs in the root of the project (on the same level as settings.gradle) and is used to define project-wide settings:
buildscript {
    repositories {
        jcenter()
    }
    dependencies {
        classpath 'com.android.tools.build:gradle:1.2.3'
    }
}
This sets up a few properties for all modules in the project. The second build.gradle goes in the app folder and contains module-specific settings:
apply plugin: 'com.android.application'

android {
    compileSdkVersion 22
    buildToolsVersion "22.0.1"
}
These are the absolute basics. If you have a simple Android app that does not depend on third-party code, this will suffice. If you have any dependencies, you need to migrate those to Gradle as well.
If you have any libraries in your project that contain Android-specific code, those also need to use Gradle in order for them to play nice with the app module. The same basics apply, but you need to use the Android library plugin instead of the Android application plugin. The details of this process are discussed in Chapter 5, Managing Multimodule Builds.