
You already know how to add and move widgets in the Design mode. Now, we need to make the UI neat and tidy. I'll show you how to do this step by step.
A quick way to delete a widget is to select it and press the Delete button. Meanwhile, some widgets, such as the menu bar, status bar, and toolbar can't be selected, so we have to right-click on them in Object Inspector and delete them. Since they are useless in this example, it's safe to remove them and we can do this for good.
Okay, let's understand what needs to be done after the removal. You may want to keep all these push buttons on the same horizontal axis. To do this, perform the following steps:
Select all the push buttons either by clicking on them one by one while keeping the Ctrl key pressed or just drawing an enclosing rectangle containing all the buttons.
Right-click and select Layout | LayOut Horizontally, The keyboard shortcut for this is Ctrl + H.
Resize the horizontal layout and adjust its
layoutSpacingby selecting it and dragging any of the points around the selection box until it fits best.
Hmm…! You may have noticed that the text of the Bonjour button is longer than the other two buttons, and it should be wider than the others. How do you do this? You can change the property of the horizontal layout object's layoutStretch property in Property Editor. This value indicates the stretch factors of the widgets inside the horizontal layout. They would be laid out in proportion. Change it to 3,3,4, and there you are. The stretched size definitely won't be smaller than the minimum size hint. This is how the zero factor works when there is a nonzero natural number, which means that you need to keep the minimum size instead of getting an error with a zero divisor.
Now, drag Plain Text Edit just below, and not inside, the horizontal layout. Obviously, it would be neater if we could extend the plain text edit's width. However, we don't have to do this manually. In fact, we could change the layout of the parent, MainWindow. That's it! Right-click on MainWindow, and then navigate to Lay out | Lay Out Vertically. Wow! All the children widgets are automatically extended to the inner boundary of MainWindow; they are kept in a vertical order. You'll also find Layout settings in the centralWidget property, which is exactly the same thing as the previous horizontal layout.
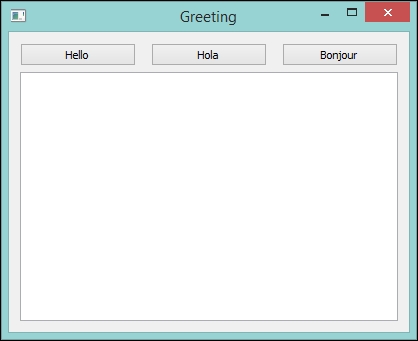
The last thing to make this application halfway decent is to change the title of the window. MainWindow is not the title you want, right? Click on MainWindow in the object tree. Then, scroll down its properties to find windowTitle. Name it whatever you want. In this example, I changed it to Greeting. Now, run the application again and you will see it looks like what is shown in the following screenshot: