
We are aware of the CDD and we did our best to create a compatible device. A lot of aspects could still have glitches and we surely want to get rid of them. To make sure that everything works as expected, our Android implementation must be tested with Android Compatibility Test Suite. Android CTS will accompany us throughout the journey to our certified device. We will constantly use it to keep an eye on what is working and what is not working yet.
Every new version of Android platform comes with a new Compatibility Test Suite (CTS). This automated testing suite has two main components:
There is also the CTS Verifier, a tool for manual testing that consists of the verifier app that is executed on the device and collects the test results; and other executables or scripts that are executed on the desktop machine in order to provide further data or control for some test cases in the Verifier app.
The following diagram shows the CTS workflow:
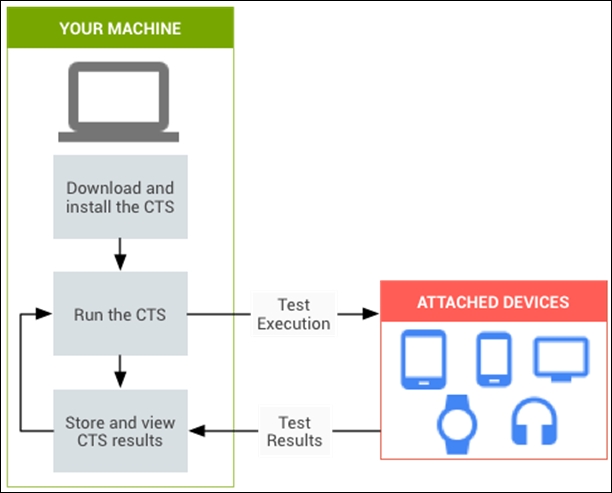
The test suite on your computer will install the test on the device and will launch it. The device will test that particular subset of features and will give the results back to the test suite on your computer. The test suite will store these results, install the next test, and will start the cycle again, until every test is executed.
Currently, the CTS provides two main types of test cases:
Unit tests
Functional tests
Unit tests test the smallest logical units of code within the Android platform, for example, a single class, such as java.util.HashMap.
Functional tests are used to test a specific function that can consist of numerous API method calls.
Google is planning to provide more tests in the future versions of the test case. A couple of ideas are:
The following table shows the areas covered by the Compatibility Test Suite:
|
Area |
Description |
|---|---|
|
Signature tests |
For each Android release, there are XML files describing the signatures of all public APIs contained in the release. The CTS contains a utility to check those API signatures against the APIs available on the device. The results from signature checking are recorded in the test result XML file. |
|
Platform API Tests |
These tests test the platform (core libraries and Android Application Framework) APIs as documented in the SDK Class Index to ensure API correctness, including correct class, attribute and method signatures, correct method behavior, and negative tests to ensure expected behavior for incorrect parameter handling. |
|
Dalvik Tests |
These tests focus on testing the Dalvik Executable Format. |
|
Platform Data Model |
The CTS tests the core platform data model as exposed to application developers through Content Providers, as documented in the SDK |
|
Platform Intents |
The CTS tests the core platform intents as documented in the SDK Available Intents. |
|
Platform Permissions |
The CTS tests the core platform permissions as documented in the SDK Available Permissions. |
|
Platform Resources |
The CTS tests for correct handling of the core platform resource types, as documented in the SDK Available Resource Types. This includes tests for: simple values, drawables, nine-patch, animations, layouts, styles and themes, and loading alternate resources. |
Our journey will be very practical and hands-on, that's why in this section we are going to set up Android Compatibility Test Suite to test an existing device. We can't start working on our own Android implementation without knowing what we are going to support and test. To be able to run Android CTS, we will need:
A computer running Linux or OS X
Android SDK: http://developer.android.com/sdk/installing/index.html
Java SDK 6 or 7: http://www.oracle.com/technetwork/java/javase/downloads/index.html
Android CTS: http://source.android.com/compatibility/downloads.html
Android CTS Media: https://dl.google.com/dl/android/cts/android-cts-media-1.1.zip
There are a lot of files to download. In the meantime, we will set up our device.
We are testing an existing device, a smartphone, so we are already satisfying needs such as having a screen and we can move to device software configuration.
Tests should be executed on a clean device, so we should run a Factory Restore to erase all the data on the smartphone. Be sure of having a backup of your data if you are not using a development device. On Android 4.4 KitKat, you can reach the specific menu by navigating to Settings | Backup & reset | Factory data reset.
This will take a while—the device will shut down and the erasing process will start. The procedure will remove every single byte that is not part of the original Android system provided with your device, restoring all the settings and bringing the device to its original setup.
When the device restarts, we need to select English US language by navigating to Settings | Language & input | Language.
Now we need to turn on the Location: We need Wi-Fi and GPS and we need to provide some Internet connectivity. We need to disable any Screen Lock by navigating to Settings | Security | Screen Lock = 'None'.
We need a few settings from the Developer options menu. On a brand new installation of a vanilla Android system this menu is hidden. We can enable using the following steps:
Navigate to Settings | About phone.
Scroll to the bottom.
Tap continuously on build number item.
You are now a developer!
Note
If you are working with an HTC, Samsung, or Sony device and its custom version of Android, the previous steps could be a bit different. We leave it as an exercise to find the right navigation path for your non-vanilla Android version.
Once the Developer options menu has been enabled, navigate back to the Settings screen. In the Developer options menu, we need to enable the following:
USB debugging
Stay awake
Allow mock locations
Before running any tests, it's important that the device is on a steady support to avoid triggering accelerometers and the gyroscope. The camera should be pointing to a focusable object. Don't press any buttons or keys during the tests—this could invalidate test results.
To properly run all the tests, we will need a few multimedia files on the device—Android CTS media files. First of all, let's connect the device to the USB. If this is the first time that you connect this device to this host PC, the device will display a dialog to authorize the connection—allow the connection:
Any Android device can communicate with a host PC using Android ADB. This key tool is covered in great detail in the next chapters, so, for now, we can start downloading the latest Android SDK from https://developer.android.com/studio/index.html#downloads, according to your platform. Once the download is completed, decompress the file and you will be provided with an android-sdk folder, containing a platform-tools folder, containing adb executable.
Back to our media files setup now:
Open a terminal.
Navigate to the downloaded file, for instance:
$ cd ~/DownloadsUnzip the file:
$ unzip android-cts-media-1.1.zipEnter the brand new
android-cts-mediafolder with:$ cd android-cts-mediaThis folder contains a file that we must make executable:
$ chmod u+x copy_media.shNow we are ready to copy all the media files we need onto the device:
$ ./copy_media.sh all
The next screenshot shows the output of the whole procedure:

Everything is in place now and we can use cts-tradefed to run some test plans. Move to the Android CTS folder and run the following command to enter the cts console:
$ ./tools/cts-tradefed

The previous screenshot shows how cts-tradefed automatically identifies our connected device and gets ready to test.
CTS console provides a few useful commands:
list plans: This will list all the available test plans in the repositorylist packages: This will list all the available test packages in the repositoryrun: This will allow us to run all the tests we want
Typically, the following test plans are available:
All CTS tests required for compatibility
Signature tests the signature verification of all public APIs
Android tests for the Android APIs
Java tests for the Java core library
VM tests for ART or Dalvik
Performance tests for your implementation
As our first approach to CTS, we are going to run CTS plan:
cts-tf > run cts --plan CTS --disable-reboot
The testing will start immediately and the console will be full of log messages in the blink of an eye, as shown in the following screenshot:

Now, grab some coffee or make some good tea: this will take a while. cts-tradefed will test everything that is possible to test with an automatic test. Luckily for us, there is a lot that can be tested in this way.
Time has passed, the tea has gone, and the tests are over. On a quad-core smartphone, such as a Motorola Moto G or Nexus 4, this could take up to 10 hours. Eventually, we have got some nice results to check out. According to the folder's path we are working in, we will have results in a .zip file in the cts folder:
$ unzip ~/bin/android-cts/repository/results/START_TIME.zip
Unzipping the file, we will find a testResult.xml file. Opening this file with a recent web browser (Firefox is working fine here) will show plenty of meaningful tables, with all kind of test and results. The next screenshot shows the initial Test Summary. We have information about the test duration, how many tests were executed, how many tests passed, and how many tests failed:

As you can see, even testing a certified smartphone, currently on the market, will produce some failed tests. This gives you an idea about the complexity of producing the perfect Android device.
The next screenshot shows Test Summary by Package, specifying the test results one test after the other. For brevity, we are showing just a subset of the results:

The previous Test Summary screenshot shows that 29 tests have failed. If we dig into the test result file, we see that detailed reports are also available. This further information is hugely useful to precisely spot the failed test, like the one in the following screenshot, and investigate the issue:

The test result file tries to play polite and, for brevity, does not show the full stacktrace of the failed test. To reach the stack trace of the failure, we must inspect the source code of testResult.xml. For every executed test, there is a corresponding <Test> tag. For those tests that failed, we will have a <StackTrace> tag too. That's what we are looking for!
As a final note, testResult.xml contains a huge section with all the information about the device it has been able to retrieve. It's a very large amount of data that, for brevity, we are not reporting here, not even as an example.