
In this recipe, we will create three tkinter Radiobutton widgets. We will also add some code that changes the color of the main form depending upon which Radiobutton is selected.
We are adding the following code to the previous recipe:
# Radiobutton Globals   # 1
COLOR1 = "Blue"         # 2
COLOR2 = "Gold"         # 3
COLOR3 = "Red"          # 4

# Radiobutton Callback  # 5
def radCall():          # 6
   radSel=radVar.get()
   if   radSel == 1: win.configure(background=COLOR1)
   elif radSel == 2: win.configure(background=COLOR2)
   elif radSel == 3: win.configure(background=COLOR3)

# create three Radiobuttons   # 7
radVar = tk.IntVar()          # 8
rad1 = tk.Radiobutton(win, text=COLOR1, variable=radVar, value=1,               command=radCall)              # 9
rad1.grid(column=0, row=5, sticky=tk.W)  # 10

rad2 = tk.Radiobutton(win, text=COLOR2, variable=radVar, value=2, command=radCall)                             # 11
rad2.grid(column=1, row=5, sticky=tk.W)  # 12

rad3 = tk.Radiobutton(win, text=COLOR3, variable=radVar, value=3, command=radCall)                             # 13
rad3.grid(column=2, row=5, sticky=tk.W)  # 14
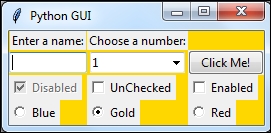
Running this code and selecting the Radiobutton named Gold creates the following window:
In lines 2-4 we create some module-level global variables, which we will use in the creation of each radio button as well as in the callback function that creates the action of changing the background color of the main form (using the instance variable win).
We are using global variables to make it easier to change the code. By assigning the name of the color to a variable and using this variable in several places, we can easily experiment with different colors. Instead of doing a global search-and-replace of a hard-coded string (which is prone to errors), we just need to change one line of code and everything else will work. This is known as the DRY principle, which stands for Don't Repeat Yourself. This is an OOP concept that we will use in later recipes of the book.
Note
The names of the colors we are assigning to the variables (COLOR1, COLOR2 …) are tkinter keywords (technically, they are symbolic names). If we use names that are not tkinter color keywords, then the code will not work.
Line 6 is the callback function that changes the background of our main form (win) depending upon the user's selection.
In line 8 we are creating a tk.IntVar variable. What is important about this is that we are creating only one variable to be used by all three radio buttons. As can be seen from the above screenshot, no matter which Radiobutton we select, all the others will automatically be unselected for us.
Lines 9 to 14 create the three radio buttons, assign them to the main form, and pass in the variable to be used in the callback function that creates the action of changing the background of our main window.
Here is a small sample of the available symbolic color names that you can look up at the official tcl manual page:
http://www.tcl.tk/man/tcl8.5/TkCmd/colors.htm
|
Name |
Red |
Green |
Blue |
|---|---|---|---|
|
alice blue |
240 |
248 |
255 |
|
AliceBlue |
240 |
248 |
255 |
|
Blue |
0 |
0 |
255 |
|
Gold |
255 |
215 |
0 |
|
Red |
255 |
0 |
0 |
Some of the names create the same color, so alice blue creates the same color as AliceBlue. In this recipe we used the symbolic names Blue, Gold, and Red.