

Workflows are one of the most powerful no-code extensions you can configure in Dynamics 365; without any code, you can automate repetitive business processes.
Workflows are versatile and can fulfill a wide range of functionalities, ranging from creating entities and sending e-mails to calling actions. In this recipe, we will create a workflow that sends an e-mail to any new students after 24 hours of their record being created.
Similar to the previous recipe, a System Customizer or higher security role is required to perform the configuration as well as a solution to contain the changes.
- Navigate to
Settings|Solutions|Packt. - Under
Processes, click onNew. - Fill in the following details:
Process name:Send Student Welcome EmailCategory:WorkflowEntity:Contact- Tick
Run this workflow in the background Type:New blank process
- In the
Processeditor tickRecord is createdandAs an on-demand. Keep the rest as is with their default values. - Click on
Add Step|Wait Condition. - Click on
<condition> (click to configure)and select the following:- Process in the first column
- Execution time in the second column
- Equals in the third column
- In the last column, use the form assistance on the right-hand side:
- Select
1underDay - Select
After - Look for
Process - Double click
Execution Timein the last list
- Select
- Click on
Save and Close. - Back in your process, click on
Select this row and click Add Step, then click onAdd Step|Checkcondition. - Click on <condition> (click to configure) and enter the following details:
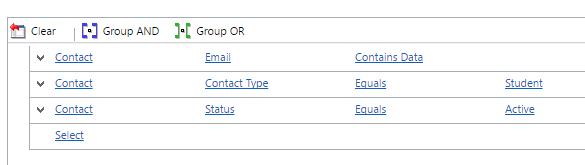
Contact,Email, andContains DataContact,Contact Type,Equals, andStudent(created in the previous recipe)Contact,Status,Equals, andActive- Click on
Save and Close:
- Click on
Selectthis row and clickAdd Step,followed byAdd Step|Send Email. - Select
Create New Messagefrom the drop-down and click onSet Properties. - Enter the details of the e-mail as follows:
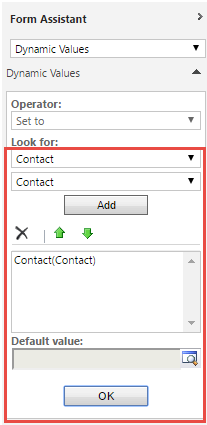
From:<your name>To: usingForm Assistanceon the right, selectContactunderLook forfollowed byContactfrom the next dropdown, then click on theAddbutton followed by theOKbutton at the bottom:
- Enter
Welcome to Packt Universityin theSubject Lineoption - Enter
Hi - Using the right
Form Assistance, selectContact,Last Name, and click onAdd, thenOK - Follow the salutation with a carriage return (Enter) and
Welcome to Packt University
- Enter
Save and Closethe dialog.
- Click on
Activateat the top of the workflow:

In step 2 to step 4, we created a workflow that triggers on creation (when the contact record is first created, the workflow will start waiting). The workflow can also be called on demand in case we want to trigger it again. In this example, the contact might already be created but not as a Student. Once the contact is set as a Student, the workflow can be triggered manually to send the welcome e-mail.
In step 5 and step 6, we set up the wait condition to wait for a day.
In step 7 and step 8, we checked if the contact is an active student with an e-mail address.
In step 9 to step 12, we created a personalized e-mail for the contact and welcomed them.
In step 13, we activated the workflow.
Note
As a good practice, always add descriptions to your workflow, and to each step, to understand at a high level what the workflow is doing.
When asynchronous workflows are triggered, they enter into a pool to be processed when the asynchronous service is free. Asynchronous workflows are typically executed within seconds or minutes. If the execution is taking hours, then you might want to raise a support ticket with Microsoft to investigate. Executing workflows asynchronously is a great way to lighten the load on your Dynamics instances.
When workflows instances are waiting for a condition to be satisfied, they do not consume resources or affect your instance's performance. However, it is generally agreed by the community that it is a bad practice to have too many workflow instances in a waiting status.
In more recent releases, synchronous workflows that turn your workflow into a configurable plugin became available. Microsoft does not recommend synchronous workflows for long processes due to the load that is associated with them. Furthermore, online instances have a limit of 2 minutes per synchronous workflow or plugin. Nevertheless, synchronous workflows are there to be used. Use them wisely.
- The Creating your first custom workflow activity recipe of Chapter 4, Server-Side Extensions