
We will now rearrange the layout of MainWindow to be able to display our todo tasks. Right now, there is no widget where we can display our tasks. Open the MainWindow.ui file and edit it to get the following result:
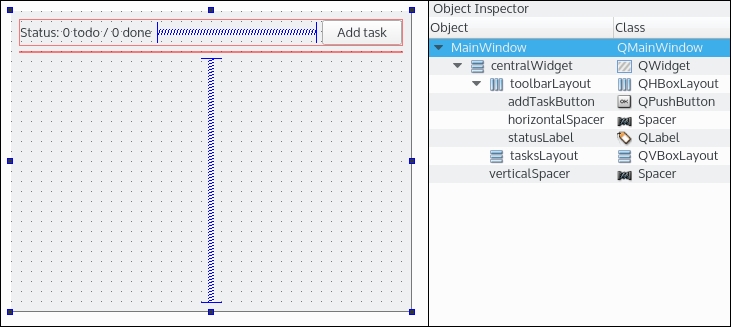
If we detail the content, we have:
A vertical layout for
centralWidgetcontaining thetoolbarLayoutfile and thetasksLayoutfile.A vertical spacer pushing these layouts to the top, forcing them to take up the smallest possible space.
We got rid of
menuBar,mainToolBar, andstatusBar. Qt Creator created them automatically, we simply don't need them for our purposes. You can guess their uses from their names.
Do not forget to rename the MainWindow title to Todo by selecting the MainWindow in the Object Inspector window and editing the Qwidget | windowTitle property. Your app deserves to be named properly.
Now that the MainWindow UI is ready to welcome tasks, let's switch to the code part. The application has to keep track of the new tasks. Add the following in the MainWindow.h file:
#include <QVector>

#include "Task.h"

class MainWindow : public QMainWindow
{
    // MAINWINDOW_H

public slots:
    void addTask();

private:
    Ui::MainWindow *ui;
    QVector<Task*> mTasks;
};
The QVector is the Qt container class providing a dynamic array, which is an equivalent of the std::vector. As a general rule, STL containers are more customizable but might miss some features compared to Qt containers. If you use C++11 smart pointers, you should favor std containers, but we will get into that later.
In the Qt documentation of QVector, you might stumble upon the following statement: "For most purposes, QList is the right class to use". There is a debate about this in the Qt community:
Do you often need to insert objects larger than a pointer at the beginning or in the middle of your array? Use a
QListclass.Need contiguous memory allocation? Less CPU and memory overhead? Use a
QVectorclass.
The already added slot addTask() will now be called each time we want to add a new Task object to the mTasks function.
Let's fill our QVector tasks each time addTaskButton is clicked. First, we connect the clicked() signal in the MainWindow.cpp file:
MainWindow::MainWindow(QWidget *parent) :
    QMainWindow(parent),
    ui(new Ui::MainWindow),
    mTasks()
{
    ui->setupUi(this);
    connect(ui->addTaskButton, &QPushButton::clicked,
    this, &MainWindow::addTask);
};
Tip
C++ tip
As a best practice, try to always initialize member variables in the initializer list and respect the order of variable declarations. Your code will run faster and you will avoid unnecessary variable copies. Take a look at the standard C++ documentation at https://isocpp.org/wiki/faq/ctors#init-lists.
The body of the addTask() function should look like this:
void MainWindow::addTask()
{
        qDebug() << "Adding new task";
        Task* task = new Task("Untitled task");
        mTasks.append(task);
        ui->tasksLayout->addWidget(task);
}
We created a new task and added it to our mTask vector. Because Task is a QWidget, we also added it directly to the tasksLayout. An important thing to note here is that we never managed this new task's memory. Where is the delete task instruction? This is a key feature of the Qt Framework we started to broach earlier in the chapter; the QObject class parenting automatically handles object destruction.
In our case, the ui->tasksLayout->addWidget(task) call has an interesting side-effect; the ownership of the task is transferred to tasksLayout. The QObject* parent defined in Task constructor is now tasksLayout, and the Task destructor will be called when tasksLayout releases its own memory by recursively iterating through its children and calling their destructor.
This will happen at this precise moment:
MainWindow::~MainWindow()
{
    delete ui;
}
When MainWindow is released (remember, it's a stack variable allocated in the main.cpp file), it will call delete ui, which in turn will bring down the whole QObject hierarchy. This feature has interesting consequences. First, if you use the QObject parenting model in your application, you will have much less memory to manage. Second, it can collide with some new C++11 semantics, specifically the smart pointers. We will get into that in later chapters.