Book Image

Swift 3 Game Development - Second Edition

By : Stephen Haney
Book Image

Swift 3 Game Development - Second Edition

By: Stephen Haney

Overview of this book

Swift is the perfect choice for game development. Developers are intrigued by Swift 3.0 and want to make use of new features to develop their best games yet. Packed with best practices and easy-to-use examples, this book leads you step by step through the development of your first Swift game. This book starts by introducing SpriteKit and Swift's new features that can be used for game development. After setting up your first Swift project, you will build your first custom class, learn how to draw and animate your game, and add physics simulations. Then, you will add the player character, NPCs, and powerups. To make your game more fun and engaging, you will learn how to set up scenes and backgrounds, build fun menus, and integrate with Apple Game Center to add leaderboards and achievements. You will then make your game stand out by adding animations when game objects collide, and incorporate proven techniques such as the advanced particle system and graphics. Finally, you will explore the various options available to start down the path towards monetization and publish your finished games to the App Store. By the end of this book, you will be able to create your own iOS games using Swift and SpriteKit.
Table of Contents (20 chapters)
Swift 3 Game Development - Second Edition
Credits
About the Author
About the Reviewer
www.PacktPub.com
Customer Feedback
Preface

Uploading our project from Xcode


Next, we will create a final build of our game, validate that it contains everything it needs for the App Store, and upload the bundle to iTunes Connect.

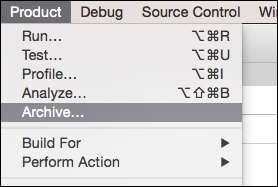
First, we will create the deployment archive for our game. When you are happy with your project, use the Product menu and select Archive..., as shown in the following screenshot:

Tip

If Archive... is grayed out, make sure to select a real iOS device or the Generic iOS Device option in the target scheme drop-down in the upper-left of Xcode.

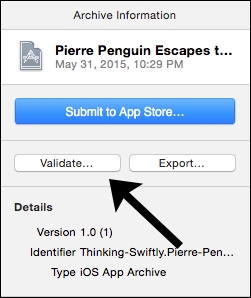
Once the process finishes, Xcode will open your archive list. From here, you can validate your app to make sure it includes all the requisite assets and profiles it needs to be on the App Store. Follow these steps to validate your app and upload it to iTunes Connect:

  1. Click on the Validate button, as shown in the following screenshot, to validate your app:

  2. The following screen will ask you to choose a development team for your app. If you are a solo developer, you will simply...