Book Image

Kotlin Programming By Example

By : Iyanu Adelekan
Book Image

Kotlin Programming By Example

By: Iyanu Adelekan

Overview of this book

Kotlin greatly reduces the verbosity of source code. With Google having announced their support for Kotlin as a first-class language for writing Android apps, now's the time learn how to create apps from scratch with Kotlin Kotlin Programming By Example takes you through the building blocks of Kotlin, such as functions and classes. You’ll explore various features of Kotlin by building three applications of varying complexity. For a quick start to Android development, we look at building a classic game, Tetris, and elaborate on object-oriented programming in Kotlin. Our next application will be a messenger app, a level up in terms of complexity. Before moving onto the third app, we take a look at data persistent methods, helping us learn about the storage and retrieval of useful applications. Our final app is a place reviewer: a web application that will make use of the Google Maps API and Place Picker. By the end of this book, you will have gained experience of of creating and deploying Android applications using Kotlin.
Table of Contents (12 chapters)

Getting started with Kotlin

In order to develop the Kotlin program, you will first need to install the Java Runtime Environment (JRE) on your computer. The JRE can be downloaded prepackaged along with a Java Development Kit (JDK). For the sake of this installation, we will be using the JDK.

The easiest way to install a JDK on a computer is to utilize one of the JDK installers made available by Oracle (the owners of Java). There are different installers available for all major operating systems. Releases of the JDK can be downloaded from http://www.oracle.com/technetwork/java/javase/downloads/index.html:

Java SE web page

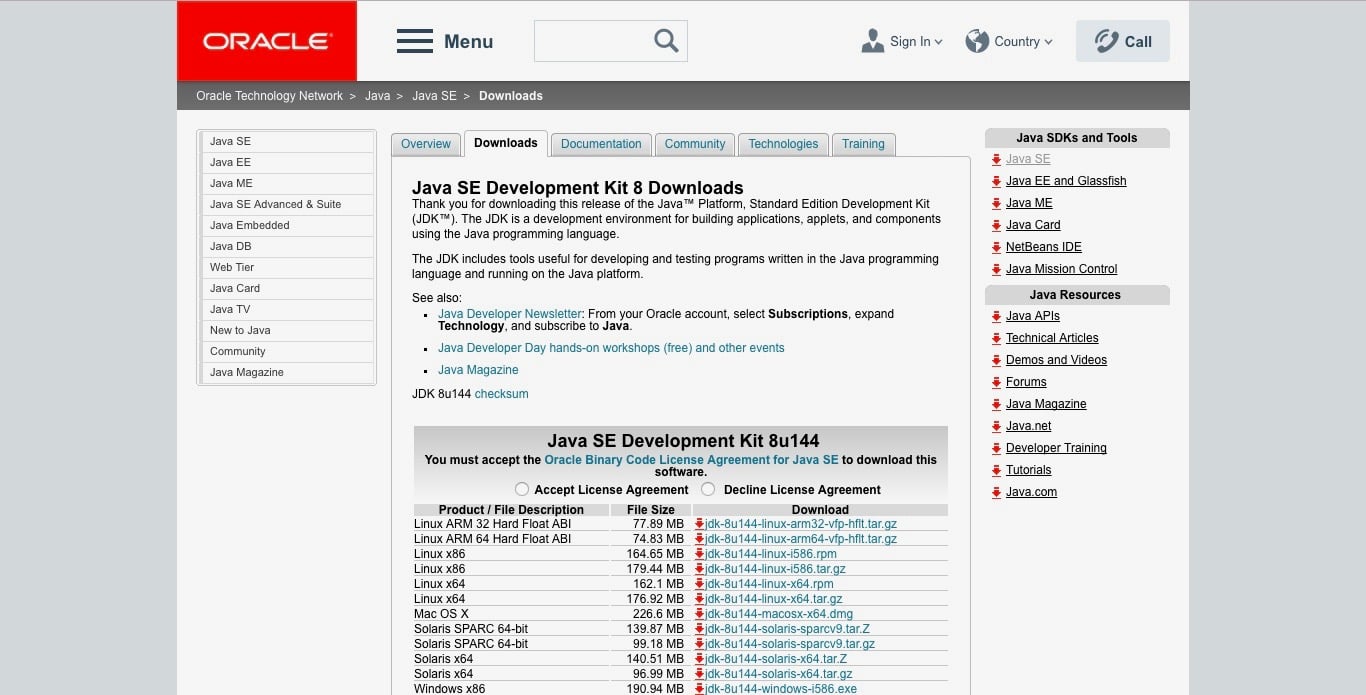
Clicking on the JDK download button takes you to a web page where you can download the appropriate JDK for your operating system and CPU architecture. Download a JDK suitable for your computer and continue to the next section:

JDK download page

JDK installation

In order to install the JDK on your computer, check out the necessary installation information from the following sections, based on your operating system.

Installation on Windows

The JDK can be installed on Windows in four easy steps:

  1. Double-click the downloaded installation file to launch the JDK installer.
  2. Click the Next button in the welcome window. This action will lead you to a window where you can select the components you want to install. Leave the selection at the default and click Next.
  1. The following window prompts the selection of the destination folder for the installation. For now, leave this folder as the default (also take note of the location of this folder, as you will need it in a later step). Click Next.
  2. Follow the instructions in the upcoming windows and click Next when necessary. You may be asked for your administrator's password, enter it when necessary. Java will be installed on your computer.

After the JDK installation has concluded, you will need to set the JAVA_HOME environment variable on your computer. To do this:

  1. Open your Control Panel.
  2. Select Edit environment variable.
  3. In the window that has opened, click the New button. You will be prompted to add a new environment variable.
  4. Input JAVA_HOME as the variable name and enter the installation path of the JDK as the variable value.
  5. Click OK once to add the environment variable.

Installation on macOS

In order to install the JDK on macOS, perform the following steps:

  1. Download your desired JDK .dmg file.
  2. Locate the downloaded .dmg file and double-click it.
  3. A finder window containing the JDK package icon is opened. Double-click this icon to launch the installer.
  4. Click Continue on the introduction window.
  5. Click Install on the installation window that appears.
  6. Enter the administrator login and password when required and click Install Software.

The JDK will be installed and a confirmation window displayed.

Installation on Linux

Installation of the JDK on Linux is easy and straightforward using apt-get:

  1. Update the package index of your computer. From your terminal, run:
      sudo apt-get update
  1. Check whether Java is already installed by running the following:
      java -version
  1. You'll know Java is installed if the version information for a Java install on your system is printed. If no version is currently installed, run:
      sudo apt-get install default-jdk

That's it! The JDK will be installed on your computer.

Compiling Kotlin programs

Now that we have the JDK set up and ready for action, we need to install a means to actually compile and run our Kotlin programs.

Kotlin programs can be either compiled directly with the Kotlin command-line compiler or built and run with the Integrated Development Environment (IDE).

Working with the command-line compiler

The command-line compiler can be installed via Homebrew, SDKMAN!, and MacPorts. Another option for setting up the command-line compiler is by manual installation.

Installing the command-line compiler on macOS

The Kotlin command-line compiler can be installed on macOS in various ways. The two most common methods for its installation on macOS are via Homebrew and MacPorts.

Homebrew

Homebrew is a package manager for the macOS systems. It is used extensively for the installation of packages required for building software projects. To install Homebrew, locate your macOS terminal and run:

/usr/bin/ruby -e "$(curl -fsSL https://raw.githubusercontent.com/Homebrew/install/master/install)"

You will have to wait a few seconds for the download and installation of Homebrew. After installation, check to see whether Homebrew is working properly by running the following command in your terminal:

brew -v

If the current version of Homebrew installed on your computer is printed out in the terminal, Homebrew has been successfully installed on your computer.

After properly installing Homebrew, locate your terminal and execute the following command:

brew install kotlin

Wait for the installation to finish, after which you are ready to compile Kotlin programs with the command-line compiler.

MacPorts

Similar to HomeBrew, MacPorts is a package manager for macOS. Installing MacPorts is easy. It can be installed on a system by:

  1. Installing Xcode and the Xcode command-line tools.
  2. Agreeing to the Xcode license. This can be done in the terminal by running xcodebuild -license.
  3. Installing the required version of MacPorts.

MacPort versions can be downloaded from https://www.macports.org/install.php.

Once downloaded, locate your terminal and run port install kotlin as the superuser:

sudo port install kotlin

Installing the command-line compiler on Linux

Linux users can easily install the command-line compiler for Kotlin with SDKMAN!

SDKMAN!

This can be used to install packages on Unix-based systems such as Linux and its various distributions, for example, Fedora and Solaris. SDKMAN! can be installed in three easy steps:

  1. Download the software on to your system with curl. Locate your terminal and run:
      curl -s "https://get.sdkman.io" | bash
  1. After you run the preceding command, a set of instructions will come up in your terminal. Follow these instructions to complete the installation. Upon completing the instructions, run:
      source "$HOME/.sdkman/bin/sdkman-init.sh"
  1. Run the following:
      sdk version

If the version number of SDKMAN! just installed is printed in your terminal window, the installation was successful.

Now that we have SDKMAN! successfully installed on our system, we can install the command-line compiler by running:

      sdk install kotlin

Installing the command-line compiler on Windows

In order to use the Kotlin command-line compilers on Windows:

  1. Download a GitHub release of the software from https://github.com/JetBrains/kotlin/releases/tag/v1.2.30
  2. Locate and unzip the downloaded file
  1. Open the extracted kotlinc\bin folder
  2. Start the command prompt with the folder path

You can now make use of the Kotlin compiler from your command line.

Running your first Kotlin program

Now that we have our command-line compiler set up, let's try it out with a simple Kotlin program. Navigate to your home directory and create a new file named Hello.kt. All Kotlin files have a .kt extension appended to the end of the filename.

Open the file you just created in a text editor of your choosing and input the following:

// The following program prints Hello world to the standard system output.
fun main (args: Array<String>) {
println("Hello world!")
}

Save the changes made to the program file. After the changes have been saved, open your terminal window and input the following command:

kotlinc hello.kt -include-runtime -d hello.jar

The preceding command compiles your program into an executable, hello.jar. The -include- runtime flag is used to specify that you want the compiled JAR to be self-contained. By adding this flag to the command, the Kotlin runtime library will be included in your JAR. The -d flag specifies that, in this case, we want the output of the compiler to be called.

Now that we have compiled our first Kotlin program, we need to run it—after all, there's no fun in writing programs if they can't be run later on. Open your terminal, if it's not already open, and navigate to the directory where the JAR was saved to (in this case, the home directory). To run the compiled JAR, perform the following:

java -jar hello.jar

After running the preceding command, you should see Hello world! printed on your display. Congratulations, you have just written your first Kotlin program!

Writing scripts with Kotlin

As previously stated, Kotlin can be used to write scripts. Scripts are programs that are written for specific runtime environments for the common purpose of automating the execution of tasks. In Kotlin, scripts have the .kts file extension appended to the file name.

Writing a Kotlin script is similar to writing a Kotlin program. In fact, a script written in Kotlin is exactly like a regular Kotlin program! The only significant difference between a Kotlin script and regular Kotlin program is the absence of a main function.

Create a file in a directory of your choosing and name it NumberSum.kts. Open the file and input the following program:

val x: Int = 1
val y: Int = 2
val z: Int = x + y
println(z)

As you've most likely guessed, the preceding script will print the sum of 1 and 2 to the standard system output. Save the changes to the file and run the script:

kotlinc -script NumberSum.kts
A significant thing to take note of is that a Kotlin script does not need to be compiled.

Using the REPL

REPL is an acronym that stands for Read–Eval–Print Loop. An REPL is an interactive shell environment in which programs can be executed with immediate results given. The interactive shell environment can be invoked by running the kotlinc command without any arguments.

The Kotlin REPL can be started by running kotlinc in your terminal.

If the REPL is successfully started, a welcome message will be printed in your terminal followed by >>> on the next line, alerting us that the REPL is awaiting input. Now you can type in code within the terminal, as you would in any text editor, and get immediate feedback from the REPL. This is demonstrated in the following screenshot:

Kotlin REPL

In the preceding screenshot, the 1 and 2 integers are assigned to x and y, respectively. The sum of x and y is stored in a new z variable and the value held by z is printed to the display with the print() function.

Working with an IDE

Writing programs with the command line has its uses, but in most cases, it is better to use software built specifically for the purpose of empowering developers to write programs. This is especially true in cases where a large project is being worked on.

An IDE is a computer application that hosts a collection of tools and utilities for computer programmers for software development. There are a number of IDEs that can be used for Kotlin development. Out of these IDEs, the one with the most comprehensive set of features for the purpose of developing Kotlin applications is IntelliJ IDEA. As IntelliJ IDEA is built by the creators of Kotlin, there are numerous advantages in using it over other IDEs, such as an unparalleled feature set of tools for writing Kotlin programs, as well as timely updates that cater to the newest advancements and additions to the Kotlin programming language.

Installing IntelliJ IDEA

IntelliJ IDEA can be downloaded for Windows, macOS, and Linux directly from JetBrains' website: https://www.jetbrains.com/idea/download. On the web page, you are presented with two available editions for download: a paid Ultimate edition and a free Community edition. The Community edition is sufficient if you wish to run the programs in this chapter. Select the edition you wish to download:

IntelliJ IDEA download page

Once the download is complete, double-click on the downloaded file and install it on your operating system as you would any program.

Setting up a Kotlin project with IntelliJ

The process of setting up a Kotlin project with IntelliJ is straightforward:

  1. Start the IntelliJ IDE application.
  2. Click Create New Project.
  1. Select Java from the available project options on the left-hand side of the newly opened window.
  2. Add Kotlin/JVM as an additional library to the project.
  3. Pick a project SDK from the drop-down list in the window.
  4. Click Next.
  5. Select a template if you wish to use one, then continue to the next screen.
  6. Provide a project name in the input field provided. Name the project HelloWorld for now.
  7. Set a project location in the input field.
  8. Click Finish.

Your project will be created and you will be presented with the IDE window:

To the left of the window, you will immediately see the project view. This view shows the logical structure of your project files.

Two folders are present. These are:

  • .idea: This contains IntelliJ's project-specific settings files.
  • src: This is the source folder of your project. You will place your program files in this folder.

Now that the project is set up, we will write a simple program. Add a file named hello.kt to the source folder (right-click the src folder, select New | Kotlin File/Class, and name the file hello). Copy and paste the following code into the file:

fun main(args: Array<String>) {
println("Hello world!")
}

To run the program, click the Kotlin logo adjacent to the main function and select Run HelloKt:

The project will be built and run, after which, Hello world! will be printed to the standard system output.