
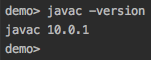
In the previous section, you saw one example of a Java command, the one that displays the JVM version. By the way, the command java starts the JVM, and is used to run bytecodes of the compiled Java programs (we will demonstrate how to do this in detail in Chapter 4, Your First Java Project).
Main Java commands
The JVM execution command
Now, if you only run java, the output will display the short version of help. Since it is quite long, we will show it in several parts. Here is the first section:
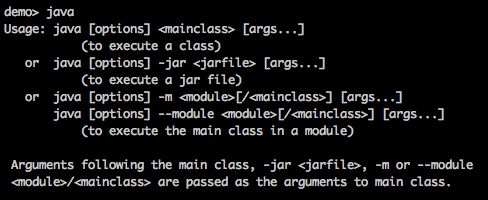
It shows three ways to run JVM:
- To execute a class, a .class file that contains bytecode
- To execute a jar file, a file with the extension .jar that contains .class files (may be even the whole application) in a ZIP format, which also includes a Java-specific manifest file
- To execute the main class in a module (a group of .class files and other resources that is better structured than a .jar file), typically an application, or a part of it
As you can see, in each of the preceding commands, a main class has to be supplied explicitly. It is the .class file that has to be executed first. It acts as the main entrance into the application, and starts the chain of loading other classes (as they are needed) to run the application. An example of such a command would be:
java MyGreatApplication
In fact, this means that there is a file, MyGreatApplication.class, in the current directory, but we should not specify the file extension. Otherwise, JVM will look for the file MyGreatApplication.class.class, which it will not find, of course, and fail to run anything.
In this book, we are not going to use any of these commands explicitly, and will leave it up to the editor to run it behind the scenes, because a modern editor does not just help write and modify the source code; it can also compile and execute the written code. That's why it is called not just the editor, but the Integrated Development Environment (IDE).
Nevertheless, we will continue to overview all of the java command options, so you will have an idea what is going behind the scenes in your IDE. To enjoy car driving, one does not need to know the details of the engine's inner workings, but it is helpful to have some idea about the principles of its operation. Besides, as your professional level grows and the applications you work on grow too and have to handle many requests, you will need to adjust the JVM configuration, so here is the first sneak peek under the hood.
Here is the next section of the output of the java command:
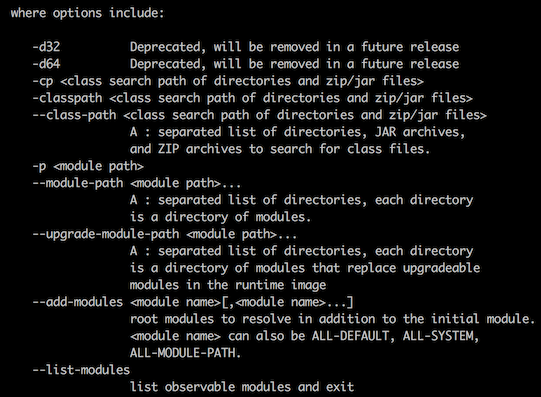
In the preceding screenshot, you can see two deprecated options followed by options related to classpath and module path. The last two are very important options. They allow the specifying of the location of the classes your application consists of, and the location of the libraries your application uses. The latter can be classes written by you or third-party libraries.
The concept of modules is out of the scope of this book, but module path is used very similarly to the classpath. The classpath option tells JVM where to look for the classes, while the module path tells JVM about the location of the modules. It is possible to use both in the same command line.
For example, let us assume that you have the file MyGreatApplication.class (which contains the bytecode of your program, MyGreatApplication.java) stored in the directory dir2, which is a subdirectory of the directory dir1, and your terminal window currently shows the content of the directory dir1:
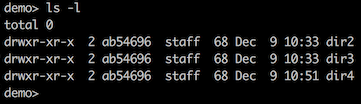
As you can see, there is another directory, dir3, which we created to store another file, SomeOtherProgram.class, that is used by your application. We also put in dir4 a library of other supporting .class files, collected in SomeLibrary.jar. The command line to run your application then looks like this:
java -cp dir2:dir3:dir4/SomeLibrary.jar  MyGreatApplication //on Unix
java -cp dir2;dir3;dir4\SomeLibrary.jar  MyGreatApplication //on Windows
Alternatively, we can put SomeOtherProgram.class and MyGreatApplication.class in some.jar or a some.zip file, and place it in dir5. Then, the command will take one of the following forms:
java -cp dir4/SomeLibrary.jar:dir5/some.zip MyGreatApplication //Unix
java -cp dir4/SomeLibrary.jar:dir5/some.jar MyGreatApplication //Unix
java -cp dir4\SomeLibrary.jar;dir5\some.zip MyGreatApplication //Windows
java -cp dir4\SomeLibrary.jar;dir5\some.jar MyGreatApplication //Windows
Instead of -cp, we could use the options -classpath or --class-path. They are just three different conventions, so that people used to one of them can write a command line intuitively. None of the styles are better or worse than the others, although each of us has preferences and opinions. If neither of the classpath options is used, JVM looks for classes only in the current directory. Some of the classes (standard libraries) are always located in certain directories of Java installation, so there is no need to list them with a classpath option. We will talk about setting the classpath in more detail in Chapter 3, Your Development Environment Setup.
The next section of the java command output lists options that allow for validating that everything is set correctly before actually executing the application:
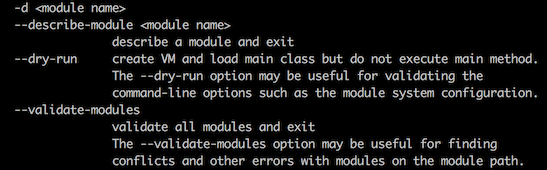
Since modules are outside of the scope of this book, we are skipping these and moving on to the next section of the output:
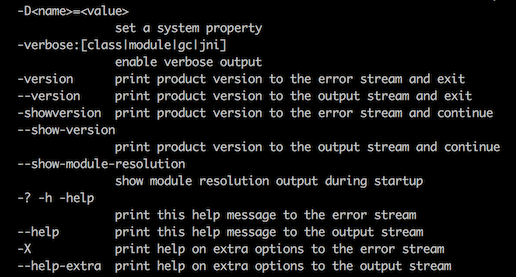
The -D option allows for setting a parameter with a value that is accessible to the application. It is often used to pass some values or flags to the application, which the application can use to change its behavior. If more information needs to be passed, then the .properties file is used (with many flags and various values), while the location of the property file is passed with the option -D. It is completely up to the programmer what has to be in the .properties file or in the value passed with the option -D. But there are best practices related to the application configuration, which also depend on the particular framework or libraries you are using. You will learn them over time, and these practices are beyond the beginner programmer course.
The -verbose option provides more information (than we have seen on these screenshots) and some specific data, depending on the flags class, module, gc, or jni, where gc stands for garbage collector, which will be discussed in Chapter 11, JVM Processes and Garbage Collection. For the other flags, you can read the official Oracle documentation, but chances are, you will not use them anytime soon.
The -version option displays the version of Java that is installed. This is very useful from day one, because it allows for checking, at any time, what version of Java is currently in use. In the previous section, we demonstrated how to do it, and the output it produces. When a new version of Java is released, many programmers install it in parallel with the one they are currently using, and switch between them, either to learn new features or to start writing code for a new version, while maintaining the old code written for the old version. You will learn how to have two versions of Java installed on the same computer, and how to switch between them, in Chapter 3, Your Development Environment Setup.
We will skip the module-related options.
The rest of the options in the preceding screenshot are related to the help. The options -?, -h, -help, and --help display what we are showing in these screenshots, and the options -X and --help-extra provide additional information. You can try all of them on your own.
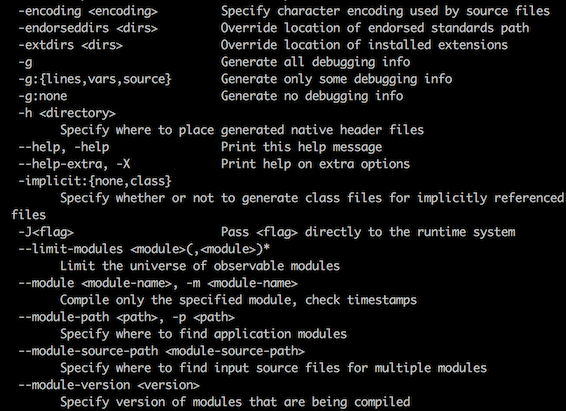
The last section of the help output looks as follows:
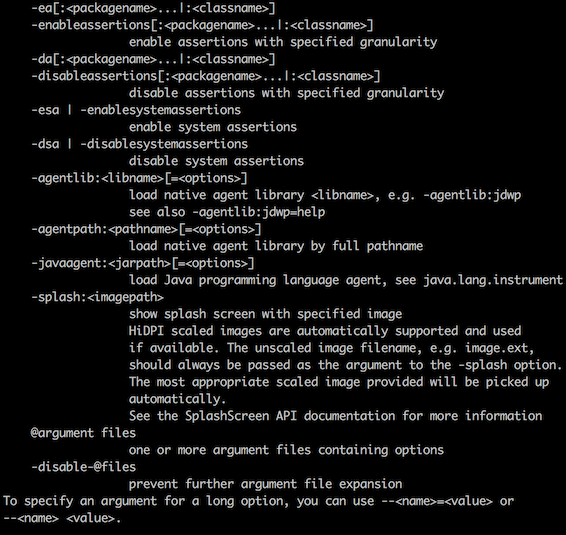
We will not discuss these options. Just note how to use the long option (with two hyphens) explained in the last preceding line.
The compilation command
As mentioned earlier, a program written in Java is called a source code, and is stored in a .java file. The compilation command javac reads it and creates a corresponding .class file with Java Byte Code.
Let us run the command javac without specifying a .java file. It will show help. Let us review it in sections:
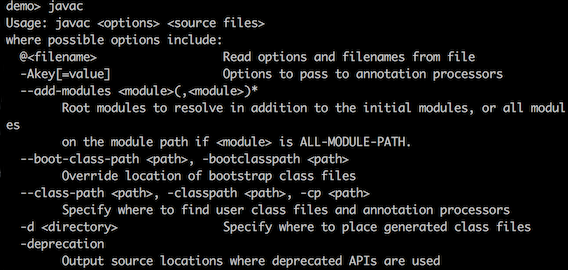
The help tells us that this command has the following format:
javac <options> <source files>
To compile just a few files, one can list them in the command line after options (if the file is not in the current directory, one has to prepend the filename with an absolute or relative path). Listed files are separated by colons (:) for Oracle Solaris, or semicolons (;) for Windows, and can be directories, .jar files, or .zip files. It is also possible to list all source files in a file and provide this filename using the @filename option (see the preceding screenshot). But do not try to remember all of this. You will rarely (if ever) run the commands java or javac explicitly. You will probably use an IDE that will do it for you (see Chapter 3, Your Development Environment Setup). That is also the reason we are going to skip most of the options listed in the preceding screenshot and will mention only two of them: --class-path (or -classpath, or -cp), which specifies where to find the .class files required by the currently compiled code, and -d, which indicates where to put the created .class files.
Here is the next section of javac help:
The only option from the preceding screenshot that we will mention here is --help (or -help), which provides the same help message that we are going through now.
Finally, the last section of javac help is as follows:
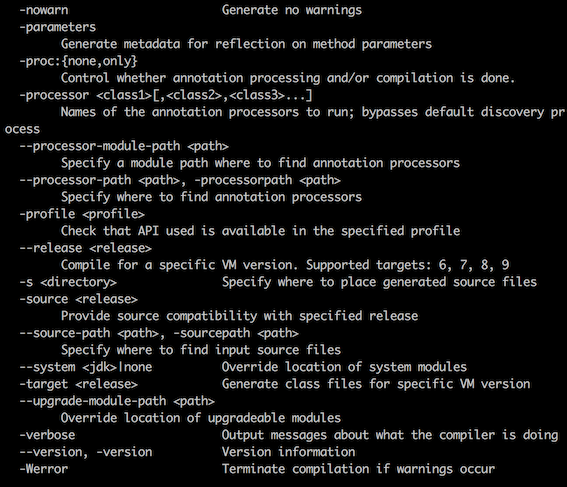
We have already described the option --source-path (or -sourcepath). The option -verbose asks the compiler to provide a more detailed report about what it is doing, while the option --version (or -version) displays the JDK version:
Command jcmd and other commands
There are more than a dozen other Java commands (tools and utilities) that you will only start using probably after several years of professional programming, if at all. They are all described in the Oracle Java documentation online. Just search the Java utilities and tools.
Among them, we find only one command that is very useful from day one of Java programming. It is the command jcmd. If you run it, it displays all of the Java processes (JVM instances) that are running on your computer. In this example, you can see three Java processes, with the process IDs 3408, 3458, and 3454:
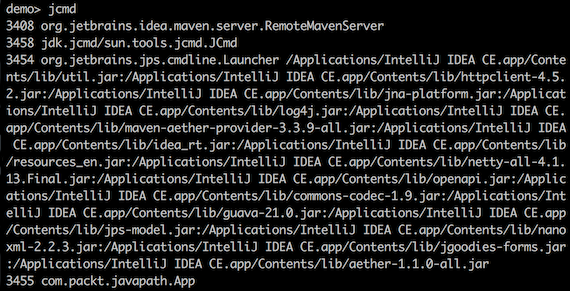
Process 3408 runs the Maven server (your IDE will typically start it). Process 3458 is our running of jcmd. And process 3454 is an editor (IDE) IntelliJ IDEA that is running the small demo application com.packt.javapath.App.
This way, you can always check to see if there is a runaway Java process on your computer. If you would like to stop it, you can use a Task Manager, or the command kill, which requires PID.
Knowledge of PID is also needed when you would like to monitor your Java application. We will talk about that in Chapter 11, JVM Processes and Garbage Collection.
With this, we complete our overview of Java commands. As we already mentioned, your IDE will use all of these commands behind the scenes, so you will probably never use them unless you do production support (which is several years out, after you start learning Java). But we feel that you need to know them, so that you can connect the dots of the Java development process.