
Now that we have spent a lot of time installing Java, it's time to get your fingers burnt a bit. As we are using Java 18.9, there is a new tool that helps developers play around with the language. This is a Read-Eval-Print-Loop (REPL) tool that many language toolsets contain and there were also implementations from Java, but version 9 is the first that contains this feature off the shelf.
REPL is a tool that has interactive prompt and language commands that can be directly entered without editing some standalone file. The entered commands are executed directly and then the loop starts again, waiting for the user to type in the next command.
This is a very effective tool to try out some language constructs without the delay of editing, compiling, and loading. The steps are automatically and transparently done by the REPL tool.
The REPL tool in Java 18.9 is called jshell. To start it, just type its name. If it is not on the PATH, then type the full path to jshell that comes installed with Java 18.9, as shown in the following example:
$ jshell | Welcome to JShell -- Version 11-ea | For an introduction type: /help intro jshell>
The jshell starts up in an interactive way and the prompt it displays is jshell> to help you recognize that jshell is running. What you type is read by the program and not the operating system shell. As this is the first time you will start jshell, it tells you to type /help intro. Let's do it. It will print out a short text about what jshell is, as shown in the following code:
jshell> /help intro
|
|                                   intro
|                                   =====
|
|  The jshell tool allows you to execute Java code, getting immediate results.
|  You can enter a Java definition (variable, method, class, etc), like:  int x = 8
|  or a Java expression, like:  x + x
|  or a Java statement or import.
|  These little chunks of Java code are called 'snippets'.
|
|  There are also the jshell tool commands that allow you to understand and
|  control what you are doing, like:  /list
|
|  For a list of commands: /help
Okay, so we can type Java snippets and /list, but that is only one example of the available commands. We can hope for more information by typing /help, as demonstrated in the following code:
jshell> /help
|  Type a Java language expression, statement, or declaration.
|  Or type one of the following commands:
|  /list [<name or id>|-all|-start]
|       list the source you have typed
|  /edit <name or id>
|       edit a source entry
|  /drop <name or id>
|       delete a source entry
|  /save [-all|-history|-start] <file>
|       Save snippet source to a file
...
What you get is a long list of commands. Most of it is not presented here to save paper and your attention. We will use many of these commands on our journey through the next few pages. Let's start with a small Java snippet, that is, the ageless Hello World example:
jshell> System.out.println("Hello, World!")
Hello World!
This is the shortest ever Hello World program in Java. Till Java 9, if you wanted to do nothing more than print out Hello World!, you had to create a program file. It had to contain the source code of a class, including the public static main method, which contained the one line we had to type in with Java 9 jshell. It was cumbersome just for a simple printout of sample code. Now it is much easier, and jshell is also lenient. It forgives us the regarding missing semicolon at the end of the line.
The next thing we should try is declaring a variable, as follows:
jshell> var a = 13
a ==> 13
We declared a variable, named a, and assigned the value to it—13. The type of the variable is int, which is an abbreviation for integer types in Java. Now, we have this variable already in our snippet, so we can print it out if we want to, as shown here:
jshell> System.out.println(a)
13
It's time to write something more complex into jshell than a one-liner:
jshell> void main(String[] args){
   ...> System.out.println("Hello, World")
   ...> }
|  Error:
|  ';' expected
|  System.out.println("Hello, World")
|                                   ^
The jshell recognizes that this is not a one-liner and that it cannot process what we typed so far when we press Enter at the end of the first line, and it signals that it expects more characters from us, so it displays ...> as a continuation prompt. We type in the commands that make up the whole hello world main method.
However, this time, jshell does not let us miss the semicolon; that is allowed only in the case of one-line snippets. As jshell is interactive, it is easy to correct the mistake—press the up arrow key a few times to get back the previous lines and, this time, add the semicolon at the end of the second line:
jshell> void main(String[] args){
   ...> System.out.println("Hello, World");
   ...> }
|  created method main(String[])
This method was created for us as a snippet, and now we can call it:
jshell> main(null)
Hello, World
It works. You can list all the snippets that were created, as follows:
jshell> /list

   1 : System.out.println("Hello World!")
   2 : var a = 13;
   3 : System.out.println(a)
   4 : void main(String[] args){
       System.out.println("Hello, World");
       }
   5 : main(null)
Also, as we want to go on writing a full Java version of hello world, we can save our work from jshell to a file, as follows:
jshell> /save HelloWorld.java
Finally, we exit from jshell by typing /exit. As you get back to the system prompt, type cat HelloWorld.java (or type HelloWorld.java on Windows) to see the content of the file. It is as follows:
$ cat HelloWorld.java
System.out.println("Hello, World!")
var a = 13;
System.out.println(a)
void main(String[] args){
System.out.println("Hello, World");
}
main(null)
The file contains all the snippets that we typed in, one after the other. If you think that you have messed up the shell with lots of variables and code snippets that you do not need anymore, you can issue the /reset command:
jshell> /reset
|  Resetting state.
After this command, the jshell is as clean as when it was started earlier:
jshell> /list

jshell>
Listing just does not produce anything, as we deleted it all. Fortunately, we saved the state of jshell to a file, and we can also loaded the content of the file by issuing the /open command:
jshell> /open HelloWorld.java
Hello, World!
13
Hello, World
It loads the line from the file and executes it, just as the characters were typed into the Command Prompt.
You may recall that the /list command printed a number in front of each snippet. We can use it to edit the snippets individually. To do so, issue the /edit command, followed by the number of the snippet:
jshell> /edit 1
You may recall that the first command we entered was the System.out.println system call that prints out the argument to the console. When you press Enter after the /edit 1 command, you do not get the prompt back. Instead, jshell opens a separate graphical editor that contains the snippet to edit, as shown:
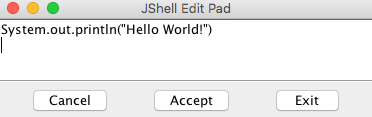
Edit the text in the box so that it will look like this:
void printf(String format, Object... args) { System.out.printf(format, args); }
printf("Hello World!")
Click on Accept and then Exit. When you click on Accept, the Terminal will execute the snippet and display the following result:
| created method printf(String,Object...) Hello World!
The method that we used, printf, stands for formatted printing. This may be well-known from many other languages. It was first introduced by the C language and though cryptic, the name survived. This is also part of the standard Java class, PrintStream, just like println. In case of println, we had to write System.out in front of the method name. To avoid that, we defined the snipped in the editor, and it got executed and defined the printf method for us.
Jshell also defines a few snippets that are automatically loaded when jshell starts or resets. You can see these if you issue the /list command with the -start option, as follows:
jshell> /list -start

  s1 : import java.io.*;
  s2 : import java.math.*;
  s3 : import java.net.*;
  s4 : import java.nio.file.*;
  s5 : import java.util.*;
  s6 : import java.util.concurrent.*;
  s7 : import java.util.function.*;
  s8 : import java.util.prefs.*;
  s9 : import java.util.regex.*;
 s10 : import java.util.stream.*;
These predefined snippets help in the use of jshell. Most users will import these classes.
If you want to list all the snippets you entered as well as the predefined snippets, and also those that contained some error and thus were not executed, you can use the -all option on the /list command, as follows:
jshell> /list -all
  s1 : import java.io.*;
  s2 : import java.math.*;
  s3 : import java.net.*;
  s4 : import java.nio.file.*;
  s5 : import java.util.*;
  s6 : import java.util.concurrent.*;
  s7 : import java.util.function.*;
  s8 : import java.util.prefs.*;
  s9 : import java.util.regex.*;
 s10 : import java.util.stream.*;
   1 : System.out.println("Hello, World!")
   2 : var a = 13;
   3 : System.out.println(a)
   4 : void main(String[] args){
       System.out.println("Hello, World");
       }
   5 : main(null)
   6 : void printf(String format, Object... args) { System.out.printf(format, args); }
   7 : System.out.println("Hello, World!");
The lines that are preloaded are numbered with the s prefix. The snippets that contain an error have a number prefixed with e. (We have none in this printout.)
If you want to execute some of the snippets again, you only have to type /n, where n is the number of the snippet, as follows:
jshell> /1
System.out.println("Hello, World!")
Hello, World!
You cannot re-execute the preloaded snippets or snippets that contained errors. There is no need for any of those anyway. Preloaded snippets declare some imports; erroneous snippets do not execute because they are, well…erroneous.
You need not rely on the number of jshell when you want to re-execute a snippet. When you already have a lot of snippets in your jshell session, listing them all would be too cumbersome; there is a shortcut to re-execute the last n-th snippet. You have to write /-n. Here, n is the number of the snippet counting from the last one. So, if you want to execute the very last snippet, you have to write /-1. If you want to execute the one before the last one, you have to write /-2. Note that if you already typed /-1, the last one is the re-execution of the last snippet, and snippet number -2 will become number -3.
Listing all the snippets can also be avoided in other ways. When you are interested only in certain types of snippets, you can have special commands.
If we want to see only the variables that we defined in the snippets, we can issue the /vars command, as follows:
jshell> /vars
|    int a = 13
If we want to see only the classes, the /types command will do that:
jshell> class s {}
|  created class s

jshell> /types
|    class s
Here, we just created an empty class and then we listed it.
To list the methods that were defined in the snippets, the /methods command can be issued:
jshell> /methods
|    void main(String[])
|    void printf(String,Object...)
You can see in the output that there are only two methods, which are as follows:
- main: Which is the main class of the program
- printf: This, we defined when using the editor
If you want to see everything you typed, you have to issue the /history command for all the snippets and commands that you typed. (I will not copy the output here; I do not want to shame myself showing all of my typos and failures. You should try yourself and see your own history!)
Recall that we can delete all the snippets by issuing the /reset command. You can also delete snippets individually. To do so, you should issue the /drop n command, where n is the snipped number:
jshell> /drop 1

jshell> /list

   2 : var a = 13;
   3 : System.out.println(a)
   4 : void main(String[] args){
       System.out.println("Hello, World");
       }
   5 : main(null)
   6 : void printf(String format, Object... args) { System.out.printf(format, args); }
   7 : System.out.println("Hello, World!");
   8 : System.out.println("Hello, World!")
We can see that we dropped the first snippet:
jshell> /drop 2
|  dropped variable a

jshell> /drop 4
|  dropped method main(String[])
When we were editing the snippets, jshell opened a separate graphical editor. It may happen that you are running jshell using ssh on a remote server and where it is not possible to open a separate window. You can set the editor using the /set command. This command can set quite a few configuration options of the jshell. To set the editor to use the ubiquitous vi, issue the following command:
jshell> /set editor "vi"
|  Editor set to: vi
After this, jshell will open the snipped-in vi in the same Terminal window where you issue the /edit command.
It is not only the editor that you can set. You can set the startup file, and also the way jshell prints the feedback to the console after a command was executed.
If you set the startup file, the commands listed in the startup file will be executed instead of the built-in commands of jshell after the /reset command. This also means that you will not be able to use the classes that are imported by default directly, and you will not have the printf method snippet, unless your own startup file contains the imports and the definition of the snippet.
Create the sample.startup file with the following content:
void println(String message) { System.out.println(message); }
Starting up a new jshell, execute it as follows:
jshell> /set start sample.startup

jshell> /reset
|  Resetting state.

jshell> println("wuff")
wuff

jshell> printf("This won't work...")
|  Error:
|  cannot find symbol
|    symbol:   method printf(java.lang.String)
|  printf("This won't work...")
|  ^----^
The println method is defined, but the printf method, which we defined earlier, is not.
The feedback defines the prompt jshell prints and then waits for the input, the prompt for the continuation lines, and the message details after each command. There are predefined modes, which are as follows:
- Normal
- Silent
- Concise
- Verbose
Normal is selected by default. If you issue /set feedback silent, prompt becomes ->, and jshell will not print details about the commands. The /set feedback concise code prints a bit more information, and /set feedback verbose prints verbose information about the commands executed:
jshell> /set feedback verbose
|  Feedback mode: verbose

jshell> int z = 13
z ==> 13
|  created variable z : int

jshell> int z = 13
z ==> 13
|  modified variable z : int
|    update overwrote variable z : int
You can also define your own modes, giving a name to the new mode using the /set mode xyz command, where xyz is the name of the new mode. After this, you can set prompt, truncation, and format for the mode. When the format is defined, you can use it in the same way as the built-in modes.
Last but not least, the most important command of jshell is /exit. This will just terminate the program, and you will return to the operating system shell prompt.
Now, let's edit the HelloWorld.java file to create our first Java program. To do so, you can use vi, notepad, Emacs, or whatever is available on your machine and fits you. Later on, we will use some integrated development environment (IDE), NetBeans, Eclipse, or IntelliJ; however, for now, a simple text editor is enough.
Edit the file so that the content will be as follows:
public class HelloWorld {
  public static void main(String[] args){
        System.out.println("Hello World");
       }
  }
To compile the source code to bytecode, which is executable by JVM, we have to use the Java compiler named javac:
javac HelloWorld.java
This generates the java.class file in the current directory. This is a compiled code that can be executed as follows:
$ java HelloWorld
Hello World
With this one, you have created and executed your first full Java program. You may still wonder what we were doing; everything will be clear later. Here and now, I wanted you to get a feeling that it works.
The file we edited contained only the snippet, and we deleted most of the lines, except for the declaration of the main method, and inserted the declaration of the class around it.
In Java, you cannot have standalone methods or functions, like in many other languages. Every method belongs to some class, and every class should be declared in a separate file (well, almost, but for now, let's skip the exceptions). The name of the file has to be the same as the name of the class. The compiler requires this for public classes. Even for non-public classes, we usually follow this convention. If you renamed the file from HelloWorld.java to Hello.java, the compiler will display an error when you try to compile the file with the new name:
$ mv HelloWorld.java Hello.java
~/Dropbox/java_9-by_Example$ javac Hello.java
Hello.java:2: error: class HelloWorld is public, should be declared in a file named HelloWorld.java
public class HelloWorld {
       ^
1 error
So, let's move it back to the original name, that is, mv Hello.java HelloWorld.java.
The declaration of the class starts with the class keyword, then the name of the class, an opening curly brace, and lasts until the matching closing brace. Everything in-between belongs to the class.
For now, let's skip why I wrote public in front of the class and focus on the main method in it. The method does not return any value; therefore, its return value is void. The argument, named args, is a string array. When JVM starts the main method, it passes the command-line arguments to the program in this array. However, this time, we do not use it. The main method contains the line that prints out Hello World. Now, let's examine this line a little more.
In other languages, printing something to the console requires only a print statement, or a very similar command. I remember that some BASIC interpreters even allowed us to type ? instead of print, because printing to the screen was so common. This has changed a lot during the last 40 years. We use graphical screens, internet, and many other input and output channels. These days, it is not very common to write to the console.
Usually, in professional large-scale enterprise applications, there is not even a single line that does that. Instead, we will direct the text to log files, send messages to message queues, and send requests and reply with responses over TCP/IP protocol. As this is so infrequently used, there is no reason to create a shortcut for the purpose in the language. After the first few programs, when you get acquainted with the debugger and logging possibilities, you will not print anything directly to the console yourself.
Still, Java has features that let you send text directly to the standard output of a process the good old way, as it was invented originally for UNIX. This is implemented in a Java way, where everything has to be an object or class. To get access to the system output, there is a class named System, and it, among other things, has the following three variables:
- in: This is the standard input stream
- out: This is the standard output stream
- err: This is the standard error stream
To refer to the output stream variable, because it is not in our class but in System, we will have to specify the class name, so we will refer to it as System.out in our program. The type of this variable is PrintStream, which is also a class. Class and type are synonyms in Java. Every object that is of the PrintStream type has a method named println that accepts a String. If the actual print stream is the standard output, and we are executing our Java code from the command line, the string is sent to the console.
The method is named main, and this is a special name in Java programs. When we start a Java program from the command line, JVM invokes the method named main from the class that we specify on the command line. It can do that because we declared this method public so that anyone can see and invoke it. If it was private, it would be seen and callable only from within the same class, or classes that are defined in the same source file.
The method is also declared as static, which means it can be invoked without an actual instance of the class that contains the methods. Using static methods is usually not seen as a good practice these days, unless they are implementing functions that cannot really ever be related to an instance, or have different implementations such as the functions in the java.lang.Math class. However, somewhere, the code execution has to start, and the Java runtime will not usually create instances of classes for us automatically.
To start the code, the command line should be as follows:
java -cp . HelloWorld
The -cp option stands for classpath. The classpath is a fairly complex idea for Java, but, for now, let's make it simple and say that it is a list of directories and JAR files that contain our classes. The list separator for the classpath is : (colon) on UNIX-like systems and ; (semicolon) on Windows. In our case, the classpath is the actual directory, as that is the place where the Java compiler created HelloWorld.class. If we do not specify classpath on the command line, Java will use the current directory as a default. That is the reason our program was working without the -cp option in the first place.
Both java and javac handle many options. To get a list of the options, type javac -help or java -help. We use the IDE to edit the code and, many times, to compile, build, and run it during development. The environment, in this case, sets the reasonable parameters. For production, we use build tools that also support the configuration of the environment. Due to this, we rarely meet these command-line options. Nevertheless, professionals have to understand their meanings at least and know where to learn their actual use, in case it is needed.