Book Image

iOS 12 Programming for Beginners - Third Edition

By : Craig Clayton
Book Image

iOS 12 Programming for Beginners - Third Edition

By: Craig Clayton

Overview of this book

Want to build iOS 12 applications from scratch with the latest Swift 4.2 language and Xcode 10 by your side? Forget sifting through tutorials and blog posts; this book is a direct route to iOS development, taking you through the basics and showing you how to put principles into practice. Take advantage of this developer-friendly guide and start building applications that may just take the App Store by storm! If you’re already an experienced programmer, you can jump right in and learn the latest iOS 12 features. For beginners, this book starts by introducing you to iOS development as you learn Xcode and Swift. You'll also study advanced iOS design topics, such as gestures and animations, to give your app the edge. You’ll explore the latest Swift 4.2 and iOS 12 developments by incorporating new features, such as the latest in notifications, custom-UI notifications, maps, and the recent additions in Sirikit. The book will guide you in using TestFlight to quickly get to grips with everything you need to get your project on the App Store. By the end of this book, you'll be ready to start building your own cool iOS applications confidently.
Table of Contents (27 chapters)
Free Chapter
1
Getting Familiar with Xcode

The Xcode interface

Your project is now open, and it is time for us to get familiar with all of the panels. If this is your first time in Xcode, then it will probably be a bit overwhelming for you. Therefore, we will break it down into six parts:

  • NAVIGATOR PANEL
  • STANDARD EDITOR
  • UTILITIES PANEL
  • DEBUG PANEL
  • TOOLBAR
  • WINDOW PANE CONTROLS

Navigator panel

The primary use of the navigator panel is to add new files and select existing files. The other icons are used from time to time; we will cover them as we need them.

Standard editor

The standard editor is a single panel view that's used to edit files. The standard editor area is the primary area in which you will work. In this area, we can view storyboard files, see our Swift files, or view our project settings.

Utilities panel

The utilities panel can be a bit confusing when you first use Xcode because this menu changes based on what you have selected in the standard editor. When we start building an app, we will dig deeper into this. For now, know that the utilities panel is made up of the inspector pane at the top and the library pane at the bottom. The inspector pane allows you to change the attributes or properties of things you put in your storyboard; the library pane enables you to insert objects, image assets, and code snippets into your app.

Debug panel

The debug panel will allow us to see log messages from our app. You will become very familiar with this panel by the time you finish this book. The debug panel is one of the most excellent tools for getting feedback on what your app is doing or not doing.

Toolbar

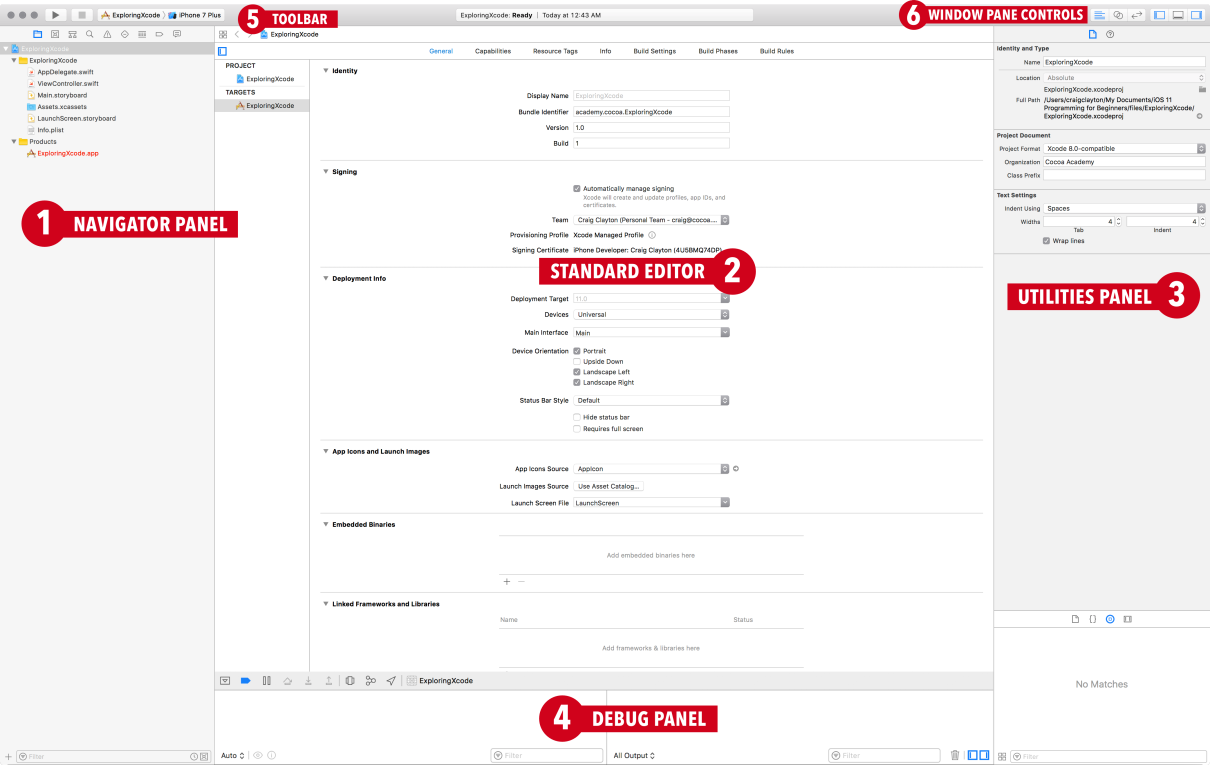
Next, we look at the toolbar, which is demonstrated as follows:

First, we have a play button, which is how we launch our app (or use command + R). Next, you will see a stop button, which will not be active until you run your app. This stop button (or command + .) is used to stop your app from running. To the right of the stop button, you will see your target (your project name), along with the current simulator that has been selected. If you click on your project name, you will see a screen similar to this:

This drop-down menu, which we will call the Device and iOS Simulators drop-down menu, allows you to change your simulator type. For our project, select iPhone7 Plus as your simulator and then click on the play icon (or use command + R) to run your app.

Now, let's return to Xcode and select the stop button (or use command + .).

If you use the keyboard shortcut, make sure Xcode is in focus; otherwise, this shortcut will not work. I work on a 15-inch MacBook Pro Retina. Therefore, when I am working on an app, I will use the iPhone X or iPad Air 2 simulator in landscape mode. They both fit nicely on my screen without me having to resize either.

In addition to the Simulator, there is a Build Only Device as well as a Device section, both of which can be found at the top of the Device and Simulator drop-down menu that was shown earlier in this chapter. Note that, for our purposes, you will only need a simulator while we are building the app; however, you can add an iOS device if you would like (see under iOS Device).

Generic iOS device

The Generic iOS Device, under the Build Only Device section of the Device and Simulator drop-down menu, is used for when you need to archive your app, which means that you are preparing your app for submission to Apple (either to the App Store or Test Flight). If you try to select Generic iOS Device now and run the app, you will get the following message:

Therefore, change Generic iOS Device to an actual simulator, and then you will be able to continue.

iOS device

If you do not have a device connected to the computer, you will see No devices connected under the Device section of the Device and Simulator drop-down menu.

As noted earlier, when we start building the Let's Eat app, you will have the option of using the simulator or connecting a device to Xcode. Using a device is slower; however, the simulator will not perform in the same way as a device will.

In the past, you needed to have a paid account to build your app on a device. Nowadays, you do not need a developer account to run the app on your device. Note that, if you decide to connect your device instead of using a simulator, you will need iOS 12 installed on it. Xcode 10 introduced the capability of connecting your phone wirelessly. We will look at the traditional way first and then we will go over how you can connect your phone wirelessly.

The following steps are only intended for those of you who do not want to pay for the Apple Developer Program at this time:

  1. Connect your iOS device via USB.
  2. In the drop-down menu, select your device (here, I have chosen Xclusive iPhone 6 Plus):
  1. Wait for Xcode 10 to finish indexing and processing. The indexing and processing may take a bit of time. Once complete, the status will say Ready.
  2. Run the project by hitting the Play button (or use command + R).

You will get two errors that state the following:

    • Signing for ExploringXcode requires a development team.
      Select a development team in the project editor.
    • Code signing requires a product type application in SDK iOS 12.0.

Ignore the specifics of these errors as they indicate that we need to create an account and add our device to that account.

  1. Now, in the standard editor, you will see under Signing that you need to add an account:
  1. Click on Add Account. If a Sign into Xcode with your Apple ID dialog box does not pop up, inside the Accounts screen on the bottom left, click on the + and select Apple ID:
  1. Then, when you click on Create Apple ID, you will be asked to enter your birth date, name, email, and password, along with a number of security questions. Make sure that you verify your email before you answer the security questions, otherwise you will have to come back to this screen and add your Apple ID again.

  1. Once you have finished all of the steps, you will see your account, as follows:

If you already have an account, then instead of seeing Add Account, you will see a drop-down menu with your account listed. If your device is not connected to this account, you might see a message asking if you would like to add your device to your account. Adding your device to an account is for testing purposes only.

Connecting wirelessly

Now that you have your phone and account connected, you can quickly get your phone set up to run wirelessly. With your device already connected via USB, go to Window | Devices, and then Simulators. Click on the checkbox marked Connect via network:

Make sure that your phone and your computer are connected to the same Wi-Fi network.

When I first connected to my device, I saw a globe icon in Xcode that lets you know that your device is connected via the network, as demonstrated in the following screenshot:

After a short time, the globe went away. Even if you do not see the icon, you can disconnect the USB, and your device should still be connected to Xcode (as long as it is connected to the same Wi-Fi network).

You will not need to use a device for this book, but it is always good to run your app in an actual device before you submit it to the store.

Before we get to the right-hand side of the toolbar, select the Main.storyboard file in your navigator panel. This file is used to display all of your visual setup for your entire app. We will this in detail later in this book. After you select the file, you should see the following:

Window pane controls

The following screenshot shows the window pane controls:

Moving on to the window pane controls, you will see two groups of icons. The first group is called the Editor Mode, and the second group is called the View. Let's look at the functions of the Editor Mode icons:

Editor Mode icons Function
This icon controls the standard editor (which is the center panel in the earlier screenshot of the Main.storyboard file in the navigator panel).
This icon splits the Standard editor into two panels, where you will see the ViewController.swift file on the right. We will use this split screen throughout this book.
This icon is the Version editor. We will not address the Version editor in this book since it is a more advanced feature.

At this point, you might be thinking that there are way too many panels open, and I would agree with you! The last panel is where the previous group of View icons in the toolbar comes in handy.

Let's look at these icons and their functions in the following table:

View Mode icons Function
This icon will toggle (hide or show) the navigator panel (or use command + O).

This icon will toggle (hide or show) the debug panel (or use command + shift + Y).

This icon will toggle (hide or show) the utilities panel (or use command + alt + O).