
Shell History Recall, Editing, and Autocompletion
In the previous section, we have experienced the fact that we need to repeatedly type some commands, and often type out the pathnames of files and folders. Indeed, it can get quite tedious if we work with long or hard-to-spell pathnames (both of which are present in our tree dataset). To counter this, we can use a few convenient features of modern command-line shells to reduce typing effort. We will explore these useful keyboard shortcuts for the command line in this section.
The GNU Bash shell uses an interface library called readline. This same interface is used by several programs (for example, gdb, python, and Node.js); hence, what you learn now applies to the CLIs of all those.
The readline interface supports emacs and vi modes. The keyboard shortcuts in these modes are derived from the ones in the iconic editors of those names. Since the default is the emacs mode, we will study only that.
Note
When indicating shortcuts, the convention is to show a combination of the Ctrl key and another key using the caret symbol '^' with the key. For example, Ctrl + C is indicated by ^C.
Command History Recall
The Bash shell retains a history of the past commands that were typed. Depending on the system configuration, anywhere from a few hundred to a few thousand commands could be maintained in the history log. Any command from the history can be brought back and re-executed (after optionally modifying it).
Basic History Navigation Shortcuts
History is accessed by using the following shortcuts:
- The up and down arrow keys move through the command history.
- Esc + < and Esc + > or Page Up and Page Down or Alt + < and Alt + > move to the first and last command in the history. The other shortcuts listed may or may not work depending on the system's configuration.
- Ctrl + S and Ctrl + R let you incrementally search for a command in the history forward and backward, respectively, by typing any substring of the command.
Navigating through the history of past commands with the up and down arrow keys or with Esc + < and Esc + > is quite straightforward. As you navigate, the command appears on the prompt, and can be executed by pressing Enter immediately, or after editing it.
Note
In the aforementioned shortcuts, remember that < and > implies that the Shift key is held down, since these are the secondary symbols on the keyboard.
To view the entire history, we can use the history command:
robin ~ $ history
An example output is shown here:
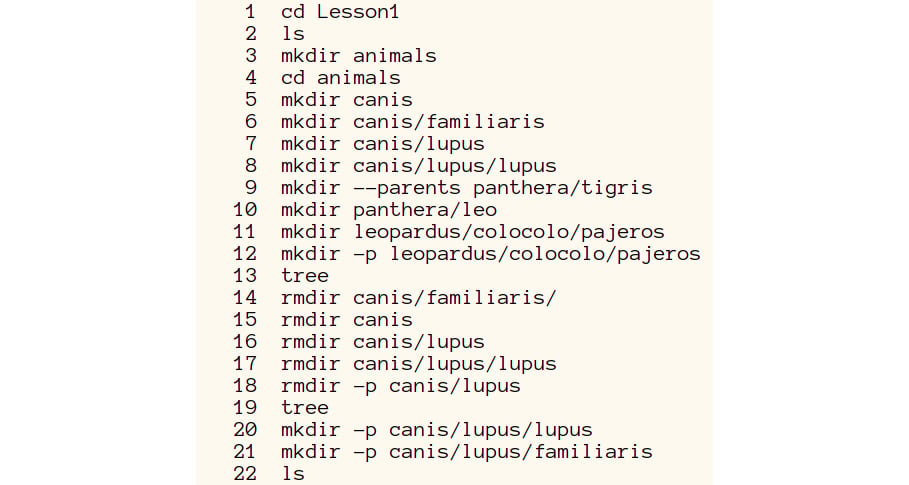
Figure 1.16: A screenshot of the output displaying the shell command history
This command can perform other tasks related to history management as well, but we will not concern ourselves with that for this book.
Incremental Search
This feature lets you find a command in the history that matches a few characters that you type. To perform a forward incremental search, press Ctrl + S, upon which the shell prompt changes to something like this:
robin ~ $ ^S
(i-search)`':
When we press Ctrl + R instead, we see the following prompt:
robin ~ $ ^R
(reverse-i-search)`':
i-search stands for incremental search. When these prompts are displayed, the shell expects a few characters that appear within a command to be typed. As they are typed, the command which matches those characters as a substring is displayed. If there is more than one command that matches the input, the list of matches can be iterated with Ctrl + R and Ctrl + S backward and forward, respectively.
The incremental search happens from the point where you have currently navigated in the history (with arrow keys and so on). If there are no more matches in the given direction, the prompt changes to something similar to what is shown here:
(failed reverse-i-search)`john': man join
At this point, we can do the following:
- Backspace the search string that was typed, to widen the range of matches and find one.
- Change the search direction. We can press Ctrl + S if we were searching backward or press Ctrl + R if we were searching forward, to return to any previous match that was crossed over.
- Press Esc to exit the search and accept whatever match was shown last.
- Press Ctrl + G to exit the search and leave the command line empty.
Note
On some systems, Ctrl + S does not activate incremental search. Instead, it performs an unrelated function. To make sure it works as we require it to, type the following command once in the console before the exercises here:
stty -ixon.
Remember that the search happens relative to the current location in history, so if you start a search without navigating upward in the history, then searching forward would have no effect, since there are no commands after the current history location (that is, the present). This means that searching backward with Ctrl + R is generally the more frequently used and useful feature. Most of the time, a history search comes in handy for retyping a long command from the recent past, or for retrieving a complex command typed long ago, whose details have been forgotten.
As you progress in your command-line knowledge and experience, you will find that although it is easy to compose complicated command lines when you have a certain problem to solve, it is not easy to recollect them after a long period of time has passed. Keeping this in mind, it makes sense to conserve your mental energy, and reuse old commands from history, rather than try to remember or recreate them from scratch. Indeed, it is possible to configure Bash to save your entire history infinitely so that you never lose any command that you ever typed on the shell.
Exercise 3: Exploring Shell History
In this exercise, we will use the history search feature to repeat some commands from an earlier exercise. Make sure that you are in the Lesson1 directory before starting:
- Create a temporary directory called
data2to work with:robin ~/Lesson1 $ mkdir data2 robin ~/Lesson1 $ cd data2 robin ~/Lesson1/data2 $
- Press Ctrl + R to start a reverse incremental search, and then type "animals". The most recent command with that string will be shown.
- Press Ctrl + R two times to search backward until we get the command we need, and then press Enter to execute it:
(reverse-i-search)`animals': mkdir animals
robin ~/Lesson1/data2 $ mkdir animals
robin ~/Lesson1/data2 $ cd animals
- Find the command that created the directory for the species of the domestic dog
canis/lupus/familiaris. The stringfamiliarisis quite unique, so we can use that as a search pattern. Press Esc + < to reach the start of the history and Ctrl + S to start searching forward from that point. Type "fa" and press Ctrl + S two more times to get the command we are searching for. Finally, press Enter to execute it:(i-search)`fa': mkdir -p canis/lupus/familiaris robin ~/Lesson1/data2/animals $ mkdir -p canis/lupus/familiaris
- Repeat the same command, except change the directory to create
canis/lupus/lupus. Press the up arrow to get the same command again. Change the last word tolupusand press Enter to create the new directory:robin ~/Lesson1/data2/animals $ mkdir -p canis/lupus/lupus
In this brief exercise, we have seen how to retrieve commands that we typed previously. We can move through the history linearly or search for a command, saving ourselves a lot of retyping.
Command-Line Shortcuts
There are many keyboard shortcuts on Bash that let you modify an already typed command. Usually, it is more convenient to take an existing command from the history and edit it to form a new one, rather than retype everything.
Navigation Shortcuts
The following are some navigation shortcuts:
- The left or right arrow keys, as well as Home or End work as per standard conventions. Ctrl + A and Ctrl + E are alternatives for Home and End.
- Alt + F and Alt + B jump by one word forward and backward, a word being a contiguous string that consists of numbers and letters.
Clipboard Shortcuts
The following are some clipboard shortcuts:
- Alt + Backspace cuts the word to the left of the cursor
- Alt + D cuts the word to the right of the cursor, including the character under the cursor
- Ctrl + W cuts everything to the left of the cursor until a whitespace character is encountered
- Ctrl + K cuts everything from the cursor to the end of the line
- Ctrl + U cuts everything from the cursor to the start of the line, excluding the character under the cursor
- Ctrl + Y pastes what was just cut
- Alt + Y cycles through the previously cut entries one by one (works only after pasting with Ctrl + Y)
Other Shortcuts
The following are some other shortcuts that may come in useful:
- Alt + \ deletes all whitespace characters that are at the cursor, that is, it joins two words that are separated by whitespaces.
- Ctrl + T swaps the current and previous character. This is useful to correct typos.
- Alt + T swaps the current and previous word.
- Ctrl + Shift + _ undoes the last keypress.
- Alt + R reverts all changes to a line. This is useful to revert a command from history back to what it was originally.
- Alt + U converts the characters from the cursor position until the next word boundary to uppercase.
- Alt + L converts the characters from the cursor position until the next word boundary to lowercase.
- Alt + C capitalizes the first letter of the word under the cursor and moves to the next word.
There are several other shortcuts, but these are the most useful. It is not necessary to memorize all of these, but the navigation and cut/paste shortcuts are certainly worth learning by heart.
Note
The clipboard that the readline interface in Bash uses is distinct from the clipboard provided in the GUI. The two are independent mechanisms and should not be confused with each other. When you use any other command-line interface that uses readline, for example, the Python shell, it gets its own independent clipboard.
Exercise 4: Using Shell Keyboard Shortcuts
In this exercise, we will try out some of the command-line shortcuts. For simplicity, we will introduce the echo command to help with this exercise. This command merely prints out its arguments without causing any side effects. The examples here are contrived to help illustrate the editing shortcuts:
- Run the following command:
robin ~/Lesson1/data2/animals $ echo one two three four five/six/seven
one two three four five/six/seven
- Press the up arrow key to get the same command again. Press Alt + B three times. The cursor ends up at
five. Type "thousand" followed by a space, and press Enter to execute the edited command:robin ~/Lesson1/data2/animals $ echo one two three four thousand five/six/seven one two three four thousand five/six/seven
- Now use the cut and paste shortcuts as follows: press the up arrow key to get the previous command, press Alt + Backspace to cut the last word
seveninto the clipboard, press Alt + B twice (the cursor ends up atfive), use Ctrl + Y to paste the word that we cut, type a forward slash, and finally press Enter:robin ~/Lesson1/data2/animals $ echo one two three four thousand seven/five/six/ one two three four thousand seven/five/six/
- Press the up arrow key to get the previous command, press Alt + B four times (the cursor ends up at
thousand), press Alt + D to cut that word (notice that an extra space was left behind), press End to go to the end of the line, use Ctrl + Y to paste the word that we cut, and press Enter to execute the command:robin ~/Lesson1/data2/animals $ echo one two three four seven/five/six/thousand one two three four seven/five/six/thousand
- Press the up arrow key to get the previous command again, press Alt + B three times (the cursor ends up at
five), press Ctrl + K to cut to the end of the line, press Alt + B to go back one word (the cursor ends up atseven), use Ctrl + Y to paste the word that we cut, type a forward slash, and press Enter to execute the command:robin ~/Lesson1/data2/animals $ echo one two three four five/six/thousand/seven/ one two three four five/six/thousand/seven/
- Press the up arrow key to get the previous command once more, press Alt + B three times (the cursor ends up at
six), press Ctrl + U to cut to the start of the line, press Alt + F to move forward one word (the cursor ends up at/thousand), press Ctrl + Y to paste the content we cut earlier, press Home and typeecho, and then press the spacebar and then Enter to execute the command:robin ~/Lesson1/data2/animals $ echo sixecho one two three four five//thousand/seven/ sixecho one two three four five//thousand/seven/
In this exercise, we have explored how to use the editing shortcuts to efficiently construct commands. With some practice, it becomes quite unnecessary to compose a command from scratch. Instead, we compose them from older ones.
Command-Line Autocompletion
We all use auto-suggest on our mobile devices, but surprisingly, this feature has existed on Bash for decades. Bash provides the following context-sensitive completion when you type commands:
- File and pathname completion
- Command completion, which suggests the names of programs and commands
- Username completion
- Options completion
- Customized completion for any program (many programs such as Git add their own completion logic)
Completion is invoked on Bash by entering a few characters and pressing the Tab key. If there is only one possible completion, it is immediately inserted on to the command line; otherwise, the system beeps. Then, if Tab is pressed again, all the possible completions are shown. If the possible completions are too numerous, a confirmation prompt is shown before displaying them.
Note
Depending on the system's configuration, the number of possible command completions seen will vary, since different programs may be installed on different systems.
Exercise 5: Completing a Folder Path
In this exercise, we will explore hands-on how the shell autocompletes folder paths for us:
- Open a new command shell and return to the directory that we recreated from history in the earlier exercise:
robin ~ $ cd Lesson1/data2/animals
robin ~/Lesson1/data2/animals $
- Type
cd canis/and press Tab three times. It completes the command tocd canis/lupus/and shows two possible completions:robin ~/Lesson1/data2/animals $ cd canis/lupus/ familiaris/ lupus/ robin ~/Lesson1/data2/animals $ cd canis/lupus/
- Type
fand press Tab to choose the completionfamiliaris:robin ~/Lesson1/data2/animals $ cd canis/lupus/familiaris/
Exercise 6: Completing a Command
In this exercise, we will use command completion to suggest commands (after each sequence here, clear the command line with Ctrl + U or Alt + Backspace):
- Type "les" and press Tab to produce the completion:
robin ~/Lesson1/data2/animals $ less
- Type "rmd" and press Tab to produce the completion:
robin ~/Lesson1/data2/animals $ rmdir
- If we do not type enough characters, the number of possible completions may be a large one. For instance, type "g" and press Tab twice (it beeps the first time to indicate that there is no single completion). The shell shows a confirmation prompt before showing all possible commands that start with "g", since there are too many:
robin ~/Lesson1/data2/animals $ g
Display all 184 possibilities? (y or n)
In such cases, it is more practical to say
n, because poring over so many possibilities is time-consuming, and defeats the purpose of completion.
Exercise 7: Completing a Command using Options
In this exercise, we will use command completion using options to suggest the long options for commands (after each sequence here, clear the command line with Ctrl + U):
- Type "ls --col" and press Tab to produce the completion:
robin ~/Lesson1/data2/animals $ ls --color
- Type "ls --re" and press Tab twice to produce the list of two possible completions:
robin ~/Lesson1/data2/animals $ ls --re
--recursive  --reverse
- Then, type "c" and press Tab to select
--recursiveas the completion:robin ~/Lesson1/data2/animals $ ls --recursive
After performing these exercises, we have learned how the shell autocompletes text for us based on the context. The autocompletion is extensible, and many programs such as docker and git install completions for their commands, too.
Activity 3: Command-Line Editing
You are provided with the following list of tree species' names:
- Pinaceae Cedrus Deodara
- Cupressaceae Thuja Aphylla
- Taxaceae Taxus Baccata
- Podocarpaceae Podocarpus Alba
Each line has the family, genus, and species written like this: Podocarpaceae Lepidothamnus Intermedius. You need to type out each of these entries and use command-line shortcuts to convert them into a command that prints out the path of the data.txt file associated with the species.
You need to work out the most efficient way to compose a command, reducing typing effort and errors. Use the conifer tree sample data for this chapter that is in the ~/Lesson1/data folder and follow these steps to complete this activity:
- Navigate to the
datafolder. - Type out a line from the file manually, for example,
Podocarpaceae Lepidothamnus Intermedius. - Use as few keystrokes as possible to generate a command that prints out the name of the file associated with that species, in this case:
echo podocarpaceae/lepidothamnus/intermedius/data.txt. - Repeat steps 3 and 4 for all the entries.
You should obtain the following paths for the data.txt files for the given species:
pinaceae/cedrus/deodara/data.txt
cupressaceae/thuja/aphylla/data.txt
taxaceae/taxus/baccata/data.txt
podocarpaceae/podocarpus/alba/data.txt
Note
If you are typing any piece of text multiple times, you can save time by typing that only once and then using the cut and paste functionality. You might want to experiment with the behavior of the two "cut word" shortcuts for this particular case. The solution for this activity can be found on page 272.
In this topic, we have examined the more hands-on interactive facilities that command-line shells provide. Without the time-saving features of history, completion, and editing shortcuts, the command line would be very cumbersome. Indeed, some old primitive command shells from the 1980s such as MS-DOS lacked most, if not all, of these features, making it quite a challenge to use them effectively.
Going forward, we will delve deeper into file management operations by utilizing a powerful concept called wildcard expansion, also known as shell globbing.