
For the fundamental language features, Rust does not stray far from what you are used to in other languages. At a high level, a Rust program is organized into modules, with the root module containing a main() function. For executables, the root module is usually a main.rs file and for libraries, a lib.rs file. Within a module, you can define functions, import libraries, define types, create constants, write tests and macros, or even create nested modules. We'll see all of them, but let's start with the basics. Here's a simple Rust program that greets you:
// greet.rs

1. use std::env;
2.
3. fn main() {
4.    let name = env::args().skip(1).next();
5.    match name {
6.       Some(n) => println!("Hi there ! {}", n),
7.       None => panic!("Didn't receive any name ?")
8.    }
9. }
Let's compile and run this program. Write it to a file called greet.rs and run rustc with the file name, and pass your name as the argument. I passed the name Ferris, Rust's unofficial mascot, and got the following output on my machine:
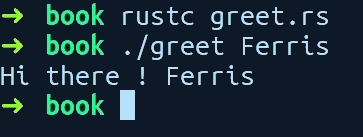
Awesome! It greets Ferris. Let's get a cursory view of this program, line by line.
On line 1, we import a module called env from the std crate (libraries are called crates). std is the standard library for Rust. On line 3, we have our usual function main. Then, on line 4, we call the function args() from the env module, which returns an iterator (sequence) of arguments that has been passed to our program. Since the first argument contains our program name, we want to skip it, so we call skip and pass in a number, which is how many elements (1) we want to skip. As iterators are lazy and do not pre-compute things in Rust, we have to explicitly ask it to give the next element, so we call next(), which returns an enum type called Option. This can be either a Some(value) value or a None value because a user might forget to provide an argument.
On line 5, we use Rust's awesome match expression on the variable name and check whether it's a Some(n) or a None value. match is like the if else construct, but more powerful. On line 6, when it's a Some(n), we call println!(), passing in our inner string variable n (this gets auto-declared when using match expressions), which then greets our user. The println! call is not a function, but a macro (they all end with a !). Finally, on line 7, if it's a None variant of the enum, we just panic!() (another macro), which aborts the program, making it leave an error message.
The println! macro, as we saw, accepts a string, which can contain placeholders for items using the "{}" syntax. These strings are called format strings, while the "{}" in the string are called format specifiers. For printing simple types such as primitives, we can use the "{}" format specifier, whereas for other types, we use the "{:?}" format specifier. There are more details to this, though. When println! encounters a format specifier, that is, "{}", and a corresponding substitution value, it calls a method on that value, which returns a string representation of it. This method is part of a trait. For the "{}" specifier, it calls a method from the Display trait, whereas for "{:?}", it calls a method from the Debug trait. The latter is mostly used for debugging, while the former is for displaying a human readable output of data types. It is somewhat similar to the toString() method in Java. When developing, you usually need to print your data types for debugging. The cases where these methods are not available on a type when using the "{:?}" specifier, we then need to add a #[derive(Debug)]attribute over the type to get those methods. We'll explain attributes in detail in subsequent chapters, but expect to see this in future code examples. We'll also revisit the println! macro in Chapter 9, Metaprogramming with Macros.
Running rustc manually is not how you will do this for real programs, but it will do for these small programs in this chapter. In subsequent chapters, we will be using Rust's package manager to build and run our programs. Apart from running the compiler locally, another tool that can be used to run the code examples is the official online compiler called Rust playground, which can be found at http://play.rust-lang.org. Following is the screenshot from my machine:
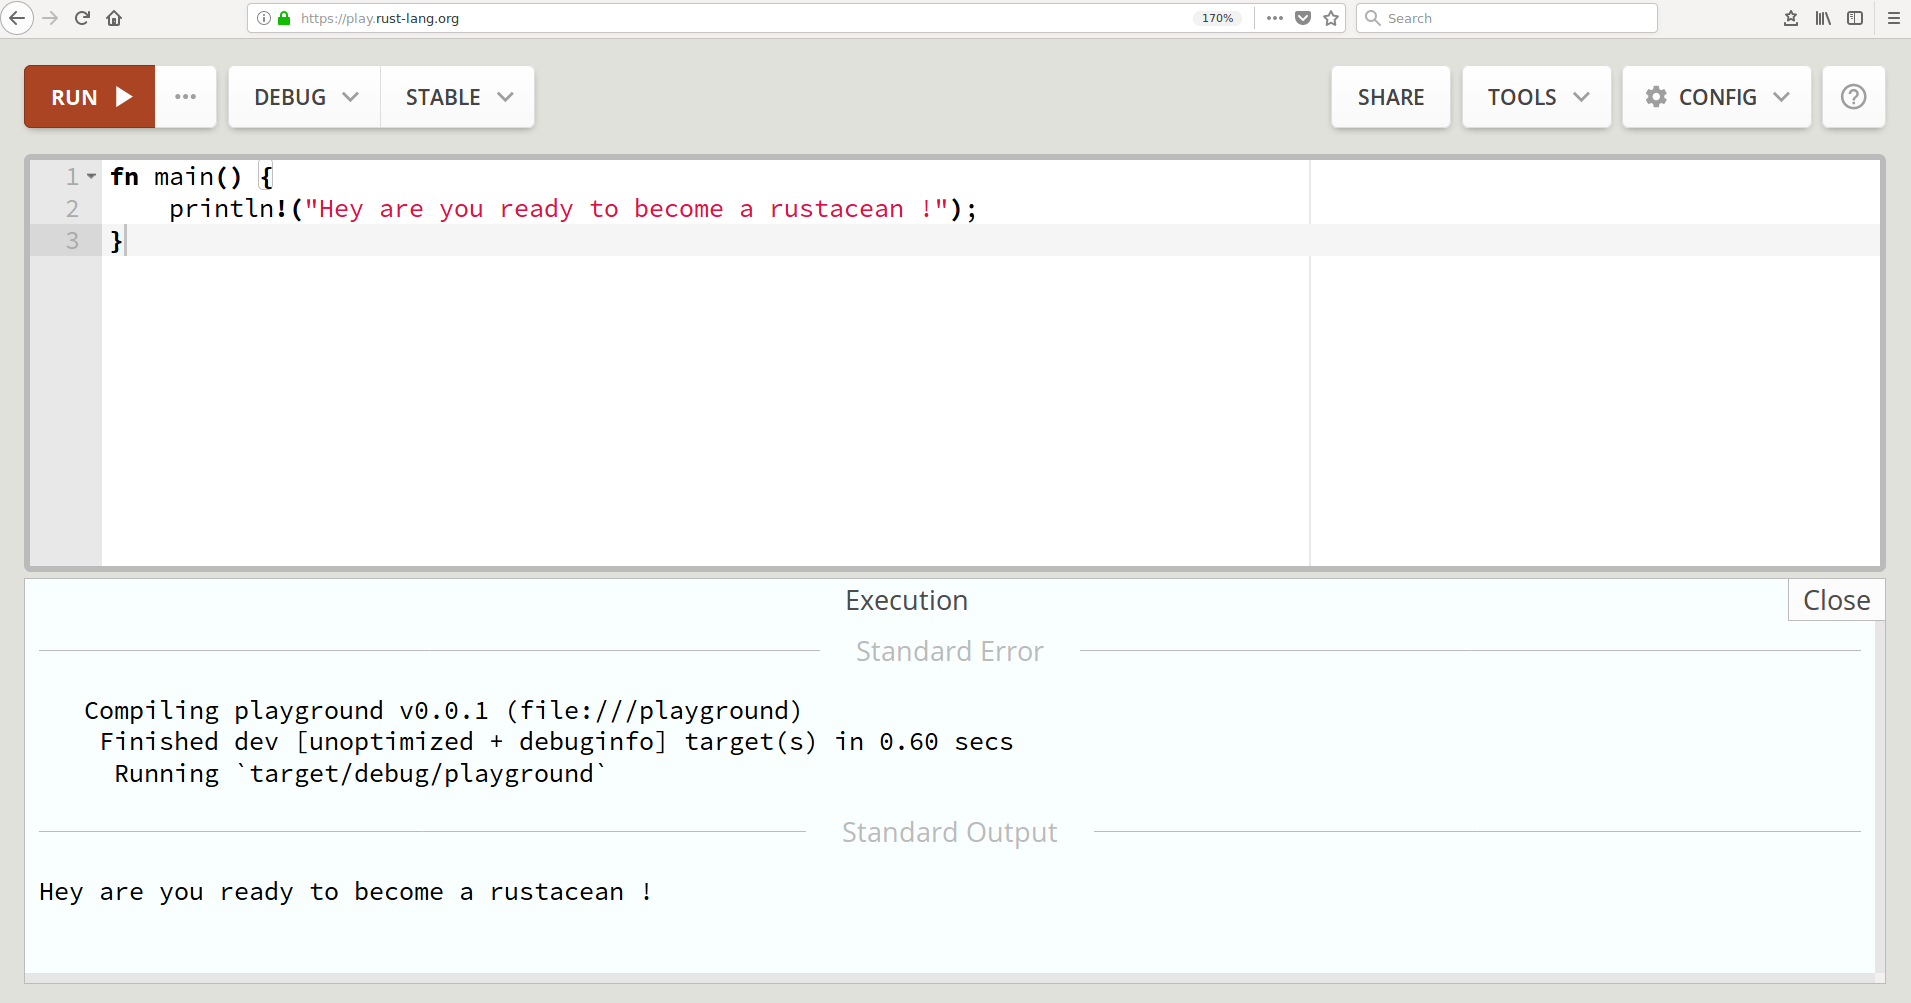
The Rust playground also supports external libraries to be imported and to be used when trying out sample programs.
With the previous example, we got a high-level overview of a basic Rust program, but did not dive into all of the details and the syntax. In the following section, we will explain the language features separately and their syntax. The explanations that follow are here to give you enough context so that you can quickly get up and running in regard to writing Rust programs without going through all of the use cases exhaustively. To make it brief, each section also contains references to chapters that explain these concepts in more detail. Also, the Rust documentation page at https://doc.rust-lang.org/std/index.html will help you get into the details and is very readable with its built-in search feature. You are encouraged to proactively search for any of the constructs that are explained in the following sections. This will help you gain more context about the concepts you're learning about.
All of the code examples in this chapter can be found in this book's GitHub repository (PacktPublishing/The-Complete-Rust-Programming-Reference-Guide).
Note
Some of the code files are deliberately presented to not compile so that you can fix them yourselves with the help of the compiler.
With that said, let's start with the fundamental primitive types in Rust.
Rust has the following built-in primitive types:
bool: These are the usual booleans and can be eithertrueorfalse.char: Characters, such ase.- Integer types: These are characterized by the bit width. Rust supports integers that are up to 128 bits wide:
signed | unsigned |
i8 | u8 |
i16 | u16 |
i32 | u32 |
i64 | u64 |
i128 | u128 |
isize: The pointer-sized signed integer type. Equivalent toi32on 32-bit CPU andi64on 64-bit CPU.usize: The pointer-sized unsigned integer type. Equivalent toi32on 32-bit CPU andi64on 64-bit CPU.f32: The 32-bit floating point type. Implements the IEEE 754 standard for floating point representation.f64: The 64-bit floating point type.[T; N]: A fixed-size array, for the element type,T, and the non-negative compile-time constant size N.
[T]: A dynamically-sized view into a contiguous sequence, for any typeT.str: String slices, mainly used as a reference, that is,&str.(T, U, ..): A finite sequence, (T, U, ..) where T and U can be different types.fn(i32) -> i32: A function that takes ani32and returns ani32. Functions also have a type.
Variables allow us to store a value and easily refer to it later in code. In Rust, we use the let keyword to declare variables. We already had a glimpse of it in the greet.rs example in the previous section. In mainstream imperative languages such as C or Python, initializing a variable does not stop you from reassigning it to some other value. Rust deviates from the mainstream here by making variables immutable by default, that is, you cannot assign the variable to some other value after you have initialized it. If you need a variable to point to something else (of the same type) later, you need to put the mut keyword before it. Rust asks you to be explicit about your intent as much as possible. Consider the following code:
// variables.rs

fn main() {
    let target = "world";
    let mut greeting = "Hello";
    println!("{}, {}", greeting, target);
    greeting = "How are you doing";
    target = "mate";
    println!("{}, {}", greeting, target);
}
We declared two variables, target and greeting. target is an immutable binding, while greeting has a mut before it, which makes it a mutable binding. If we run this program, though, we get the following error:
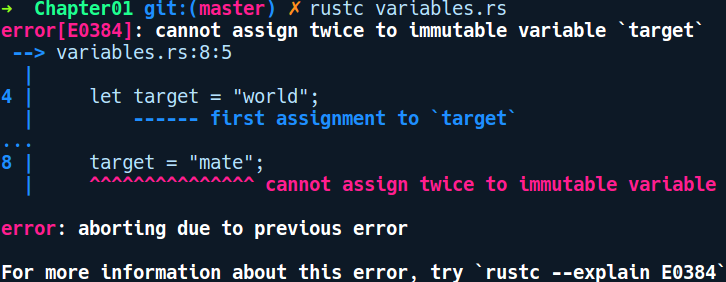
As you can see from the preceding error message, Rust does not let you assign to target again. To make this program compile, we'll need to add mut before target in the let statement and compile and run it again. The following is the output when you run the program:
$ rustc variables.rs
$ ./variables
Hello, world
How are you doing, mate
let does much more than assign variables. It is a pattern-matching statement in Rust. In Chapter 7, Advanced Concepts, we'll take a closer look at let. Next, we'll look at functions.
Functions abstract a bunch of instructions into named entities, which can be invoked later by other code and help manage complexity. We already used a function in our greet.rs program, that is, the main function. Let's look at how we can define another one:
// functions.rs

fn add(a: u64, b: u64) -> u64 {
    a + b
}

fn main() {
    let a: u64 = 17;
    let b = 3;
    let result = add(a, b);
    println!("Result {}", result);
}
In the preceding code, we created a new function named add. The fn keyword is used to create functions followed by its name, add, its parameters inside parentheses a and b, and the function body inside {} braces. The parameters have their type on the right, after the colon :. Return types in functions are specified using a ->, followed by the type, u64, which can be omitted if the function has nothing to return. Functions also have types. The type of our add function is denoted as fn(u64, u64) -> u64. They can also be stored in variables and passed to other functions.
If you look at the body of add, we don't need a return keyword to return a + b as in other languages. The last expression is returned automatically. However, we do have the return keyword available for early returns. Functions are basically expressions that return a value, which is a () (Unit) type by default, akin to the void return type in C/C++. They can also be declared within other functions. The use case for that is when you have a functionality within a function (say, foo) that is hard to reason as a sequence of statements. In this case, one can extract those lines in a local function, bar, which is then defined within the parent function, foo.
In main, we declared two variables, a and b, using the let keyword. As is the case with b, we can even omit specifying the type as Rust is able to infer types of variables in most cases by examining your code. This is also the case with the result, which is a u64 value. This feature helps prevent type signature clutter and improves the readability of code, especially when your types are nested inside several other types that have long names.
Note
Rust's type inference is based on the Hindly Milner type system. It's a set of rules and algorithms that enable type inference in a programming language. It's an efficient type inference method that performs in linear time, making it practical to type check large programs.
We can also have functions that modify their arguments. Consider the following code:
// function_mut.rs

fn increase_by(mut val: u32, how_much: u32) {
    val += how_much;
    println!("You made {} points", val);
}

fn main() {
    let score = 2048;
    increase_by(score, 30);
}
We declare a score variable with 2048 as the value, and call the increase_by function, passing score and the value 30 as the second argument. In the increase_by function, we have specified the first parameter as mut val, indicating that the parameter should be taken as mutable, which allows the variable to be mutated from inside the function. Our increase_by function modifies the val binding and prints the value. Following is the output when running the program:
$ rustc function_mut.rs
$ ./function_mut
You made 2078 points
Next, let's look at closures.
Rust also has support for closures. Closures are like functions but have more information of the environment or scope in which they are declared. While functions have names associated with them, closures are defined without a name, but they can be assigned to a variable. Another advantage of Rust's type inference is that, in most cases, you can specify parameters for a closure without their type. Here's the the simplest possible closure: let my_closure = || ();. We just defined a no-parameter closure that does nothing. We can call this by invoking my_closure(), just like functions. The two vertical bars || hold the parameters for the closure (if any), such as |a, b|. Specifying the types of parameters (|a: u32|) is sometimes required when Rust cannot figure out the proper types. Like functions, closures can also be stored in variables and invoked later or passed to other functions. The body of the closure, however, can either have a single line expression or a pair of braces for multi-line expressions. A more involved closure would be as follows:
// closures.rs

fn main() {
    let doubler = |x| x * 2;
    let value = 5;
    let twice = doubler(value);
    println!("{} doubled is {}", value, twice);

    let big_closure = |b, c| {
        let z = b + c;
        z * twice
    };

    let some_number = big_closure(1, 2);
    println!("Result from closure: {}", some_number);
}
In the preceding code, we have defined two closures: doubler and big_closure. doubler doubles a value given to it; in this case, it is passed value from the parent scope or environment, that is, the function main. Similarly, in big_closure, we use the variable twice from its environment. This closure has multi-line expressions within braces and needs to end with a semi-colon to allow us to assign it to the big_closure variable. Later, we call big_closure, passing in 1, 2, and print some_number.
The major use case for closures are as parameters to higher-order functions. A higher-order function is a function that takes another function or closure as its argument. For example, the thread::spawn function from the standard library takes in a closure where you can write code you want to run in another thread. Another example where closures provide a convenient abstraction is when you have a function that operates on collection such as Vec and you want to filter the items based on some condition. Rust's Iterator trait has a method called filter, which takes in a closure as an argument. This closure is defined by the user and it returns either true or false, depending on how the user wants to filter the items in the collection. We'll get more in-depth with closures in Chapter 7, Advanced Concepts.
Strings are one of the most frequently used data types in any programming language. In Rust, they are usually found in two forms: the &str type (pronounced stir) and the String type. Rust strings are guaranteed to be valid UTF-8 encoded byte sequences. They are not null terminated as in C strings and can contain null bytes in-between them. The following program shows the two types in action:
// strings.rs

fn main() {
    let question = "How are you ?";            // a &str type
    let person: String = "Bob".to_string();
    let namaste = String::from("नमस्ते");        // unicodes yay!

    println!("{}! {} {}", namaste, question, person);
}
In the preceding code, person and namaste are of type String, while question is of type &str. There are multiple ways you can create String types. Strings are allocated on the heap, while &str types are usually pointers to an existing string, which could either be on stack, the heap, or a string in the data segment of the compiled object code. The & is an operator that is used to create a pointer to any type. After initializing the strings in the preceding code, we then use the println! macro to print them together using format strings. That's the very basics of strings. Strings are covered in detail in Chapter 7, Advanced Concepts.
Conditionals are also similar to how they're found in other languages. They follow the C-like if {} else {} structure:
// if_else.rs

fn main() {
    let rust_is_awesome = true;
    if rust_is_awesome {
        println!("Indeed");
    } else {
        println!("Well, you should try Rust !");
    }
}
In Rust, the if construct is not a statement, but an expression. In general programming parlance, statements do not return any value, but an expression does. This distinction means that if else conditionals in Rust always return a value. The value may be an empty () unit type, or it may be an actual value. Whatever remains in the last line inside the braces becomes the return value of the if else expression. It is important to note that both if and else branches should have the same return type. Also, we don't need parentheses around the if condition expression, as you can see in the preceding code. We can even assign the value of if else blocks to a variable:
// if_assign.rs

fn main() {
    let result = if 1 == 2 {
        "Wait, what ?"
    } else {
        "Rust makes sense"
    };

    println!("You know what ? {}.", result);
}
When assigning values that have been returned from an if else expression, we need to end them with a semicolon. For example, if { ... is an expression, while let is a statement that expects us to have a semicolon at the end. In the case of assignment, if we were to remove the else {} block from the preceding code, the compiler would throw an error, like so:
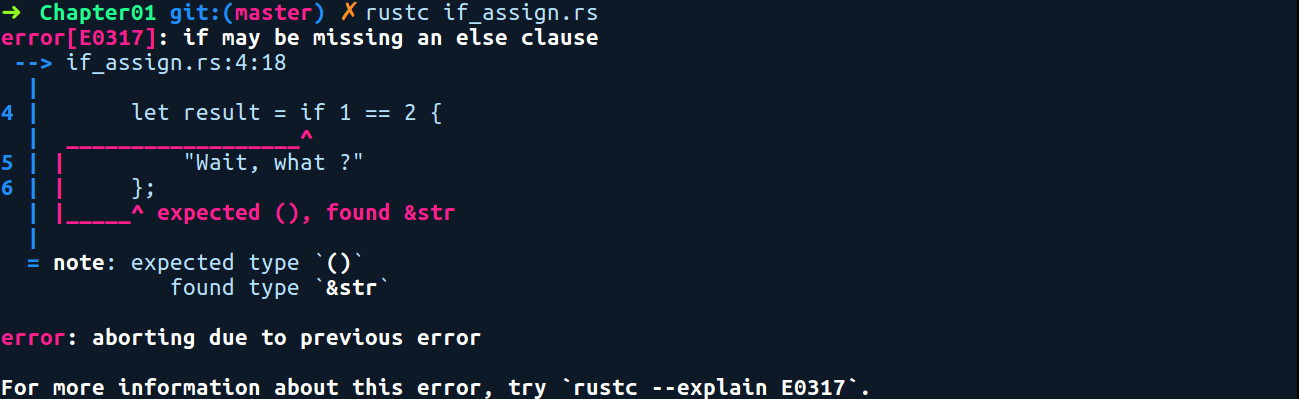
Without the else block, if the if condition evaluates to false, then the result will be (), and there would be two possible values for the result variable, that is, () and &str. Rust does not allow multiple types to be stored in one variable. So, in this case, we need both the if {} and else {} blocks returning the same types. Also, adding a semicolon in the conditional branches changes the meaning of the code. By adding a semicolon after the strings in the if block in the following code, the compiler would interpret it as you wanting to throw the value away:
// if_else_no_value.rs

fn main() {
    let result = if 1 == 2 {
        "Nothing makes sense";
    } else {
        "Sanity reigns";
    };

    println!("Result of computation: {:?}", result);
}
In this case, the result will be an empty (), which is why we had to change the println! expression slightly (the {:?}); this type cannot be printed out in the regular way. Now, for the more complex multi-valued decision making; Rust has another powerful construct called match expressions, which we'll look at next.
Rust's match expressions are quite a joy to use. It's basically C's switch statement on steroids and allows you to make decisions, depending on what value the variable has and whether it has advanced filtering capabilities. Here's a program that uses match expressions:
// match_expression.rs

fn req_status() -> u32 {
    200
}

fn main() {
    let status = req_status();
    match status {
        200 => println!("Success"),
        404 => println!("Not Found"),
        other => {
            println!("Request failed with code: {}", other);
            // get response from cache
        }
    }
}
In the preceding code, we have a req_status, function that returns a dummy HTTP request status code of 200, which we call in main and assign to status. We then match on this value using the match keyword, followed by the variable we want to check the value of (status), followed by a pair of braces. Within braces, we write expressions – these are called match arms. These arms represent the possible values that the variable being matched can take. Each match arm is written by writing the possible value of the variable, followed by a =>, and then the expression on the right. To the right, you can either have a single line expression or a multi-line expression within {} braces. When written in a single line expression, they need to be delimited with a comma. Also, every match arm must return the same type. In this case, each match arm returns a Unit type ().
Another nice feature or you can call guarantee of match expressions is that we have to match exhaustively against all possible cases of the value we are matching against. In our case, this would be listing all the numbers up until the maximum value of i32. However, practically, this is not possible, so Rust allows us to either ignore the rest of the possibilities by using a catch all variable (here, this is other) or an _ (underscore) if we want to ignore the value. Match expressions are a primary way to make decisions around values when you have more than one possible value and they are very concise to write. Like if else expressions, the return value of a match expression can also be assigned to a variable in a let statement when it's delimited with a semicolon, with all match arms returning the same types.
Repeating things in Rust can be done using three constructs, namely loop, while, and for. In all of them, we have the usual continue and break keywords, which allow you to skip and break out of a loop, respectively. Here's an example of using loop, which is equivalent to C's while(true):
// loops.rs

fn main() {
    let mut x = 1024;
    loop {
        if x < 0 {
            break;
        }
        println!("{} more runs to go", x);
        x -= 1;
    }
}
loop represents an infinite loop. In the preceding code, we simply decrement the value x until it hits the if condition x < 0, where we break out of the loop. An extra feature of using loop in Rust is being able to tag the loop block with a name. This can be used in cases where you have two or more nested loops and want to break out from any one of them and not just the loop immediately enclosing the break statement. The following is an example of using loop labels to break out of the loop:
// loop_labels.rs

fn silly_sub(a: i32, b: i32) -> i32 {
    let mut result = 0;
    'increment: loop {
        if result == a {
            let mut dec = b;
            'decrement: loop {
                if dec == 0 {
                    // breaks directly out of 'increment loop
                    break 'increment;
                } else {
                    result -= 1;
                    dec -= 1;
                }
            }
        } else {
            result += 1;
        }
    }
    result
}

fn main() {
    let a = 10;
    let b = 4;
    let result = silly_sub(a, b);
    println!("{} minus {} is {}", a, b, result);
}
In the preceding code, we are doing a very inefficient subtraction just to demonstrate the usage of labels with nested loops. In the inner 'decrement label, when dec equals 0, we can pass a label to break (here, this is 'increment) and break out of the outer 'increment loop instead.
Now, let's take a look at while loops. Nothing fancy here:
// while.rs

fn main() {
    let mut x = 1000;
    while x > 0 {
        println!("{} more runs to go", x);
        x -= 1;
    }
}
Rust also has a for keyword and is similar to for loops used in other languages, but they are quite different in their implementation. Rust's for is basically a syntax sugar for a more powerful repetition construct known as iterators. We'll discuss them in more detail in Chapter 7, Advanced Concepts. To put it simply, for loops in Rust only work on types that can be converted into iterators. One such type is the Range type. The Range type can refer to a range of numbers, such as (0..10). They can be used in for loops like so:
// for_loops.rs

fn main() {
    // does not include 10
    print!("Normal ranges: ");
    for i in 0..10 {
        print!("{},", i);
    }

    println!();       // just a newline
    print!("Inclusive ranges: ");
    // counts till 10
    for i in 0..=10 {
        print!("{},", i);
    }
}
Apart from the normal range syntax, that is, 0..10, which does not include 10, Rust also has inclusive range syntax 0..=10, which iterates all the way until 10, as can be seen in the second for loop. Now, let's move on to user-defined data types.
As the name says, user-defined types are types that are defined by you. These can be composed of several types. They may either be a wrapper over a primitive type or a composition of several user defined types. They come in three forms: structures, enumerations, and unions, or more commonly known as structs, enums, and unions. They allow you to easily express you data. The naming convention for user-defined types follows the CamelCase style. Structs and enums are more powerful than C's structs and enums, while unions in Rust are very close to C and are there mainly to interact with C code bases. We'll cover structs and enums in this section, while unions are covered in Chapter 7, Advanced Concepts.
In Rust, there are three forms of structs that we can declare. The simplest of them is the unit struct, which is written with the struct keyword, followed by its name and a semicolon at the end. The following code example defines a unit struct:
// unit_struct.rs

struct Dummy;

fn main() {
    let value = Dummy;
}
We have defined a unit struct called Dummy in the preceding code. In main, we can initialize this type using only its name. value now contains an instance of Dummy and is a zero sized value. Unit structs do not take any size at runtime as they have no data associated with them. There are very few use cases for unit structs. They can be used to model entities with no data or state associated with them. Another use case is to use them to represent error types, where the struct itself is sufficient to understand the error without needing a description of it. Another use case is to represent states in a state machine implementation. Next, let's look at the second form of structs.
The second form of struct is the tuple struct, which has associated data. Here, the individual fields are not named, but are referred to by their position in the definition. Let's say you are writing a color conversion/calculation library for use in your graphics application and want to represent RGB color values in code. We can represent our Color type and the related items like so:
// tuple_struct.rs

struct Color(u8, u8, u8);

fn main() {
    let white = Color(255, 255, 255);

    // You can pull them out by index
    let red = white.0;
    let green = white.1;
    let blue = white.2;

    println!("Red value: {}", red);
    println!("Green value: {}", green);
    println!("Blue value: {}\n", blue);

    let orange = Color(255, 165, 0);

    // You can also destructure the fields directly
    let Color(r, g, b) = orange;
    println!("R: {}, G: {}, B: {} (orange)", r, g, b);

    // Can also ignore fields while destructuring
    let Color(r, _, b) = orange;
}
In the preceding code, Color(u8, u8, u8) is a tuple struct that was created and stored in white. We then access the individual color components in white using the white.0 syntax. Fields within the tuple struct can be accessed by the variable.<index> syntax, where the index refers to the position of the field in the struct, which starts with 0. Another way to access the individual fields of a struct is by destructuring the struct using the let statement. In the second part, we created a color orange. Following that, we wrote the let statement with Color(r, g, b) on the left-hand side and to the right we put our orange. This results in three fields in orange getting stored within the r, g, and b variables. The types of r, g, and b are also inferred automatically for us.
The tuple struct is an ideal choice when you need to model data that has less than four or five attributes. Anything more than that hinders readability and reasoning. For a data type that has more than three fields cases, it's recommended to use a C-like struct, which is the third form and the most commonly used one. Consider the following code:
// structs.rs

struct Player {
    name: String,
    iq: u8,
    friends: u8,
    score: u16
}

fn bump_player_score(mut player: Player, score: u16) {
    player.score += 120;
    println!("Updated player stats:");
    println!("Name: {}", player.name);
    println!("IQ: {}", player.iq);
    println!("Friends: {}", player.friends);
    println!("Score: {}", player.score);
}

fn main() {
    let name = "Alice".to_string();
    let player = Player { name,
                          iq: 171,
                          friends: 134,
                          score: 1129 };

   bump_player_score(player, 120);
}
In the preceding code, structs are created in the same way as tuple structs, that is, by writing the struct keyword followed by the name of the struct. However, they start with braces and their field declarations are named. Within braces, we can write fields as field: type comma-separated pairs. Creating an instance of a struct is also simple; we write Player, followed by a pair of braces, which contains comma-separated field initializations. When initializing a field from a variable that has the same name as the field name, we can use the field init shorthand feature, which is the case with the name field in the preceding code. We can then access the fields from the created instance easily by using the struct.field_name syntax. In the preceding code, we also have a function called bump_player_score, which takes the struct Player as a parameter. Function arguments are immutable by default, so when we want to modify the score of the player, we need to change the parameter to mut player in our function, which allows us to modify any of its fields. Having a mut on the struct implies mutability for all of its fields.
The advantage of using a struct rather than a tuple struct is that we can initialize the fields in any order. It also allows us to provide meaningful names to the fields. As a side note, the size of a struct is simply the sum of its individual field members, along with any data alignment padding, if required. They don't have any extra metadata size overhead associated with them. Next, let's look at enumerations, also known as enums.
When you need to model something that can be of different kinds, enums are the way to go. They are created using the enum keyword, followed by the name of the enum, followed by a pair of braces. Within braces, we can write all the possibilities of the type, which are called variants. These variants can be defined with or without data contained in them, and the data contained can be any primitive type, structs, tuple structs, or even an enum. However, in the recursive case, where you have an enum, Foo, and also a variant which holds Foo, the variant needs to be behind a pointer (Box, Rc, and so on) type to avoid having recursively infinite type definitions. Because enums can also be created on the stack, they need to have a predetermined size, and infinite type definitions makes it impossible to determine the size at compile time. Now, let's take a look at how to create one:
// enums.rs

enum Direction {
    N,
    E,
    S,
    W
}

enum PlayerAction {
    Move {
        direction: Direction,
        speed: u8
    },
    Wait,
    Attack(Direction)
}

fn main() {
    let simulated_player_action = PlayerAction::Move {
        direction: Direction::N,
        speed: 2,
    };
    match simulated_player_action {
        PlayerAction::Wait => println!("Player wants to wait"),
        PlayerAction::Move { direction, speed } => {
          println!("Player wants to move in direction {:?} with speed {}",
                direction, speed)
        }
        PlayerAction::Attack(direction) => {
            println!("Player wants to attack direction {:?}", direction)
        }
    };
}
The preceding code defines two enum types: Direction and PlayerAction. We then create an instance of them by choosing any variant, such as Direction::N or PlayerAction::Wait using the double colon :: in between. Note that we can't have something like an uninitialized enum, and it needs to be one of the variants. Given an enum value, to see what variant an enum instance has, we use pattern matching by using match expressions. When we match on enums, we can directly destructure the contents of the variants by putting variables in place of fields such as direction in PlayerAction::Attack(direction), which in turn means that we can use them inside our match arms.
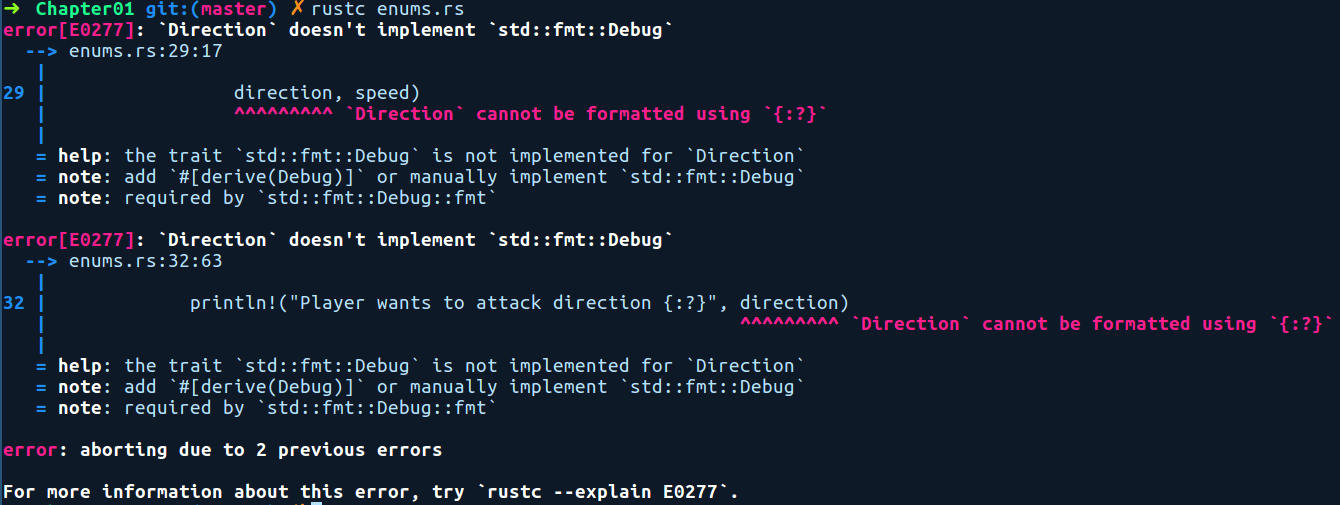
As you can see in our preceding Direction enum, we have a #[derive(Debug)] annotation. This is an attribute and it allows Direction instances to be printed using the {:?} format string in println!(). This is done by generating methods from a trait called Debug. The compiler tells us whether the Debug trait is missing and gives suggestions about how to fix it, and so we need the attribute there:
From a functional programmer's perspective, structs and enums are also known as Algebraic Data Types (ADTs) because the possible range of values they can represent can be expressed using the rules of algebra. For instance, an enum is called a sum type because the range of values that it can hold is basically the sum of the range of values of its variants, while a struct is called a product type because its range of possible values is the cartesian product of their individual fields' range of values. We'll sometime refer to them as ADTs when talking about them in general.
Types without behavior can be limiting, and it's often the case that we want to have functions or methods on types so that we can return new instances of them rather than constructing them manually or so that we have the ability to the manipulate fields of a user-defined type. We can do this via implblocks, which is read as providing implementations for a type. We can provide implementations for all user-defined types or any wrapper type. First, let's take a look at how to write implementations for a struct.
We can add behavior to our previously defined Player struct with two functionalities: a constructor-like function that takes a name and sets default values for the remaining fields in Person, and getter and setter methods for the friend count of Person:
// struct_methods.rs

struct Player {
    name: String,
    iq: u8,
    friends: u8
}

impl Player {
    fn with_name(name: &str) -> Player {
        Player {
            name: name.to_string(),
            iq: 100,
            friends: 100
        }
    }

    fn get_friends(&self) -> u8 {
        self.friends
    }

    fn set_friends(&mut self, count: u8) {
        self.friends = count;
    }
}

fn main() {
    let mut player = Player::with_name("Dave");
    player.set_friends(23);
    println!("{}'s friends count: {}", player.name, player.get_friends());
    // another way to call instance methods.
    let _ = Player::get_friends(&player);
}
We use the impl keyword, followed by the type we are implementing the methods for, followed by braces. Within braces, we can write two kinds of methods:
- Associated methods: Methods without a
selftype as their first parameter. Thewith_namemethod is called an associated method because it does not haveselfas the first parameter. It is similar to a static method in object-oriented languages. These methods are available on the type themselves and do not need an instance of the type to invoke them. Associated methods are invoked by prefixing the method name with the struct name and double colons, like so:
Player::with_name("Dave");- Instance methods: Functions that take a
selfvalue as its first argument. Theselfsymbol here is similar to self in Python and points to the instance on which the method is implemented (here, this isPlayer). Therefore, theget_friends()method can only be called on already created instances of the struct:
      let player = Player::with_name("Dave");
      player.get_friends();
If we were to call get_friends with the associated method syntax, that is, Player::get_friends(), the compiler gives the following error:
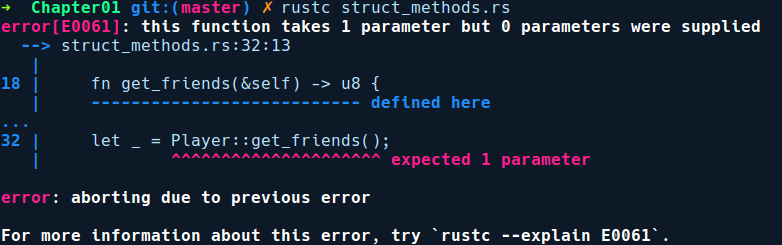
The error is misleading here, but it indicates that instance methods are basically associated methods with self as the first parameter and that instance.foo() is a syntax sugar. This means that we can call it like this, too: Player::get_friends(&player);. In this invocation, we pass the method an instance of Player, that is, &self is &player.
There are three variants of instance methods that we can implement on types:
selfas the first parameter. In this case, calling this method won't allow you to use the type later.&selfas the first parameter. This method only provides read access to the instance of a type.&mut selfas the first parameter. This method provides mutable access to the instance of a type.
Our set_friends method is a &mut self method, which allows us to mutate the fields of player. We need the & operator before self, meaning that self is borrowed for the duration of the method, which is exactly what we want here. Without the ampersand, the caller would move the ownership to the method, which means that the value would get de-allocated after get_friends returns and we would not get to use our Player instance anymore. Don't worry if the terms move and borrowing does not make sense as we explain all of this in Chapter 5, Memory Management and Safety.
Now, onto implementations for enums.
We can also provide implementations for enums. For example, consider a payments library built in Rust, which exposes a single API called pay:
// enum_methods.rs

enum PaymentMode {
    Debit,
    Credit,
    Paypal
}

// Bunch of dummy payment handlers

fn pay_by_credit(amt: u64) {
    println!("Processing credit payment of {}", amt);
}
fn pay_by_debit(amt: u64) {
    println!("Processing debit payment of {}", amt);
}
fn paypal_redirect(amt: u64) {
    println!("Redirecting to paypal for amount: {}", amt);
}

impl PaymentMode {
    fn pay(&self, amount: u64) {
        match self {
            PaymentMode::Debit => pay_by_debit(amount),
            PaymentMode::Credit => pay_by_credit(amount),
            PaymentMode::Paypal => paypal_redirect(amount)
        }
    }
}

fn get_saved_payment_mode() -> PaymentMode {
    PaymentMode::Debit
}

fn main() {
    let payment_mode = get_saved_payment_mode();
    payment_mode.pay(512);
}
The preceding code has a method called get_saved_payment_mode(), which returns a user's saved payment mode. This can either be a CreditCard, Debit Card, or Paypal. This is best modeled as an enum, where different payment methods can be added as its variants. The library then provides us with a single pay() method to which we can conveniently provide an amount to pay. This method determines which variant of the enum it is and dispatches methods accordingly to the correct payment service provider, without the library consumer worrying about checking which payment method to use.
Enums are also widely used for modeling state machines, and when combined with match statements, they make state transition code very concise to write. They are also used to model custom error types. When enum variants don't have any data associated with them, they can be used like C enums, where the variants implicitly have integer values starting with 0, but can also be manually tagged with integer (isize) values. This is useful when interacting with foreign C libraries.
Languages often provide a way to split large code bases into multiple files to manage complexity. Java follows the convention of a single public class per .java file, while C++ provides us with header files and include statements. Rust is no different and provides us with modules. Modules are a way to namespace or organize code in a Rust program. To allow flexibility in organizing our code, there are multiple ways to create modules. Modules are a complex topic to understand and to make it brief for this section, we'll highlight only the important aspects about using them. Modules are covered in detail in Chapter 2, Managing Projects with Cargo. The following are the key takeaways about modules in Rust:
- Every Rust program needs to have a root module. In executables, it is usually the
main.rsfile, and for libraries, it islib.rs. - Modules can be declared within other modules or can be organized as files and directories.
- To let the compiler know about our module, we need to declare it using the
modkeyword, as inmod my_module;, in our root module. - To use any of the items within the module, we need to use the
usekeyword, along with the name of the module. This is known as bringing the item into scope. - Items defined within modules are private by default, and you need to use the
pubkeyword to expose them to their consumers.
That was modules in brief. Some of the advanced aspects of modules are also covered in Chapter 7, Advanced Concepts. Next, let's look at the commonly used collection types that are available in the standard library.
It's often the case that your program has to process more than one instance of data. For that, we have collection types. Depending on what you want and where your data resides in memory, Rust provides many kinds of built-in types to store a collection of data. First, we have arrays and tuples. Then, we have dynamic collection types in the standard library, of which we'll cover the most commonly used ones, that is, vectors (list of items) and maps (key/value items). Then, we also have references to collection types, called slices, which are basically a view into a contiguous piece of data owned by some other variable. Let's start with arrays first.
Arrays have a fixed length that can store items of the same type. They are denoted by [T, N], where T is any type and N is the number of elements in array. The size of the array cannot be a variable, but has to be a literal usize value:
// arrays.rs

fn main() {
    let numbers: [u8; 10] = [1, 2, 3, 4, 5, 7, 8, 9, 10, 11];
    let floats = [0.1f64, 0.2, 0.3];

    println!("Number: {}", numbers[5]);
    println!("Float: {}", floats[2]);
}
In the preceding code, we declared an array, numbers, which contains 10 elements for which we specified the type on the left. In the second array, floats, we specified the type as a suffix to the first item of the array, that is, 0.1f64. This is another way to specify types. Next, let's look at tuples.
Tuples differ from arrays in the way that elements of an array have to be of the same type, while items in a tuple can be a mix of types. They are heterogeneous collections and are useful for storing distinct types together. They can also be used when returning multiple values from a function. Consider the following code that uses tuples:
// tuples.rs

fn main() {
    let num_and_str: (u8, &str) = (40, "Have a good day!");
    println!("{:?}", num_and_str);
    let (num, string) = num_and_str;
    println!("From tuple: Number: {}, String: {}", num, string);
}
In the preceding code, num_and_str is a tuple of two items, (u8, &str). We can also extract values from an already declared tuple into individual variables. After printing the tuple, we destructure it on the next line into the num and string variables, and their types are inferred automatically. That's pretty neat.
Vectors are like arrays, except that their content or length doesn't need to be known in advance and can grow on demand. They are allocated on the heap. They can be created by either calling the Vec::new constructor or by using the vec![] macro:
// vec.rs

fn main() {
    let mut numbers_vec: Vec<u8> = Vec::new();
    numbers_vec.push(1);
    numbers_vec.push(2);

    let mut vec_with_macro = vec![1];
    vec_with_macro.push(2);
    let _ = vec_with_macro.pop();    // value ignored with `_`

    let message = if numbers_vec == vec_with_macro {
        "They are equal"
    } else {
        "Nah! They look different to me"
    };

    println!("{} {:?} {:?}", message, numbers_vec, vec_with_macro);
}
In the preceding code, we created two vectors, numbers_vec and vec_with_macro, in different ways. We can push elements to our vector using push() method and can remove elements using pop(). There are more methods for you to explore if you go to their documentation page: https://doc.rust-lang.org/std/vec/struct.Vec.html . Vectors can also be iterated using the for loop syntax as they also implement the Iterator trait.
Rust also provides us with maps, which can be used to store key-value data. They come from the std::collections module and are named HashMap. They are created with the HashMap::new constructor function:
// hashmaps.rs

use std::collections::HashMap;

fn main() {
    let mut fruits = HashMap::new();
    fruits.insert("apple", 3);
    fruits.insert("mango", 6);
    fruits.insert("orange", 2);
    fruits.insert("avocado", 7);
    for (k, v) in &fruits {
        println!("I got {} {}", v, k);
    }

    fruits.remove("orange");
    let old_avocado = fruits["avocado"];
    fruits.insert("avocado", old_avocado + 5);
    println!("\nI now have {} avocados", fruits["avocado"]);
}
In the preceding code, we created a new HashMap called fruits. We then insert some fruits into our fruits map, along with their count, using the insert method. Following that, we iterate over the key value pairs using for loop, where in we take a reference to our fruit map by &fruits, because we only want read access to the key and value. By default, the value will be consumed by the for loop. The for loop in this case returns a two field tuple ((k ,v)). There are also seperate methods keys() and values() available to iterate over just keys and values, respectively. The hashing algorithm used for hashing the keys of the HashMap type is based on the Robin hood open addressing scheme, but can be replaced with a custom hasher depending on the use case and performance. That's about it.
Next, let's look at slices.
Slices are a generic way to get a view into a collection type. Most use cases are to get a read only access to a certain range of items in a collection type. A slice is basically a pointer or a reference that points to a continuous range in an existing collection type that's owned by some other variable. Under the hood, slices are fat pointers to existing data somewhere in the stack or the heap. By fat pointer, it means that they also have information on how many elements they are pointing to, along with the pointer to the data.
Slices are denoted by &[T], where T is any type. They are quite similar to arrays in terms of usage:
// slices.rs

fnmain() {
    let mut numbers: [u8; 4] = [1, 2, 3, 4];
    {
        let all: &[u8] = &numbers[..];
        println!("All of them: {:?}", all);
    }

    {
        let first_two: &mut [u8] = &mut numbers[0..2];
        first_two[0] = 100;
        first_two[1] = 99;
    }

    println!("Look ma! I can modify through slices: {:?}", numbers);
}
In the preceding code, we have an array of numbers, which is a stack allocated value. We then take a slice into the array numbers using the &numbers[..] syntax and store in all, which has the type &[u8]. The [..] at the end means that we want to take a full slice of the collection. We need the & here as we can't have slices as bare values – only behind a pointer. This is because slices are unsized types. We'll cover them in detail in Chapter 7, Advanced Concepts. We can also provide ranges ([0..2]) to get a slice from anywhere in-between or all of them. Slices can also be mutably acquired. first_two is a mutable slice through which we can modify the original numbers array.
To the astute observer, you can see that we have used extra pair of braces in the preceding code when taking slices. They are there to isolate code that takes mutable reference of the slice from the immutable reference. Without them, the code won't compile. These concepts will be made clearer to you in Chapter 5, Memory Management and Safety.
Note
Note: The &str type also comes under the category of a slice type (a [u8]). The only distinction from other byte slices is that they are guaranteed to be UTF-8. Slices can also be taken on Vecs or Strings.
Next, let's look at iterators.
An iterator is a construct that provides an efficient way to act on elements of collection types. They are not a new concept, though. In many imperative languages, they are implemented as objects that are constructed from collection types such as lists or maps. For instance, Python's iter(some_list) or C++'s vector.begin() are ways to construct iterators from an existing collection. The main motivation for iterators to exist in the first place is that they provide a higher level abstraction of walking through items of a collection instead of using manual for loops, which are very much prone to off by one errors. Another advantage is that iterators do not read the whole collection in memory and are lazy. By lazy, we mean that the iterator only evaluates or accesses an element in a collection when needed. Iterators can also be chained with multiple transformation operations, such as filtering elements based on a condition, and do not evaluate the transformations until you need them. To access these items when you need them, iterators provide a next() method, which tries to read the next item from the collection. This occurs when the iterator evaluates the chain of computation.
In Rust, an iterator is any type that implements the Iterator trait. This type can then be used in a for loop to walk over its items. They are implemented for most standard library collection types such as Vector, HashMap, BTreeMap, and many more and one can also implement it for their own types.
Note
Note: It only makes sense to implement the Iterator trait if the type has a collection, such as semantics. For instance, it doesn't make sense to implement the iterator trait for a () unit type.
Iterators are frequently used whenever we are dealing with collection types in Rust. In fact, Rust's for loop is desugared into a normal match expression with next calls on the object being iterated over. Also, we can convert most collection types into an iterator by calling iter() or into_iter() on them. That's enough information on iterators – now, we can tackle the following exercise. We'll go deep into iterators and implement one ourselves in Chapter 7, Advanced Concepts.