
In this next recipe we are going to link the concurrent programs and run them together as a request set.
We are going to complete the following tasks in this recipe:
Run request set wizard
Add a request set to a request group
Run the request set
To create a request set we are going to run a wizard. The request set allows us to link concurrent programs together. Concurrent programs can be run sequentially or in parallel as a group. They can also be dependent upon the outcome of another program within the request set.
To create a request set using the wizard complete the following tasks:
1. Log in to Oracle with the System Administrator responsibility.
2. Navigate to Requests | Set and the Request Set window will open, as shown in the following screenshot:

4. Select the radio button called Sequentially (One After Another) and then click Next, as shown in the following screenshot:

5. Click on radio button called Continue Processing. This is what we want the request set to do if any of the programs end with a status of Error:

6. We now need to enter the details of our request set in the wizard as shown in the following table and click Next:
Item name
Item value
Set
XXHR20001
Application
XXHR Custom Application
Description
XXHR Employee By Organization

7. We now want to print the output files as each request finishes, so select As Each Request in the Set Completes and click Next as follows:

8. Now add the concurrent programs that we want to run in the request set so add the two programs we have created, XXHR First Concurrent Program and XXHR Second Concurrent Program, and click Finish as shown in the following screenshot:

9. The following message will appear; click OK:

10. The request set is then automatically created and the completed set will appear something similar to the following screenshot. We are going to first look at the Define Stages screen and the Link Stages screen to check the configuration:

11. Click on the Define Stages button to check that the concurrent programs are configured as required:

12. Check that the screen is configured as we expected and then close the Stages window to navigate back to the Request Set window.
13. Click on the Link Stages button and the Link Stages window will open as shown in the following screenshot:

We will now add our request set to the request group we have associated with the XXEBS Extending e-Business Suite responsibility.
To add the request set perform the following steps:
1. Log in to Oracle with the System Administrator responsibility.
2. Navigate to Security | Responsibility | Request and the Request Groups window will open.
3. Query back the XXHR Request Group request group.
4. Now we are going to add the request set we created in the Requests region. Enter data as in the following table in the Requests block:
Type
Name
Application
Set
XXHR20001
XXHR Custom Application
5. Click the Save button in the toolbar (or Ctrl + S) to save the record.
6. Exit the form.
Now we want to run the concurrent request set.
To run the request set take the following steps:
1. Log in to Oracle with the XXEBS Extending e-Business Suite responsibility.
2. Navigate to Submit Requests and click the OK button as shown in the following screenshot:

3. Navigate to the Request Set field and select the XXHR20001 request set from the list of values and click OK.
4. Click on the Submit button and when prompted to submit a new request select No and the form will close down.
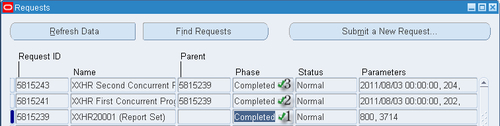
5. Navigate to View Requests and click on the Find button (to find all requests) and you will see the request set as shown in the following screenshot:

6. You should see that the request set we just submitted is running.
If you click the refresh button you will see the stages of the request set complete as they are executed. Once the request set has completed you will see three records in the Requests block. One for the set and one each for the concurrent programs in the request set as shown in the following screenshot: